Mammographic Positioning
One of the most important yet difficult aspects of breast cancer detection and diagnosis is positioning the patient and properly exposing the mammogram. If the breast is not properly positioned, large volumes of breast tissue may not be imaged. Clearly, if tissues are not imaged, then the skill of the interpreter is irrelevant and cancers will be missed (Fig. 10-1). The radiologist must insist on well-positioned, properly exposed mammograms and work continuously with and support dedicated technologists whose goal is try to obtain the best images for every patient. High-quality imaging requires highly motivated technologists who recognize the importance of their work and constantly seek to improve its quality.
Imaging the anterior breast tissues is simple, but imaging the deep tissues is difficult. Given that the volume of the breast increases toward the chest wall, failure to image these tissues could exclude large areas where cancer might develop. It requires a well-trained technologist who is skilled in the proper maneuvers and a cooperative patient who is relaxed and permits the pulling and compression of the breast that is so important for high-quality imaging.
The following discussions pertain to conventional 2D mammograms—film/screen and digital. With the introduction of digital breast tomosynthesis (DBT), the need for multiple projections will be much less and will probably be eliminated. Our reviews of the literature and a review of more than 400 cancers imaged using 2D mammography (1) suggest that the mediolateral oblique (MLO) projection should be all that is needed when using DBT. The craniocaudal (CC) projection is primarily of value to allow the radiologist to “see behind” tissues that can obscure a lesion on the MLO. DBT eliminates this problem. Furthermore, DBT will eliminate the need for most “diagnostic” mammography. Lesions are far more conspicuous using DBT and margins are more clearly seen using DBT, so that spot compression and rolled views will no longer be needed. Since the location of a lesion is clearly defined by the x and y coordinates on DBT and the z is easily determined from the number of slices and the breast thickness, the 3D location of a lesion is always evident by DBT. DBT will still require excellent positioning for the MLO. This will become even more important since the CC projection will likely not be obtained.
Screening Mammography
The screening mammogram is the most important mammographic study. Although earlier detection does not guarantee cure, the screening mammogram is the only opportunity to detect a clinically occult breast cancer earlier. The fact that screening must be highly efficient and of low cost, so that it can be available to as many women as possible, does not mean that the quality of the screening mammogram can be diminished. The equipment and detector system must be capable of producing excellent image quality. The technologist must strive to work with the patient to position the breast as completely over the imaging field of view as possible to avoid missing the deep tissues. The breast must be appropriately compressed to spread overlapping structures, and the exposure should be suitable to properly image the tissues at risk for cancer. With the introduction of DBT, the distinction between a screening study and diagnostic x-ray evaluation will disappear, but the need for excellent positioning will become even more important. DBT provides much clearer x-ray images by eliminating structure noise, but the technique will require maximizing the tissues in the field of view.
Routine Mammographic Projections
Breast tissue can be found as far medial as the sternum, laterally to the anterior edge of the latissimus dorsi, superiorly to the clavicle and apex of the axilla, and inferiorly to
just below the inframammary fold (IMF) (Fig. 10-2). The mammogram is an effort to image as much of this volume as possible.
just below the inframammary fold (IMF) (Fig. 10-2). The mammogram is an effort to image as much of this volume as possible.
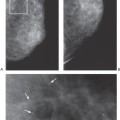
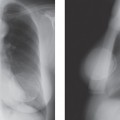
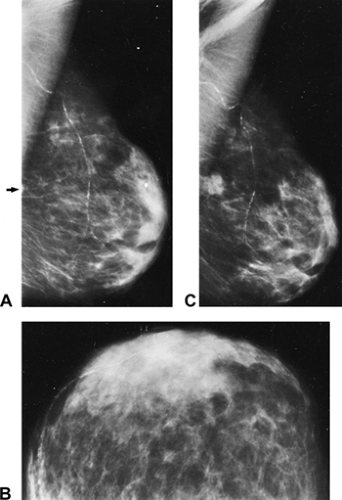 Figure 10-1 Poor positioning can result in lost opportunity. This MLO projection was not well positioned and was interpreted as negative A along with the CC projection B. One year later C the breast was pulled further into the machine and an invasive ductal carcinoma was evident. It could have been detected a year earlier with better positioning. Its front edge is barely visible at the back of the earlier MLO (arrow on A). |
Standard Views
When using digital or film/screen conventional mammography, two projections of each breast should be obtained whether the study is for screening or for a diagnostic evaluation (unless a recent two-view study is available). Two views permit an appreciation of three dimensions and an understanding of overlapping structures that may be confusing when single-view mammograms are obtained. Sickles et al found that single-view mammography leads to a higher rate of patient recall for additional evaluation (2). This is because normal overlapping structures can be confusing on a single projection but are easily clarified by the second view. More important, it has been shown repeatedly that single-view mammography causes the radiologist to fail to detect 11% to 25% of cancers (Fig. 10-3) (3,4). If DBT is being used, then the problem of overlapping tissues is eliminated so that the CC projection may not be needed when using DBT.
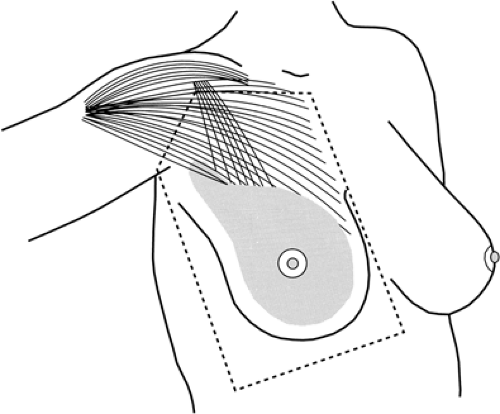 Figure 10-2 Although the glandular and ductal elements of the breast are usually in the distribution shown (dark area), they can extend high on the chest wall up to the clavicle, high into the axilla itself, around laterally past the anterior axillary line, and down to the upper abdomen. |
Two views should always be obtained as the first baseline screening examination. Some radiologists, to save money and radiation exposure, still argue that when the breast tissues are predominantly composed of radiolucent fat, subsequent screening studies with single-view mammograms are sufficient. Not only has this never been proved, but the cost savings is a relatively small percentage of the overall cost of screening (a sheet of film contributes 1/25 of the cost of a mammogram) and the radiation exposure, relative to the benefit of early detection, is insignificant for women ages 40 and over (5). Because single-view conventional mammography is likely to result in early cancers being missed, the effort to save money and dose will result in lives lost, and single-view screening is unlikely to be cost-effective. Two-view mammography is preferred for all screening studies. If DBT is used, then the MLO projection may be all that is needed.
Additional Views
When using conventional mammography (film/screen or digital), additional views may be useful when a suspected abnormality is detected at screening or by clinical examination. Modified projections, coned-down spot compression, and magnification may be useful to clarify a problem (see the section on additional projections later in this chapter).
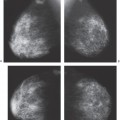
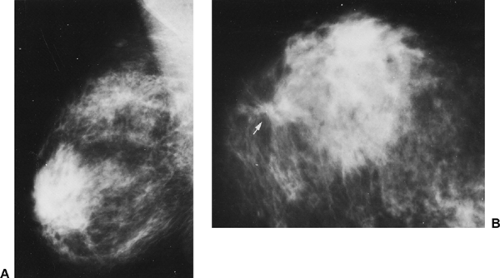 Figure 10-3 Single-view mammography results in higher recall rates, and as many as 25% of cancers may be overlooked with a single view. The clinically occult cancer is not visible on this MLO projection A and would have been missed had it not been for the CC projection B, on which it is clearly evident medially (arrow). |
Positions for Mammography
Mammography can be performed with the patient seated or standing. In a screening context, when rapid throughput is desired, the standing position is preferred. The standing position also makes positioning easier if the patient has a protuberant abdomen. Most mammography systems permit imaging of women confined to wheelchairs. Recumbent imaging can be accomplished with screen/film and dedicated mammographic units for the incapacitated patient, but it is difficult. The breast must still be compressed, and a stretcher must be brought as close as possible to the detector tray so that the breast can be positioned in the unit. With some units the tray can be removed and the breast compressed directly against the film, but this usually limits the quality of the study because the phototimer and the oscillating grid cannot be used. By padding the edges of the “bucky,” the recumbent patient can be imaged, and some multipurpose chairs have also been devised to permit imaging of the recumbent patient. It is generally better, if possible, to wait for the incapacitated patient to recover so that she can be positioned in the usual fashion.
Pendent Positioning
Pendent positioning, with the patient leaning forward or even prone, using gravity to assist in positioning the breast into the field of view, has advantages in some women (Fig. 10-4). With the pectoralis major muscle relaxed by having the arm hang forward, the free margin of the pectoralis falls away from the chest wall, carrying the adjacent breast tissue with it (Fig. 10-5). This helps bring the deep tissues into the imaging field. Unfortunately, these systems did not become standard and are no longer manufactured.
One company offers a positioning assist technology that was developed at the Massachusetts General Hospital. As an aid to the technologist, a membrane that lies between the compression system and the breast can be used to pull the breast further into the machine even after compression is applied (Fig. 10-6). This too can help ensure that the deep tissues are included in the imaging.
Need for Compression
As long as fine detail is needed on breast images, it is likely that the breast will always need to be compressed. Compression holds the breast away from the chest wall to permit transmission imaging without obscuration by the structures of the thorax. It prevents motion, spreads the overlapping structures of the breast, reduces scatter by reducing the thickness of the tissue, permits more uniform exposure by converting the cone shape of the breast into a rectangular solid, reduces the dose required for proper exposure, and, by pushing the tissues close to the detector, reduces geometric blur. DBT may reduce the need for breast compression, but even this technique requires that the breast be completely immobilized during the exposure(s).
Breast motion compromises the reconstruction of DBT images. Furthermore, spreading the structures in the plane parallel to the detector will likely improve the accuracy of the imaging even using DBT.
Breast motion compromises the reconstruction of DBT images. Furthermore, spreading the structures in the plane parallel to the detector will likely improve the accuracy of the imaging even using DBT.
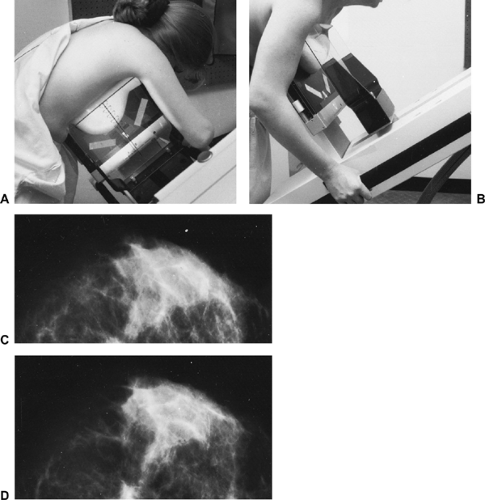 Figure 10-4 Using gravity to help position the breast in the pendent position has some advantages. This mammography unit tilts so that the patient can lean forward and gravity can assist the technologist in positioning on the mediolateral projection A and the CC view B. Having the arms relaxed and forward relaxes the pectoralis major muscle and also facilitates positioning. C On this image obtained using conventional, upright positioning, the back of the breast is not as far into the field of view as when the patient was positioned with her breast pendent D. |
Proper Compression
Insufficient compression permits tissue to slip out from the field of view. Too much compression does nothing to improve the image and only results in discomfort and even pain for the patient. Among the goals of compression are thinning the breast as much as possible and spreading the structures. The determining factor is the elasticity of the breast and in particular the elasticity of its envelope, the skin. As compression is increased, the breast tissues push out perpendicular to the direction of the compression and against the exposed skin. Once the exposed skin is tight,
additional pressure only pushes the tissues against an unstretchable skin envelope and does not improve the image, but causes pain. Thus, the compression should be applied until the skin becomes taut (or the patient asks that it be stopped).
additional pressure only pushes the tissues against an unstretchable skin envelope and does not improve the image, but causes pain. Thus, the compression should be applied until the skin becomes taut (or the patient asks that it be stopped).
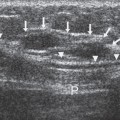
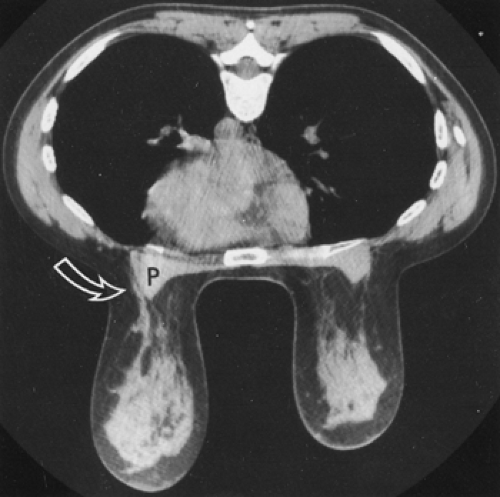 Figure 10-5 Breast tissue lies along the lateral margin of the pectoralis major muscle. The patient in this CT scan was lying prone with her breasts pendent. There is breast tissue (arrow) that extends along the lateral margin of the pectoralis major (P) that must be pulled into the field of view on a mammogram. The same tissue was excised from the other side when her breast cancer was excised. |
Pain and Compression
Contrary to popular belief, women who are polled with regard to mammographic compression acknowledge that most of the time there is little or no discomfort from mammography (6). It is not surprising that if the breast is sore to begin with, compressing it will likely exacerbate the discomfort. Unless an immediate study is needed, mammography can be delayed until the breasts are not uncomfortable. Since the breast is often edematous and sore in the days leading up to the menstrual period, and since it is also best for x-ray imaging to be undertaken when the individual is not likely pregnant, the best time for mammographic imaging is in the first half of the menstrual cycle for premenopausal women.
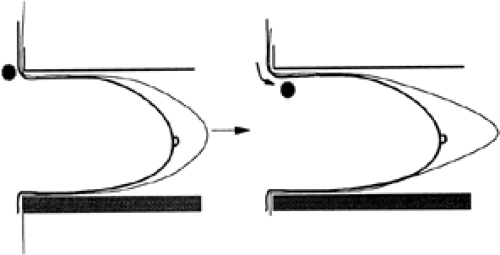 Figure 10-6 A traction system can pull the breast (and possible lesions) further into the machine, even after some compression has been applied. |
Mammography should not be painful. If it is, it may mean that skin is being pinched; if compression is hurting, the technologist should stop and release the compression. In addition to the actual squeezing, much of the discomfort is likely due to the anxiety and loss of control associated with the procedure. Technologists should recognize this and be as supportive as possible. Each step of the process should be explained, and the patient should be warned when pressure is to be applied. Compression at a slow rate appears to be preferred over rapid squeezing. If the patient expresses pain, compression should be stopped. If the positioning is unsatisfactory, compression should be released, the technologist should try to determine what was causing the discomfort, the procedure should be discussed again with the patient, and then the technologist should try to reposition so that it is more comfortable.
There is clearly a psychological aspect to the discomfort associated with breast compression. Although mammography systems are expected to be able to generate 25 to 45 lb of force, pressure is related to the surface area over which the force is applied. This is expressed in pounds per square inch (psi). Because even the smallest breasts have surface areas that are over 10 in2, the actual pressure on the breast is quite low. For example, if the surface of the breast that is in contact with the compression paddle is semicircular (Fig. 10-7) and the chest wall side is 11 inches across, the
area in contact with the compression device is approximately half the area of a circle that is 11 inches in diameter (5.5 inches in radius). This is approximately 45 square inches (1/2 × πgp × 5.52). This means that if 45 pounds is applied over that area, the pressure amounts to 1 psi (45 lb/45 in2). If the breast is smaller, the same force amounts to greater pressure, but even reducing the diameter to 7 inches only increases the pressure to 3 psi. In our experience the amount of force rarely exceeds 20 lb. It has been shown that the average (depending on breast size) pressure generated from mammographic compression is approximately 3 psi. This is the equivalent of applying 45 lb to a breast whose skin area, in contact with the compression paddles, is 15 square inches, suggesting a diameter at the chest wall that is a little less than 7 inches. These numbers may not have much meaning until it is realized that the pressure from a mammogram is actually much less than the 6 psi that can be generated by the examining fingers of a clinical breast examination (CBE) (7). A mammogram likely delivers less pressure to the breast tissues than “social interactions.”
area in contact with the compression device is approximately half the area of a circle that is 11 inches in diameter (5.5 inches in radius). This is approximately 45 square inches (1/2 × πgp × 5.52). This means that if 45 pounds is applied over that area, the pressure amounts to 1 psi (45 lb/45 in2). If the breast is smaller, the same force amounts to greater pressure, but even reducing the diameter to 7 inches only increases the pressure to 3 psi. In our experience the amount of force rarely exceeds 20 lb. It has been shown that the average (depending on breast size) pressure generated from mammographic compression is approximately 3 psi. This is the equivalent of applying 45 lb to a breast whose skin area, in contact with the compression paddles, is 15 square inches, suggesting a diameter at the chest wall that is a little less than 7 inches. These numbers may not have much meaning until it is realized that the pressure from a mammogram is actually much less than the 6 psi that can be generated by the examining fingers of a clinical breast examination (CBE) (7). A mammogram likely delivers less pressure to the breast tissues than “social interactions.”
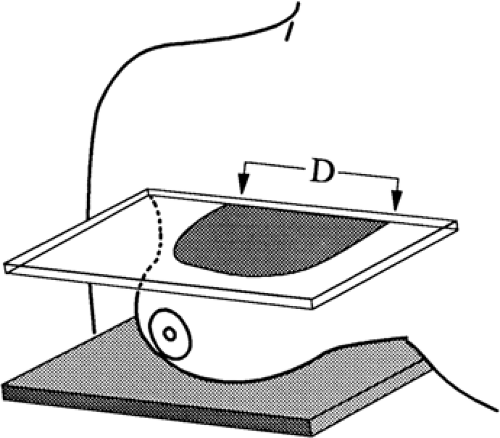 Figure 10-7 The amount of pressure applied to the breast is the number of pounds applied divided by the area of the compression paddle’s contact with the breast (shaded area), which equals pounds per square inch. |
Lack of control is also a component of the discomfort. In a study that allowed women to control the compression, many women actually satisfactorily compressed themselves with less reported discomfort than if the technologist compressed them (8).
Mediolateral Oblique Projection
The single most useful mammographic projection of the breast is the MLO image. The MLO provides the greatest amount of coverage for a single projection; this is why it was chosen for DBT. Ideal MLO positioning should permit the breast to be imaged from high in the axilla down to and including the IMF (Fig. 10-8). The term oblique is used differently than in other areas of radiology. It does not apply to the patient but rather to the plane of breast compression. Breast tissue often is found lateral to and curving around the free, lateral margin of the pectoralis major muscle as it courses toward the humerus (see Fig. 10-5). Although there is no direct attachment of the breast to the pectoralis, there are penetrating blood vessels and lymphatics that go from the breast into the muscle, and the adherence of the retromammary fascia to the prepectoral fascia makes it very difficult to pull the breast away from the muscle.
Just as it is easier to pull the skin of the arm away from the muscle by pinching it parallel to the muscle fibers, it is easier to pull the breast away from the chest wall by pulling it and compressing it along a plane that is parallel to the angle of the pectoralis muscle fibers. This also reduces the discomfort from compression. Usually the most lateral and superior portions of the breast and its tail must be imaged through the pectoralis major; for these reasons, the muscle should be included in the MLO image.
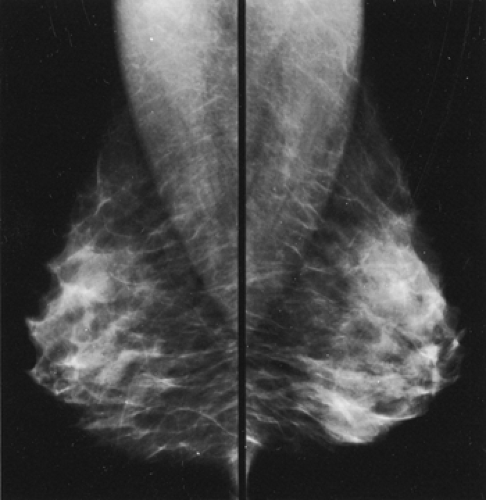 Figure 10-8 A well-positioned MLO mammogram should include tissue from high and deep in the axilla down to the opened IMF with the front of the breast pulled up and out from the chest wall. |
Proper positioning is accomplished by determining the angle of the free margin of the pectoralis major muscle while the patient’s humerus is slightly raised, keeping the muscle relaxed (Fig. 10-9). The gantry should be rotated so that the plane of the detector parallels the muscle as it passes obliquely across the chest. This has been shown to be the best way to permit the breast to be pulled away from the chest wall and to permit the maximum amount of tissue to be brought into the field of view. This angle, which varies from individual to individual, permits the necessary compression of the tissues of the breast with the least amount of discomfort.
It is important that the patient be instructed to relax her shoulders as much as possible to avoid tension in the pectoralis muscles, because this reduces the amount of tissue that can be imaged. The arm should never be elevated higher than the shoulder, and every effort should be made to avoid tightening the chest muscles, which tends to pull the breast out of the field of view. The best mammograms are obtained when a woman can actively relax the pectoralis major muscle.
The breast is positioned by taking advantage of its movable margins. One of the goals of positioning is to press the breast and its structures as close to the detector as possible to reduce blur from geometric unsharpness. Because it is firmly attached to the chest wall medially along the sternum and superiorly below the clavicle, the breast cannot be moved laterally or inferiorly on the chest wall, but it
can be elevated and moved medially (Fig. 10-10). In positioning for the MLO, the technologist raises the breast and pulls it forward and medially, trying to gather all the deep lateral tissues. She guides the patient into the machine so that the corner of the cassette is high and deep in the axilla, positioning the edge of the cassette against the ribs to keep the breast from sliding back laterally.
can be elevated and moved medially (Fig. 10-10). In positioning for the MLO, the technologist raises the breast and pulls it forward and medially, trying to gather all the deep lateral tissues. She guides the patient into the machine so that the corner of the cassette is high and deep in the axilla, positioning the edge of the cassette against the ribs to keep the breast from sliding back laterally.
 Figure 10-9 The technologist’s fingers are behind the free margin of the pectoralis major muscle. It is the angle of the muscle (line and arrows) that determines the angle to which the gantry is rotated. |
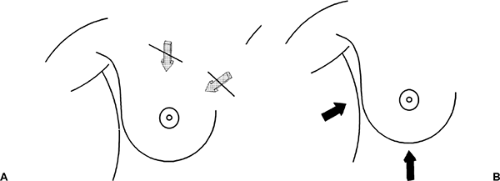 Figure 10-10 A) The medial and superior margins of the breast are fixed and immovable (patterned arrows). The mobility of the lateral and inferior margins (B) (solid arrows) is used to properly position the breast. |
The patient is then rolled slowly toward the cassette holder so that the edge of the cassette keeps the breast from slipping out of the field of view and the detector pushes
and holds the breast medially, preventing it from slipping back laterally and out of the field of view. As the compression paddle is brought across the sternum and against the breast, the technologist removes her hand. As this is done, the technologist should continue to hold the breast and slide her hand up and out to ensure that the breast continues to be held medially, is pulled forward away from the chest wall, and is pulled up so that the structures are spread (up and out). The patient should be as far into the machine as possible to image the tissues from high in the axilla and the upper outer quadrant of the breast down to the IMF. The breast should be pulled up and out (Fig. 10-11) so that the IMF is open and there is no overlap between the bottom of the breast and the upper abdomen (Fig. 10-12). The open IMF should be visible at the bottom edge of the film (Fig. 10-13).
and holds the breast medially, preventing it from slipping back laterally and out of the field of view. As the compression paddle is brought across the sternum and against the breast, the technologist removes her hand. As this is done, the technologist should continue to hold the breast and slide her hand up and out to ensure that the breast continues to be held medially, is pulled forward away from the chest wall, and is pulled up so that the structures are spread (up and out). The patient should be as far into the machine as possible to image the tissues from high in the axilla and the upper outer quadrant of the breast down to the IMF. The breast should be pulled up and out (Fig. 10-11) so that the IMF is open and there is no overlap between the bottom of the breast and the upper abdomen (Fig. 10-12). The open IMF should be visible at the bottom edge of the film (Fig. 10-13).
If the corner of the detector has been properly placed high in the axilla, then the compression paddle, which is aligned with the detector, encounters the breast high and deep along its superomedial margin (Fig. 10-14). During positioning the technologist must hold the breast to maintain its position and smooth the skin to eliminate any folds. Because the breast is anchored medially, the compression paddle cannot push these tissues any distance. If the breast is not properly held medially, then the tethering of the breast along the sternum will pull the medial tissues out of the field of view as the paddle slides over the anchored tissues (Fig. 10-15).
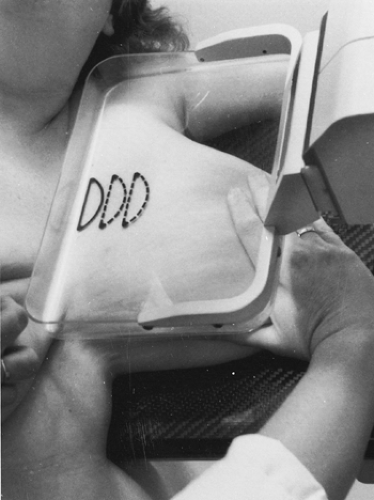 Figure 10-11 The breast should be pulled up and away from the chest wall as the compression is being applied to open the IMF. |
By moving the breast as far medially (toward the sternum) as possible, the skin over the medial breast is relaxed and the compression paddle does not have to move as far to compress the breast. This reduces, but does not eliminate, the possibility that a lesion in the medial breast will slip out from under the compression paddle and not be imaged (see Fig. 10-15C). The technologist should try to be sure that the breast is as far into the machine as possible.
Tilting Compression Paddles to Follow the Contour of the Breast
On occasion the axillary tissues are very thick. They may be even thicker than the breast itself, so that even with firm compression the lower breast is not optimally compressed because the tissues in the tail of the breast prevent further compression. Furthermore, it is common to find that the compression paddle compresses the back of the breast, but the thinner, front tissues are not even touched by the paddle and the anterior structures are not spread. We have designed a tilting compression paddle that can correct this problem. It not only rotates to compensate for thicker tissues in the upper outer portion of the breast, but it also tilts so that the anterior, subareolar tissues are compressed (Fig. 10-16).
If a tilt paddle is not available, the technologist should image the high deep tissues separately (Fig. 10-17A) and then repeat the view of the front of the breast with better compression if necessary (see Fig. 10-17B). Similarly, if the breast is too large for the cassette, it should be imaged as a mosaic, using several overlapping views, although “tiling” is not to be encouraged because it makes image interpretation more difficult.
Gauging Proper Mediolateral Positioning
A properly positioned MLO study shows tissues extending from the axillary tail to the upper abdominal wall (Fig. 10-18). If the breast is not well positioned, cancers can be missed. The pectoralis muscle should be visible extending obliquely in the upper half of the image. It should be wide at the top and taper as it crosses behind the upper breast. Studies have suggested that breast tissue is maximally imaged when the pectoralis muscle is visible down to the axis of the nipple.
Technologists should make every effort to include as much breast as possible in the compression to avoid missing deep lesions. The degree of gantry rotation for the oblique view may vary depending on the patient’s body habitus, and technologists should adjust the machine to the geometry of the particular individual. The goal is to project as much tissue as possible onto the detector. The way to accomplish this may vary between women. Any
obliquity that accomplishes this is satisfactory as long as both breasts are imaged symmetrically.
obliquity that accomplishes this is satisfactory as long as both breasts are imaged symmetrically.
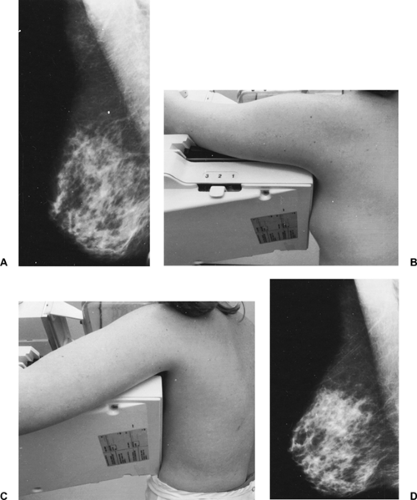 Figure 10-12 The breast should be pulled up and away from the chest wall. In this MLO projection the breast is drooping and the IMF is not even on the film A. This can occur because the patient has been allowed to pull out of the compression, as seen from behind B, and the bottom of the breast has slipped out. By pulling the breast up and away from the chest wall and being sure that the detector is as close against the chest wall as possible C, the inframammary crease is visible and open D. |
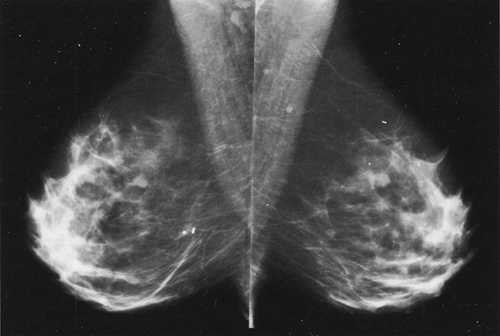 Figure 10-13 On well-positioned mammograms the IMF is open, with no overlap of the breast and upper abdomen. |
 Figure 10-14 The corner of the detector should ideally be placed high in the axilla, as shown in this picture where the technologist has placed her fingers. The compression paddle will be at the level of the technologist’s thumb. |
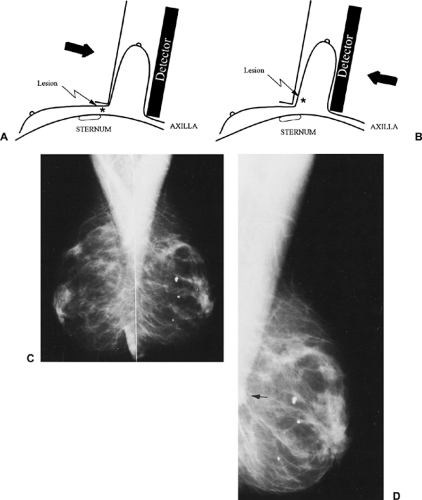 Figure 10-15 A This schematic is a perspective looking down from above. If a lesion is in the medial portion of the breast, it may be pulled out from the field of view if the breast is moved laterally during compression (arrow). The breast should be moved medially B (arrow) to avoid requiring the compression paddle to move too far laterally. Medial lesions can be pulled out of the field of view from under the compression because the breast is tethered medially. No abnormality is evident on these bilateral MLO projections C. A repeat image on the same day of the right breast demonstrates an invasive cancer D. The medial tissues had been pulled from the field of view on the first study. |
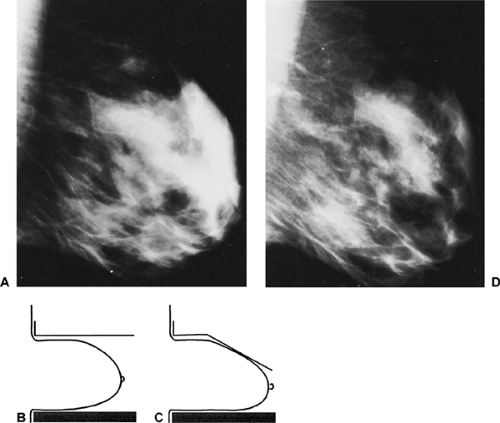 Figure 10-16 The tilt paddle is able to compress the anterior breast tissues. This MLO projection was performed with a standard compression paddle. The front of the breast is not compressed, and the structures overlap A. Using standard, flat compression, the back of the breast is compressed but the front is frequently not B. The tilt paddle first holds and compresses the back of the breast, and then it tilts to compress the front C. The result is better overall compression and separation of the anterior structures D. |
As the only constant reference point, the nipple should ideally be projected in tangent to the x-ray beam on all images. This also reduces the chance of confusing the nipple as a mass, or a true subareolar mass being mistaken as the nipple. If positioning the nipple in profile reduces the amount of breast tissue imaged, then the technologist should ignore trying to image the nipple in profile in favor of projecting the maximum amount of tissue onto the film. When the nipple is not in tangent, it can be mistaken for a mass (Fig. 10-19A). If there is any question that a subareolar abnormality may be present, an additional view of the front of the breast, with the nipple in profile, can be obtained (Fig. 10-19B).
Craniocaudal Projection
The second view that should be routinely obtained when using conventional 2D x-ray imaging is the CC projection. Compression is usually applied from the top of the breast (although some units permit compression from the bottom up) with the detector system under the caudal surface. The gantry is positioned with the beam perpendicular to the floor.
Whenever possible, the nipple should be projected in profile, although, as with the MLO projection, maximizing the tissues imaged takes precedence over imaging the nipple in profile. In the standard CC view, the axis of the nipple is perpendicular to the edge of the detector. Optimal CC positioning is achieved by having the technologist elevate
the breast by gathering the tissues from below and pulling the breast up and away from the chest wall. The skin and tissues at the top of the breast are fixed, but the lower breast and its attachment at the IMF are movable and can be elevated, relaxing the skin of the upper breast. If the breast is simply placed on the detector (Fig. 10-20), the compression paddle may not be able to keep the deep tissues in the field of view. Elevation of the IMF permits more breast tissue to be pulled into the field of view as well as allowing better and more comfortable compression.
the breast by gathering the tissues from below and pulling the breast up and away from the chest wall. The skin and tissues at the top of the breast are fixed, but the lower breast and its attachment at the IMF are movable and can be elevated, relaxing the skin of the upper breast. If the breast is simply placed on the detector (Fig. 10-20), the compression paddle may not be able to keep the deep tissues in the field of view. Elevation of the IMF permits more breast tissue to be pulled into the field of view as well as allowing better and more comfortable compression.
 Get Clinical Tree app for offline access 
|