Percutaneous Biliary Interventions
David W. Hunter
Endoscopic techniques are improving particularly as a result of the incorporation of ultrasound guidance (1). Access to the intra- or extrahepatic biliary tree can be achieved not only via the usual transampullary route but also from the stomach or duodenum. With the ultrasound probe within a few centimeters of the target, the punctures rarely fail. Through the puncture needle, a wire is passed through the ducts to the duodenum. A through-and-through, “rendezvous technique” wire is used to complete the procedure through the usual transampullary approach. Because the puncture, in most cases, involves only a needle and a wire, the tract is small. Bleeding problems are relatively minor and infrequent.
Percutaneous biliary intervention remains useful when endoscopy fails or is unlikely to succeed and in a recent meta-analysis, percutaneous techniques showed a greater therapeutic success rate than endoscopic retrograde cholangiopancreatography (ERCP) for malignant occlusions (2). However, as a result of the new “selection” process, most percutaneous cases are technically and medically challenging. They require careful planning, meticulous technique, long-term clinical follow-up, and close cooperation with liver surgeons and endoscopists. Indeed, many of the most rewarding and remarkable successes result from combined efforts with an endoscopist or surgeon to surmount an obstacle that would have stymied either working independently.
Indications
Percutaneous transhepatic cholangiography (PTC)
1. Prior to percutaneous biliary intervention when the cause is apparent
2. In pediatric, uncooperative, or very ill patients in whom an extra diagnostic test especially magnetic resonance imaging (MRI) would require an additional sedation event or might result in a delay in needed therapy
3. When there is clinical and laboratory evidence of obstruction, in patients with choledochojejunostomy who do not appear obstructed on noninvasive imaging as a result of decreased ductal compliance and minimally dilated or nondilated ducts (e.g., liver transplant or post-pancreatectomy/duodenectomy surgical patients)
Percutaneous biliary drainage (PBD)
1. Palliation or treatment of biliary obstruction resulting from benign (e.g., postoperative or posttransplant) or malignant strictures following failed ERCP drainage
a. Preoperative decompression prior to surgery is no longer felt to be routinely indicated; several recent evaluations of this practice and one meta-analysis have shown that it is actually associated with increased morbidity and should be avoided unless there is another compelling reason, such as cholangitis, that must be corrected before surgery (3).
2. Cholangitis or infected bile
3. Bile duct injury or bile leak resulting from traumatic or iatrogenic causes
4. Complex strictures involving both left and right ducts (e.g., Billroth IV cholangiocarcinoma, sclerosing cholangitis, and ischemic cholangitis)
5. To facilitate intraductal procedures
a. Stricture biopsy
b. Brachytherapy for cholangiocarcinoma
Percutaneous stricture dilation and self-expanding metallic stents are inserted for
1. Stricture dilation
a. Benign strictures
b. Anastomotic strictures in both transplant and nontransplant patients who have undergone choledochoenterostomy (duct to bowel) or choledochocholedochostomy (duct to duct) anastomoses
c. Intraductal strictures (e.g., postoperative, inflammatory, ischemic, particularly posttransplant, or drug-induced)
2. Metallic stent placement
a. Palliation of malignant biliary obstruction to both improve quality of life as well as to improve candidacy for alternative therapies such transarterial chemoembolization (TACE) or systemic chemotherapy
b. Palliation of bowel obstruction, at or distal to, ductal entry
Contraindications
Absolute
1. Uncorrectable coagulopathy
2. Obligatory use of Plavix
Relative
1. Uncorrectable moderate coagulopathy or use of aspirin
a. Consider infusion of fresh frozen plasma (FFP), cryoprecipitate, or platelets during the procedure.
2. Large volume ascites
a. Consider paracentesis before and during the procedure.
b. Use a left-sided approach because ascites is frequently absent anteriorly.
3. Hemodynamic instability
a. Consider that it may be due to an infected bile leak that may be corrected by drainage.
Self-expanding metallic stent insertion specifically:
Absolute
1. Active hemobilia
2. Infected bile
Relative
1. Coagulopathy, including antiplatelet agents (e.g., Plavix)
2. Worsening liver function in the face of adequate external drainage
3. Less than 30-day life expectancy and patient is stable with an external catheter
4. Visible infection involving the percutaneous tract or entry site
5. Visible intraductal debris or stones
Preprocedure Preparation
1. Directed history and physical examination
2. Review imaging studies, clarify the indication, and develop a plan.
a. Consider whether magnetic resonance cholangiopancreatography (MRCP), ultrasound, or computed tomography (CT) will provide the needed information without a more invasive procedure.
b. MRCP has become so accurate that even when intervention is likely, MRCP is performed to verify the problem and get an accurate picture of the ductal anatomy.
3. Review blood tests including at a minimum of the following:
a. Complete blood count (CBC) and platelet count
(1) Correct platelet count to >50,000 per dL.
b. International normalized ratio (INR) and activated partial thromboplastin time (APTT) or anti-10A activity
(1) Correct INR to <1.7.
c. If bleeding is a real concern, consider either a simple test like bleeding time or activated clotting time (ACT), or one of the more sophisticated modern tests that measure global clotting function such as thromboelastography, thrombodynamics, or thrombin generation.
d. Liver function tests particularly conjugated and unconjugated bilirubin levels to establish baseline.
e. Renal function. Renal dysfunction before, during, and after biliary drainage can be a significant cause of morbidity and can potentially be avoided by nasogastric or intravenous (IV) infusion of normal saline or Ringer’s lactate along with a systemic dopamine infusion.
4. Obtain informed consent after discussing expected complications and outcomes. Use this opportunity to educate and establish a positive relationship.
5. Establish IV access for medications and hydration.
6. Administer preprocedural antibiotics within 1 hour of the start of the procedure; antibiotics given before that time or after the procedure is completed have decreased effectiveness. This is particularly important if there is clinical evidence of infection or suspicion of any degree of obstruction. Cultures from obstructed biliary systems are positive in approximately 50% of cases. The most common organism continues to be Escherichia coli especially extended-spectrum betalactamase (ESBL)-producing E. coli (4). Recommendations for antibiotic coverage include
a. A carbapenem (e.g., ertapenem 1 g IV) because they cover many of the organisms found in biliary cultures
c. Unasyn (ampicillin plus sulbactam) 3 g IV
7. Follow institution’s guidelines for food and clear liquid consumption prior to sedation or anesthesia. General anesthesia is recommended for PBD. There have been studies suggesting that IV sedation is adequate for PBD; however, given our anecdotally poor experience with sedation, especially when the case gets long and difficult, we prefer general anesthesia unless there is a compelling reason to avoid it. The most common guidelines are no food or non-clear liquids for 6 hours and clear liquids up to 2 hours before the procedure.
Procedure
Percutaneous Transhepatic Cholangiography
1. Position the patient supine.
a. Abduct the right arm onto an arm board. To avoid brachial plexus injury, do not abduct it more than 90 degrees if the patient is under general anesthesia.
b. Ensure that the C-arm rotates freely around the patient at the level of the liver from at least 40 degrees right anterior oblique (RAO) to 40 degrees left anterior oblique (LAO).
2. Perform a quick ultrasound survey of the upper abdomen and right lower chest.
a. Confirm that liver anatomy and pathology are as expected.
b. Outline the area for skin preparation. Be generous. Include the entire epigastrium to the navel, the right upper quadrant above and below the costal margin, and the entire right lateral chest wall from the diaphragm to the tip of segment 5. Think not only about where your needle is expected to enter the skin but also of other potential puncture and ultrasound probe placement sites.
3. Clean and drape the skin in sterile fashion.
4. Perform a “Time Out” to make sure that the patient, procedure, and location are correct; that any desired antibiotics have been administered; and that sedation is appropriate.
5. Ductal puncture
a. Locate the target with ultrasound.
b. Administer local anesthetic (1% lidocaine) at the puncture site. Generously inject from the skin through the subcutaneous (SC) tissues, muscles, and peritoneum and then into the very sensitive liver capsule.
c. The duct is adjacent to the portal vein and artery. If the duct is not dilated, use the portal vein as your target. The relationship of the duct to the vein is unpredictable, so multiple passes may be necessary.
d. Left duct puncture
(1) The epigastric approach avoids problems that can occur when crossing the pleural space. Entry into a peripheral portion of the duct reduces the chance of crossing a large central vessel and allows easier placement of drainage catheters.
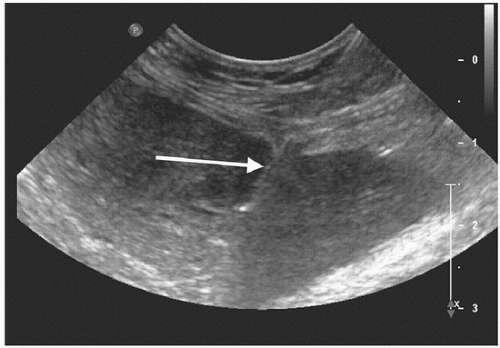
(2) The safest target is the segment 3 duct, which is inferior and anterior to the segment 2 duct. In addition, the duct is often just slightly anterior and superior to the portal vein, which makes it a safe target (Fig. 52.1).
(3) Start scanning transversely and then rotate the transducer until it is parallel to the segment 2 and 3 ducts (see Fig. 52.1).
(4) The needle can then be placed into the liver in the plane of the transducer and monitored for its entire passage through the epigastric tissues and liver to the duct (Fig. 52.2). Make absolutely sure, before your needle enters the liver, that the trajectory is in the plane of the duct you wish to enter. If you are close enough, even if the needle fails to enter the duct, you will only need to pull back 1 to 2 cm to redirect the needle. The goal is to cross the liver capsule once.
(5) The needle is usually passed a few millimeters deep to the duct, and a slow, high magnification pullback injection of contrast is performed. A mixture of 7 mL contrast to 3 mL saline is easily seen yet not so dense to obscure repeat attempts if there is parenchymal staining.
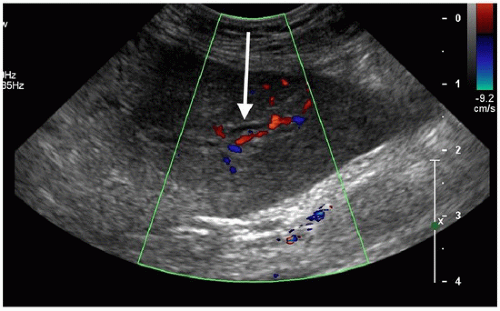 FIGURE 52.1 • The transverse scan in the epigastrium shows the segment 3 duct (arrow) with-out color flow immediately anterior to the red portal vein. |
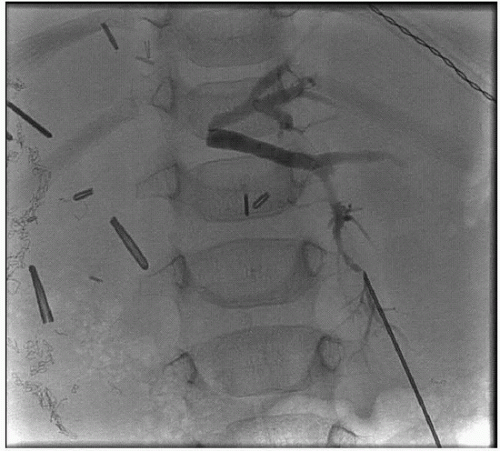
(6) During the pullback injection, use rapid, small intermittent “puff” injections to produce a continuous tract barely wider than the needle tip. Contrast in the portal vein or hepatic artery will clear toward the periphery of the liver, clear rapidly and completely, and result in a parenchymal stain in the peripheral distribution of the vessel. Contrast in a bile duct will clear centrally, clear slowly, and not cause staining (Fig. 52.3). Contrast in a hepatic vein will clear in a cephalad and central direction, clear rapidly, and not cause staining.
(7) Overinjection of infected biliary ducts is the most common cause of sepsis during a PTC and must be avoided. If you begin to see tiny peripheral ducts and slight sinusoidal staining when injecting into a duct, stop immediately and reassess what you are doing and what you need to see or accomplish.
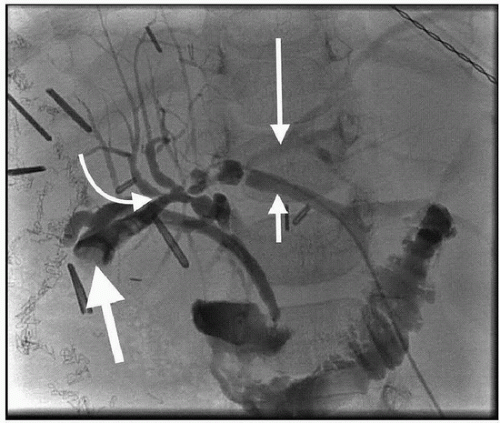
(8) If there is an obstruction, take a specimen for culture and then advance a catheter to the obstruction (Fig. 52.4) to make small injections and decide on therapy.
(9) If there is no obstruction, obtain images in multiple projections. Ensure that contrast clears from the ducts and the bowel.
(10) When the cholangiographic findings are indeterminate, a pressureflow study, a variation of the urinary Whitaker test, can be done (Chapter e-88). We often follow a simplified protocol of 10 mL per minute for 20 minutes taking pressures at baseline then every 2 minutes. Obstruction is present if there is ductal dilatation associated with a pressure rise above 15 mm Hg (20 cm saline if using a manometer).
e. Right duct puncture
(1) Whenever possible, aim for segment 5. One great benefit of puncturing into a segment 5 duct is that gentle contrast injections plus gravity will show you all of the other ducts in the right lobe except for the most anterior ducts in segment 8. That is often very helpful in accurately defining the extent and severity of any obstructing process. In addition,
a segment 5 approach often allows an approach from below the right anterolateral costal margin. In addition, if an intercostal approach is required, it can usually be made anterior to the midaxillary line. If at all possible, it is advisable to stay below the 10th rib and anterior to the midaxillary line in order to minimize the chance of traversing the pleural space. If you go through the pleural space, the negative intrapleural pressure of each inspiration can suck in blood, bile, air, and even carefully secured catheters.
a segment 5 approach often allows an approach from below the right anterolateral costal margin. In addition, if an intercostal approach is required, it can usually be made anterior to the midaxillary line. If at all possible, it is advisable to stay below the 10th rib and anterior to the midaxillary line in order to minimize the chance of traversing the pleural space. If you go through the pleural space, the negative intrapleural pressure of each inspiration can suck in blood, bile, air, and even carefully secured catheters.
(2) If you are making an intercostal puncture, rotation of the transducer is limited to a few degrees in the plane of the intercostal space, but it is important to keep the transducer in that space so you don’t lose the needle tip behind a rib. Before puncturing, select the best target. Look for a duct bifurcation in segment 5 to find a three-dimensional chance of a duct with one pass.
(3) If you go through the intercostal space, stay as close as possible to the superior aspect of a rib to avoid blood vessels, and, as you go through the intercostal space, consider injecting extra local anesthetic, especially 0.25% or 0.5% bupivacaine, which can cut down remarkably on postprocedure discomfort.
(4) The left-sided ducts often do not fill after right duct contrast injection in supine patients, particularly if there is no obstruction. The left ducts can be seen by injecting air or CO2 in the supine patient or by injecting more contrast and carefully rotating the patient left side down.
Percutaneous Biliary Drainage
1. After ultrasound-guided fine needle (usually 21-gauge or 22-gauge) puncture of a duct, perform a careful preliminary contrast injection with at least two oblique views to define the needle position and the angle of entry into the duct. If necessary, use the first needle for contrast injections to visualize a better entry point, which can be punctured under fluoroscopic guidance.
2. Advance a 0.018-in. wire into the bile duct. Use a short (35 to 60 cm) 0.018-in. nitinol wire with a gently curved soft platinum tip. If you can get this wire into the ducts, its stiffness will make the following steps much easier.
a. If it does not advance, stop, think, and be patient, which is an undervalued step and is often the key to a successful procedure. The angle between the needle and the duct may be too obtuse (close to or greater than 90 degrees), the wire may be travelling parallel to the duct but not actually be inside the duct but instead in the portal triad tissue, there may be severe scarring in the duct, or the wire may be travelling through or around the duct in the needle tract. Take time to get oblique views and then, if necessary, repeat the puncture in a position and/or alignment that gives you improved access to the ducts.
(1) Consider increasing the fluoroscopic magnification, pulse rate, and dose.
(2) Use multiple angles, especially use cephalad and caudad angles, which are an accurate and quick way to use parallax to help you figure out if you are short of the duct, or through it, with your needle and wire.
b. Anytime you get a needle into the ductal system and can opacify the ducts, do not move it. If you cannot advance a wire and are getting frustrated, resist the temptation to just pull the needle back a little and redirect it. Instead, leave the needle where it is, use it to opacify the ducts, and repuncture with a second needle.
c. “Dance” the wire out of the needle with gentle twirling movements. If it buckles or hits resistance, stop, pull back, and try again.

