The Systematic Approach
There are two basic elements to the systematic interpretation of a chest radiograph. The first is the structure of the system itself and this chapter describes the sequence of interpretation I have developed over the years. Whether you adopt this system or develop your own, it is essential to be disciplined and not deviate from a structured approach. Train yourself to examine anatomical structures in strict order because deviation will risk missing important information. A classic example is your eye being drawn to an obvious abnormality. You note the abnormality and it is easy to consider ‘job done’ ignoring further critical examination. This happened recently when a radiographic diagnosis was considered complete after multiple rounded shadows were detected in the lung fields. These were well defined, variable in size and clearly represented metastatic malignant disease. Unfortunately, the right mastectomy, readily visible on the radiograph and the likely source of the metastatic deposits, was missed and this was simply because the breast shadows were not examined specifically as part of a systematic approach. I have known osteolytic lesions in ribs (accompanying an obvious lung mass) to be missed for exactly the same reason. So, develop a sequential system of observation and do not deviate from it.
The second element is to ‘problem-solve’ as you follow your systematic interpretation. By this I mean ask specific questions at each stage of the examination. Is an anatomical structure of normal size, is it correctly positioned and are its borders well defined? What are the detailed features of any pulmonary infiltrate – distribution, size and shape of component shadows, presence of calcification and so on? In other words, go in search of information and do not just wait for it to hit you in the eye – this is a basic, generic skill of clinical medicine.
There is a third element that will accrue with experience and this is ‘pattern recognition’ – an ability to recognize heart failure because you have seen the pattern hundreds of times and recognize it. Pattern recognition is another generic skill of the art of clinical medicine and should not be disparaged but use it warily and do not allow yourself to abbreviate the systematic approach – even the most experienced of us has been caught out by ignoring this fundamental maxim.
Here is the system I follow.
BASIC OBSERVATIONS FIRST
Note the patient’s name, age and ethnic background. These details may provide clues to the possible diagnosis.
What is the date of the radiograph? A stunning radiographic diagnosis is far more relevant to patient care if the X-ray is current rather than 2 years old.
Has the radiograph been taken in postero-anterior (PA) or antero-posterior (AP) projection? If the latter, then it is impossible to comment accurately on heart size.
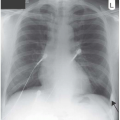
How centred is the image? Look at the sterno-clavicular joints when making this assessment. The right and left sterno-clavicular joints are equidistant from the
mid-line in the normal chest X-ray shown in Fig. 1.1 (arrowed) and this is a wellcentred radiograph. A rotated film will distort the appearance of all anatomical structures, particularly those within the mediastinum, and interpretation may be impossible if the image is significantly skewed.
Next, decide on the degree of radiological penetration of the image. Ideal penetration applies when you can see vertebral bodies clearly through the heart shadow. Sometimes a softer film helps in defining pulmonary infiltration and, in these days of digital images, it is possible to manipulate the window level in order to optimize penetration. Figure 1.1 is an example of near-perfect X-ray penetration.
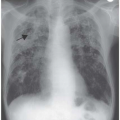
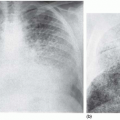
Finally, examine the alignment of the ribs. In Fig. 1.2 the ribs are horizontal with the anterior and posterior parts of each rib shadow virtually overlying one another. This is an AP X-ray that has been taken with the patient lying back rather than sitting (lordotic). The mediastinum and the hemidiaphragms are very distorted and interpretation is unreliable, a situation exacerbated by the fact that the film is significantly underpenetrated.
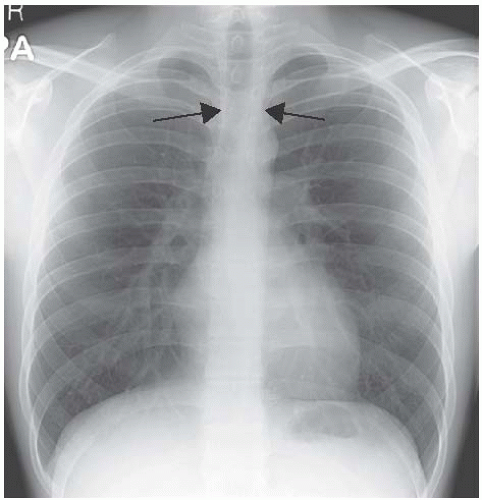 Figure 1.1 Normal chest X-ray. |
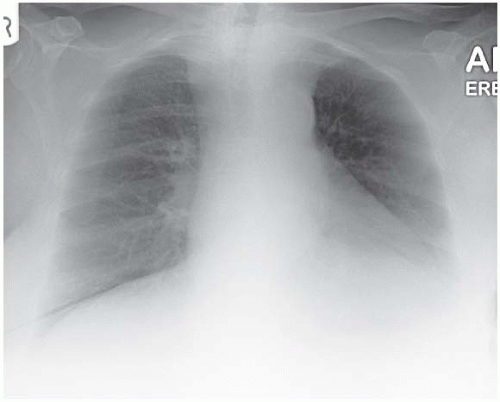 Figure 1.2 An underpenetrated lordotic chest X-ray. The horizontal appearance of the ribs is the clue to imperfect patient positioning. |
Accurate radiographic interpretation is reliant upon the quality of the X-ray. It is vital to assess penetration, centring and position of the patient before drawing conclusions from the radiographic appearances.
Figure 1.3 illustrates the characteristic acute angle between posterior and lateral ribs in a patient with pectus excavatum. Note the ‘fuzziness’ adjacent to the right heart border, which is a normal accompaniment of this anatomical variant. Recognition of
pectus excavatum from the shape of the rib cage will remove the concern that there might be right middle lobe consolidation. Figure 1.4 is a lateral chest X-ray of the same patient, clearly showing the chest wall deformity.
pectus excavatum from the shape of the rib cage will remove the concern that there might be right middle lobe consolidation. Figure 1.4 is a lateral chest X-ray of the same patient, clearly showing the chest wall deformity.
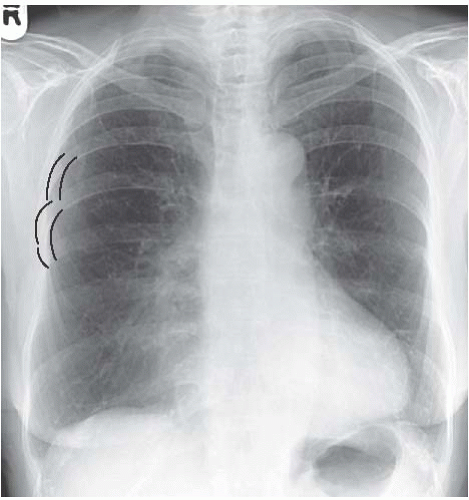 Figure 1.3 The characteristic acute angle between posterior and lateral ribs (highlighted) in a patient with pectus excavatum. Note the shadowing adjacent to the right heart border, which is a normal association of this chest wall shape. |
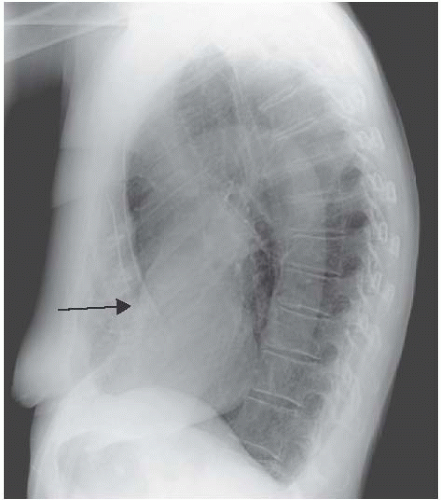 Figure 1.4 A right lateral chest X-ray of the same patient showing the anterior chest wall depression (arrowed). |
You are now ready to examine specific areas. ‘Problem-solve’ as you proceed with critical analysis of areas and anatomical structures in turn, continually asking questions of the appearances you detect.
COMMENCE IN THE NECK
Is the trachea deviated or compressed? If so, this is compatible with retrosternal thyroid enlargement (Fig. 1.5).
Can you see surgical emphysema in the soft tissues of the neck? Figure 1.6 is an obvious example in a young person with an acute attack of asthma but the appearances are often subtle and will be missed unless you look for them specifically.
Interestingly, one cannot see a pneumomediastinum in Fig. 1.6, although presumably there is one. Figure 1.7, on the other hand, shows obvious air in the mediastinum in association with a right-sided tension pneumothorax. Once again, surgical emphysema is present in the neck. The combination of pneumomediastinum and pneumothorax must raise the possibility of oesophageal rupture although, in this case, air had leaked from a ruptured bulla into both the pleural cavity and the mediastinum as a complication of acute asthma.
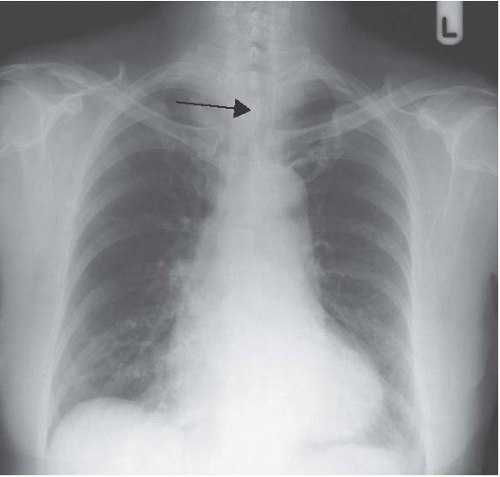 Figure 1.5 Retrosternal thyroid goitre showing indentation and deviation of the trachea (arrowed). |
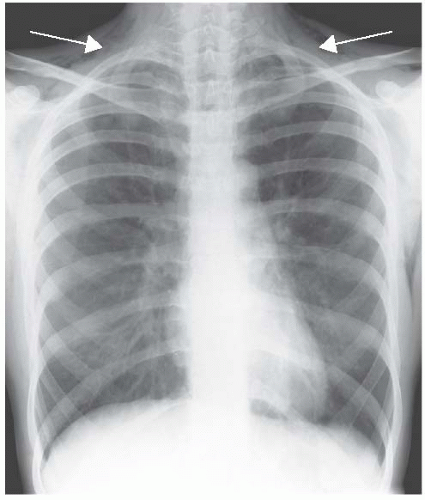 Figure 1.6 Surgical emphysema in the soft tissues of the neck (arrowed), complicating acute asthma. |
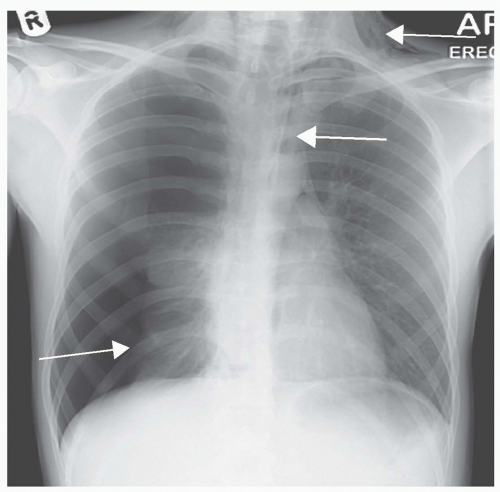 Figure 1.7 Pneumothorax and pneumomediastinum. Note the black line defining the left mediastinal structures, the border of the collapsed right lung and air in the soft tissues of the neck (all arrowed). |
It is important to diagnose pneumomediastinum. Asthmatics rarely come to harm from this complication of acute asthma but air in the mediastinum can also result from oesophageal rupture and this condition must not be missed. Spontaneous rupture of the oesophagus does happen. It is usually associated with vomiting but the severity of the vomiting can be surprisingly slight.
The classical physical signs of pneumomediastinum are palpable surgical emphysema in the neck and Hamman’s sound. This is a crunching noise heard over the praecordium throughout the cardiac cycle. It is similar to, though more ‘crackly’ than, a pericardial rub.
Is there calcification in the area of the thyroid gland, typical of a thyroid adenoma?
Are cervical ribs present (Fig. 1.8)? These can be responsible for neurological symptoms due to nerve entrapment.
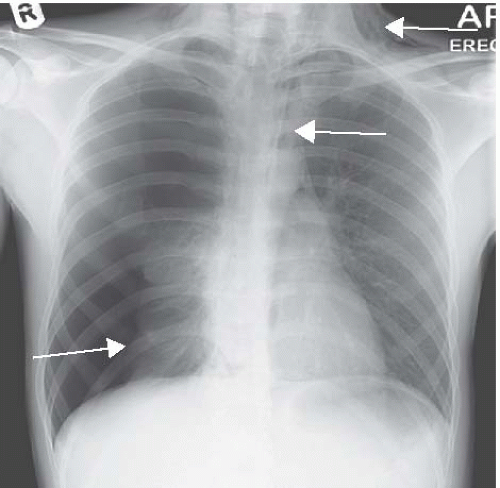 Figure 1.8 Cervical ribs (arrowed). |
PROCEED TO THE MEDIASTINUM
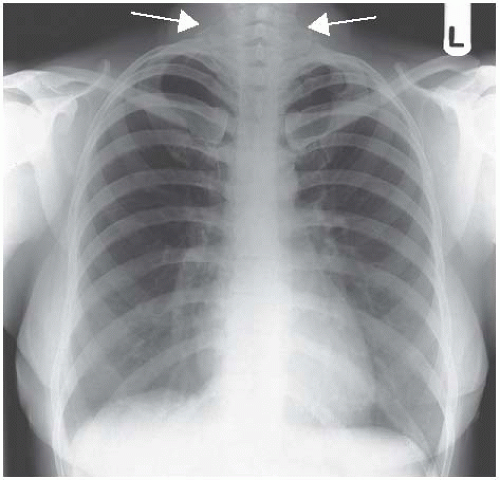 Figure 1.9 summarizes the mediastinal structures to be examined. I start with the aortic root. |
Is the aortic root of normal size? If it is small, this may indicate an atrial septal defect and you should seek (proactive ‘problem-solving’) the ancillary radiographic appearances of this diagnosis – namely, prominent hilar shadows and exaggerated vascular markings in the lung fields (Figs 1.9 and 1.10).
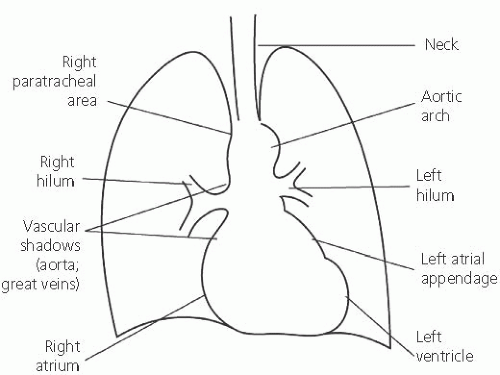
Figure 1.9 Diagram of the mediastinal structures to examine on PA chest X-ray.
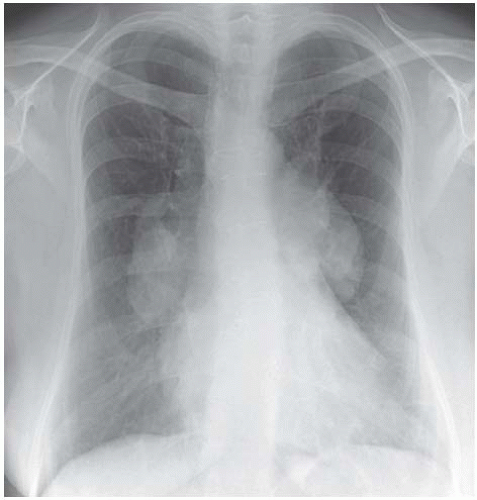
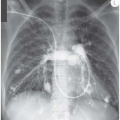
Figure 1.10 Atrial septal defect. This deeply cyanosed 45-year-old woman had an undiagnosed atrial septal defect. On her chest X-ray, the aortic knuckle is small and the hilar shadows are huge. The pulmonary vasculature is prominent proximally but is ‘pruned’ (i.e. tails out) distally into the lung fields and this indicates established pulmonary hypertension. Unfortunately, because the left-to-right intracardiac shunt had gone undiagnosed for many years, it had resulted in pulmonary hypertension and the shunt had reversed to become ‘right-to-left’. In other words, this is an example of Eisenmenger’s syndrome.
If the aortic root is prominent, the commonest reasons are hypertension or degenerative unfolding of the aorta. Prominence may be associated with thoracic aortic dissection and, although the appearance is uncommon, always look for a ‘double-shadow’ within a prominent aortic arch. Be aware though that the chest X-ray in aortic dissection is usually normal (see Hazard and Fig. 1.11).
Clinical confirmation of an atrial septal defect relies on the classical physical signs of a pulmonary flow murmur, a fixed and split second heart sound and a flow murmur in mid-diastole across the tricuspid valve.
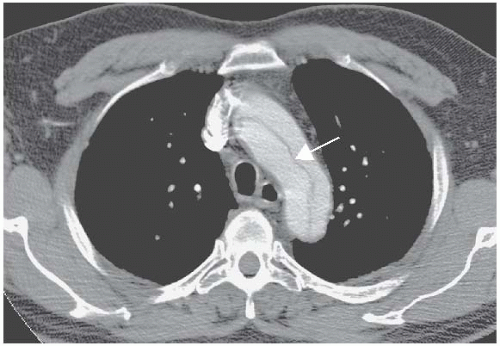 Figure 1.11
Get Clinical Tree app for offline access
Related posts:Stay updated, free articles. Join our Telegram channel
Full access? Get Clinical Tree


|