Fig. 1.
Schematic illustration of a FIB/SEM system. The scheme shows a sample hit by both ions (Ga+) and electrons (e−) during FIB/SEM operation.
3 Methods
3.1 Preparation of Dry Samples for FIB Milling and SEM Imaging
The aim of biological sample preparation procedures is to stabilize and fix the sample to enable imaging. Preparation of dry samples for FIB/SEM operation consists of the following general steps: fixation, contrast enhancement or conductive staining, dehydration with an organic solvent, drying of the solvent, mounting onto specimen stubs, and sputter coating. These steps are described in detail below.
3.1.1 Fixation
Glutaraldehyde, which is used as a fixative, is efficient in cross-linking proteins and maintaining cell ultrastructure, but penetrates tissues relatively slowly. Formaldehyde penetrates tissues rapidly, apparently due to its low molecular weight. Osmium tetroxide, most commonly used for postfixation, acts both as a fixative and as an electron stain. It preserves many lipids and it is able to stabilize some proteins by transforming them into clear gels without destroying many of their structural features (12).
1.
Tissue specimens should be cut into blocks of at least 1 mm in one dimension. Larger specimens will result in incomplete penetration of chemicals, thus reducing the final quality of the results.
2.
Fix a tissue block in 0.4% paraformaldehyde and 1% glutaraldehyde in 0.1 M sodium cacodylate buffer (pH 7.2) for 2.5 h at room temperature or overnight at 4°C (see Note 3).
3.
Wash 3 times for 10 min in 0.1 M sodium cacodylate buffer (pH 7.2).
4.
Post-fix for 1 h at room temperature in 1% osmium tetroxide in distilled water.
3.1.2 Contrast Enhancement or Conductive Staining
Sample fixation is followed either by en bloc staining to enhance contrast or by OTOTO (osmium tetroxide/thiocarbohydrazide/osmium—tetroxide/thiocarbohydrazide/osmium—tetroxide) staining for conductivity. In the OTOTO conductive staining technique, thiocarbohydrazide (T) is used as a ligand. It is bidentate, binding the osmium (O) tetroxide molecules together giving T–O–T. In this manner the natural affinity of osmium for unsaturated lipids is enhanced or amplified. The electrical conductivity imparted to the tissue by this increased deposition of osmium reduces specimen charging during the SEM operation (13).
1.
Stain the tissue block for 30 min in a saturated solution of thiocarbohydrazide in distilled water (saturated means the maximum amount of thiocarbohydrazide that can be dissolved in a given volume of water without forming insoluble crystals).
2.
Wash three times in distilled water for 10 min each.
3.
Stain for 1 h in 1% aqueous osmium tetroxide.
4.
Wash three times in distilled water for 10 min each.
5.
Stain for 30 min in saturated thiocarbohydrazide in distilled water.
6.
Wash three times in distilled water for 10 min each.
7.
Stain for 1 h in 1% aqueous osmium tetroxide.
8.
Wash three times in distilled water for 10 min each and proceed with dehydration.
3.1.3 Dehydration
1.
Wash the tissue in 50% ethanol for 10–15 min.
2.
Wash in 70% ethanol for 10–15 min (may be stored overnight at this stage if necessary).
3.
Wash in 95% ethanol for 10–15 min.
4.
Wash three times in 100% ethanol for 15 min each.
5.
Wash three times in 100% acetone for 15 min each.
6.
Shake specimen from time to time during the process to ensure full penetration and infiltration of chemicals.
3.1.4 Drying
Critical point drying (CPD) is an automated process that requires approximately 40 min to be completed. It relies on the following physical principle: the liquid in the biological tissue is replaced with a suitable inert fluid whose critical temperature at a realizable pressure is just above the ambient temperature. The choice of fluids is severely limited and despite early work with Freon 13 and N2O, CO2 is now commonly used. With CO2, a critical point of approximately 35°C can be achieved at a pressure of about 1,200 psi. Samples are transferred in 100% acetone to the pressure chamber of a critical point dryer. When the acetone is replaced with liquid CO2 and the temperature is raised to above the critical temperature, the liquid CO2 vaporizes with no change in density. As a consequence, there are no surface tension effects that can distort morphology and ultrastructure. However, another method using hexamethyldisilazane can be used for drying. In our experience, the two drying methods are found to produce a similar appearance of cellular ultrastructure. When the two protocols are compared, we find that HMDS drying takes less effort, has lower costs for chemicals, requires no specialized equipment and has a high rate of success. In our laboratory and elsewhere (14), CPD- and HMDS-dried samples have typically shown equally good results (Fig. 2) (15). The high magnifications in Fig. 2a, b are unusual for SEM investigation of biological samples prepared by drying. This is evidence of satisfactory sample stabilization and conductivity, as well as, of successful FIB operation.
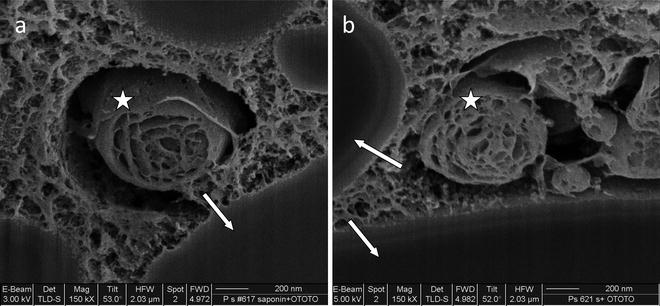
Fig. 2.
(a) CPD-dried specimen followed by FIB exposure and SEM imaging of the cell interior. Sample was aldehyde-fixed and osmium-postfixed (0.4% paraformaldehyde and 1% glutaraldehyde in 0.1 M sodium cacodylate buffer; 1% osmium tetroxide in distilled water). Homogenous regions correspond to lipid droplets (arrows). (b) HMDS-dried sample subjected to FIB exposure and SEM imaging of cell interior. Sample was aldehyde-fixed and osmium-postfixed (0.4% paraformaldehyde and 1% glutaraldehyde in 0.1 M sodium cacodylate buffer; 1% osmium tetroxide in distilled water). Note different electron beam voltages (left image 3 kV, right image 5 kV). Arrows—lipid droplets; asterisk—lamellar body. Image (b) reprinted from ref. 15 with permission.
For drying with Hexamethyldisilazane:
1.
Incubate tissue block in acetone–HMDS (1:1) for 10 min.
2.
Remove the HMDS–acetone and replace with HMDS.
3.
Incubate in HMDS for 10 min.
4.
Replace HMDS with fresh HMDS.
5.
Incubate in HMDS from 2 to 24 h to allow HMDS to evaporate.
3.1.5 Mounting Dried Samples onto Specimen Stubs
Dried samples are mounted on standard SEM microscope stubs prior to FIB/SEM investigation. Double-stick adhesive tape, conductive silver paint, or both can be used to attach specimens to stubs. Due to the small size of specimens and because sometimes samples are mechanically opened in order to expose their subsurface structure, a stereo microscope with magnification up to 10× is indispensible.
3.1.6 Sputter Coating of Dry Samples
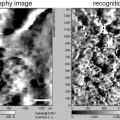
Samples are sputter coated with a layer of carbon or platinum/palladium, or other metals (thickness of ∼10–30 nm). Metal atoms ejected from the target by the ionized gas cross the plasma and are deposited onto any surface within the coating unit, including the specimen. A low vacuum is used (0.1–0.05 mbar), which with a modern low voltage sputter coater, enables metal to be deposited at a rate of 1 nm/s. For SEM imaging, when high magnifications are required, sputtering is a very important step that is needed to ensure the thickness and evenness of the cover layer. In Fig. 3a, b we provide examples of different qualities of sample coating.

Fig. 3.
SEM micrograph of the digestive gland cells prepared for conventional SEM. (a) Unsuitable sputter coating when high magnifications are required. Surface deposits are sputtering artifacts. (b) Properly coated samples allowing imaging at high magnifications. Image (b) taken by M. Hočevar; IMT, Ljubljana, Slovenia.
3.2 Sample Preparation for FIB Milling and SEM Imaging by Resin Embedding
3.2.1 Fixation
Fixation is the same as described above (Subheading 3.1.1), using a mix of paraformaldehyde and glutaraldehyde in sodium cacodylate buffer.
3.2.2 Staining
Following fixation, the samples are stained en bloc for enhancement of contrast. Uranyl acetate, usually used for staining thin sections for transmission electron microscopy, is used here for en bloc staining before dehydration. It also acts as both an electron stain and as a fixative. As a fixative, uranyl acetate stabilizes membranous and nucleic acid-containing structures but also reacts with proteins (12).
1.
Wash tissue block at least 3–5 times for 10 min each in distilled water to remove all excess phosphate ions, therefore preventing precipitation of uranyl acetate (UA).
2.
En bloc stain with 3% aqueous uranyl acetate for 4.5 h at room temperature in the dark to prevent uranyl acetate from being precipitated. This is necessary because UA is photo-reductive.
3.
Wash three times in distilled water for 10 min each.
3.2.3 Dehydration
The dehydration steps are the same as described above (Subheading 3.1.3), using an increasing series of ethanol concentration.
3.2.4 Embedding
The embedding steps are similar to those commonly used for preparing samples for TEM. To embed our samples we use Spurr’s-based resin.
1.
Infiltrate for 1 h in 50/50 acetonitrile/Spurr’s resin.
2.
Remove the 50/50 acetonitrile/Spurr’s resin and infiltrate twice in 100% Spurr’s resin for 1.5 h each.
3.
Place samples in mold and add resin.
4.
 Introduction: Nanoimaging Techniques in Biology
 Two-Color STED Imaging of Synapses in Living Brain Slices
 Secondary Ion Mass Spectrometry Imaging of Biological Membranes at High Spatial Resolution
 High Data Output Method for 3-D Correlative Light-Electron Microscopy Using Ultrathin Cryosections
 Functional AFM Imaging of Cellular Membranes Using Functionalized Tips
 Single-Molecule Tracking of mRNA in Living Cells


Embed in plastic using beam capsules or embedding molds, and label each sample.
Related posts:
Introduction: Nanoimaging Techniques in Biology
Two-Color STED Imaging of Synapses in Living Brain Slices
Secondary Ion Mass Spectrometry Imaging of Biological Membranes at High Spatial Resolution
High Data Output Method for 3-D Correlative Light-Electron Microscopy Using Ultrathin Cryosections
Functional AFM Imaging of Cellular Membranes Using Functionalized Tips
Single-Molecule Tracking of mRNA in Living Cells
Stay updated, free articles. Join our Telegram channel
Full access? Get Clinical Tree
