Fig. 1.
(a) Flow diagram of a typical immuno-EM protocol using the Tokuyasu technique. (b) Example of Tokuyasu immunolabeling. Scale bar 0.5 μm. Reproduced with permission from ref. 4.
The HDO-CLEM protocol has been optimized to correlate the highest amount of different cells, structures, or events in a single experiment. The possibility to apply the method to semithin cryosections, or ribbons of serial cryosections, makes the method suitable for 3D studies, both by EM tomography and FLM, respectively. FLM 3D relies on free software, MicroscoBioJ (3, 4), and a collection of Image-J (17) based plug-ins, able to create 3D multicolor volume rendering from serial 2D images. A high-content data analysis procedure is also available, to provide large-scale FLM morphometric data sets, with an accuracy close to the EM. The method involves the correction of the FLM data by a systematic error obtained from the FLM/EM correlation of a significant cohort of samples.
Here we report a step-by-step description of the HDO-CLEM method we have developed, as we have applied it to correlate FLM and EM analysis of Russell bodies (18, 19). Russell bodies are dilated ER cisternae, generally separated from the normal ER network, containing condensed aberrant immunoglobulins (Ig) originally identified in plasmocitoma cells. We used HeLa cells stably transfected with a mouse immunoglobulin μ chain, lacking the first constant domain (μ-ΔCH1), together with a wild-type immunoglobulin λ light chain, displaying spherical dilated RER cisternae resembling the Russell bodies identified in plasmocitoma cells (rough Russell bodies, RRBs). RRBs are about 1 μm in diameter and contain protein aggregates of mutant immunoglobulin M. Conversely, when μ-ΔCH1 is transfected in the absence of λ, it aggregates in the smooth ERGIC tubular compartments (smooth Russell bodies, SRBs), as shown by the association with the ERGIC marker ERGIC-53. SRBs are composed of narrow (100 nm wide, n-SRB) or dilated (200 nm wide, d-SRB), curled, tubular cisternae.
2 Materials
2.1 Reagents
1.
0.1 M phosphate-buffered saline (PBS) at pH 7.4.
2.
4% Paraformaldehyde.
3.
4% Paraformaldehyde/0.4% glutaraldehyde.
4.
0.15% Glycine.
5.
2.3 M sucrose.
6.
2% Methylcellulose.
7.
12% Gelatin.
8.
10% Sodium azide solution.
9.
10% Bovine serum albumin (BSA) stock solution.
10.
4% Uranyl acetate.
11.
0.3 M oxalic acid.
12.
2% Uranyl acetate/0.15 M oxalic acid.
13.
25% Ammonium hydroxide
14.
0.4% Uranyl acetate/1.8% 25 ctp methylcellulose.
15.
50% Glycerol in water.
16.
Formvar powder.
17.
40,6-Diamidino-2-phenylindole (DAPI) (1 mg/ml stock solution, use 100 ng/ml)
2.2 Antibodies
1.
Rabbit anti-IgG (μ chain) (Zymed) primary antibodies (1:200).
2.
Rabbit anti-calreticulin (Stressgen) primary antibodies (1:200).
3.
Cy3-conjugated donkey anti-rabbit secondary antibody (Zymed).
4.
Cy2-conjugated donkey anti-rabbit secondary antibody (Zymed).
5.
10 and 15 nm Protein A-gold (PAG).
2.3 Sectioning and Imaging Equipment
1.
T5293 DUMONT Biology tweezers # 5 stainless.
2.
Aluminum specimen pins for ultra-cryo-microtomy (local manufacturer).
3.
Diamond knife, cryo, dry, 3 mm—45 °, 1 mm/s cutting speed (Drukker or Diatome).
4.
Leica EM FCS Ultracut ultramicrotome (Leica Microsystem).
5.
Finder gold EM grids (Agar).
6.
Microscope coverslips (Nr. 0/1, 20 × 20 mm).
7.
Microscope slides (1.0–1.2 mm thick, 25.4 × 76.2 mm size).
8.
A spectral laser scanning microscope equipped with an HeNe laser (1 mW, 543 nm), a multiline Ar laser (100 mW, 457–476–488–514 nm) and a near ultra-violet laser diode (405 nm), such as a Olympus FV1000, with a transmitted light detector for recording brightfield images. A PlanApo 60×/1.42 oil objective (Olympus).
9.
Transmission electron microscope capable of recording tomographic tilt series, such as a Tecnai 12-G2 Bio-Twin EM (FEI Company). This microscope is equipped with a LaB6 emitter for high brightness, a CompuStage for accurate movement of the specimen on five axes (X, Y, Z, α, β), a SIS Mega View III CCD camera (Olympus-SIS) for digital image acquisition, and Kodak film 4489 for recording some EM micrographs.
2.4 Software
2.
MicroSCoBioJ (http://imagejdocu.tudor.lu/doku.php?id = plugin:stacks:microscobioj:start) free software package (3, 4) (see Note 2).
3 Methods
Outline of the methods: (1) preparation of reagents, (2) preparation of semi/ultrathin cryosections of cell samples by Tokuyasu technique (Fig. 1), (3) immunofluorescence and immunogold labeling of semi/ultrathin cryosections (Fig. 2), (4) image acquisition and processing (ImageJ and MicroScoBioJ software) (Fig. 3), and (5) hybrid morphometry (Fig. 3).
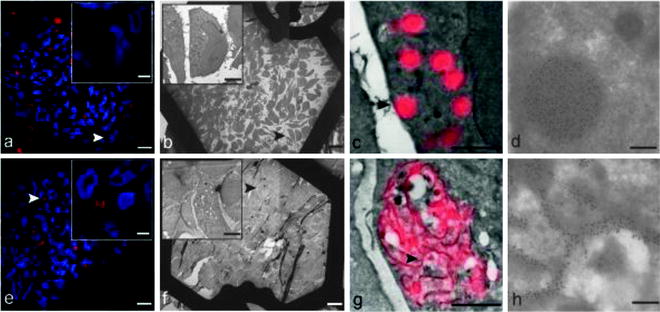
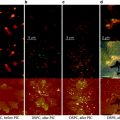
Fig. 2.
Flow diagram of a typical HDO-CLEM experiment.
Fig. 5.
MicroSCoBioJ interface. (a) Grayscale FLM 3D stack containing the cellular structure to display. (b) Mesh Maker MicroSCoBioJ user-friendly interface. Using the following menu one can choose: segmentation threshold, voxel dimensions, and algorithm (marching cubes or marching tetratrahedra). (c) Binary 3D stack (black: background, red: structure) obtained by the segmentation algorithm included in the Mesh Maker plugin and successfully used to generate the iso-surface mesh. Note that the iso-surface mesh calculation might take several minutes depending on the size of the 3D stack (up to 1 h for very large 3D stack); a progress bar will display the percentage of the performed calculation. (d) Mesh Viewer MicroSCoBioJ user-friendly interface. It is possible to visualize the iso-surface mesh as points, lines or filled surface. (ES) WAT MicroSCoBioJ user-friendly interface.
3.1 Preparing Reagents
1.
0.1 M PBS: Weigh 80 g NaCl, 2 g KCl, 14.4 g Na2HPO4⋅2H2O, and 2.3 g NaH2PO4⋅H2O, and add distilled water (Milli Q) up to 1,000 ml. Dilute 1:10 with distilled water prior to use.
2.
4% Paraformaldehyde: Dissolve 4 g of granular parafolmaldehyde in 100 ml of PBS. This solution must be prepared under the chemical fume hood. Pre-heat the PBS to 60°C to allow the parafolmaldehyde to completely dissolve, then add 50 μl of 1N NaOH while stirring.
3.
4% Paraformaldehyde/0.4% glutaraldehyde: Mix 70% glutaraldehyde and 4% paraformaldehyde in a 1:175 v:v ratio.
4.
0.15% Glycine: To 30 mg of glycine, add PBS up to a 20 ml final volume.
5.
2.3 M sucrose: Dissolve 78.73 g of sucrose in 50 ml of PBS and stir until the sucrose is completely dissolved. Add PBS to a 100 ml final volume and store 50 ml aliquots at 4°C.
6.
2% Methylcellulose: Add 4 g of methylcellulose to 196 ml of distilled water while stirring at 90°C. Rapidly cool to 10°C on ice while stirring, and then add water to a final volume of 200 ml. Seal with parafilm and stir overnight at 4°C. Store methylcellulose at 4°C in the dark, for up to 3 months.
7.
12% Gelatin: Dissolve 12 g of gelatin powder (local food brand is satisfactory) in 75 ml of PBS by first stirring the solution for 10 min at room temperature and then for 4–6 h at 60°C. When the gelatin is completely dissolved, cool the solution to 37°C, add 200 μl of a 10% sodium azide solution, and finally add PBS to a 100 ml final volume. Aliquot and store at 4°C, up to several months.
8.
10% BSA stock solution: Add 10 g of serum albumin in 100 ml of distilled water (Milli Q) and gently stir overnight, to prevent foaming, at 4°C. Set the pH to 7.4 with 1N NaOH, and then add sodium azide to a 0.02% final concentration. Centrifuge the solution for 1 h at 100,000 × g, retrieve the supernatant, and store in small aliquots at 4°C.
9.
4% Uranyl acetate: Dissolve 4 g of uranyl acetate in 100 ml of distilled water by stirring at room temperature.
10.
0.3 M oxalic acid: Dissolve 3.78 g of oxalic acid in 100 ml of distilled water by stirring at room temperature.
11.
2% Uranyl acetate/0.15 M oxalic acid: Mix 4% uranyl acetate and 0.3 M oxalic acid in a 1:1 v:v ratio. Adjust the pH to 7–8 by adding drops of 25% ammonium hydroxide while stirring.
12.
0.4% Uranyl acetate/1.8% 25 ctp methylcellulose: Gently mix 1 ml of 4% uranyl acetate to 9 ml of 2% methylcellulose solution. Store the solution at 4°C in the dark, for up to 3 months.
13.
50% Glycerol in water: Add 100 ml of glycerol to 100 ml of deionized water while stirring. Aliquot to 100 ml bottles and autoclave.
14.
Formvar: Weigh 1.1 g of formvar and place in a 100 ml volumetric flask. Add chloroform to a 75 ml volume, and stir until dissolved. Subsequently, add more chloroform to a 100 ml final volume and let rest overnight at room temperature (see Note 6). Store formvar solution in a clean bottle for up to 3 months.
3.2 Preparation of Ultrathin Cryosections for HDO-CLEM
Hela cells, treated to induce Russell bodies formation (18), are plated on tissue culture dishes until they reach 80% confluence. Unless otherwise indicated, all steps are performed at room temperature.
1.
Fix cells by adding a mixture of 4% paraformaldehyde/0.4% glutaraldehyde to an equal volume of culture medium for 2 h at room temperature (see Note 7).
2.
Quench free aldehyde groups by incubating the cells for 10 min in 0.15% glycine at room temperature.
3.
Add a small volume of 1% gelatin in PBS. Scrape off the cells from the tissue culture dishes with a cell scraper.
4.
Transfer the cells to a 1.5 ml microcentrifuge tube, pellet the cells for 1 min at 13,000 rpm (16,100´g) and remove the supernatant.
5.
Resuspend the cells with 1 ml of 12% gelatin for 10 min at 37°C.
6.
Pellet the cells for 1 min at 13,000 rpm and carefully remove the supernatant (gelatin 12%).
7.
Resuspend the pellet in 1 ml of 12% gelatin.
8.
Repeat the centrifugation step and remove the supernatant.
9.
Transfer the pellet to 4°C for 15 min.
10.
Carefully cut the microcentrifuge tube, at the level of the pellet, using a razor blade and remove the solidified gelatin/cell pellet from the microcentrifuge tube.
11.
Using a sharp razor blade cut small (∼ 1 mm3) gelatin blocks with the aid of a stereo-microscope (see Note 8) while taking good care not to dry the sample during the cutting procedure. Rapidly proceed to the next step.
12.
Submerge the small blocks in 2.3 M sucrose solution, and slowly rotate tubes overnight at 4°C (see Note 9).
13.
Carefully retrieve the specimen blocks from the 2.3 M sucrose solution, using stainless biology tweezers # 5, and transfer to the top of the aluminum pins.
14.
Remove the excess sucrose by gently touching with a piece of filter paper while leaving enough sucrose to glue the block to the pin.
17.
The formvar film is made on a microscope slide. The surface is cleaned by wiping the slide with a chamois and next with lens paper. The Formvar solution is poured gently without forming air bubbles in an adapted separating funnel provided with two stop-cock valves in its outlet. The upper one is used to regulate the flow, the second one to switch on or off. The level of the Formvar solution in the funnel is about 2/3 of the length of the slide. The slide is carefully placed in the funnel with a pair of tweezers and the top of the funnel is covered to reduce evaporation of the chloroform. Then the lower valve is opened with one turn. The upper valve is set in such a way that the Formvar/chloroform solution flows out of the funnel in 10s. Remove the slide from the funnel after 30 s and loosen the film at the edges of the slide by cutting the film 0.5 mm from the edges with a razor blade. Fill a beaker with clean distilled water and slowly bring the slide in vertical position into the water. The film will float on the water surface. The thickness of the film should be about 50 nm, which will give it a silver-white appearance on the water surface. The grids can be placed on the film, avoiding irregularities in the film. Once the film is covered with grids, a microscope slide provided with a sticker is gently pressed on the film into the water. The film with grids will attach to the sticker. Be sure to submerge the slide far enough into the water so that the film is totally submerged before the slide can be removed from the water and dried.
18.
Cut semithin (200–300 nm) or ultrathin cryosections (60–65 nm) with a diamond knife using the cryo-ultramicrotome. The temperature of sample, knife and chamber are set at −100°C for semithin sections, and −120°C for ultrathin cryosections, respectively. The cutting speed is set at 1–2.5 mm/s.
19.
Collect ribbons of flat cryosections on a droplet of a 1:1 mixture of 2.5 M sucrose and 2% methylcellulose and transfer to formvar film-coated, carbon stabilized, gold finder EM grids.
20.
Store the cryosections at 4°C, for up to 1 month.
3.3 Immuno-fluorescence and Immunogold Labeling for HDO-CLEM
Every step of the labeling procedure is performed by floating the section-side grid on drops of the different solutions placed on a strip of parafilm. Unless otherwise indicated, all steps are performed at room temperature.
Related posts:
 Introduction: Nanoimaging Techniques in Biology
 Two-Color STED Imaging of Synapses in Living Brain Slices
 Secondary Ion Mass Spectrometry Imaging of Biological Membranes at High Spatial Resolution
 Functional AFM Imaging of Cellular Membranes Using Functionalized Tips
 Correlative Optical and Scanning Probe Microscopies for Mapping Interactions at Membranes
 Nanoimaging Cells Using Soft X-Ray Tomography
Stay updated, free articles. Join our Telegram channel

Full access? Get Clinical Tree


