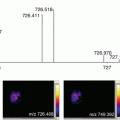
Fig. 1
Image displaying (a) alignment of mouse optic nerve tissue along hypodermic needle after dissection, (b) displaying initial freezing process where the lower portion of the hypodermic needle is immersed into liquid nitrogen using long handled forceps before immersing in CMC solution
The tissue should then be frozen by immersing the base of the needle into liquid nitrogen without immersing the actual tissue, while holding with long forceps as seen in Fig. 1b, after 1–2 min, the pupil will take on an opaque appearance once the lens has frozen.
The tissue on the end of the needle can then be quickly immersed into the CMC solution contained in a weighing boat with suitable depth and the sample can now be immersed in liquid nitrogen to encase the tissue. This process can be repeated a number of times until sufficient material is surrounding the sample.
The sample should be handled with care, as any twisting of the sample or the needle could result in the mark on the Luer lock used to indicate the tissue region becoming displaced.
3.5 Cryostat Sectioning of Ocular Tissue
3.5.1 Obtaining Sections for Neural Retina and Cornea Analysis
- 1.
Samples should be mounted onto the cryostat chuck using OCT in the desired orientation; a flat surface can be shaved onto the mounting CMC surface using a razor blade to ensure correct orientation and good adherence.
- 2.
The angle of the stage should be adjusted to allow for a less acute passage of the tissue section over the blade as seen in Fig. 2, as acute angles cause the surrounding CMC to fragment and lose structural integrity.

Fig. 2
(a) Image showing less acute angle on a Leica CM 3050 S sample stage. (b) Image showing more acute angle on a Leica CM 3050 S sample stage
- 3.
CMC should be trimmed using larger section increments of 30–50 μm until the tissue becomes visible.
- 4.
Before section procurement, the blade should be replaced as trimming can cause blade dulling that will diminish section quality. Once the tissue is visible, excess CMC can now be removed from around the sample using a precooled razor blade if necessary.
- 5.
Once a desired region for sectioning is reached, the section can be manipulated into position on the target surface using a fine-tipped paint brush on the surrounding CMC material, preventing contamination or disruption of the tissue .
- 6.
Flat sections thaw mount better than wrinkled sections as wrinkled sections thaw at different rates across the tissue. This can cause tissues to stretch and fold, affecting the morphology and resulting in artifacts in the MALDI IMS data. One way to prevent wrinkled and stretched sections is to remove the lens, see Subheading 3.6.
- 7.
Once thaw mounted onto a target plate or slide, the section should be air dried immediately, while providing heat from a gloved hand before returning the sample to the cryostat or to a vacuum desiccator.
3.5.2 Obtaining Sections from Aligned Optic Nerves
- 1.
Attach the sample to the sample chuck, with the mark on the Luer lock indicating the position of the tissue on the needle facing downward toward the sample chuck. The sample should be frozen to the sample chuck using minimal OCT , keeping the needle as parallel to the chuck as possible as seen in Fig. 3.

Fig. 3
Image of CMC embedded mouse eye attached to a cryostat chuck with the mark on the luer lock of the needle oriented toward the chuck and mounted with the needle parallel to the chuck surface
- 2.
Once attached the chuck the sample can be placed in the sample chuck holder . The sample can be advanced toward the blade using the manual control adjustment on the cryostat to bring the sample closer to the blade and sample stage. Make adjustments to the sample holder until the needle is as visually parallel to the blade as possible.
- 3.
The sample can now be trimmed to allow the needle to get closer to the blade to make adjustment more accurate, taking care not to let the luer lock collide with the blade, Fig. 4. Once satisfied with the adjustment the needle can be pulled from the embedded sample using a gentle twisting motion. Continue with trimming until the impression left behind by the needle is visible on the block face as seen in Fig. 5, initially the widest region of the impression indicates closest region to the blade, fine adjustments can be made to ensure the sample alignment is optimal. The cryostat blade should be replaced at this point as trimming of the CMC results in premature dulling of the blade. The position of the anti-roll bar can also be optimized at this point. Section procurement can begin after the impression is no longer visible.

Fig. 4
Image of partially sectioned CMC embedded mouse eye with the hypodermic needle still in place, so it can be aligned parallel to the cryostat blade

Fig. 5
Image of CMC embedded mouse eye once the hypodermic needle removed and partially trimmed to the point where the needle impression is visible, indicated by the arrow in the zoomed inlay
- 4.
The surrounding CMC material around the tissue should have sufficient structural integrity to manipulate the section into position on the sample surface (if the material has poor structural integrity, see Note 3 ).Related posts:
 “A Future Amalgamation Between the Scientist and the Clinician?”
 Peptide Imaging: Maximizing Peptide Yield, Optimization of the “Peptide Mass Fingerprint”
 MALDI-MS Imaging in the Study of Glomerulonephritis
 Mass Spectrometry Imaging of Drugs of Abuse in Hair
 DESI Mass Spectrometry Imaging (MSI)
 Laser Ablation Inductively Coupled Plasma Mass Spectrometry Imaging of Plant Metabolites

Stay updated, free articles. Join our Telegram channel

Full access? Get Clinical Tree


