Fig. 1
Photograph of the primary and secondary capillaries after fabrication. (A) Secondary capillary, (B) tip of primary capillary, (C) stainless steel union, (D) PEEK union
3.1.1 Secondary Capillary
1.
Cut approximately 5 cm of a fused silica capillary (50 μm × 150 μm) and insert it into a ~0.5 cm long PEEK tubing (0.01″ × 0.0625″).
2.
Place the capillary such that both sides extend evenly from the PEEK tubing and apply a small amount of loctite glue to attach the capillary to the PEEK tubing (see Note 3 ).
3.
Keeping the PEEK tubing in the center, cut the ends of the fused silica capillary to a final length of ~2 cm.
4.
Examine the capillary under a microscope to make sure that it is cut evenly without any cracks or sharp points (see Note 4 ).
3.1.2 Primary Capillary
1.
Cut 40–50 cm of fused silica tubing (50 μm × 150 μm) (small) and a piece of PEEK tubing (0.01 in. × 0.0625 in.) to ~2 cm.
2.
Insert the fused silica capillary into the PEEK tubing and push it all the way through until approximately 2 cm of the capillary tip sticks out.
3.
4.
Cut a second 40–50 cm piece of fused silica tubing (250 μm × 360 μm) (large).
5.
Cut ~3 cm long pieces of 0.01 in. × 0.0625 in. and 0.02 in. × 0.0625 in. PEEK tubing and place these on the ends of the small and large capillary, respectively.
6.
7.
Add a micro tight sleeve (0.0155 in. × 0.025 in.) to the end of the large capillary, insert it into a PEEK fitting, and tighten the PEEK union.
8.
Add a second PEEK fitting to the other side of the union and tighten it around a flat-headed Hamilton syringe filled with solvent. Propel the solvent through the primary capillary to make sure that it is properly tightened.
3.2 Fabricating a High-Resolution Nano-DESI Capillaries
3.3 Setting Up the Nano-DESI Probe
1.
Place a Hamilton syringe containing the working solvent into a syringe pump and attach the high-voltage supply to the stainless steel union using a crocodile clip.
2.
Mount the secondary capillary onto a manual XYZ stage (Fig. 2a) and place it in front of the mass spectrometer inlet (Fig. 2b). Use the manual XYZ stage to move the secondary capillary close to the inlet so that the instrument vacuum can assist in drawing the liquid through the secondary capillary as shown in Fig. 3.
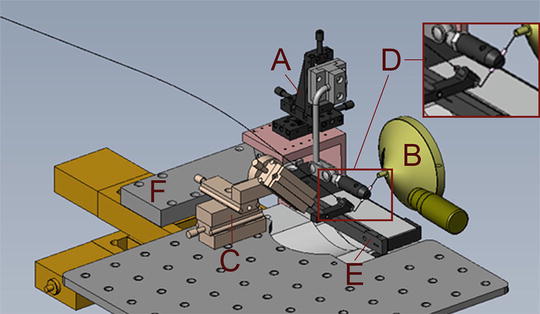

Fig. 2
Schematics of the nano-DESI setup. (A) Manual XYZ stage for positioning the secondary capillary, (B) mass spectrometer inlet, (C) manual XYZ stage for positioning the primary capillary, (D) nano-DESI probe, (E) sample holder attached to (F) computer-controlled XYZ stage

