Fig. 1.
Principle of MALDI (Matrix-Assisted Laser Desorption/Ionization) Imaging mass spectrometry. A matrix-coated tissue section is spot-wise analyzed in a mass spectrometer. After the MALDI Imaging measurement, the tissue section is histologically stained. This allows a histology-driven analysis of the proteomic pattern acquired by mass spectrometry.
A major challenge in the analysis of tissues is their complexity. Tissues are comprised of a multitude of different cell types and extracellular components. However, MALDI Imaging can cope with this tissue complexity since it analyzes it in a spatially resolved manner (see Fig. 2). The histology and thus the underlying morphological features of each sample can be taken into account during the analysis. So, only spectra which truly reflect the tissue components of interest can be selected for later analysis (20, 21).
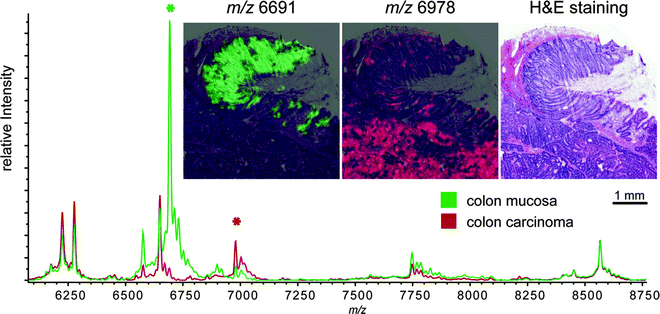
Fig. 2.
MALDI Imaging mass spectrometry of a colon cancer sample. The overall spectra (bottom) of mucosa (green) and carcinoma (red) show a multitude of differentially expressed m/z species. In this case 49 differentially expressed masses (p < 0.05) could be identified. The expression pattern of two differentially expressed masses (asterisk) is visualized (top). The two m/z species are superimposed onto the hematoxylin- and eosin-stained section (m/z 6,691: green, mucosa; m/z 6,978: red, carcinoma). The visualization allows a straightforward correlation of the expression pattern with the tissue morphology.
Here, we will present a protocol for MALDI Imaging of whole proteins on sections from native or alcohol-fixed and paraffin-embedded (22) tissues.
2 Materials
All solutions unless stated differently are of pro analysis grade.
2.1 Tissue Preparation
For tissue preparation, standard equipment of histological laboratories is needed. Staining dishes should be used to wash the slides. Additionally, a cryostat microtome for cutting frozen sections from native tissue samples and a standard microtome for alcohol-fixed and paraffin-embedded tissues are needed.
1.
MALDI Imaging slides (Bruker Daltonics, Bremen, Germany).
2.
Poly-lysine solution: 500 μL poly-lysine, 500 μL deionized water, 1 μL NP40.
3.
Water-based Tipp-Ex.
2.2 Matrix Application
1.
Sinapinic acid matrix: 10 g/L sinapinic acid (Sigma-Aldrich) in acetonitrile:water (3v:2v) with 0.2% trifluoroacetic acid (Applied Biosystems, Carlsbad, USA).
2.
ImagePrep spray device (Bruker Daltonics, Bremen, Germany).
2.3 MALDI Imaging Mass Spectrometry Measurement
1.
Table top scanner with a 35 mm film strip holder.
2.
Protein standard: dissolve Protein Calibration Standard I (Bruker Daltonics, Bremen, Germany) in 125 μL acetonitrile:water (1v:2v) with 0.1% trifluoroacetic acid. Make 10 μL aliquots and store at −20°C.
3.
Mass spectrometer suitable for and adjusted to MALDI Imaging (for instance the Autoflex or Ultraflex series by Bruker Daltonics, Bremen, Germany) and the FlexImaging software (Bruker Daltonics).
2.4 Tissue Staining
1.
Eosin solution: 1 g/L Eosin Y disodium salt in water.
2.
Mayer’s hematoxylin solution (Carl Roth, Karlsruhe, Germany).
3.
Formalin solution, 10%, neutral, buffered.
2.5 Data Analysis
1.
Light microscope scanner with an optical zoom factor of 20×.
2.
Analysis software: ClinProTools (Bruker Daltonics, Bremen, Germany) is essential, additional statistical software either openSource, such as R (R Foundation for Statistical Computing), or commercial ones, such as SAS/STAT (SAS, Cary, USA) and S-Plus (Tibco Software, Palo Alto, USA), are beneficial.
3 Methods
3.1 Tissue Preparation
1.
For better tissue adherence, coat the MALDI Imaging slide with poly-lysine. For this, put a droplet (20 μL) of poly-lysine solution on the MALDI Imaging slide close to one of its edges, streak it out with a Drigalski spatula, and dry the slide on a hot-plate (80°C) (see Note 1).
3.
Label a microscopy slide with the name or identification number of the tissue specimen (see Note 3).
3.1.1 Section Preparation from Native Tissues
1.
Set the cryostat microtome temperature to −16 to −25°C depending on the tissue type. Transfer the tissue sample from the liquid nitrogen storage to the cryostat microtome on dry-ice. Put the MALDI Imaging slide placed in a slide holder into the cryostat microtome. Fill a 50-mL tube with deionized water and store it on ice.
2.
Mount the tissue sample onto a precooled specimen disc. For this, place a specimen disc onto the quick-freeze shelf of the cryostat microtome, put a droplet of ice-cold deionized water with a Pasteur pipette on the specimen disc, wait a few seconds to let the water cool down further and then press the tissue onto the specimen disc holding it with a forceps (see Note 4).
3.
Cut sections at a thickness of 12 μm.
4.
Mount the tissue section onto the labeled microscopy slide.
5.
Mount the consecutive section onto a MALDI Imaging slide. For good tissue adherence pre-warm the slide at the site of tissue application before mounting the tissue. Do this by pressing your thumb to the backside of the slide. Dry the tissue section after mounting in the same way. Afterwards, keep the slide in the cryostat microtome (see Note 5).
6.
Remove the MALDI Imaging slide from the cryostat microtome and let the condensation water evaporate (see Note 6).
7.
Wash the MALDI Imaging slide in 70% and 100% ethanol for 1 min each.
8.
Remove the slide from the ethanol, wipe off the remaining liquid from the backside and the edges of the slide. Then, air-dry the slide in a vertical position.
9.
Apply teach marks to the MALDI Imaging slide using Tipp-Ex. The teach marks will be used for later co-registration of the tissue with its reflected light scan image before the measurement and for co-registration of the tissue with its virtual microscopy scan after measurement. Three teach marks are needed for co-registration. Ideally, the three teach marks would form a triangle covering the tissue section (see Fig. 3).
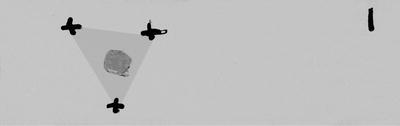
Fig. 3.
Tissue section for MALDI Imaging with teach marks for co-registration. Three teach marks are needed for co-registration. In order to reduce the offset to a minimum, the teach marks should be the corners of a triangle covering the tissue section as displayed here in grey.
10.
Scan the MALDI Imaging slide with a table top slide scanner at 2,400 dpi.
3.1.2 Section Preparation from Alcohol-Fixed and Paraffin-Embedded Tissues
1.
Store the alcohol-fixed and paraffin-embedded tissue for 30 min at 4°C. Fill the water-bath of the microtome with deionized water and set the temperature to 45°C. Mount the tissue onto the block holder of the microtome (see Note 1).
2.
Cut sections at a thickness of 3.5 μm and transfer them to the water-bath.
3.
Mount a tissue section on the labeled microscopy slide.
4.
Mount the consecutive section onto the MALDI Imaging slide.
5.
Dry the tissue sections for 1 h at room temperature.
6.
Incubate the tissue section twice for 10 min in xylene.
7.
 Histochemical Detection of Lipid Droplets in Cultured Cells
Environmental Scanning Electron Microscopy Gold Immunolabeling in Cell Biology
Histochemical Detection of Lipid Droplets in Cultured Cells
Environmental Scanning Electron Microscopy Gold Immunolabeling in Cell Biology
 Colocalization Analysis in Fluorescence Microscopy
 Atomic Force Microscopy Functional Imaging on Vascular Endothelial Cells
 A Novel Combined Imaging/Morphometrical Method for the Analysis of Human Sural Nerve Biopsies for Clinical Diagnosis
 Environmental Scanning Electron Microscopy in Cell Biology


Related posts:
Histochemical Detection of Lipid Droplets in Cultured Cells
Environmental Scanning Electron Microscopy Gold Immunolabeling in Cell Biology
Colocalization Analysis in Fluorescence Microscopy
Atomic Force Microscopy Functional Imaging on Vascular Endothelial Cells
Environmental Scanning Electron Microscopy in Cell Biology
Stay updated, free articles. Join our Telegram channel
Full access? Get Clinical Tree
