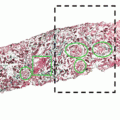
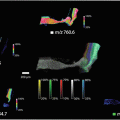
Fig. 1
Deposition of discrete matrix spots onto a fingermark sample and subsequent MALDI MS profiling showing how chemical differences can be observed between the selected areas
3.3.2 Spraying
Suncollect Autosprayer
The “Suncollect” autosprayer (Sunchrom GmbH, Friedrichsdorf, Germany) employs a motorised nozzle linked to an inert gas line (such as N2), producing a jet of matrix which is directed toward the sample. The flow rate of the matrix is dictated by a syringe driver, allowing for the reproducible deposition of matrices onto samples for MALDI MS Imaging applications. It has been used extensively for the preparation of fingermarks for MALDI MS analyses [18, 52, 54–58, 62–65].
- 1.
Fill the syringe with solvent and flush the capillaries for at least 30 min at a flow rate of 2 μL/min.
- 2.
Prepare the desired matrix solution.
- 3.
Remove solvent from the syringe and fill with the matrix solution. Flush the capillaries for a further 15 min at a flow rate of 2 μL/min (see Note 9 ).
- 4.
Set the coordinates of the sample (perimeter and height) using the instrumentation guidelines.
- 5.
Turn on the gas flow and spray the sample (e.g., a total of five layers at a flow rate of 2 μL/min) using the “slow” raster setting.
- 6.
Remove matrix from the syringe and fill with solvent. Flush the capillaries for at least 30 min at a flow rate of 2 μL/min (see Note 10 ).
HTX TM Sprayer
The HTX sprayer (HTX technologies, North Carolina, USA) employs a patented spray nozzle design that enables the deposition of the MALDI matrix at elevated temperatures (up to 140 °C). When combined with a high pressure system (often controlled by a HPLC pump) and optimized gas flow, rapid matrix deposition can be achieved with small crystal size facilitating high-resolution imaging. A novel 1 layer methodology was developed for the deposition of matrix onto fingermark samples, allowing for the spraying of a sample in under 1 min [66]. A more extensive outline of this methodology is as follows:
- 1.
Prepare 400 mL of solvent in a 1 L wash bottle (this should be a similar composition of that used to dissolve the MALDI matrix (i.e., 70:30 ACN:Water)).
- 2.
The wash bottle should be connected to the flow of the HPLC pump to allow continual purging of the sprayer.
- 3.
Prepare 50 mL of the same solvent in a falcon tube (this will be used to flush the system prior to use).
- 4.
Ensure that the system is set to the “load” position and flush with the prepared solvent (3 × 5 mL).
- 5.
Change to the “spray” position and flush with the prepared solvent (3 × 5 mL).
- 6.
Using the manufacturer’s guidelines, create a method for the fingermark sample. An optimized methodology has been provided (Table 1).
Table 1
Optimized 1 min methodology for the deposition of matrix onto latent fingermarks using the HTX TM Sprayer [66]
N2 pressure
Nozzle Temperature (°C)
Number of layers
Flow rate (mL/min)
Velocity (mm/min)
Track spacing (mm)
5
75
1
0.06
1300
1.5
- 7.
Prepare the desired matrix solution.
- 8.
Allow the nozzle to reach the specified temperature (e.g., 75 °C).
- 9.
Load the MALDI matrix into the loop while in the “load” position (1 × 5 mL). Excess matrix will be redirected to waste.
- 10.
Turn to the “spray” position and wait for matrix to be sprayed from the nozzle; this can be determined by holding a clean glass slide under the nozzle and waiting for matrix to be deposited.
- 11.
Spray the sample.
- 12.
Once spraying has completed, ensure that the system has been completely flushed with solvent by following steps 4 and 5.
Gravity Feed Airgun (Manual Sprayer)
The use of a gravity feed airgun is often necessary when depositing large amounts of matrix (volumes in excess of 5 mL), or when the chosen solvent/matrix is not compatible with an autosprayer system. Previously, manual spraying has been employed for the deposition of dithranol onto latent fingermark samples contaminated with condom lubricants [18, 53]. A more extensive outline for this methodology is provided below.
- 1.
Clean the outside of the airgun thoroughly using approximately 5 mL ACN and absorbent tissue.
- 2.
Load ACN into the airgun cup and flush thoroughly using at least 10 mL of solvent.
- 3.
Line a mounting block (any surface that measures approximately 40 × 20 × 5 cm) with absorbent paper.
- 4.
Secure the sample to the block with masking tape and stand it upright so that that the sample lies parallel to the sprayer nozzle.
- 5.
Prepare 40 mL of the desired matrix solution.
- 6.
Add the matrix solution to the airgun cup and seal the lid securely to avoid spillages.
- 7.
At a distance of approximately 12 in from the sample, spray the matrix solution for 5 s, moving evenly across all areas of the sample during the time (see Note 11 ).
- 8.
After 5 s, stop spraying and allow the sample to dry for approximately 20 s (this time may vary depending on the composition of the fingermark, the matrix solution employed, the pressure of the airflow, and the distance from the sample).
- 9.
Continue this process until all 40 mL of the matrix solution has been deposited, or until the fingermark has been sufficiently coated with the MALDI matrix. This will require optimisation depending on the matrix, solvent and type of fingermarks being employed.
Fingermark Dusting (Dry-Wet Method)
The Dry-Wet method was first developed in 2011 [62] following a necessity to make the workflows more forensically applicable. In this process, the MALDI matrix (α-CHCA) is mechanically ground and sieved to produce crystals <10 μm in size. In the same manner in which latent fingermarks are developed using enhancement powders at crime scenes, the ground α-CHCA powder is dusted onto the fingermark samples (see Note 12 ) in order to provide visual development on non-porous and semi-porous surfaces. These developed marks can then be lifted using forensic lifting tape before being sprayed with solvent (to induce cocrystallization on the lifting tape) and analyzed by MALDI MS imaging.
- 1.
Grind at least 1 g of α-CHCA using a mechanical ball mill or pestle and mortar.
- 2.
Sieve the matrix using a 38 μm sieve.
- 3.
Put a small amount of the dry matrix powder (approximately 100 mg) into the lid of a petri dish.
- 4.
Collect the matrix onto the end of a zephyr fingerprint development brush, rotating the brush between the fingertips to ensure even distribution of the powder.
- 5.
Using the same motion, rotate the brush between the fingertips while making light pressure with the substrate containing the latent fingermark.
- 6.
After the powder has adhered to the fingermark ridges, remove excess powder using a Klenair air sprayer at a distance of approximately 30 cm from the fingermark.
- 7.
Place forensic lifting tape directly onto the fingermark and apply a light pressure in order to adhere the matrix particles to the tape.
- 8.
Peel the tape away from the substrate and transfer directly onto double-sided carbon attached to a MALDI target plate, ensuring that the adhesive side of the tape is facing upward.
- 9.
Spray the fingermark using the Suncollect autosprayer, replacing the matrix solution with a solvent solution of 70:30 ACN:0.5% TFA (see Note 13 ).
- 10.
The fingermark should be sprayed with a total of five layers at a flow rate of 5 μL/min using the “fast” raster setting.
4 Notes
- 1.
The choice of matrix and solvent is heavily dependent upon the analytes of interest. The examples provided in this chapter should only be used as a general guide and further optimization may be necessary for different applications.
- 2.
Aluminum sheets are recommended for fingermark deposition due to the ease of preparation, conductivity, ability to manipulate the material, flatness of the surface, and lack of porosity. However, this substrate is only provided as an example and alternatives can be employed depending on the application/outcomes required.
- 3.
While preparing the fingermarks, the room temperature will greatly influence the extent of excretion from the fingertips; therefore, keep this consistent throughout all experiments.
- 4.
Electronic scales can be used when depositing fingermarks to allow for consistent pressure to be achieved. A light/medium pressure should be used, corresponding to approximately 40–50 g (0.39–1.49 N). Excessive pressure will cause merging of the fingermark ridges and will affect the quality of the MALDI MS images generated.
- 5.
When preparing groomed marks, refrain from using any cosmetics (such as hair products and moisturisers) on the day of deposition. These are likely to be transferred to the fingertips during the grooming procedure and could potentially be observed among the chemical species following MALDI MS analyses .
- 6.
When employing the glass slide-transfer methodology for contaminated fingermarks, an appropriate solvent (such as MeOH) should be used to ensure rapid evaporation.
- 7.
It is imperative to ensure that any exogenous substances used to contaminate fingermarks are safe to come into contact with the skin —if not then an artificial fingermark/press should be employed [65].
- 8.
When using any matrix sprayers, ensure that the solvents employed are compatible by consulting the manufacturer’s guidelines.
- 9.
When flushing the matrix through the capillaries of the Suncollect autosprayer prior to spraying the sample, ensure that for the last 15 min, the flow rate is set the same as the rate that will be sprayed onto the fingermark. If the flow rate is set too high, back pressure may build up which can cause excessive matrix to be deposited onto the sample for the initial stages of the spraying sequence.
- 10.
If multiple matrices are being deposited with the same sprayer, it may be necessary to flush the components for longer periods of time to avoid cross-contamination.
- 11.
When employing the manual sprayer, it is necessary for the matrix to dry almost instantaneously after it is deposited onto the surface, thus reducing lateral diffusion of the fingermark ridges. However, the sample must also be wet enough to allow for extraction of analytes. Therefore, method optimization is necessary before preparing any samples.
Stay updated, free articles. Join our Telegram channel

Full access? Get Clinical Tree


