Fig. 1.
Scheme for the reaction of APTES with mica. APTES reacts with hydroxyl groups on the mica surface formed spontaneously after the mica is cleaved.
An analogous surface chemistry utilizes a more hydrolytically stable silatrane reagent 1-(3-aminopropyl) silatrane (APS) instead of silanes. Slow hydrolysis of the silatrane moiety allows one to avoid clumping and enable a smooth modification of the surface with amino groups achieving the results similar to vapor treatment. The schemes for the synthesis of APS and its reaction with the mica surface are shown in Fig. 2. The reaction with the surface (Fig. 2b) is apparently proceeding through several steps (phase 1–3) with eventual loss of triethanolamine molecule and covalent attachment of 3-aminopropyl siloxane group to mica. Both methods are robust and work reproducibly in various topographic studies involving DNA (19–32). The APS-mica methodology works reliably for force spectroscopy AFM applications (33–37). Sections below provide all specifics related to the preparation of both surfaces for AFM imaging.
Fig. 2.
APS-mica preparation. (a) Scheme for synthesis of 1-(3-aminopropyl)silatrane (APS, III) using APTES (I) and triethanolamine (II). APS: Molecular weight 232.36; molecular formula C9H20N2O3Si. (b) Scheme for reaction of APS (III) with mica surface. Similarly to APTES, APS reacts with hydroxyl groups on mica surface formed spontaneously after the cleavage. Three different stages of the reaction with the formation of adducts IV and V are shown. Note the last stage, exposure of APS-functionalized mica to water; it leads to dissociation of triethanolamine yielding product VI.
2 Materials
2.1 General Equipment and Supplies
1.
A vacuum cabinet or desiccator for storing samples. A Gravity Convention Utility Oven (VWR) is recommended.
2.
Plastic tubes, 15 mL.
3.
Eppendorf tubes, 1.5 mL.
4.
Plastic cuvettes.
5.
Scissors.
6.
Razor blade.
7.
2-L glass desiccators and vacuum line (50 mmHg is sufficient).
8.
Pipettes with plastic tips for rinsing the samples.
9.
Tweezers.
10.
Gas tank with clean argon gas. Nitrogen gas can be used as well.
11.
Vacuum distillation apparatus for distilling APTES.
12.
Mica substrate. Any type of commercially available mica sheets (green or ruby mica) can be used. Asheville-Schoonmaker Mica Co (Newport News, VA) supplies thick and large (more than 5 × 7 cm) sheets (Grade 1) suitable for making the substrates of different thickness and sizes.
13.
Deionized water filtered through 0.2-μm filter for mica functionalization and AFM sample preparation.
2.2 Reagents and Solutions
1.
TE buffer solution: (20 mM Tris–HCl, pH 7.6, 1 mM EDTA) with 200 mM NaCl.
2.2.1 AP-Mica Preparation
1.
3-Aminopropyltriethoxy silane for re-distillation to ensure a reliable and reproducible AP-mica preparation.
2.
N,N-diisopropylethylamine (DIPEA) for AP-mica preparation.
2.2.2 APS-Mica Preparation
1.
3-Aminopropyltriethoxy silane (APTES, TCI, USA) for APS-mica preparation.
2.
Sodium hydroxide and triethanolamine for APS synthesis.
3.
Methanol and toluene solvents for APS synthesis.
3 Methods
3.1 Synthesis of APS
The procedure described below is a modified version of our previously published method (38). We tested and verified that sodium hydroxide can be used as a catalyst instead of the previously recommended sodium metal. We also found that reproducibility and chance of crystallization after reaction completion substantially improve when precise stoichiometric amounts of triethanolamine and (3-aminopropyl) triethoxysilane are used. For this purpose, we recommend using a precision balance rather than graduated cylinders for measuring the volumes of these liquid reagents. The reaction is essentially quantitative and can be described by the scheme in Fig. 2a (see Notes 1 and 2).
1.
Prepare the solution of sodium hydroxide in methanol (2 mg/mL) by adding sodium hydroxide granules to the calculated amount of methanol and stirring for a prolonged period of time until all sodium hydroxide is completely dissolved. Sonication or moderate heat can accelerate the process (Caution: sodium hydroxide solid and solutions can cause burns to the eyes and skin! Do not heat in a closed vial!).
2.
Add triethanolamine (14.92 g, 0.1 M) to a 250 mL round-bottom flask followed by 2 mL of sodium hydroxide solution in methanol (2 mg/mL). A precise equivalent amount of (3-aminopropyl) triethoxysilane (22.14 g, 0.1 M) is measured in a separate flask and added to the reaction mixture. Complete transfer of the reagent is assured by washing the flask with two portions of methanol (2 × 10 mL), and adding the methanol washes to the reaction mixture.
3.
Place the reaction flask on a rotary evaporator (see Note 1); methanol is evaporated at 40°C under a moderate vacuum (100 Torr). This part of the process takes approximately 10 min.
4.
Lower the vacuum gradually to 1 Torr; raise the temperature of the water bath to 60°C. Make sure that the flask is rotated constantly and the vacuum is applied slowly to avoid bumping. Ethanol that forms in the reaction is evaporated off. At the end of the reaction, the product solidifies to a crystalline mass (see Note 2). The crystallization starts spontaneously after approximately 30 min. The product forms quantitatively; the yield is 23.22 g of colorless solid material. The melting point is 86–90°C. We have shown that this product is suitable for the preparation of APS-mica. Traces of sodium hydroxide in the product do not affect the performance or pH of solutions for AFM. Transfer of the crude solid product from the reaction flask into a storage container may be difficult due to its hardness.
5.
Save a small portion of the solid product (10–20 mg) for seeding crystallization. The rest of the solid product dissolved in hot methanol (15 mL) and diluted with toluene (150 mL). The mixture is partially evaporated to approximately 1/2 of the volume. If the product does not crystallize during evaporation, the solution is seeded with a small portion of the saved crude solid product, stirred and crystallized. Crystallization can be accelerated by sonication or stirring and spreading the seed crystals with a spatula.
6.
Cool the mixture by placing the flask on ice. Crystals of the product form a slurry.
7.
The solid material is collected by filtration using a medium porosity sintered-glass filter and vacuum suction, washed with two 20-mL portions of ice-cold toluene, and dried under vacuum. Avoid prolonged suction of air through the solid product after the filtration and wash steps. The solid product can absorb moisture from the air and melt.
8.
The final product (11.3 g) is a colorless powder. APS prepared and purified by this method has a melting point (m.p.) of 91–94°C (open capillary tube); literature m.p. 87.2−87.9°C (sealed capillary tube) (US Patent 3,118,921). 1H NMR (DMSO-d6), ppm: 0.08–0.14 (2H, m, SiCH2); 1.1 (2H, br. s, NH2); 1.28–1.37 (2H, m, CH2); 2.37 (2H, tJ = 7.2 Hz, NCH2); 2.77 (6H, tJ = 5.9 Hz, NCH2); 3.59 (6H, t J = 5.9 Hz, OCH2).
9.
The APS reagent should be stored refrigerated over a desiccant. The reagent demonstrated good performance in AFM after 3 years of storage under such conditions.
3.2 Mica Functionalization with APS
1.
Prepare a 50 mM APS stock solution in deionized water and store it in refrigerator. The stock solution can be kept for more than a year at 4°C (see Note 3).
2.
Dissolve the APS from the stock in a 1:300 ratio in water (e.g., 45 μL of the stock to 15 mL deionized H2O) to make the working APS solution for mica modification; it can be stored at room temperature for several days.
3.
Cut both sides of the mica sheets to make strips of the needed size (typically 1.2 cm × 3 cm) and cleave the strips with a razor blade, or tape to make them as thin as 0.05–0.1 mm. Do not touch the cleaved mica surface (see Note 4).
4.
Place the mica strips in appropriate plastic tubes.
5.
Pour the working APS solution to cover the mica strip completely.
6.
Leave the tubes/cuvettes on the bench for 30 min.
7.
After 30 min discard the APS solution.
8.
Rinse both sides of the mica with deionized water.
9.
Completely dry both sides of the mica strips under argon flow. Put the dry mica strip into the clean dry cuvette for storage (see Note 5). The strips are now ready for the sample preparation. Additional storage in a vacuum for 1–2 h is recommended when the environment is humid.
3.3 Mica Functionalization with AP (Evaporation Method)
3.3.1 Vacuum Distillation of APTES
1.
Assemble the distillation apparatus (see Fig. 3).
Fig. 3.
The scheme for the vacuum distillation apparatus of APTES. The distillation flask is immersed into the heated oil bath. A regular faucet aspirator (Nalgene) creates a necessary vacuum for the distillation process.
2.
Fill the distillation flask by no more than 2/3 of the volume with APTES.
3.
Carefully insert the capillary tube into the distillation flask to prevent bumping during the distillation process. Put a piece of flexible tubing onto the inlet portion of the capillary. Insert a piece of thin wire inside the tubing and squeeze the tubing and the wire part with a clamp (see Fig. 3, left). This technique enables a fine control of the gas flow into the capillary tube and at the same time prevents complete closing of the inlet.
4.
Connect the inlet to the argon or nitrogen line.
5.
Slowly apply the vacuum and increase the temperature in the oil bath. Monitor the distillation process. Discard the first 10% of the distillate. Distillation will be complete when approximately 10% of the initial amount of APTES remains in the distillation flask. Boiling temperature depends on the vacuum. Typically, the reagent distills at 103°C/20 mmHg. Refer to the boiling point calculators or Pressure–Temperature Nomograph when using other vacuums. The reference boiling point at atmospheric pressure is 217°C/760 mmHg.
6.
Dispense the reagent into 1–2 mL screw cap vials, avoiding prolonged exposure to atmospheric moisture. The reagent showed good performance in AFM applications over 6 months when stored in frozen at −20°C.
3.3.2 Preparation of AP-Mica
1.
Place two plastic caps (cut them from regular 1.5 mL plastic Eppendorf tubes) on the bottom of a 2 L desiccator.
2.
Place the desiccator under vacuum, and fill it with argon.
3.
As described in step 3 from Subheading 3.2, cut the mica sheets to the required size with scissors; you can use the sheets as large as 5 cm × 5 cm, cleaving the large thick sheets with a razor blade. A thickness of ∼0.1 mm is recommended.
4.
Place 30 μL of APTES into one plastic cap in the desiccator and 10 μL of DIPEA into the other cap.
5.
Mount the sheets at the top of the desiccator. Clip each mica sheet at the edge with a metal binder paper clip, use a glass or plastic rod to hold the clips and mount the rod at the top of the desiccator. The design in Fig. 4 accommodates five mica sheets that can be modified simultaneously.
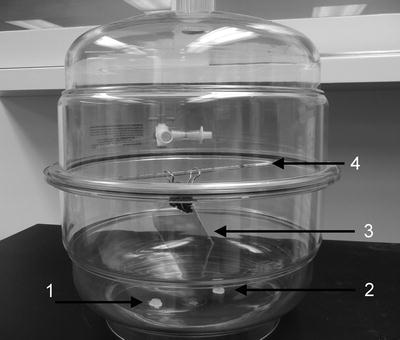
Fig. 4.
Photo of the setup used for the preparation of AP-mica. The mica sheet (3), clipped with the paper clip, is mounted at the top on a plastic rod (4); the two plastic caps with APTES (1) and DIPEA (2) reagents are placed at the bottom of the desiccator.
6.
Close the lid and allow the functionalization reaction to proceed for 2 h at room temperature.
7.
Open the lid, remove the caps with reagents, and purge the desiccator with argon gas for 2 min.
8.
Leave the mica sheets for 1–2 days in the desiccator to cure. The AP-mica is then ready for the sample deposition (see Notes 6 and 7).
3.4 Sample Preparations for AFM Imaging
The sections below describe the procedures for the preparation of samples of DNA or protein-DNA complexes for AFM imaging. The procedures for AP-mica and APS-mica are similar; therefore, the type of functionalized mica is not specified unless it is required.
3.4.1 Sample Preparation for Imaging in Air
Droplet Procedure
1.
Prepare the solution of the sample (DNA, RNA, protein-DNA complex) in an appropriate buffer. The DNA concentration should be between 0.8 and 0.01 μg/mL, depending on the size of the molecules. The concentration 0.2 μg/mL is recommended for PUC plasmid DNA and higher concentrations (0.8 μg/mL) are recommended for smaller, 1 Kb DNA fragments. Concentrations as low as 0.01 μg/mL were used for imaging of lambda DNA (∼50 Kb) (14).
2.
Cut the AP- or APS-mica substrates to a desired size (1 × 1 cm squares for the MultiMode (MM) AFM instrument) and place 5–10 μL of the solution in the middle of the substrate for 2 min.
3.
Rinse the sample thoroughly with deionized water (2–3 mL per sample) to remove all buffer components. A 10 mL plastic syringe is useful for rinsing. Attach an appropriate plastic tip instead of a metal needle.
4.
Dry the sample with clean argon gas. Additional drying of samples for an hour or two prior to imaging is recommended to ensure low tip adhesion. The samples can be stored in vacuum cabinets or desiccators filled with argon. The samples, as prepared, can be imaged many times provided that after imaging they are stored as described. Their shelf life is more than a month.
The Immersion Procedure
This procedure is recommended if the deposition should be performed at strictly controlled temperature conditions (0°C or elevated temperatures).
1.
Prepare the solution (DNA, RNA, nucleoprotein complexes) in an appropriate tube and pre-incubate for 10–20 min to allow the temperature to equilibrate. The recommended concentration of DNA is between 0.8 and 0.01 μg/mL, depending on the DNA size (see Subheading 3.4.1.1 above) (see Notes 9 and 10).
2.
 Histochemical Detection of Lipid Droplets in Cultured Cells
Environmental Scanning Electron Microscopy Gold Immunolabeling in Cell Biology
Histochemical Detection of Lipid Droplets in Cultured Cells
Environmental Scanning Electron Microscopy Gold Immunolabeling in Cell Biology
 Colocalization Analysis in Fluorescence Microscopy
 Atomic Force Microscopy Functional Imaging on Vascular Endothelial Cells
 A Novel Combined Imaging/Morphometrical Method for the Analysis of Human Sural Nerve Biopsies for Clinical Diagnosis
 Environmental Scanning Electron Microscopy in Cell Biology


Related posts:
Histochemical Detection of Lipid Droplets in Cultured Cells
Environmental Scanning Electron Microscopy Gold Immunolabeling in Cell Biology
Colocalization Analysis in Fluorescence Microscopy
Atomic Force Microscopy Functional Imaging on Vascular Endothelial Cells
Environmental Scanning Electron Microscopy in Cell Biology
Stay updated, free articles. Join our Telegram channel
Full access? Get Clinical Tree
