Fig. 1
Workflow for multiplex MALDI-MS imaging of plant metabolites. Procedures discussed in this work are labeled with the corresponding section number
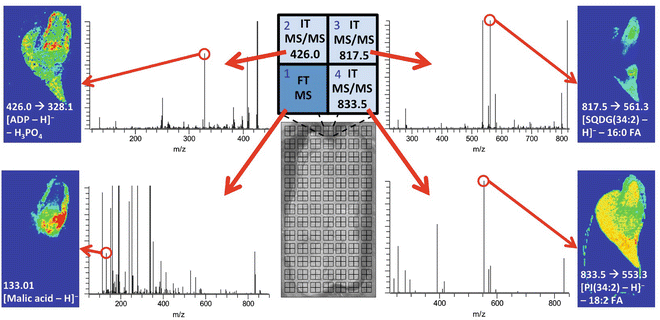
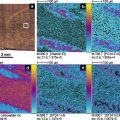
Fig. 2
Illustration of the protocol applied to a germinating corn seed. A corn seed was germinated in water for 3 days in a greenhouse, cryosectioned (Subheading 3.1), freeze-dried (Subheading 3.3), and sublimated with 9-aminoacridine matrix (Subheading 3.4), before a four-step multiplex MS imaging experiment was performed (raster design A in Fig. 3). ADP, SQDG, and PI represent adenosine diphosphate, sulfoquinovosyl diacylglycerol, and phosphatidylinositol, respectively. Peaks used to generate images are circled
2 Materials
2.1 Tissue Cryosectioning
1.
Cryomicrotome: A cryomicrotome consists of a microtome inside a cryostat, allowing for the cutting of thin sections of frozen tissue. Precool the cryostat to the appropriate temperature, e.g., −20 °C, and keep microscope slides and adhesive tape sections inside the cryostat.
2.
High-purity water: Nanopure or LC-MS-grade water is recommended to minimize any mass spectrometry contamination.
3.
Warm gelatin solution: Prepare a 10 % w/v solution (e.g., 1 g in 10 mL) of 300 bloom gelatin in water by heating the water to ~75 °C, then adding the gelatin, and stirring manually until dissolved.
4.
Cryomold: This should be large enough to contain tissue sample and gelatin-embedding medium.
5.
Liquid nitrogen in a dewar: Pour into a Styrofoam box just before flash-freezing tissue or cryomold.
6.
70 % ethanol solution, prepared from LC-MS-grade ethanol and water.
8.
Optimal cutting temperature (OCT) compound.
9.
Glass microscope slides: These slides are to carry and store tissue sections.
10.
Styrofoam cooler with dry ice.
2.2 Direct Attachment of Intact Tissues
1.
Double-sided tape.
2.
Sample-handling tools (e.g., forceps).
3.
Tank of compressed nitrogen.
2.3 Sample Drying
1.
Roll of adhesive tape (e.g., electrical tape): To attach the tissue sections to a heat sink.
2.
Vacuum chamber or lyophilizer with vacuum system capable of mtorr pressures.
3.
Heat sink (e.g., metal block; see Note 2 ): Precool the heat sink in a −80 °C freezer for several hours.
2.4 Matrix Application by Sublimation
1.
2.
Glass microscope slide (optional): To attach the tissue slice to a smaller size sublimation device. Cut into half with glass scorer. Mounting Cryo-Jane tape windows with tissue sections to a glass slide makes handling and removing the sample easier.
3.
Heating assembly: Temperature-controllable heating mantle and controller. The mantle should be preheated to the intended temperature.
4.
Roll of adhesive tape.
5.
Crushed dry ice.
6.
Acetone (any grade).
2.5 Matrix Application by Oscillating Capillary Nebulizer
2.
500 μL syringe: Rinse the syringe with the same solvent used for matrix.
3.
Syringe pump.
4.
Oscillating capillary nebulizer (OCN): A handheld airbrush or other commercial nebulizer can also be used if the matrix homogeneity is not a concern. We use an OCN to ensure homogeneous matrix application (≤ ~10 μm). One can make such a device by simple modification of a commercial airbrush (Aztek A470; Testor, Rockford, IL) (Fig. 2 and see Note 6 ). Rinse the capillary with the same solvent used for matrix.
5.
Tank of compressed nitrogen.
3 Methods
3.1 Tissue Sectioning
This section is intended for imaging of internal metabolites with minimal analyte loss or redistribution.
1.
Harvest the tissue from the plant, and flash-freeze it as quickly as possible by submerging it into liquid nitrogen. Keep the frozen tissue in a cooler with dry ice while transporting it to the cryostat.
2.
Place the frozen tissue into the precooled cryostat for approximately 30 min to allow it to warm to the temperature of the cryostat.
3.
Place the frozen tissue into the mold, making sure to orient the tissue so as to section in the desired plane. Pour the warm gelatin solution around the tissue to fill the mold.
4.
Float the mold on liquid nitrogen until the gelatin is almost completely frozen to the center (~10–20 s), and then transfer the mold into the cryostat (see Note 7 ). Once the gelatin is completely frozen (see Note 8 ), let it stay in the cryostat for an additional 30 min to ensure that the tissue block has equilibrated to the temperature of the cryostat.
5.
Remove the tissue block from the mold by cutting the sides of the mold with a razor blade and carefully peeling away the plastic of the cryomold.
6.
Place a small amount (<0.5 mL) of OCT compound on the cryotome sample stage and immediately press the tissue block onto it. Allow the OCT to set and fix the tissue block to the stage (see Note 9 ).
7.
Before installing the cryomicrotome blade, rinse it several times with 70 % ethanol to remove any oil or other contaminants that may be transferred to the tissue during sectioning.
8.
Run off several sections to provide a flat sample surface and reach the desired portion of the embedded tissue. Set the tissue thickness to the desired value (e.g., 10–20 μm).
9.
Remove the protective strip from the Cryo-Jane tape and stick the tape window to the tissue surface (see Note 10 ). Using a roller or similar tool, carefully press the tape against the tissue section for uniform adhesion.
10.
Slice the section using the cryomicrotome.
11.
Keeping it deep inside the cryostat, collect the tape with attached section and inspect it for any potential damage during cutting. If the sample is damaged, discard it and repeat steps 9 and 10.
12.
Place the tape window with section attached face up on a chilled glass slide, and attach it by taping both ends to the slide. Ensure that the tape window is flat against the slide (see Note 11 ). Avoid prolonged contact with either the tape or slide to prevent thawing of the sample.
13.
Remove the slide, with the tape and section attached, from the cryostat and quickly transfer them into a covered cooler full of dry ice (see Note 12 ).
14.
Repeat steps 9–13 until the desired number of sections has been collected.
15.
Optionally, some sections may be taken using traditional thaw-mounting for imaging with optical microscopy, with possible fixation and/or staining.
16.
Store tissue sections at −80 °C until analysis.
3.2 Direct Attachment to Sample Plate
This section is intended for imaging of surface metabolites.
1.
Place a strip or several strips of double-sided tape on the MALDI sample plate. Immediately before harvesting samples, remove the tape backing.
2.
Harvest the plant tissue and lay it on the double-sided tape with the surface to be imaged facing upward. Take care not to damage the tissue sample during handling.
3.
Using a gentle stream of nitrogen, flatten any parts of the tissue that are not firmly attached to the double-sided tape.
3.3 Sample Drying
This procedure covers warming of cryosections and drying of tissue samples to quench metabolite turnover with minimal metabolite redistribution before the subsequent matrix application and MS imaging procedures.
1.
Place the glass slides with the Cryo-Jane tape and tissue sections onto the cooled heat sink and immediately place into a vacuum chamber. For directly attached samples, the heat sink is not necessary and samples can simply be dried under vacuum at room temperature.
2.
Evacuate the chamber. Monitor the samples to ensure that no condensation occurs on the sample surface during the thaw-vacuum dry process (see Note 13 ).
3.


After samples are dried and the heat sink is warmed sufficiently that water will not condense onto the sample when exposed to atmosphere (see Note 2 ), release the vacuum and remove the samples.
Stay updated, free articles. Join our Telegram channel

Full access? Get Clinical Tree


