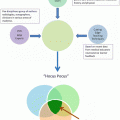
Fig. 9.1
Approach to ultrasound examination of a young child. The examiner is positioned sitting on the stretcher on the same side as the ultrasound machine, so that the probe wire and examiner do not have to cross over the child’s body. The parent is positioned next to child on the opposite side of the machine, so she is visible at all times and able to provide comfort and distraction by engaging the child in a book activity
Selecting a Probe
There is no “ideal” probe to be selected during the examination of a pediatric patient. The choice of probe will be dictated by the patient’s age, body habitus, and most importantly—the actual indication for your ultrasound scan. Low frequency probes are typically designed with curvilinear footprints which provide more tissue penetration while sacrificing some detail and overall resolution. Higher frequency probes are generally designed with linear footprints which offer tremendous resolution of superficial structures but a limited capacity for depth and tissue penetration. Phased-array probes, which can range in frequency from 8 to 1 MHz are usually employed for cardiac imaging, although curvilinear probes may be used as well. In certain situations, children that are obese may require scanning with curvilinear probes in order to visualize their relatively superficial structures of interest. Smaller footprint probes are available. These allow clinicians to work with smaller body parts. During ultrasound scans, most clinicians hold the probe in their dominant hand while making adjustments to the machine with their non-dominant hand. Holding the probe at the very end with the ulnar side of one’s hand in direct contact with the patient’s skin will allow for greater stability and maneuverability of the probe.
Scanning
Ultrasound is considered to be an operator dependent diagnostic test. This means that unlike a typical radiograph, where images are obtained and interpreted based on standard views (e.g., chest PA and lateral), the acquisition of good ultrasound images is dependent on the skill and technique of the sonographer (the individual performing the ultrasound). For pediatrics, performance characteristics of ultrasound scans do not necessarily mimic those expected of adult patients. A classic example is the differential sensitivity when performing a focused abdominal assessment in trauma (FAST) exam. The diagnostic accuracy for “ruling out” hemoperitoneum after blunt abdominal trauma is less reliable in children (60–70 %) when compared to adults (90–95 %) [3, 4]. Another example is the evaluation of appendicitis. Ultrasound visualization rates of the appendix in the pediatric population have been shown to exhibit wide ranges of detection and accuracy [5, 6]. Inaccurate examinations are possible when the sonographer is inexperienced, the child has an obese body habitus, or there is a low clinical pretest probability for appendicitis before the ultrasound is performed [7]. For these reasons, ultrasound results should be interpreted in conjunction with clinical findings to properly assess for appendicitis risk in the pediatric population.
The procedure for performing ultrasound scans in children should be similar to steps taken during other ultrasound examinations.
1.
Obtain verbal agreement from the child and parent that the ultrasound will be performed.
2.
Review the reasoning behind your ultrasound scan. It is always a good idea to describe what you will be looking for during the study. This often will take on the form of a “yes or no” question. For example, if you are interested in diagnosing the presence or absence of a drainable soft tissue fluid collection, it is reasonable to lay out what the next steps will be if a collection is found. You should discuss any potential limitations before the scan is performed and always interpret the ultrasound findings in context to the clinical exam.
3.
Proper name and ID information should be inputted on the machine.
4.
Familiarize yourself with the ultrasound machine that will be used. This is a vital step because the knobs, functions, and displays on ultrasound machines do vary by manufacturer. Basic equipment knowledge will help save time during your scan and lead to a smoother interaction between you, the patient, and their family.
5.
Select the desired probe and liberally apply ultrasound gel . The gel may be cold depending on storage conditions and the room temperature. Review this with any child and allow them to touch the gel so they may feel its texture.
6.
When the probe and overlying gel come in contact with skin, please mind your orientation. The convention is for the “notch” or indicator to point towards the patient’s head when long-axis or longitudinal scans are performed and towards the patient’s right side when short-axis or transverse scans are performed.
7.
The scanning depth may need to be adjusted during the ultrasound. You want to focus your structure of interest so that it is clearly visible in the center of the monitor. Peripheral structures and thin children generally require low depth settings while deeper structures and obese children will require greater depth adjustments.
8.
The gain function may need to be adjusted during the ultrasound. This essential function can be considered to serve as a volume amplifier. If the images on the screen appear too dark (hypoechoic), then you should increase the gain. Conversely, if the images on the screen appear too bright (hyperechoic), the gain should be decreased. Some machines allow you to increase the gain in either the top half or bottom half of the screen, and others offer an optimize button which automatically sets a gain level for you.
9.
The Doppler function may need to be used during the ultrasound. Color Doppler provides information related to the intensity and direction of movement of any given structure. Red color indicates flow towards your probe and blue color indicates flow away from the probe. This is useful when visualizing and differentiating vascular structures. Power Doppler provides non-directional motion information with a greater sensitivity over areas that have lower flow rates.
10.
A complete scan of your structure or area of interest is achieved by rocking back and forth, or “fanning” the probe while it remains in contact with the same area of the skin in one location . This will allow you to fully evaluate that particular area and find the “best” angle for image storage. This should be repeated after repositioning the probe by 90° so that you have fanned images in one location using both the long-axis view and a short-axis view.
11.
Ensure to record a short video clip (preferable) or still image of your examination. These are typically stored in a HIPAA protected database which allow for subsequent review and enhance quality assurance.
Normal Anatomy of Pediatrics
The other chapters have reviewed normal ultrasound findings as they relate to different body systems in adults. In general, the same principles described in these chapters will also apply for most pediatric scans. In this section, we review some important ultrasound indications that are specific to a pediatric population.
1.
Hydrocephalus .
(a)
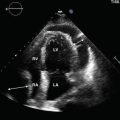
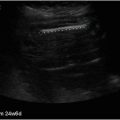
Cranial ultrasound is an excellent and noninvasive tool for brain imaging during the neonatal period and is the study of choice for the initial assessment of neonatal hydrocephalus [8, 9]. Hydrocephalus is the accumulation of fluid within the ventricular system of the brain. The unique presence of open fontanels easily allows one to evaluate for the presence of hydrocephalus using cranial ultrasound. Selection of a probe that fits over the anterior fontanel is recommended. A phased-array probe is commonly selected given its relatively small footprint size. The examination should consist of coronal and sagittal views. For coronal views, the probe is placed directly over the open fontanel with the indicator pointing to the infant’s right. For sagittal views, the probe is rotated so that the indicator now points to the front of the infant’s forehead. The probe should be slowly fanned back and forth in each of these orientations to assess for ventricular enlargement over different sections of the brain. The depth setting is adjusted so that the base of the skull can be seen on the bottom portion of the monitor, a distance of 7–9 cm is a typical starting point. Special precautions should be exercised for this patient population. Given the immature immune systems of neonatal patients, careful attention should be paid to proper hand washing and probe cleansing before and after the ultrasound examination. Given the susceptibility to rapid heat loss, patients should be scanned in a warm environment (or well wrapped with blankets to maintain normal body temperature) and efforts should be made to warm the ultrasound gel before it is applied on the newborn’s head. Figures 9.2 and 9.3 depict changes observed with increasing hydrocephalus in coronal and parasagittal planes.


Fig. 9.2
Coronal view near the foramen of Monro depicting normal anatomy in image (a) and worsening hydrocephalus as seen in the frontal and temporal horns of the lateral ventricles in images (b–d)
Fig. 9.3
Left parasagittal view directly over the lateral ventricle depicting normal anatomy in image (a) and worsening hydrocephalus as seen through the body of the lateral ventricle in images (b–d)
2.
Intussusception .
(a)
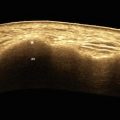
Intussusception is a common pediatric abdominal emergency, with the highest incidence in children <2 years of age. Clinical presentations can vary and include nonspecific symptoms such as crying episodes, abdominal pain, vomiting, and lethargy. “Currant jelly” stools are a late finding which are suggestive of ongoing bowel ischemia. A high index of suspicion for pediatric intussusception is imperative to minimize associated morbidities when operative management is necessitated. Ultrasound is an accurate and preferred method for the diagnosis of pediatric intussusception [10, 11]. Furthermore, it is an ultrasound application that can be readily learned by novice physician sonographers [12]. A high frequency, linear probe is used to obtain views of all four abdominal quadrants. The scan should begin in the right lower quadrant. With the indicator pointing towards the patient’s right, a transverse view of the psoas muscle should be obtained, as this is a helpful anatomical landmark found in close proximity to the spine (Fig. 9.4). While the patient lays supine, the probe is slowly brought cephalad towards the liver. Upon reaching the right upper quadrant, the probe is rotated 90° with the indicator now pointing towards the child’s head. The probe is now brought across the abdomen in a longitudinal orientation until reaching the left upper quadrant. At this point the probe is again rotated 90° and a transverse scan of the left side of the abdomen down to the left lower quadrant is obtained. Ileo-colic intussusception is most commonly identified by the appearance of a “target sign” in the transverse orientation. In this view the intussusceptum is the part of bowel that is entrapped by the intussuscipiens, which forms the circular outer wall of the intussusception. Normal bowel can have a spectrum of different appearances depending on the amount of air, fluid, fecal material, and ingested matter that is present. Figure 9.5 contrasts the appearance of an ileo-colic intussusception with otherwise normal appearing bowel.


Fig. 9.4
Transverse view of the psoas muscle in the right lower quadrant. The muscle is well defined and is found lateral to the iliac vessels and vertebral column. The “speckled pattern” caused by muscle striations as seen in cross section helps to distinguish this landmark from other structures
Fig. 9.5
Image (a) depicts the classic “target sign” appearance in transverse orientation of an ileo-colic intussusception. Images (b–g) represent examples of normal bowel as seen by high frequency ultrasound
3.


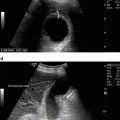
Pyloric stenosis .
(a)
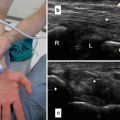
Infantile hypertrophic pyloric stenosis (PS) causes gastric outlet obstruction and presents as persistent, forceful, non-bilious vomiting during the newborn period (usually around 3–12 weeks of age). Palpation of an “olive” during examination of the right upper quadrant may be appreciated, but this finding lacks sufficient sensitivity to reliably rule out the condition. Ultrasound by an experienced operator is the gold standard diagnostic test for PS. A linear probe can be used to obtain longitudinal and transverse views of the pylorus beside the gastric antrum . With the indicator pointing to the infant’s right, a transverse midline view distal to the xiphoid process is a common starting point. Crying infants can be given oral sucrose, a pacifier or be held by their parents to allow for a better study. Administration of Pedialyte or other clear liquid before the ultrasound scan (which displaces air as fluid fills the antrum) and slight rotation of the infant into a right lateral decubitus position will improve one’s ability to visualize the pylorus. The liver acts as an acoustic window and in most cases, a longitudinal view of the pylorus can be found below and adjacent to the liver edge. On longitudinal view, the presence of a “hamburger” may suggest the diagnosis. Ultimately, three measurements are commonly performed: the pyloric muscle thickness (normal measurement is ≤ 3 mm), the pyloric muscle length (normal measurement is ≤ 15 mm), and the pyloric diameter (normal measurement is ≤ 11 mm) [13]. Measurements at or above these cut off values in full term infants support the diagnosis of PS, especially if gastric contents are not visualized to pass the pylorus during sonographic evaluation . A false positive interpretation is possible if the pyloric muscle and channel are imaged at an oblique angle, pylorospasm is present or there is a fluid-filled duodenal bulb. A false negative interpretation is possible if overlying bowel gas creates poor visualization of the pylorus. Figure 9.6 depicts a comparison between the normal anatomy and a hypertrophied pyloric muscle. Note the “hamburger” appearance on longitudinal view.

Fig. 9.6
Images (a, b) depict normal pylorus measurements in longitudinal view with muscle wall thicknesses of 1.8 and 1.9 mm, and channel lengths of 8.6 and 6.4 mm, respectively. Images (c, d) depict findings consistent with pyloric stenosis with single muscle wall thickness of 5.3 and 4.1 mm, and channel lengths of 19 mm
Related posts:
Stay updated, free articles. Join our Telegram channel
Full access? Get Clinical Tree
