■
Introduction
Heart disease is a leading cause of morbidity and mortality worldwide. Noninvasive imaging plays a role in the diagnosis, monitoring, and treatment of heart disease. Hence, radiologists can increase the clinical utility of their imaging reports and consultations with basic knowledge of cardiac chamber assessment on computed tomography (CT) for dedicated cardiovascular and conventional thoracic imaging protocols. Although analysis of many CT scans can be performed solely with images oriented in the conventional axial, coronal, and sagittal planes (and, in many cases, images in the axial plane only may suffice), this approach significantly limits the imager in cardiac evaluation.
To analyze cardiac chambers on cross-sectional imaging, the radiologist must first understand cardiac chamber anatomy, as defined by standardized planes that can be obtained from multiplanar reformatted images. Standardized cardiac imaging planes, which include the four-chamber, three-chamber, two-chamber, and short-axis views, are used to assess cardiac morphology, size, and function. These standardized imaging planes, or their approximations, are shared among multiple tomographic imaging modalities. The creation of these planes on CT requires access to multiplanar reconstruction (MPR) software and knowledge of an accurate and reproducible step-by-step approach based on anatomic landmarks.
This chapter will illustrate one such step-by-step approach for creating standardized cardiac imaging planes on CT using MPR software. This chapter will also illustrate how to use these standardized cardiac planes to assess cardiac chamber morphology, size, and function. Knowledge of these imaging planes and the associated anatomy not only sets the stage for the radiologist to analyze cardiac structures on CT scans thoroughly, but also allows the radiologist to begin correlation with other cardiac imaging modalities with shared imaging planes and anatomic vernacular.
■
Standardized Cardiac Imaging Planes
Vertical Long-Axis and True Two-Chamber Views
The vertical long-axis view of the left ventricle is obtained from a plane that passes through the center of the mitral valve and left ventricular apex, parallel to the midportion of the interventricular septum. This view of the left ventricle is a single oblique cardiac imaging plane and is an approximation of the true two-chamber view of the left ventricle. The true paraseptal (parallel to the septum) two-chamber view of the left ventricle is a double-oblique cardiac imaging plane that differs slightly from the vertical long-axis view of the left ventricle. It differs by the off-axis tilt from a straight vertical line through the short-axis view. Both of these views can be used to evaluate mitral valve morphology and function; left atrial morphology, size, and function; and left ventricular chamber morphology, size, and function—in particular, the left ventricular anterior and inferior walls on the true two-chamber view, and typically the anterior and inferoseptal walls with the vertical long-axis view.
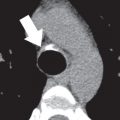
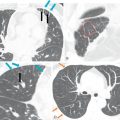
See Fig. 4.1 for a step-by-step approach for obtaining a vertical long-axis view of the left ventricle. Fig. 4.2 demonstrates sample pathologies that can be depicted with this view.


Short-Axis View
The short-axis view of the left ventricle (a double-oblique cardiac imaging plane) is obtained from a plane that is orthogonal to the vertical long axis of the left ventricle. This view can be used to evaluate global left ventricular function, regional left ventricular wall motion, and left ventricular myocardial wall thickness.
See Fig. 4.3 for a step-by-step approach for obtaining a short-axis view of the left ventricle. Fig. 4.4 demonstrates sample pathologies that could be depicted with this view.


Four-Chamber View
The four-chamber view (a double-oblique cardiac imaging plane) is obtained from a plane that slices along the horizontal plane through the short-axis perspective. This view includes both tricuspid and mitral valve planes. The four-chamber view can be used to evaluate interatrial and interventricular septum morphology, cardiac chamber morphology, the left ventricular septal wall, the left ventricular lateral wall, the right ventricular free wall, and the pericardium.
See Fig. 4.5 for a step-by-step approach for obtaining a four-chamber view of the left ventricle. Fig. 4.6 demonstrates sample pathologies that could be depicted with this view.


Three-Chamber View
The three-chamber view of the left ventricle is obtained from a plane that includes the long axis of the left ventricle and the center line through the left ventricular outflow tract and aortic root. This view can be used to evaluate mitral valve morphology and function, left ventricular outflow tract morphology, left ventricular anteroseptal and inferolateral walls, and aortic root morphology, size, and function.
See Fig. 4.7 for a step-by-step approach for obtaining a three-chamber view of the left ventricle. Fig. 4.8 demonstrates sample pathologies that could be depicted with this view.