Before scanning the patient
It is important to remember that liver stiffness is measured, not liver fibrosis. Liver stiffness is influenced by fibrosis, inflammation, and congestion. Therefore obtaining clinical information before starting the examination is helpful. Important patient factors that can influence liver stiffness include elevated transaminase values, acute hepatitis, infiltrative diseases, alcohol ingestion, increased right heart pressure, deep inspiration, and recent ingestion of food. These factors all increase liver stiffness and would therefore overestimate the degree of liver fibrosis if cutoff tables are used.
It is also important to know the reason why the patient is undergoing ultrasound (US) examination and to know the etiology of liver disease (rule of 4 or 5 presented in Chapter 7 applicable only to viral hepatitis and nonalcoholic fatty liver disease [NAFLD]). , In patients with viral hepatitis under treatment or successfully treated, the liver stiffness values may be lower than expected even though the fibrosis stage is not changed (due to the resolution of inflammation). Knowing when the treatment was completed is helpful in analyzing the results. Always ask if the patient is under treatment or has been treated for any liver disease. The etiology is important, for example, in cases of amyloidosis or other diffuse infiltrating liver diseases because there could be an increase of stiffness not related to fibrosis. B-mode findings are important in patients with suspected or known liver disease. All focal liver lesions should be evaluated and included in the report. As discussed in Chapter 13 , focal liver lesions in patients with chronic liver disease are concerning for possible hepatocellular carcinoma.
There is evidence that exercise increases liver stiffness, thus having the patient resting for 5–10 minutes before starting the examination is recommended. Eating can increase the liver stiffness value by increasing the blood flow through the portal vein, so asking the patient when they last ate is important. Ingestion of food can only elevate the liver stiffness, so it may not be necessary to cancel the examination if the patient ate and the liver stiffness is normal: in this case nothing else needs to be done. If the liver stiffness is elevated, a comment can be added to the report stating that the patient ate, and the liver stiffness value may be artificially elevated. This lets the referring doctor decide if a repeat study is needed.
If this is a follow-up examination, review of the previous study(ies) is important. The same US system, transducer, software, depth of measurement, and location will make comparison more accurate. In general, the error of measurement of all US elastography systems is +/− 10%. As discussed in other chapters of this book, there is variability between US systems, transducer frequency, and the depth of measurement.
During the acquisition
Patient positioning
Patient positioning is important especially in patients with high body mass index (BMI). A high-quality B-mode image is required for accurate liver stiffness measurements. Having the patient raise their right arm above their head to increase the intercostal space can be very helpful in acquiring accurate liver stiffness measurements. The B-mode image in the location of the measurement should be free of artifacts before turning on elastography. The signal intensity of the liver should be uniform to confirm there is no partial shadowing. Many of the US techniques to optimize B-mode imaging, such as compounding and harmonic imaging, are not compatible with shear wave imaging and are automatically turned off when in elastography mode. Therefore there will be a decrease in the imaging quality of the liver in the elastography mode. Confirming that the B-mode image is free of artifacts BEFORE turning on elastography is important because, in the elastography mode, some B-mode artifacts may not be as apparent. Scanning the liver at several intercostal locations should be performed to find a location with fewer large vessels and bile ducts. This can be done during a limited or complete US examination if performed before the elastography. Generally, the supine position is used. However, in obese subjects, a slight left side decubitus, not more than 30 degrees, can be helpful. To achieve this position, a pillow can be placed under the upper right side of the patient. If greater decubitus positions are used, there can be an increase of the pressure in the inferior vena cava, which is transmitted to the hepatic veins and therefore increases the liver stiffness value.
Placement of the measurement box
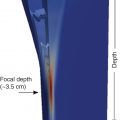
Using the penetration setting (if available on the system) can help by increasing the energy deposition of the push-pulse as well as improving the B-mode tracking of the shear waves. On most systems the area of maximum energy deposition and therefore the best shear wave generation is at 4.0–4.5 cm from the transducer. Every attempt to take the measurement in this location should be made. In point shear wave elastography (pSWE) the region of interest (ROI) must be placed 1.5–2.0 cm from the liver capsule to avoid the reverberation artifact. In two-dimensional shear wave elastography (2D-SWE), if a confidence or quality map is available, the reverberation artifact can be seen and avoided. However, it must be highlighted that, since reverberation artifacts may give rise to signals that appear as good quality also because they are stable over time, the confidence or quality map may not recognize them. Therefore it is critical to look also at the velocity/elasticity map that will depict areas of increased stiffness in the upper part of the field of view (FOV) due to the reverberation artifact to avoid measurements in that area. If the reverberation artifact is less than 1.5–2.0 cm when seen on 2D-SWE, the measurement box can be placed closer to the liver capsule, avoiding the artifact. This cannot be done on pSWE as the artifact is not seen. This is extremely helpful in patients with a large thickness of subcutaneous tissue, allowing the measurement box to be placed closer to the optimal area. To maximize the push energy, the transducer must be parallel to the liver capsule both in the superior and inferior planes and the right to left plane (see Fig. 4.4 ). With correct positioning of the transducer, the liver capsule should be a sharp bright line and visualized in most of the image, especially where the measurements will be taken. Some vendors recommend applying pressure with the transducer to compress the subcutaneous tissue to place the measurement box closer to the optimal 4.0–4.5 cm from the transducer and to avoid the reverberation artifact. With the intercostal approach this maneuver does not compress the liver.
Limiting motion
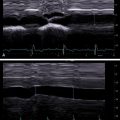
The shear waves only travel over a few millimeters before being attenuated, especially in steatotic or fibrotic livers. So motion during the acquisition both by the patient or the examiner leads to inaccurate measurements. With deep inspiration there is a change in the right atrial pressure, which is transmitted to the liver, affecting the stiffness measurement. Measurements should be taken in a neutral (mid) breathing breath hold. In pediatric patients or patients with pulmonary disease in whom a breath hold may not be possible, the use of a real-time 2D-SWE technique can be helpful. By obtaining a clip of approximately 30 seconds in shallow breathing, a review of the cine clip can identify frames where motion is limited and a neutral breathing position is present. Measurement can then be obtained on one of these frames, choosing it from a short sequence of the images with stable signals. It is recommended to perform only one measurement for each cine clip, otherwise a possible error made during that acquisition will be multiplied. Using pSWE in patients unable to hold their breath, the measurement could be taken at the end of the expiratory phase, taking advantage of the little delay between each respiratory phase. However, this requires a lot of experience and absolute absence of transducer movements.
Number of measurements
For pSWE, 10 independent measurements should be obtained. In difficult patients, a smaller number can be obtained; however, at least five measurements are required as long as the quality measures are maintained. For 2D-SWE, five independent measurements (one from each cine clip with real-time 2D-SWE) should be obtained. A review of the measurements and deleting those that are discrepant is not appropriate. If the measurement was obtained improperly (motion, angling transducer, etc.), it should not be placed in the report page. The median value is used as two single extreme measurements (very high and very low) and do not affect the median whereas they can significantly affect the mean (average). If measurements at different locations in the liver are of interest, a complete set of measurements for each location should be obtained. As there is a depth dependance of the acoustic radiation force impulse (ARFI) techniques, acquisitions in different locations for one measurement will add variability into the results.
Placement of the ROI box
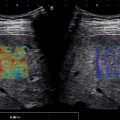
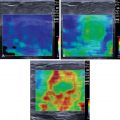
Placement of the measurement box is critical. It should be placed in a region where the quality measures are of highest quality. Both the confidence/quality map and velocity/elasticity map should be assessed for artifacts. Although the confidence/quality maps are good, they are not perfect and areas of color map differences in the velocity/elasticity map should be considered possible artifact ( Fig. 5.1 ). As reported in Chapter 6 , artifacts are generated also around blood vessels ( Fig. 5.2 ). Therefore, because in pSWE the visualization of artifacts is not possible, it is critical that the ROI be placed in a region at least 5 mm from vessels and bile ducts. Remember that the generation of shear waves is a three-dimensional process (same as throwing a stone in water), and artifacts can be generated from vessels and bile ducts adjacent to the plane being imaged. The size of the measurement box in pSWE is fixed by all vendors and cannot be changed. In 2D-SWE the size of the measurement box can be adjusted to limit taking a measurement in a region with artifacts or enlarged to average more liver tissue (if free of artifacts).


Related posts:


Stay updated, free articles. Join our Telegram channel

Full access? Get Clinical Tree


