Mohini Rawat, DPT, MS, ECS, OCS, RMSK
Contents
- Anterior Ankle
- Joint Anatomy
- Tendons
- Anterior Inferior Tibiofibular Ligament
- Anterior Talofibular Ligament
- Deep Peroneal Nerve
- Joint Anatomy
- Lateral Ankle
- Medial Ankle
- Posterior Ankle
- Hindfoot
- Subtalar Joint
- Anterior Subtalar Joint (Medial Approach)
- Posterior Subtalar Joint (Medial Approach)
- Posterior Subtalar Joint (Lateral Approach)
- Posterior Subtalar Joint (Posterior Approach)
- Anterior Subtalar Joint (Medial Approach)
- Plantar Fascia
- Subtalar Joint
- Midfoot
- Forefoot
- Patient position: Supine with the ankle in slight plantar flexion
- Probe/transducer position: The long axis (LX) view/longitudinal view is obtained by placing the probe longitudinally along the anterior ankle (Figure 5-1).
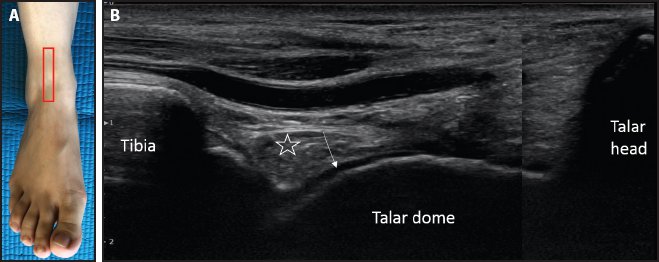
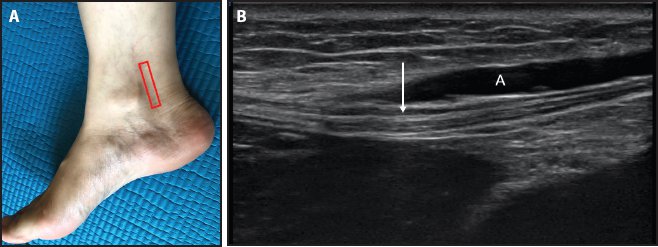
Figure 5-1. Ankle joint. (A) Probe placement. (B) Ultrasound image of the tibiotalar joint. From proximal to distal, bony landmarks are visualized in the following order: the distal tibia, talar dome, and talar head. Anechoic cartilage (white arrow) lines the talar dome surface. Overlying the cartilage, a hyperechoic fat pad (white star) is visualized.
- Relevant anatomy: From proximal to distal, bony landmarks are visualized in the following order: distal tibia, talar dome, and talar head. The talar dome presents with an anechoic cartilage-lined surface. Overlying the cartilage, a hyperechoic fat pad is visualized.
- Points to remember: Anterior joint effusions are visualized as hypoechoic/anechoic signals in the tibiotalar joint area.
Relevant anatomy is shown in Figure 5-2.
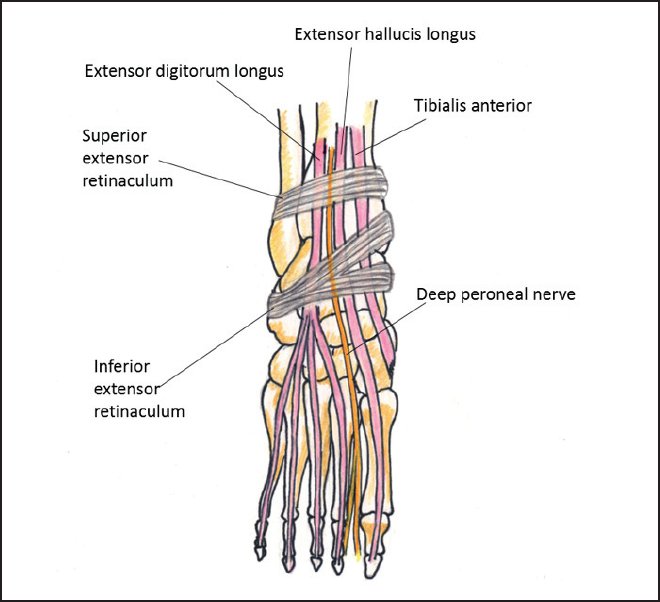
Figure 5-2. Relevant anatomy of the anterior tendons of the ankle.
- Patient position: Supine with the ankle in slight plantar flexion
- Probe/transducer position:
a. Short axis (SX) view/transverse view: The probe is placed transversely on the anterior ankle at the level of the talus to visualize the tendons on the anterior aspect of the ankle (Figure 5-3).
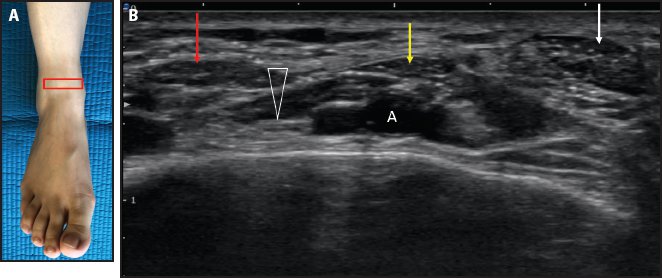
Figure 5-3. SX view of the anterior tendons of the ankle. (A) Probe placement. (B) SX view of the tendons. From medial to lateral, they are the tibialis anterior (white arrow), EHL (yellow arrow), and EDL (red arrow). The EHL shows the hyperechoic tendon and hypoechoic muscle part. The deep peroneal nerve (white triangle) is present deep to the tendons in the middle, right under the EHL tendon. (A = dorsalis pedis artery.)
b. The LX view/longitudinal view can be obtained along each tendon to look for any focal tendon pathology (Figures 5-4 through 5-6).
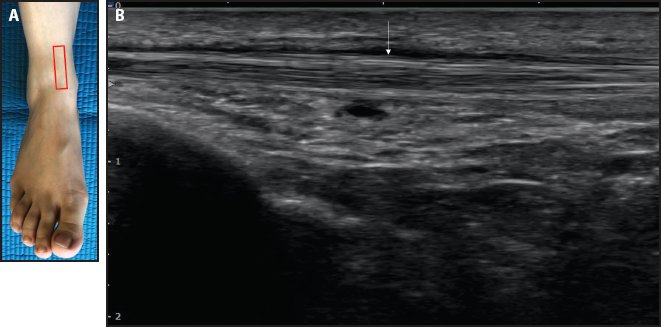
Figure 5-4. LX view of the tibialis anterior tendon. (A) Probe placement. (B) LX view of the tibialis anterior tendon (white arrow).
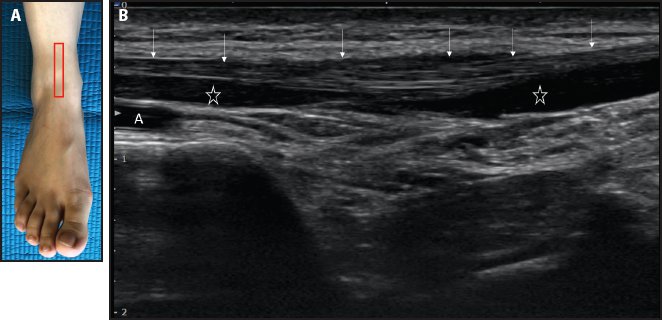
Figure 5-5. LX view of the EHL tendon. (A) Probe placement. (B) LX view of the EHL tendon (white arrows). The underlying muscle of the EHL (white stars) can be seen. (A = dorsalis pedis artery.)
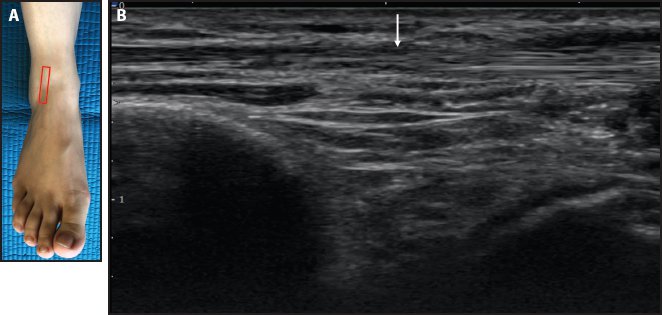
Figure 5-6. LX view of the EDL tendon. (A) Probe placement. (B) LX view of the EDL tendon (white arrow).
- Relevant anatomy: There are 3 tendons on the anterior aspect of the ankle. From medial to lateral, they are the tibialis anterior, extensor hallucis longus (EHL), and extensor digitorum longus (EDL). The dorsalis pedis artery and deep peroneal nerve are present deep to the tendons in the middle, right under the EHL tendon.1
- Points to remember: The synovial sheath of the extensor tendons of the ankle typically does not contain fluid. Tenosynovitis should be considered in the presence of even a small amount of fluid.1
- Relevant anatomy: There are 3 tendons on the anterior aspect of the ankle. From medial to lateral, they are the tibialis anterior, extensor hallucis longus (EHL), and extensor digitorum longus (EDL). The dorsalis pedis artery and deep peroneal nerve are present deep to the tendons in the middle, right under the EHL tendon.1
Anterior Inferior Tibiofibular Ligament
Relevant anatomy is shown in Figure 5-7.
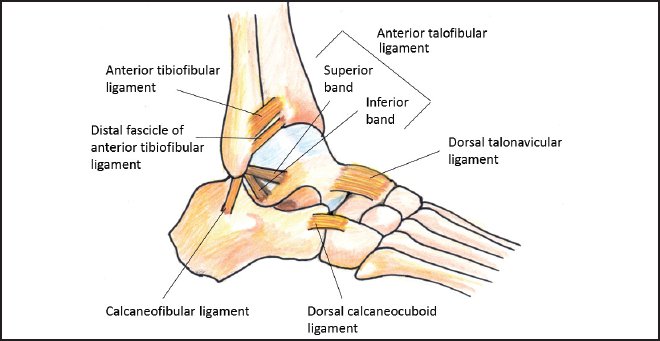
Figure 5-7. Relevant anatomy of the anterolateral ligaments of the ankle.
- Patient position: Ankle in slight plantar flexion and inversion
- Probe/transducer position: The probe is placed along the ligament bridging the distal tibial and the fibula (Figure 5-8).
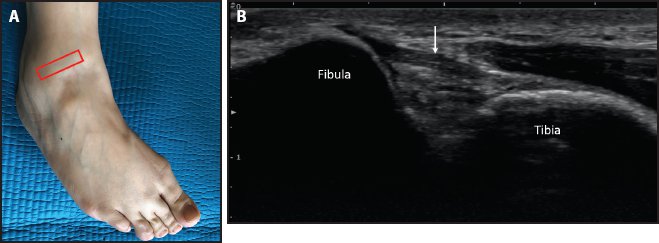
Figure 5-8. Anterior inferior tibiofibular ligament. (A) Probe placement. (B) Anterior inferior tibiofibular ligament (white arrow) between the tibia and fibula.
- Relevant anatomy: The ligament is obliquely oriented from the anterior margin of the fibular tubercle of the tibial to the anterior margin of the distal fibular shaft and lateral malleolus. The thickness of the ligament ranges from 2.6 to 4 mm, and the length measures about 12 to 15.5 mm.2,3 The ligament is a flattened band and is partially blended with the anterior interosseous membrane.4
- Points to remember: The anterior inferior tibiofibular ligament has an important role in the stability of the distal tibiofibular joint. Injury to this ligament may result in instability and widening of the ankle mortise.2
- Patient position: Ankle in slight plantar flexion and inversion
- Probe/transducer position: The probe is placed along the ligament bridging the talus and fibula anteriorly (Figure 5-9).
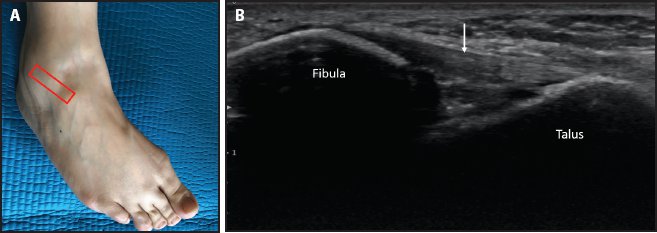
Figure 5-9. Anterior talofibular ligament. (A) Probe placement. (B) Anterior talofibular ligament (white arrow) between the talus and fibula.
- Relevant anatomy: The ligament connects the anterolateral border of the lateral malleolus and lateral surface of the talar neck. Some fibers of the ligament blend with the tibiotalar capsule. Its primary function is to restrain the anterior displacement of the talus with respect to the fibula and tibia.2,4
- Points to remember: The anterior talofibular ligament is the most commonly injured ligament of the lateral collateral complex of the ankle.2
- Patient position: Foot in neutral or slight plantar flexion
- Probe/transducer position: The probe is placed transversely over the anterior ankle to visualize 3 tendons; from medial to lateral, they are the tibialis anterior, EHL, and EDL. The deep peroneal nerve is seen deep to the EHL tendon, accompanied with an artery (Figure 5-10).
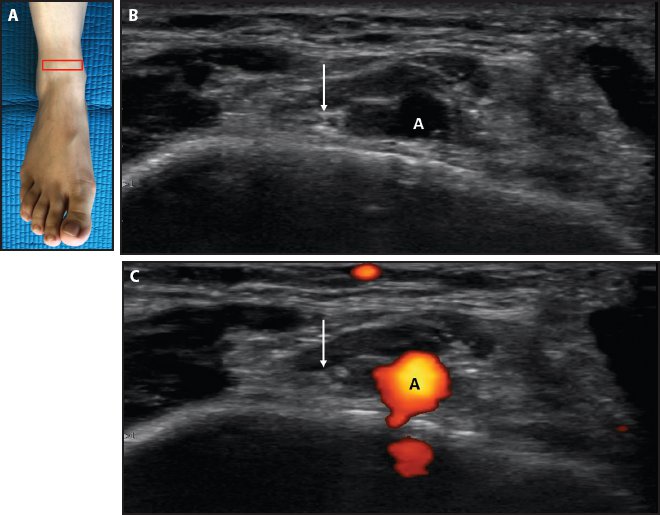
Figure 5-10. Deep peroneal nerve. (A) Probe placement. (B) The deep peroneal nerve (white arrow) is seen deep to the EHL tendon, accompanied by the dorsalis pedis artery (white A) at the level of anterior ankle. (C) Color Doppler ultrasound image showing the dorsalis pedis artery (black A) and deep peroneal nerve (white arrow).
- Relevant anatomy: The deep peroneal nerve and dorsalis pedis artery are together at the level of the anterior ankle. The deep peroneal nerve gives a motor branch to the extensor digitorum brevis and extensor hallucis brevis in the foot. It also gives sensory branches to the ankle joint and dorsal aspect of the first web space.
- Points to remember: The branching pattern of the deep peroneal nerve may differ. In some ankles, the dorsalis pedis artery may be accompanied by medial and lateral branches of the deep peroneal nerve at the level of the anterior ankle.
Relevant anatomy is shown in Figure 5-11.
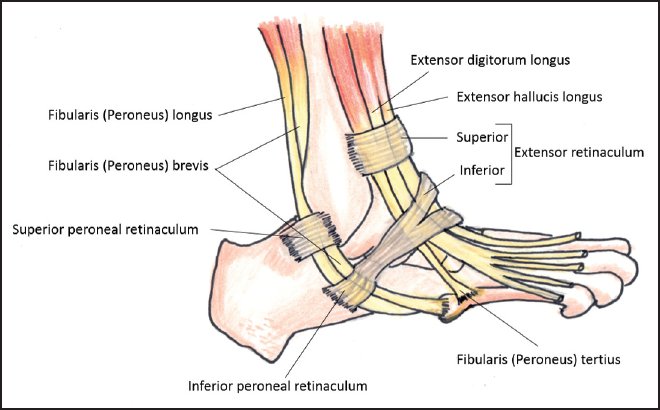
Figure 5-11. Relevant anatomy of the peroneal tendons.
- Patient position: Prone with the foot over the edge of the table
- Probe/transducer position:
a. SX view: The probe is placed transversely between the lateral malleolus and the Achilles tendon to visualize the peroneal tendons in stacked formation behind the fibula.
b. LX view: From the SX view, the probe is rotated 90 degrees to align with the LX of the tendons (Figures 5-12 through 5-15).
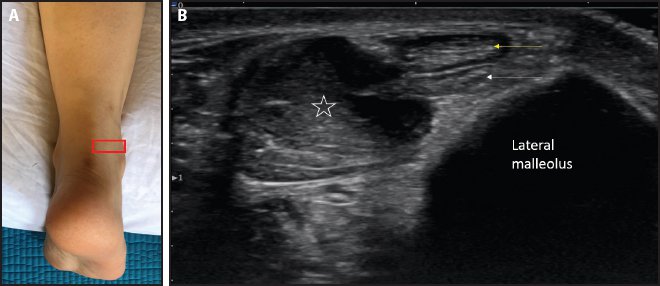
Figure 5-12. SX view of the peroneal tendons. (A) Probe placement. (B) SX view of the peroneal tendons behind the lateral malleolus. Shown are the peroneus longus (yellow arrow), peroneus brevis (white arrow), and peroneus brevis muscle (white star).
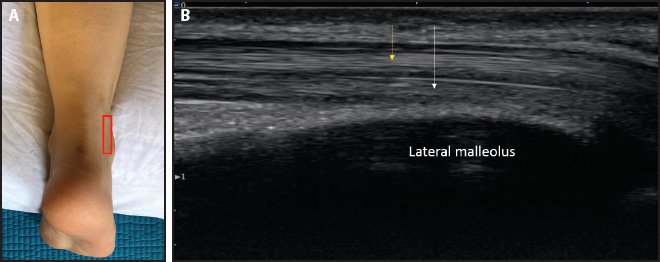
Figure 5-13. LX view of the peroneal tendons. (A) Probe placement. (B) LX view of the peroneal tendons behind the lateral malleolus. Shown are the peroneus longus (yellow arrow) and peroneus brevis (white arrow).
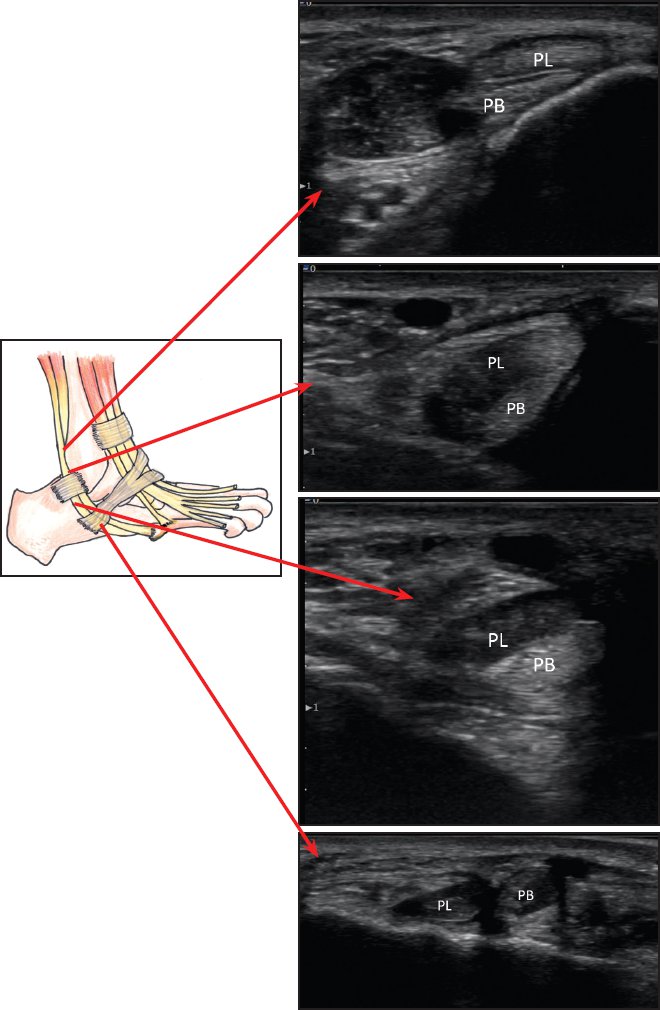
Figure 5-14. SX view of the peroneal tendons from the proximal to distal levels around the lateral malleolus and lateral foot. (PB = peroneus brevis; PL = peroneus longus.)
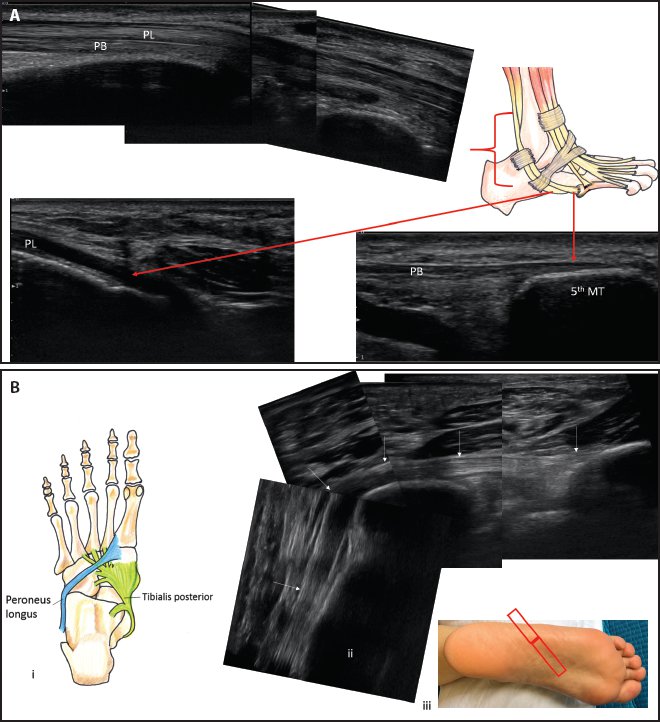
Figure 5-15. (A) LX view of the peroneal tendons from the proximal to distal level around the lateral malleolus and lateral foot. The peroneus longus (PL) tendon wraps around the lateral foot to enter the plantar aspect of the foot (note the hypoechoic tendon due to anisotropy). The peroneus brevis (PB) tendon attaches on the lateral aspect of the tuberosity at the base of fifth metatarsal (MT). (B) LX view of the peroneus longus on the plantar aspect of the foot. (i) Relevant anatomy. (ii) The peroneus longus tendon (white arrows) from the lateral aspect to the plantar aspect of the foot, inserting on the plantar aspect of the base of first metatarsal. (iii) Probe placement.
- Relevant anatomy: The peroneus brevis is deeper than the peroneus longus. At the level of the distal end of the fibula or tip of the lateral malleolus, the calcaneofibular ligament (CFL) runs deep to the peroneal tendons in a direction roughly perpendicular to the tendons.
- Points to remember: The peroneal tendons take a sharp turn around the tip of the lateral malleolus as they course along the lateral border of the foot. An anomalous muscle, the peroneus quartus, may be present as a third tendon, along with the peroneus brevis and longus.5 It should not be confused with a split tear of the peroneus brevis.
- Relevant anatomy: The peroneus brevis is deeper than the peroneus longus. At the level of the distal end of the fibula or tip of the lateral malleolus, the calcaneofibular ligament (CFL) runs deep to the peroneal tendons in a direction roughly perpendicular to the tendons.
- Patient position: Ankle in slight dorsiflexion
- Probe/transducer position: The probe is placed along the CFL, bridging the tip of the lateral malleolus and the lateral surface of the calcaneus. Alternatively, the peroneal tendons can be followed in the SX view as they wrap around the lateral malleolus, and the CFL is seen under the tendons, between the lateral malleolus and calcaneus (Figure 5-16).
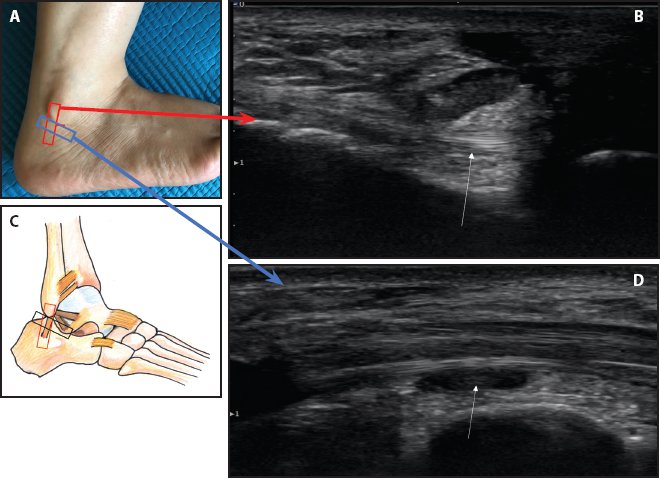
Figure 5-16. CFL. (A) Probe placement. (B) LX view of the CFL (white arrow) with overlying peroneal tendons in the SX view. (C) Relevant anatomy and probe placement. (D) SX view of the CFL (white arrow) with overlying peroneal tendons in the LX view. Due to anisotropy, the CFL appears hypoechoic. Tilting the probe can make the CFL hypoechoic or hyperechoic.
- Relevant anatomy: The CFL is a long cord-like ligament that runs deep to the peroneal tendons (see Figure 5-7). The primary function of the CFL is to restrain inversion of the calcaneus with respect to the fibula.2
- Points to remember: With ankle dorsiflexion, the peroneal tendons move superficially. If there is no superficial displacement of the peroneal tendons upon dorsiflexion, a tear of the CFL should be considered.
Tarsal Tunnel and Its Contents
Relevant anatomy is shown in Figure 5-17.
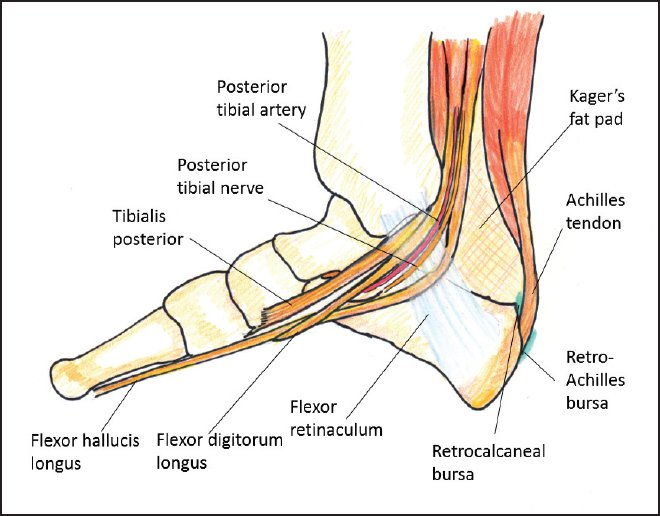
Figure 5-17. Relevant anatomy of the medial ankle/tarsal tunnel structures.
- Patient position: Supine
- Probe/transducer position: The probe is placed along the flexor retinaculum at the level of the medial malleolus to scan the contents of the tarsal tunnel in the SX view (Figure 5-18). The LX view of each structure can be obtained by rotating the probe 90 degrees from the SX view (Figures 5-19 through 5-22).
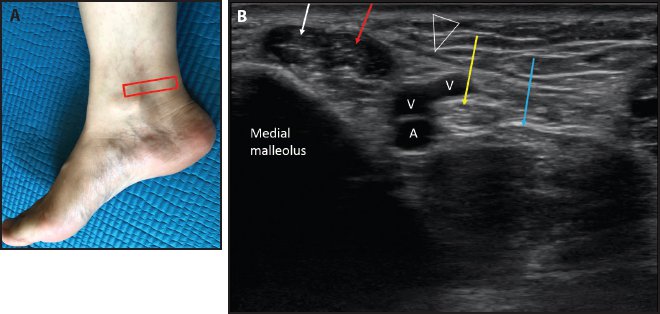
Figure 5-18. SX view of the tarsal tunnel (medial ankle). (A) Probe placement. (B) SX view of the medial ankle showing the tibialis posterior tendon (white arrow), FDL tendon (red arrow), posterior tibial artery (white A), posterior tibial nerve (yellow arrow), vein (V), and FHL tendon (blue arrow) with hypoechoic muscle under the tendon. Also shown is the flexor retinaculum (white triangle).
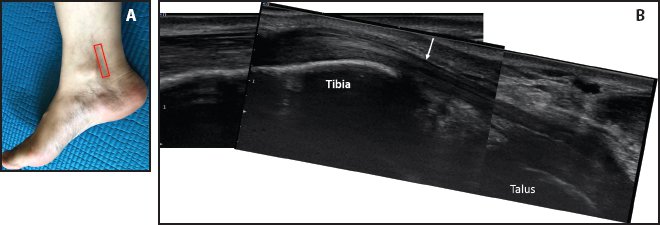
Figure 5-19. LX view of the tibialis posterior tendon. (A) Probe placement. (B) LX view of the tibialis posterior tendon (white arrow).

Figure 5-20. LX view of the FDL tendon. (A) Probe placement. (B) LX view of the FDL tendon (white arrow).

Stay updated, free articles. Join our Telegram channel

Full access? Get Clinical Tree


