Aha! You’ve identified a suspicious lesion at diagnostic evaluation and now it needs a biopsy. You’re pretty sure you can see it on ultrasonography (US), so maybe you’ll do the biopsy that way. It’s so much quicker, although sometimes it’s a struggle to see the needle and get all of those angles right. And then sometimes the clip is close to but not in the lesion. If the pathologic finding is benign, will I be sure that the biopsy was of the correct area?
When we are performing breast biopsy with imaging guidance, our goal is to obtain enough material for diagnosis using an approach that is safe and well tolerated by the patient. We need to consider how to target the lesion accurately while minimizing the invasiveness of the procedure. We also need to consider how the procedure fits into the care of the patient from a larger perspective—specifically, how the biopsy approach and results will impact future management.
Adhering to a specific routine works well for some aspects of breast imaging. When interpreting screening mammograms or breast magnetic resonance imaging (MRI), using a systematic approach will improve the consistency and efficiency of our interpretations. However, with breast interventions, it helps to keep a more flexible mindset. Keeping an open mind about using a different approach or a different modality for guidance can improve the chance of a successful outcome.
We will assume that you have at least basic proficiency in breast biopsy procedures, including an understanding of the indications, points to review while obtaining informed consent, and the use of sterile technique. We also assume a basic understanding of how lesions are targeted for biopsy and familiarity with the operation of the biopsy equipment. This foundation will allow us to focus on more challenging cases.
In this chapter, we will give you our best tips on breast biopsy that we hope will help make these interventions safer and more comfortable for you and your patients. For US biopsy, we’ll help you find that needle and adapt your technique for biopsy of small, deep, and vanishing lesions with confidence. We’ll give you some ideas for identifying and targeting posterior lesions on stereotactic biopsy, and what to do with thin breasts and superficial lesions. Finally, we’ll move to MRI and review how to biopsy posterior and multiple lesions, and how to manage those lesions that you really can’t get to with a biopsy needle.
Choosing Biopsy Guidance and Device
Ultrasound-guided biopsy has many advantages over stereotactic or MRI-guided biopsy, including patient comfort, low cost, flexibility of approach, shorter procedure time, sampling with real-time visualization, and the ability to access virtually any lesion. We therefore almost always use ultrasound guidance for biopsy of suspicious lesions that are well seen by this modality.
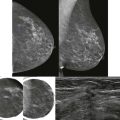
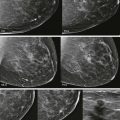
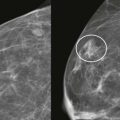
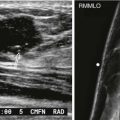
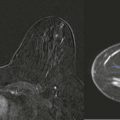
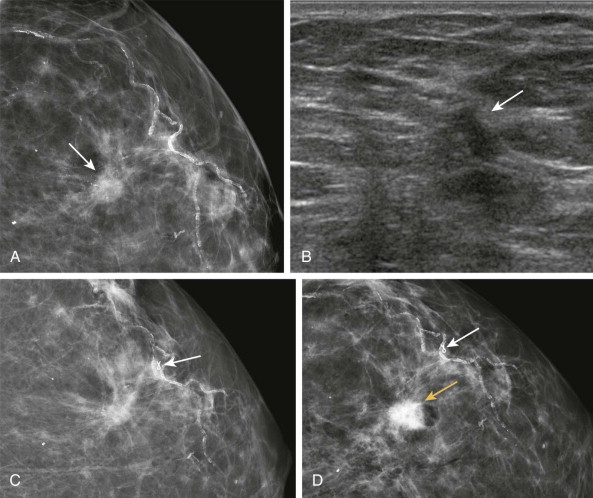
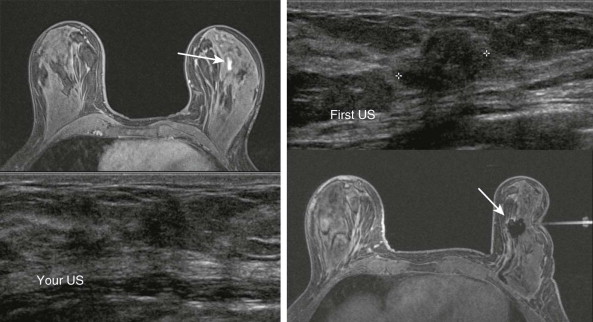
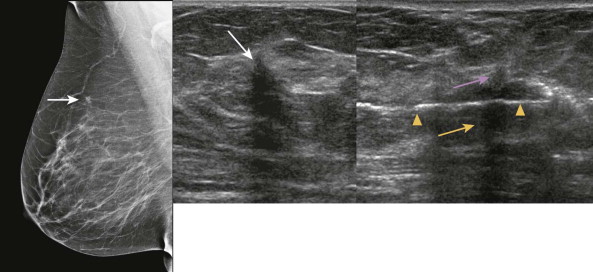
However, not every lesion that is seen on US is best sampled using ultrasound guidance. If you are struggling to identify the lesion that your partner saw on US when it is obvious on mammography, then by all means switch her to a stereotactic biopsy ( Fig. 20-1 ). Likewise, a lesion that is easily seen on MRI with a questionable correlate on US would be best sampled using MRI guidance ( Fig. 20-2 ). Keeping an open mind about guidance can keep you out of some difficult situations. More on this later.
Masses generally require less tissue removal for accurate diagnosis than calcifications. Therefore, for most ultrasound-guided biopsies, a 14-gauge automated spring-loaded device provides adequate sampling and is very cost effective. Vacuum-assisted devices offer larger tissue samples, single insertion, and directional capability. These devices are preferred for stereotactic biopsy for calcifications as they are less likely to yield a result of atypical ductal hyperplasia (ADH) in the setting of ductal carcinoma in situ (DCIS). For US biopsy, vacuum biopsy is usually overkill, but it can be really helpful for certain lesions, such as small or complex masses, or lesions with calcifications. A coaxial guide can shorten procedure time for US biopsies (especially when teaching residents) and makes it easier to place the biopsy needle into a good pre-fire position before each pass. However, the use of a guide may also result in the introduction of more air into the biopsy site.
Ultrasound-Guided Biopsy
The operator dependence of US is well known, and this dependence rises to an even higher level with ultrasound-guided biopsy. It takes practice to develop the skills needed for these procedures. Performing your initial patient procedures under the supervision of a more experienced radiologist is extremely helpful. If you are just learning these techniques or modifying your current ones, try practicing on phantoms first. A raw turkey breast with olives between the pectoralis major and minor muscles makes a very good and inexpensive phantom. This can be really fun even if you are very experienced at US biopsy and just want to practice some of the more advanced moves we describe later on.
The Basic Ultrasound-Guided Biopsy: Warning—Geometry in Use
Do you remember your high school geometry teacher? The one who kept promising that someday you would find a practical use for the subject and thank them for teaching you? That day has arrived! Don’t worry, we won’t ask you the cosine of a scalene triangle. However, understanding the basic geometry of an ultrasound-guided breast biopsy—how the lesion, transducer, skin nick, and biopsy needle can be kept in alignment—will help us confidently biopsy lesions using a safe angle of approach. Later, we’ll modify these angles when we discuss sampling of more challenging lesions.
Positioning
First we do all of the obvious things—review the images, set up the biopsy tray, and obtain consent. Next we position the patient. Yes, we want to ensure that the patient is comfortable and can remain still during the procedure, but this is also our first chance to use geometry in our favor. Positioning can be used to thin out the tissue in the region of the lesion. As a result, the lesion will not be as deep and the approach will be easier. For example, if a lateral right breast lesion is being biopsied and the patient rolls about halfway onto her left side, the lateral tissue will be thinner. Likewise, lowering the patient’s head so that she is lying flat will thin the inferior breast, improving access. Typically, the patient will raise her ipsilateral arm above her head, which can further thin the tissue. Cushions or foam wedges will help stabilize the patient and keep her comfortable in the position you choose—just make sure that they don’t end up getting in your way.
Planning the Approach
This most difficult part of ultrasound-guided biopsy occurs before the first sample is taken. Where we place the transducer is determined by the location of the lesion, but its orientation is up to us.
Find the lesion and optimize the technical settings by adjusting the depth, focal zone, and gain. Sometimes a lesion is more clearly seen using compound or harmonic imaging. Once you identify the lesion, think about where you want to make your skin nick. Entering along the curve of the lateral breast is easiest. The tissue is thinner in the upper inner quadrant and there is less of a curve, so a more inferior approach often works well for lesions in this area. Sometimes you realize that the lesion is only well seen in one plane, and in these cases you’ll need to approach the lesion with the transducer oriented in that plane in order to visualize the lesion well during sampling. Positioning the transducer so the lesion appears on the far side of the US screen from the entry site allows you to visualize a longer segment of the needle as it approaches the lesion ( Fig. 20.3 ).

Now that you’ve decided on where to place your transducer, let’s make it easy to get back there by marking the skin. You can mark the skin next to both sides of the transducer. Another option is to mark a “T” with the top of the letter at the entry side of the transducer and the stem in the plane of the long axis of the transducer. Your skin nick will be along this path, so this also helps the technologist know where to clean the skin. The patient is next prepped and draped. Don’t wash off the skin marks!
Getting Everything Lined Up
Four things need to be aligned in one plane: the lesion, transducer, skin nick, and the biopsy needle/coaxial guide (see Fig. 20-3 ). Place your transducer into position using your marks and be prepared to stay there for the duration of the biopsy. Be the rock! This can be tricky; when the transducer and gel are placed on the curved surface of the breast, the transducer can easily slide away from the lesion. And the harder you push, the more you seem to slide. To help keep the transducer still throughout the procedure, create a stable platform holding the transducer near the skin and rest the flat of your hand and the fourth and fifth fingers on the breast. Now you can stay on that lesion all day long.
If you are in the habit of turning to grab stuff from the tray behind you, you will find it difficult to stay on the lesion. Develop a habit of having things handed to you or have the tray immediately next to you. If you do slide away from the lesion, go back to those skin marks that you made earlier. It’s also helpful to record an image of the lesion before starting the procedure, with the transducer in the position to be used for biopsy. This image can be recalled during the procedure, and landmarks adjacent to the lesion can help re-identify the lesion if it becomes indistinct during biopsy.
Making the Nick
By judging the depth of your lesion, you will determine your needle path and the location of your skin nick. For superficial lesions, the nick can be made close to the transducer ( Fig. 20-4 ). For most deep lesions, we can use the curvature of the breast to advantage to keep our approach parallel to the chest wall. For these lesions, we make our nick farther away from the edge of the transducer, resulting in a needle insertion close to the depth of the lesion (see Fig. 20-4 ).

Now that we have a plan, let’s go ahead and anesthetize the skin, the path to the lesion, and the tissues surrounding the lesion along the long axis of the transducer. Watch as you inject under real-time guidance so that you can modify your approach if you discover that it is too shallow or deep. Then make the skin nick.
Needle Angle
The needle and the anterior edge of the pectoralis muscle are two lines that should never intersect! Keeping the needle parallel (or at least close to parallel) to the muscle ( Fig. 20-5 ) is mainly a safety issue, but it also improves needle visualization by keeping the needle perpendicular to the ultrasound beam. A parallel approach is a good habit even for more superficial lesions—that way you won’t ever have to worry about hitting the pectoral muscle (which hurts a LOT).

Inserting the Coaxial Guide/Biopsy Needle
Keeping the long axis of the transducer aligned with the skin nick and lesion, go ahead and insert the coaxial guide or needle through the nick. Gradually advance it toward the lesion while monitoring the process by US to be sure it is advancing at the desired depth and angle.
If you are using a coaxial guide, remove the inner cannula and slide in the biopsy needle. Maintaining real-time visualization of the needle and the lesion, advance the needle to the edge of the lesion. The biopsy needle should remain parallel or almost parallel to the chest wall. This will allow for safe sampling with good visualization of the needle.
Help! I Can’t Find My Needle!
If at any point you lose visualization of the needle or guide, it should be close to the plane of the ultrasound beam because of the steps you have taken in planning your approach. You need only to use a small waving motion of the needle from side to side to bring the needle into view. If this does not work, the alignment needs to be checked. Get good visualization of the lesion on the US screen. Then look down at the alignment of the skin nick, biopsy device, and transducer. If they are aligned, try doing the gentle wave with the needle again. If they are not in alignment, you have two choices ( Fig. 20-6 ). You can rotate the transducer to realign it with the skin nick (keeping the lesion on the screen), or you can move the needle/skin nick (a short distance) to be in alignment with the transducer.

Getting the Sample
You now have all of the geometry working in your favor. The tip of the biopsy needle is within a few millimeters of the edge of the lesion, the angle of approach is safe, and you have good visualization of the lesion and the entire shaft of the biopsy needle. You are now ready for your first pass! Watch as you take the sample. Nice job. But wait! Before you remove the needle, scan through the lesion to ensure that the needle went through it. Take at least a couple of pre- and post-fire images. We typically take five samples, place a marker, and then hold pressure for 5 to 10 minutes. A mammogram with light compression afterward will confirm the location of the marker.
Biopsy Etiquette
Patients are understandably very focused on everything that is said during the procedure. When taking the samples, we say things like, “You are going to hear a click,” or “You may feel a little pressure now.” If you ask the technologist, “Do you think that’s the mass?” or say, “I’m going to fire the gun,” your patient may ask you for a last meal and a cigarette.
Challenging Ultrasound–Guided Biopsies
The Deep Lesion in a Large Breast
In some cases—if the breast is very large or the lesion is very deep—using the curvature of the breast alone may not give you an acceptable approach. The lesion may be too far from the edge of the breast to access it easily. Fortunately, we can still biopsy these lesions by modifying our usual approach. Basically, we will start with a steeper approach and then depress the needle to have a safe angle as we approach the lesion.
Using a coaxial guide with this modified approach is really helpful, even if you don’t typically use one. Insert the guide at least several centimeters away from the edge of the transducer and advance it under real-time visualization so its tip is near the depth of the lesion ( Fig. 20-7 ). The angle of the coaxial guide will be steeper than usual and does not need to be parallel to the chest wall at this point. Now we’ll insert the biopsy needle gradually into the coaxial guide until it just emerges from the other end of the guide.
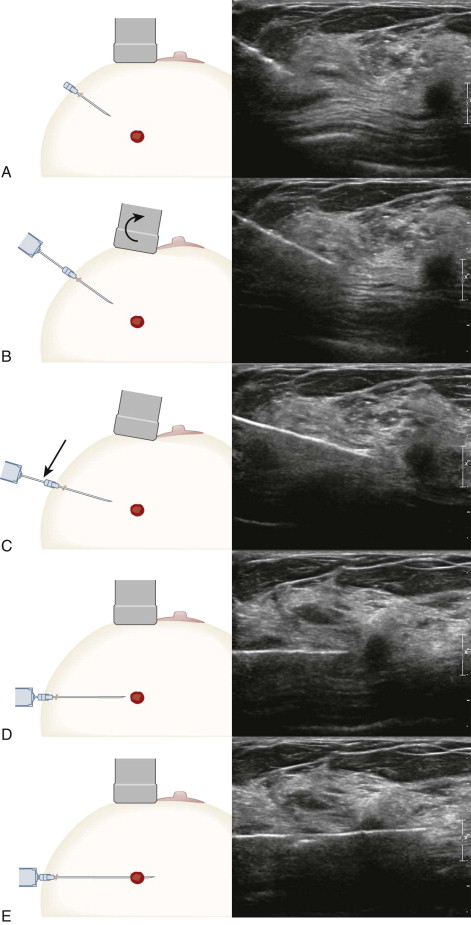
At this point, the needle is directed toward the pectoral muscle at too steep an angle to move directly toward the lesion. So how can we keep good visualization of the needle and convert our steep approach to one that is parallel to the pec? There are two great tricks that can really help. The first is to rock the transducer away from the skin nick along its long axis. This directs the ultrasound beam so that it is more perpendicular to the needle, improving its visibility (see Fig. 20-7 ). The second trick is to depress the coaxial guide, needle, and skin nick together (see Fig. 20-7 ). This is possible because of the pliability of the breast tissue (NOT recommended during biopsy of internal organs!). The result is a deeper approach that is more parallel to the chest wall. The lever effect of this action may also elevate the lesion slightly away from the pectoral muscle. Now you can advance the needle relatively parallel to the chest wall, and you’re ready to take the first sample in a very safe position (see Fig. 20-7 ).
Using this technique, it is usually possible to obtain an excellent approach for lesions at any depth. Sometimes the needle is actually angled slightly away from the pec when you’re using this technique, so you know your position is safe. If you’ve performed these actions and the needle is still angled slightly toward the pectoral muscle, try rocking the transducer away from you a little more. The resulting change in compression of the breast tissue by the transducer will often improve your angle of approach even more.
The Disappearing Lesion
After one or more samples are taken, some lesions become indistinct or even invisible by US. This loss of visualization can be caused by hemorrhage, air in the needle tracks, removal of portions of the mass, or rupture of a fluid-filled component. As a result, it may become difficult to obtain additional samples or accurately place a marker. Loss of visualization is most likely to occur during biopsy of a small solid mass, a mass that may be either cystic or solid by US, or a complex mass that has a small solid component. Here are a few tips for biopsy of these lesions.
The Small Mass
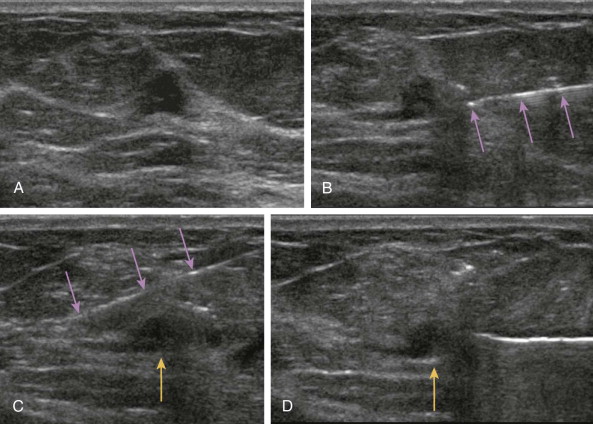
Injecting too much anesthetic can obscure some lesions—especially those in the several millimeters range. One trick is to inject anesthetic up to but not in the lesion and to use a separate injection to anesthetize the far side of the lesion ( Fig. 20-8 ). If too much anesthetic is injected, simply wait a few minutes and rescan. Some of the anesthetic will have absorbed or dissipated, and the lesion will often become easier to see. Be careful to not inject air while anesthetic is being given; it may take hours or longer to absorb. If this occurs and the lesion cannot be identified with confidence, the procedure will need to be rescheduled.
Make the first pass count! Over 90% of malignant masses can be diagnosed by tissue obtained on the first two cores. You will never see a lesion better than before the first samples are taken, so it’s important to carefully target and obtain these cores from the most suspicious portion of the lesion. This will maximize your ability to obtain diagnostic material.
Targeting the deeper part of a small lesion first is another helpful technique ( Fig. 20-9 ). The more superficial portion will remain visible longer and will be more easily targeted on subsequent passes and during clip placement. If the more superficial portion is targeted first, air in the biopsy track has a greater chance of obscuring the remainder of the lesion.

Some small masses have pronounced shadowing that is even more conspicuous than the mass itself. When we biopsy this type of lesion, we don’t want to aim too deep, as this may cause us to miss the lesion entirely ( Fig. 20-10 ).
Bleeding can also obscure a small mass during biopsy. If bleeding occurs and you are losing visibility of the mass, get a couple more quick samples if you can, place a clip, and end the procedure. Remember: the first one or two well-targeted cores will likely be diagnostic. If they are not (i.e., the pathologic findings are discordant with imaging), a repeat biopsy can be performed after the hematoma has resolved (usually in a few weeks).
Vacuum-assisted biopsy can also work very well for small masses ( Fig. 20-11 ). The vacuum needle chamber is placed posterior to the lesion. Samples are obtained anterior to the biopsy needle while the needle remains in place.
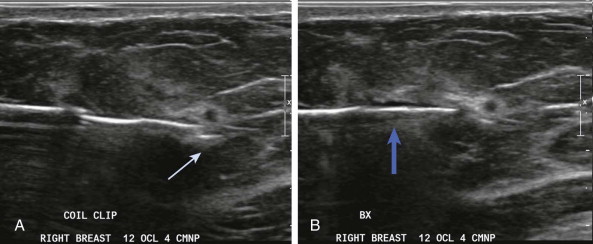
It’s a good idea to have a clip ready to use throughout the procedure. That way, if you lose visualization of a mass, the clip can be placed immediately while you can still visualize the biopsy site. You can even place a clip before finishing the biopsy if the lesion is very small or disappearing during sampling. Putting the clip just deep to the lesion will help keep it from being removed if additional cores are obtained ( Fig. 20-12 ).
Cyst versus Solid Mass
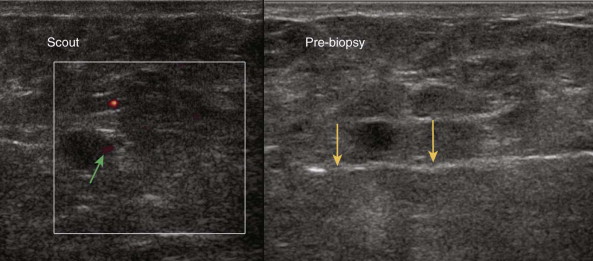
If you suspect that a hypoechoic mass may represent a cyst containing debris rather than a solid mass, aspiration can be performed first ( Fig. 20-13 ). If the aspirate is nonbloody and the lesion completely resolves, you are done. Core biopsy is not needed, and the aspirate can be discarded. If the aspirate is bloody and the lesion disappears, send the aspirate for cytologic testing and place a clip ( Box 20-1 ). Purulent aspirate is sent for microbiology culture and sensitivity testing. If the lesion does not resolve with aspiration, we proceed directly to core biopsy of the residual solid mass (see Fig. 20-13 ).