Study hip joint injection
Author
Accuracy
Ultrasound guided
Smith et al. [5]
97 % fluoro confirmed
Ultrasound guided
Pourbagher et al. [6].
100 % CT confirmed
Ultrasound guided
Levi [7]
100 % fluoro confirmed
Blind anterior approach
Leopold et al. [8]
60 % dissection
Blind anterior approach
Dobson [9]
61 % dissection
Scanning Technique and Anatomy to Identify
The patient is placed supine with the leg in the neutral position. The anterior superior iliac spine (ASIS) is palpated and the transducer is placed in the transverse (axial) plane with the lateral end over the ASIS. The transducer is then slowly moved medially and inferiorly until the femoral head is visualized. The femoral neurovascular structures are just medial to the transducer in this position. In order to visualize these structures, the transducer is rotated in the transverse plane and moved medially to identify the femoral nerve, artery, and vein. The use of Doppler can make it easier to visualize the vessels. Once the location of these structures is confirmed, the transducer can be moved back to the femoral head. While maintaining the medial portion of the transducer on the femoral head, the lateral end of the transducer is rotated inferiorly approximately 40° to visualize the femoral neck. In this view, there should be a clear picture of the femoral head/neck junction, the overlying hyperechoic iliofemoral ligament, and hip capsule. While maintaining this orientation, the transducer is moved slightly superolaterally to place the transducer as far laterally while keeping the femoral head/neck junction in view (Fig. 5.1) [12].
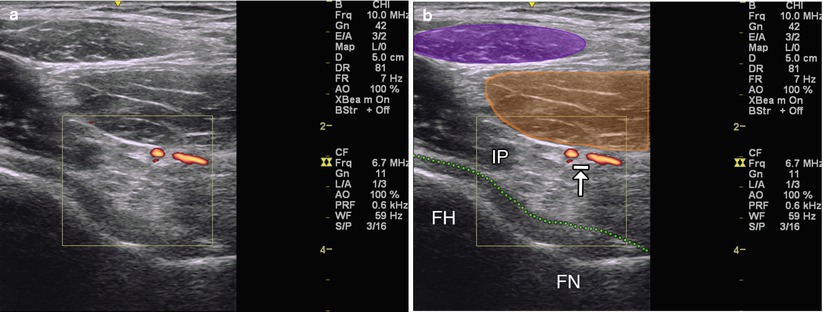
Fig. 5.1
(a) Sagittal oblique view of the femoral head/neck junction with Doppler visualizing artery. (b) Purple indicates sartorius muscle. Orange indicates rectus femoris. IP iliopsoas muscle, FH femoral head, FN femoral neck. Arrow with stop indicates vasculature. Dotted green line indicates hip joint capsule
Injection Technique: In-Plane Sagittal Oblique Approach
Patient positioning: Lay the patient supine with the leg in the neutral position. The hip can be slightly flexed for patient comfort by placing a knee roll under the ipsilateral knee.
Probe positioning: Place the lateral end of the probe in the axial plane over the ASIS and scan medially and inferiorly until the femoral head/neck junction comes into view. Rotate the lateral end of the transducer approximately 40°. At this point, the transducer should be parallel to the femoral neck (Fig. 5.2a). Be sure to identify the femoral neurovascular structures medial to the head/neck junction in the transverse plane prior to injection.
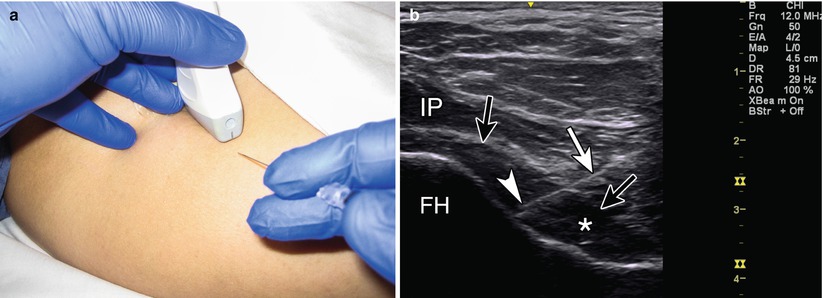
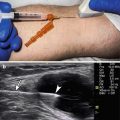
Fig. 5.2
(a) Example of sagittal oblique probe position over femoral head/neck junction with in-plane needle position. (b) Example of in-plane long-axis approach. White arrow indicates needle. Arrowhead indicates needle tip. Black arrows indicate joint capsule. Asterisk indicates effusion. IP iliopsoas muscle, FH femoral head
Markings: Once the joint space is identified, the probe is moved as far lateral while still keeping the joint space in view. Mark this probe location. Rotate to the axial plane to scan medially, identify and mark the femoral neurovascular bundle, and then return to the previously marked probe position. Mark the skin a few centimeters distal to the inferior end of the transducer. By placing the needle in this location, it will help to increase needle visibility by keeping the needle more parallel to the transducer. The area is then prepped in the usual manner.
Needle position: A 25 g needle can be used to anesthetize the area using a layer-by-layer technique with 4–6 mL of 1 % lidocaine [12]. Alternatively ethyl chloride spray may be used. A 22 or 25 gauge spinal needle with the stylet in place is then advanced under direct ultrasound visualization to the femoral head/neck junction. A slight increase in resistance is felt as the needle traverses through the iliofemoral ligament into the hip joint. Once inside the joint, a test injection of 1–2 mL of local anesthetic can help confirm the intra-articular placement. Alternatively, a small amount of air can be injected to confirm needle placement into the joint space. If the air collects in a nondependent fashion along the hip joint, then the needle is believed to be intra-articular. However, if the air bubbles collect around the needle tip, then the needle is likely in an extra-articular position and needs to be adjusted. The remainder of the injectate can then be injected while visualizing the distension of the capsule under ultrasound.
Safety considerations: It is important to identify the femoral nerve, artery, and vein prior to inserting the needle in order to avoid piercing these structures. Care should be taken to avoid femoral nerve block from excessive local anesthesia.
Pearls:
Gently pushing the probe into the skin (heel-toe maneuver) may help to better visualize deeper structures in larger patients.
In thinner patients a linear transducer may be used at a lower frequency or “virtual convex” setting. Using heel-toe maneuver may be easier to maintain constant needle visualization.
For larger patients a curvilinear transducer may be needed. Because of the curve, it is more difficult to visualize the needle in its entirety as some of the ultrasound beams will point away from the needle. It is important to use the heel-toe maneuver to maintain visualization of the needle tip.
Equipment needed:
Wide-bandwidth linear array transducer (virtual convex mode may be helpful, if available) or low-frequency curvilinear transducer
22–25 gauge 3.5–5″ spinal needle
1–2 mL of steroid preparation
4–5 mL local anesthetic
Greater Trochanteric Pain Syndrome
Greater trochanteric pain syndrome (GTPS) is a common cause of lateral hip pain [13]. Tenderness to palpation over the affected greater trochanter defines the diagnosis. The syndrome has been associated with low back pain, slight female predominance, and obesity [14]. It is usually due to a tendinopathy of the gluteus medius and minimus or inflammation of the greater trochanteric bursa (gluteus maximus) or gluteus medius bursae. The gluteus medius tendon inserts at two different locations on the greater trochanter: the superoposterior facet and the lateral facet. The gluteus minimus inserts on the anterior facet of the greater trochanter [15]. There are several bursae within this region. Between the gluteus minimus tendon and the anterior facet lies the subminimus bursa. The submedius bursa is located deep to the lateral insertion of the gluteus medius tendon. Typically, the greater trochanteric bursa is actually deep to the gluteus maximus tendon and superficial to the gluteus medius tendon. Clinically this is more tender posteriorly. Typical lateral pain is due to subgluteus minimus or medius bursitis [16]. Evidence supports that gluteus medius tendinopathy is the predominant finding in patients with GTPS and not bursitis [17]. Therefore, injections should be directed above and below the gluteus medius tendon, as well as into the greater trochanteric bursa, if seen (Table 5.2).
Scanning Technique and Anatomy to Identify
The patient is placed lying on the unaffected side in the lateral decubitus position with both hips slightly flexed. The trochanteric bursae are not typically visualized. Even when inflamed, fluid collection in the bursa may be difficult to appreciate. The transducer is placed longitudinally, parallel to the femoral diaphysis and scanned anterior to posterior to view the gluteus minimus and medius tendon insertion [18]. The gluteus minimus tendon can be visualized as it attaches on the anterior facet of the greater trochanter. The lateral and posterior parts of the gluteus medius tendon can also be evaluated as they insert on the lateral and superoposterior facets of the greater trochanter [19]. Signs of gluteus medius and minimus tendinopathy can also be assessed in this view. Look for tendon thickening, hypoechogenicity, loss of fibrillar pattern, cortical irregularity, calcifications, enthesophytes, or tears [20]. One can also view the greater trochanter in the transverse view with the probe subsequently moved anterior to posterior. The gluteus minimus and medius tendons will be viewed as a fibrillar hyperechoic structure (Fig. 5.3) [18].
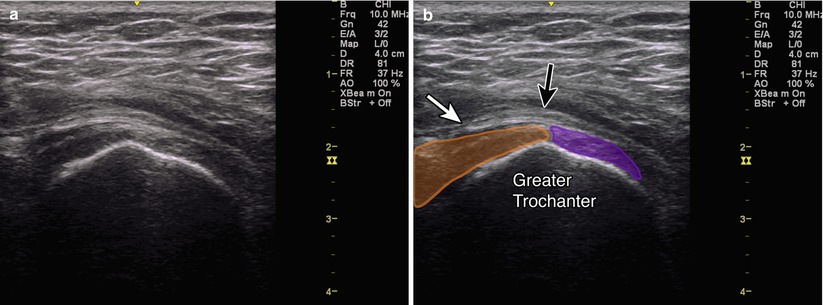
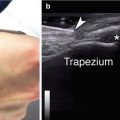
Fig. 5.3
(a) Transverse view of the greater trochanter. (b) Purple indicates gluteus minimus attaching to anterior facet. Orange indicates gluteus medius attaching to lateral facet. Black arrow indicates iliotibial tract. White arrow indicates subgluteus maximus bursa (trochanteric bursa). Greater trochanter labeled
Injection Technique: In-Plane Axial Approach
Patient positioning: Lay the patient on the unaffected side in the lateral decubitus position with both hips slightly flexed.
Probe positioning: The transducer is positioned in the transverse (axial) plane over the greater trochanter (Fig. 5.4a). A fluid-filled bursal sac may be seen just superficial to the greater trochanter or superficial to the gluteus medius or minimus tendons.
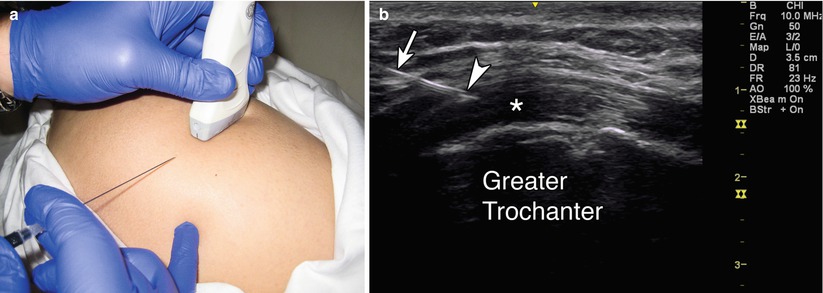
Fig. 5.4
(a) Example of probe position over greater trochanter with in-plane injection technique. (b) Example of in-plane axial approach. White arrow indicates needle. Arrowhead indicates needle tip. Asterisk indicates anisotropy within tendon. Greater trochanter labeled
Markings: No special markings are needed.
Needle position: The needle is advanced under ultrasound guidance into the fluid-filled bursal sac if visualized; otherwise, it is placed both superficial and deep to the gluteus medius tendon, in the subtrochanteric or subgluteus medius bursa, respectively. Half of the medication may be injected into each site to cover both bursae.
Safety considerations: There are no major overlying blood vessels or nerves to avoid.
Pearls:
Be careful not to apply too much force on the transducer as you may compress the inflamed bursa and cause pain during the procedure.
Equipment needed:
High-frequency linear array transducer (8 MHz+)
22–25 gauge 1.5–3″ needle
1 mL of steroid preparation
4–5 mL local anesthetic
Hip Adductor Tendinosis/Obturator Nerve
Groin pain is a common complaint in many sports. Adductor tendinopathy accounts for 2/3 of all sports related groin injuries, most commonly in hockey, soccer, and running [3, 20]. Patients typically complain of groin or pelvic pain exacerbated by sport-specific activities. Provocative physical exam maneuvers may include a positive squeeze test and pain at the adductor origin with passive stretch or resisted adduction. Treatment is typically conservative with relative rest, pain medications, and physical therapy. If the pain is not relieved, different injections have been proposed to help with pain and/or healing [21].
The obturator nerve is derived from the ventral rami of L2, 3, and 4. As the nerve courses inferiorly through the pelvis, it divides into an anterior and posterior division. The anterior division provides motor innervation to the adductor longus, adductor brevis, and gracilis muscles while also supplying cutaneous innervation to the medial thigh [22]. The posterior division innervates the adductor magnus and provides a sensory branch to the medial side of the knee joint [3]. Obturator nerve blocks are important for providing pain relief or motor blockade in cases of preventing obturator jerk reflex during transurethral bladder tumor resections, obturator neuralgia, or adductor spasticity as seen in cerebral palsy, spinal cord injury, and other upper motor neuron syndromes. They may also be useful in assisting in the treatment or diagnosis of hip pain (Table 5.3) [18].
Scanning Technique and Anatomy to Identify
The patient is placed in the supine position, with the leg external rotated. Start by placing the probe in the transverse view over the pubic tubercle. Then move the transducer laterally until the three layers of adductor muscles appear. The superficial layer represents the adductor longus laterally and the gracilis medially. The middle layer represents the adductor brevis. In between the fascia of the adductor longus and adductor brevis muscles is the anterior division of the obturator nerve. The obturator nerve does not have the “honeycomb” appearance under ultrasound as do other nerves. Instead, it is localized by its distinct appearance passing through the fascial planes of the adductor brevis. It is important to visualize the medial femoral circumflex artery and vein which traverses between the pectineus muscle and iliopsoas muscle which then continues to travel intrafascially between the obturator externus and adductor brevis muscle [3]. Deep to the adductor brevis, the posterior division of the obturator nerve can be seen traversing the fascia. The anterior and posterior divisions of the obturator nerve can be localized approximately 2–3 cm lateral and 2–4 cm distal from the pubic tubercle. The anterior division is located about 1.2–2 cm deep, while the posterior division is located about 2.3–3.6 cm deep. The deep layer of muscle represents the adductor magnus. Scan proximally toward the pubis to view the insertion of these muscles. The insertion of the adductor longus tendon can be seen with its triangular hypoechoic shape. Although much more difficult to visualize, the common obturator nerve can be found approximately 1–3.5 cm lateral and 1–3 cm distal from the pubic tubercle (Fig. 5.5) [18].
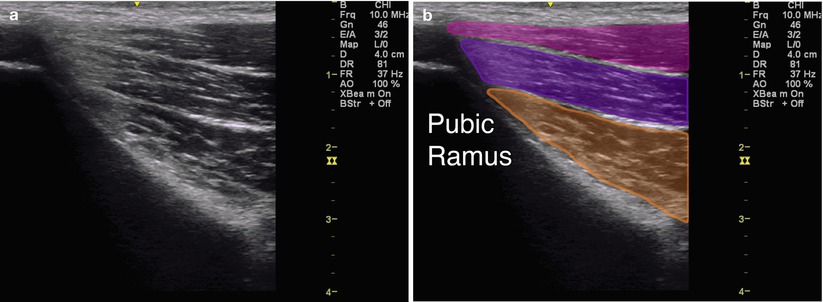
Fig. 5.5
(a) Coronal view off of the pubic ramus. (b) Magenta indicates adductor longus. Purple indicates adductor brevis. Orange indicates adductor magnus. Pubic ramus labeled
Injection Technique: In-Plane Coronal Approach
Patient positioning: Lay the patient supine with the leg in slight external rotation; the affected hip can be slightly flexed for comfort.
Probe positioning: Place the probe in the transverse view over the ipsilateral pubic tubercle and scan laterally until the three layers of adductor muscles come into view. Turn the probe until a longitudinal view of the adductor musculature is attained (Fig. 5.6a). The anterior division of the obturator nerve will be seen traversing the fascial plane between the adductor longus and adductor brevis muscles, while the posterior division will be seen traversing the fascial plane between the adductor brevis and adductor magnus muscles. The medial femoral circumflex artery can be seen between the obturator externus and the adductor brevis [18]. The obturator artery usually divides into anterior and posterior branches which encircle the obturator foramen.
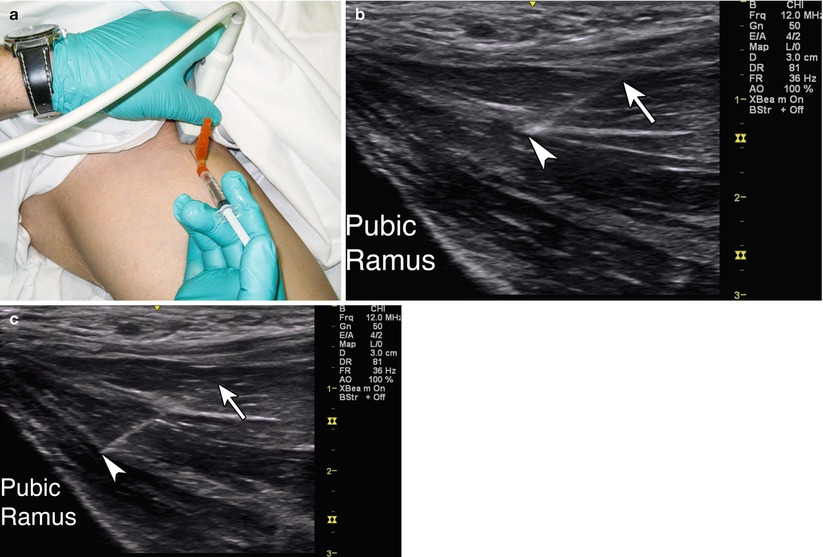
Fig. 5.6
(a) Example of probe position over adductor musculature and obturator nerve with in-plane injection technique. (b) Example of in-plane coronal approach. Arrow indicates needle. Arrowhead indicates needle tip in the fascial plane between the adductor longus and brevis for the anterior division. Pubic ramus labeled. (c) Example of in-plane long-axis approach. Arrow indicates needle. Arrowhead indicates needle tip in the fascial plane between the adductor brevis and magnus for the posterior division. Pubic ramus labeled
Markings: Obturator and medial femoral circumflex arteries and veins if noted.
Needle position: Advance the needle under direct ultrasound visualization so that the needle tip is directed just outside the desired adductor tendon or to the fascial plane of the obturator nerve division of interest. Even if nerve visualization is difficult, spread of local anesthetic in the appropriate fascial plane under direct ultrasound guidance confirms an accurate block.
Safety considerations: It is important to identify the obturator and medial femoral circumflex arteries and veins prior to inserting the needle in order to avoid piercing these structures [18].
Pearls:
Externally rotating the leg with the knee flexed can result in poor nerve imaging.
Given the probe compression needed to visualize the obturator nerve, the walls of the obturator vein may be collapsed and therefore not visible. Doppler mode can help visualize the obturator artery which lies in close proximity, or the probe pressure can be released to visualize rebound flow.
Equipment needed:
High-frequency linear array transducer (8 MHz+)
22–25 gauge 1.5–3″ needle
1 mL of steroid preparation if desired
3–5 mL of local anesthetic or alcohol or phenol solution
Lateral Femoral Cutaneous Nerve
The lateral femoral cutaneous nerve is a pure sensory nerve that arises from the L2 and L3 spinal nerve roots. The nerve travels downward lateral to the psoas muscle and then crosses the iliacus muscle. Near the anterior superior iliac spine (ASIS), the nerve courses in contact with the lateral border of the inguinal ligament [23]. It is susceptible to compression as it courses from the lumbosacral plexus, through the abdominal cavity, under the inguinal ligament, and into the subcutaneous tissue of the thigh [24].
Related posts:


Stay updated, free articles. Join our Telegram channel

Full access? Get Clinical Tree


