and Joel Marden1
(1)
Department of Radiology, Winthrop-University Hospital, Mineola, NY, USA
Keywords
Biopsy boneBiopsy equipmentBiopsy fine needle aspirationBiopsy needle systemsBiopsy soft tissue coreImaging guidance computed tomographyImaging guidance fluoroscopyTechnique coaxialTechnique single needleTechnique tandem needleLearning Objectives
- 1.
To introduce tools that can be used for image-guided percutaneous spine and rib biopsy procedures
- 2.
To learn when and how to use these instruments
- 3.
To learn techniques that can be applied with these tools to improve their diagnostic utility
- 4.
To learn the basic technical aspects of CT guidance in order to perform these procedures
3.1 Introduction
In order to properly and safely perform an image-guided percutaneous spine or rib biopsy procedure, the operator must select and correctly utilize the instruments that are necessary to perform that procedure. The operator must have a solid comfort level with a specific biopsy instrument and must understand how to use the tool. All of these instruments are packaged with product specifications and instructions for use. An operator is required to know the product specifications and to review the instructions for use prior to using the instrument. When an operator knows specific details about the instrument such as inner and outer diameter and length of a needle, then the operator will be able to easily utilize the instrument especially when deploying it with coaxial technique. If the operator is uncertain about which coaxial instrument matches or is compatible with another, then they should examine the tools and decide upon their use before the procedure. The operator should understand the advantages and disadvantages of each tool and be able to exploit the advantages of a given tool for a specific situation. For example, if the operator encounters a lytic osseous lesion and is not successful in retrieving tissue with a bone biopsy needle, then the operator can switch to a fine needle aspiration technique or use a soft tissue cutting needle instead (Fig. 3.1). In other words, the use of the correct tool can turn a nondiagnostic biopsy procedure into a procedure that not only yields a biopsy specimen but also the correct pathologic diagnosis.

Fig. 3.1
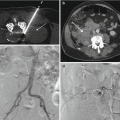
A 5-year-old male with neck pain. Fat-suppressed contrast-enhanced T1-weighted sagittal image (a) shows a partial C7 vertebral compression deformity that is associated with diffuse contrast enhancement (curved arrow) and focal prevertebral soft tissue enhancement (arrow). Sagittal CT reformation in bone window algorithm (b) shows a partially lytic lesion (arrow) at C7. Axial CT image (c) from biopsy procedure shows coaxial insertion of a 14 gauge trephine bone needle (arrow) into the C7 vertebral body. Despite multiple attempts and maneuvers, a specimen could not be obtained. Axial CT image (d) shows that the bone needle has been exchanged coaxially for a 16 gauge soft tissue core biopsy needle (arrow). Two soft tissue cores were obtained and showed a pathologic diagnosis of Langerhans cell histiocytosis
Disclaimer
The demonstration of the instruments in this chapter does not constitute an endorsement of the product or the manufacturing company. Furthermore, the authors have absolutely no financial relationships with the manufacturers of these products, and no corporate entity has contributed to this endeavor. As the emphasis of this chapter is on the product type and the principles of application for a given product type, we have refrained from disclosing actual product names. Indeed, a large variety of percutaneous biopsy products are commercially available. Prospective users of these products can easily locate and purchase the necessary instruments in order to perform these biopsy procedures.
3.2 The Tools
Prior to performing image-guided percutaneous spine or rib biopsy, the operator should become familiar with spine and rib biopsy instruments and techniques. It is best for the operator to develop a fundamental understanding and experience with a few basic tools of each type: fine needles, soft tissue cutting needles, and bone biopsy needles. This will enable the operator to develop sound techniques and understand which biopsy scenarios require specific instruments and in which order to utilize, integrate, or exchange these instruments.
Tools
- 1.
Fine needle
- 2.
Soft tissue core or cutting needle
- 3.
Bone needle
3.2.1 Fine Needle Aspiration
Fine needle aspiration (FNA) is a relatively quick procedure to learn and perform, yet it takes a very long time to master this procedure. In the majority of cases, the needles that are used for the spine or rib biopsy procedure range in length from 10 to 20 cm (Fig. 3.2). The objective of this procedure is to make short to-and-fro excursions with a lengthy but small-bore cutting needle, in the range of 25–18 gauge, while applying continuous suction, with a small Luer-Lok syringe attached to the hub of the needle (Fig. 3.3). The suction is stopped immediately prior to removal of the needle tip from the lesion so as not to aspirate cells from normal tissue and to avoid aspiration of hemorrhagic fluid. The latter phenomena, unfortunately, is not an uncommon occurrence that confounds if not prevents a cytologic diagnosis. Lesions which may be amenable to FNA include soft tissue masses that are solid or composed of variable matrix, such as mixed solid cystic lesions (Table 3.1). FNA may be attempted on purely cystic masses in order to sample the cyst wall. When there is either a breach in the osseous cortex or a bone needle has penetrated into the marrow space of the vertebra or rib, it may be possible to perform FNA using a coaxial approach.


Fig. 3.2
Examples of FNA needles. The 21 gauge and 22 gauge 15 cm long needles have small adjustable depth markers (arrows). The 22 gauge 20 cm needle also has 1 cm markings
Fig. 3.3
Photographs of step-by-step simulated demonstration of an FNA procedure; FNA can be used for soft tissue components of vertebral or rib lesions. A 17 gauge 10 cm guide needle (a) has a beveled tip (large arrow) that projects a few millimeters distal to the guide cannula tip (small arrow). The guide cannula has 1 cm markings which help guide and control advancement of the guide cannula. A plastic depth gauge has an adjustable lock (curved arrow) that prevents the guide cannula from being advanced further than this set point and helps to secure the guide cannula at the skin entry site. After guide needle placement (b) to the desired depth (arrow), the stylet is removed. A 22 gauge needle (c) is coaxially inserted through the guide needle to the desired depth (arrow). After the FNA needle is inserted into the lesion (d), the stylet is removed, and a 10 mL Luer-Lok syringe is attached to the needle hub (arrow). Aspiration (e) is performed by maintaining continuous suction (curved arrow) on the needle as it is moved slightly back and forth (arrows) within the lesion. After stopping the aspiration within the lesion, the needle is removed, and the specimen is either transferred to a slide or to the appropriate cytologic media (f)
Table 3.1
Biopsy Techniques
1. Fine needle aspiration |
Neoplasm |
Solid soft tissue mass |
Soft tissue mass composed of variable matrix |
Hypervascular soft tissue mass (e.g., renal carcinoma metastasis) |
Lesion involves the marrow cavity of the vertebra or rib |
Infection |
Disk |
Paraspinal abscess |
Facet joint |
2. Soft Tissue Core Biopsy |
Neoplasm |
Extraosseous soft tissue mass |
Intraosseous soft tissue mass: lytic lesion or marrow space occupying soft tissue lesion |
Infection |
Soft tissue phlegmon |
Disk – may require an automated percutaneous diskectomy device |
3. Bone Biopsy |
Neoplasm |
Vertebra or rib lesion (lytic, sclerotic, mixed lytic-sclerotic) |
Infection |
Disk-vertebral end plate |
Facet joint |
The key to performing a successful FNA procedure is preparation. After lesion analysis, for both matrix and measurement, the operator decides upon an approach that will safely access the lesion and provide the best opportunity for specimen yield. Factors that impact on maximizing specimen yield for sampling potentially neoplastic lesions include choosing a solid, non-necrotic portion of the lesion. This may consist of an area that shows contrast enhancement or avid FDG uptake on a pre-procedure examination. Choose a trajectory that maximizes the possibility of passes and the excursion distance of the biopsy needle inside of the lesion. Literally, try to get into the “meat” of the lesion with your biopsy passes and avoid the ill-defined areas where there may be necrosis, cyst fluid, or a possibility of sampling normal tissue. For infection, however, do sample the fluid-containing areas as these might be abscess collections. Given the increased viscosity of the purulent abscess material, large gauge needles, such as 18 gauge or larger, should be considered for use when aspirating a suspected abscess collection.
When sampling a soft tissue mass with an FNA procedure, the objective is to separate a small cell cluster from the mass by using the cutting properties of the needle and then aspirate this cell cluster into the needle bore (Gupta et al. 2002). The to-and-fro or back-and-forth excursions of the FNA needle within the lesion should be short, quick, and choppy. Slight rotations of the needle within the lesion matrix help to exploit the cutting properties of the needle. Also, mild angulations of the needle as it is moved forward help to separate and break up the tissue planes along the needle trajectory. Consistent aspiration with the syringe, by pulling back on the plunger, is applied when the needle tip is within the lesion matrix. Small syringes, 5–10 mL, can be used with smaller gauge needles, such as 25 and 22 gauge needles. A 20 gauge syringe can be used with larger gauge needles, such as an 18 gauge needle, especially when attempting to aspirate an abscess collection. Some commercially available syringes and FNA systems have a locking mechanism that is activated by twisting the retracted plunger in order to provide continuous suction during the aspiration phase of the biopsy. The main property of the syringe is that it should have a Luer-Lok technology that allows for a good twist-on connection to the needle hub. This will prevent an air leak, which would otherwise foil the aspiration. After the operator completes the aspiration, the syringe plunger can be released in order to cease the aspiration. With a basic syringe and fine needle, this can occur with the needle tip still located within the lesion. The FNA needle is then withdrawn, and the sample is expressed either onto a slide or into a cytologic alcohol medium for subsequent microscopic analysis. In other FNA biopsy systems, the syringe plunger remains withdrawn until the operator is ready to deposit the sample, as pushing the plunger ejects the specimen (Fenton and Czervionke 2003). The presence of a cytotechnologist or pathologist greatly enhances the efficiency of the FNA process as these individuals can confirm whether or not the operator has obtained adequate specimens.
The FNA procedure becomes even safer and more efficient with the use of coaxial technique and CT guidance (Table 3.2). With the use of coaxial technique, a guide needle is advanced to the margin of the lesion. This avoids reentry injury to the skin and subcutaneous tissues and enhances patient comfort during the procedure. Coaxial technique provides a safe conduit to the lesion, subjecting adjacent critical structures to fewer chances of needle injury that might otherwise result from multiple needle passes. Once the guide needle is positioned, a CT image is obtained to confirm the position of the guide needle. The guide needle stylet is removed, and multiple sequential FNA passes can be made through the guide needle. The length of the FNA or insert needle should be greater than the length of the guide needle so as to allow for the appropriate movement or excursion of the insert needle within the lesion. The FNA needle is advanced into the margin of the lesion using CT guidance. The FNA needle stylet is removed, and a syringe is connected to the FNA needle hub. By analyzing the CT image, the operator will know how long to make the needle excursions and in which directions. An aspiration is performed, and the needle is removed and replaced by another needle in order to repeat the process. With each needle exchange, a CT image is studied in order to assess the position of the guide needle and the FNA needle relative to the lesion and the adjacent critical structures. By moving and angling the guide cannula hub slightly, the operator is able to redirect the FNA needle in a slightly different trajectory within the lesion. At least three FNA passes should be performed or more if necessary and possible. If specimen is obtained upon the initial passes and the cytopathologist is confident about the diagnosis, then the procedure can be stopped at the discretion of the operator and the pathologist.
Table 3.2
FNA CT-guided percutaneous spine or rib biopsy
Step | Comment |
|---|---|
Localize | Use CT and a skin grid to localize the lesion |
Mark the skin entry site | |
Sterilize | Prep and drape the area of the skin entry site |
Anesthetize | Use local anesthetic agent at the skin entry site and adjacent to the periosteal surface or lesion margin; use intravenous sedation or analgesia or anesthesia |
Advance | Guide needle to the margin of the lesion under CT guidance |
Confirm | Guide needle position, lesion dimensions to determine excursions of the fine needle within the lesion, relative to nearby critical structures |
Insert | Fine needle |
Prepare | Remove fine needle stylet and carefully attach an aspiration syringe |
Aspirate | Use continuous suction within the lesion as the fine needle is moved within the lesion; cease aspiration when retrieving the fine needle from the lesion |
Specimen delivery | Onto slide or cytologic alcohol media |
Repeat FNA | Ideally, three passes or as many as safely possible |
A soft tissue core biopsy can be performed after the FNA passes. These soft tissue cores provide additional specimen that might be helpful in the event that special stains are required for further analysis of the tissue in question. The FNA procedure should be performed first because soft tissue core biopsy tends to cause intralesional hemorrhage, and this blood contaminates the cytologic specimen and compromises the cytologic diagnosis.
3.2.2 Soft Tissue Core Biopsy
Soft tissue core biopsy is very helpful in the evaluation of soft tissue masses (Ray-Coquard et al. 2003). This procedure is frequently performed for the evaluation of spine and rib lesions. Initially, this statement appears to be counterintuitive. Many operators assume that this procedure will have no utility in the sampling of osseous structures but, with experience, realize that there are a plethora of destructive lesions that breach the osseous margins of the spine or rib and, therefore, are amenable to soft tissue sampling techniques (Fig. 3.1). A few different types of core biopsy needles are available for soft tissue biopsy. The majority of these, as evidenced by their bulky design, have been developed for use elsewhere in the body. Nevertheless, there are a few of these core biopsy systems that can be used for spine or rib biopsy (Figs. 3.4 and 3.5). The critical aspect of core soft tissue biopsy is a combination of the furthest distance which the needle tip travels within the lesion and the length of the coring chamber that can be deployed within the lesion matrix. In some needle systems, the needle is placed at the proximal margin of the lesion, and the cutting mechanism is activated such that the needle travels a preset distance within the lesion in order to obtain a sample (Fig. 3.6). In other systems the needle tip is advanced deep enough into the lesion in order to subsequently expose the biopsy chamber within the matrix of the lesion so as to then obtain a soft tissue core sample (Fig. 3.4). Yet in another system, the needle is advanced into the lesion, and the biopsy chamber is temporarily exposed within the lesion and then retracted when the biopsy device is fully loaded; when the device is activated or fired, it sends the core needle back into its original position within the lesion with immediate, near simultaneous deployment of the cutting cannula (Fig. 3.7). The practical aspect of soft tissue core biopsy is to be aware of when these needles can be used during the biopsy process. Key factors that influence this decision are the presence of a large soft tissue mass and absence of osseous matrix along the needle trajectory. These are soft tissue cutting needles, not bone cutting needles, and their use for osseous lesions or in the setting of osseous material requires careful and thoughtful preparation. The use of a soft tissue cutting needle within the bone may result in bending or breakage of the needle tip; the needle may get stuck within the lesion which then will require a very extensive conversation with the patient and may require a surgical procedure to remove the device (Fig. 3.8). Only when there is a breach in the osseous margin of a lesion, or a coaxial channel has been made with a larger gauge bone needle, should the operator consider the possibility of approaching a lytic lesion or a marrow space lesion with a soft tissue core biopsy needle.


Fig. 3.4
Photographs of a semiautomated soft tissue core biopsy needle. The 18 gauge 15 cm length soft tissue core biopsy needle (a) fits coaxially through the 17 gauge 10 cm length guide needle. Close-up of needle (b) shows that the diamond tip needle stylet (arrow) projects a few millimeters beyond the cutting edge of the outer cannula (curved arrow). Once the guide cannula is positioned and its stylet removed (c), the core biopsy needle is inserted (curved arrow) into the guide cannula. The needle can be loaded (arrow) prior to or during the insertion; in this case the size of the core biopsy chamber can be set to either 1 or 2 cm. After imaging confirmation of the position of the core biopsy needle within the proximal lesion margin (d), the needle plunger is pushed forward, but not activated, as seen by the small gap (curved arrow). This exposes the needle’s biopsy chamber (arrows) within the lesion (e); this step would also require imaging confirmation. Simulation (f) of these maneuvers shows loaded or primed core needle (arrow) with the needle tip at the margin of the lesion (curved arrow). Closeup view of the needle (g) shows the stylet tip within the proximal lesion (arrow) and the biopsy cannula edge (curved arrow) at the lesion margin. By pushing the plunger forward (h), but not activating the cutting mechanism, the core biopsy chamber (small arrows) is exposed (in this case for a distance of 1 cm) within the lesion, while the needle tip (large arrow) extends toward the distal lesion margin. Additional forward pressure on the plunger (i) triggers the cutting mechanism, and the cutting edge of the cannula (curved arrow) slides over the biopsy chamber to sequester tissue within it; the tip of the needle stylet (arrow) remains in position near the distal lesion margin
Fig. 3.5
Comparison of two soft tissue core biopsy needle sizes. The 14 gauge biopsy needle is not only larger than the 18 gauge biopsy needle (a) but also has a larger core biopsy chamber (b). A larger needle is able to harvest more tissue
Fig. 3.6
Photographs of a soft tissue core biopsy needle. This 18 gauge 15 cm length (a) soft tissue core biopsy needle is used with a 17 gauge 11.8 cm guide needle. Closeup view (b) of the cutting tip (arrow) of the needle. This biopsy needle (c) is loaded by cocking the side handle (arrow); a side safety button (curved arrow) must be adjusted prior to activating the cutting mechanism by pressing the back button (small arrow). Simulation (d) of the positioning of the needle (arrow) relative to the proximal lesion margin prior to biopsy. After triggering the cutting mechanism (e), the needle moves forward within the lesion (arrow) a preset distance of 13, 23, or 33 millimeters. The needle would then be removed from the lesion out of the guide cannula in order to then harvest the specimen
Fig. 3.7
Photographs of a soft tissue core biopsy needle. This 20 gauge 16 cm soft tissue core biopsy needle (a) is used coaxially with a 17 gauge 7.8 cm guide needle. Simulation (b) shows that the initial loading of this needle exposes the biopsy chamber within the lesion for a distance of 1.8 cm (arrows). The needle (c) is now set to biopsy and retracts to the proximal lesion margin; there is a 4 mm offset between the needle stylet tip (arrow) and the cutting outer cannula (curved arrow). After the cutting mechanism is activated (d), the needle extends forward into the lesion (arrow) to obtain the soft tissue core
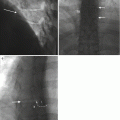
Fig. 3.8
Biopsy complication: broken needle. Axial CT image (a) shows guide cannula in place within the iliac crest. An attempt was made to biopsy the lytic lesion (arrow) with a soft tissue core biopsy needle. Axial CT image (b) shows the distal tip of the needle (arrow) lodged within the lesion. This was left within the lesion and the patient was informed of the complication
Soft tissue core needle biopsy is best performed using coaxial technique with a guide needle and CT guidance (Table 3.3). This will facilitate multiple safe biopsy needle passes and maximize the harvest of biopsy specimen. The use of large diameter biopsy needles (e.g., 14 gauge) is desirable, but this is determined by the lesion size and location relative to critical structures and balanced against the risk of hemorrhage. The larger diameter needles are able to obtain larger soft tissue cores, and this in turn improves the likelihood of obtaining a pathologic diagnosis. The guide needle and the soft tissue cutting needle are usually packaged in the same kit; the working diameter of these needles is therefore preset to facilitate coaxial technique. The guide needle is advanced to the margin of the lesion under CT guidance; the stylet of the guide needle is removed prior to insertion of the biopsy needle. Measurements are then made along the trajectory from the guide needle to the opposite margin of the lesion. This enables the operator to determine the optimal length of the biopsy “throw,” or core length, within the lesion matrix. Most soft tissue core biopsy needles have preset “throw” lengths (penetration or depth settings) that can be selected; the length of the “throw” should be less than the diameter of the lesion along the needle trajectory. Once the biopsy needle sample length is selected and set, then the biopsy needle is “loaded” or armed. The biopsy needle can now be deployed at the operator’s discretion in order to obtain a soft tissue core. Some biopsy needles can be loaded prior to coaxial insertion into the guide cannula, and some may require arming after coaxial insertion. CT guidance is required to monitor coaxial needle insertion. A specific semiautomated biopsy system with a lightweight handle allows the core chamber to be exposed within the substance of the lesion prior to firing or activating the cutting mechanism of the needle. This can be imaged with CT in order to show the exposed core chamber within the lesion and confirm the accuracy and safety of the biopsy needle location. The position and the throw length of other soft tissue core needle biopsy systems should always be confirmed using CT guidance. By activating the firing mechanism of the biopsy needle, a core sample is promptly obtained. The firing mechanism is activated by either pressing or sliding a button on the top or side of the needle handle or pressing on the plunger of the needle handle. The cutting needle is removed from the biopsy needle, and the stylet is placed within the guide needle to secure it and minimize back-bleeding. The soft tissue core is then removed from the core biopsy needle and placed in the appropriate transport medium for subsequent pathologic analysis. This often requires some form of manipulation of the soft tissue core with a small needle or a scalpel in order to dislodge the sample from the biopsy chamber. The biopsy needle can be reused if sterile technique has been maintained, or perhaps a different biopsy needle can be used, with a different diameter depending on the lesion in question. An attempt should be made to obtain four soft tissue cores, if possible, in order to optimize the diagnostic yield (Wu et al. 2008).
Table 3.3


Soft tissue core biopsy in CT-guided percutaneous spine or rib biopsy
Related posts:


Stay updated, free articles. Join our Telegram channel
Full access? Get Clinical Tree
