Mohini Rawat, DPT, MS, ECS, OCS, RMSK
Contents
- Anterior Knee
- Suprapatellar Region
- Quadriceps Tendon
- Femoral Trochlear Cartilage
- Patellar Tendon
- Anterior Bursae
- Medial and Lateral Patellar Retinaculum
- Suprapatellar Region
- Medial Knee
- Medial Joint and Meniscus
- Medial Collateral Ligament, Posterior Oblique Ligament, Adductor Magnus Tendon, and Medial Patellofemoral Ligament
- Pes Anserine Tendons
- Medial Joint and Meniscus
- Lateral Knee
- Lateral Joint and Meniscus
- Popliteus Tendon
- Lateral Collateral Ligament
- Iliotibial Band
- Biceps Femoris Tendon
- Common Fibular Nerve
- Lateral Joint and Meniscus
- Posterior Knee
- Patient position: Supine with the knee flexed at 30 degrees and supported on a roll/pillow
- Probe/transducer position:
a. Long axis (LX) view/longitudinal view: Use the patella as a bony landmark to scan the region in the LX view (Figure 6-1).
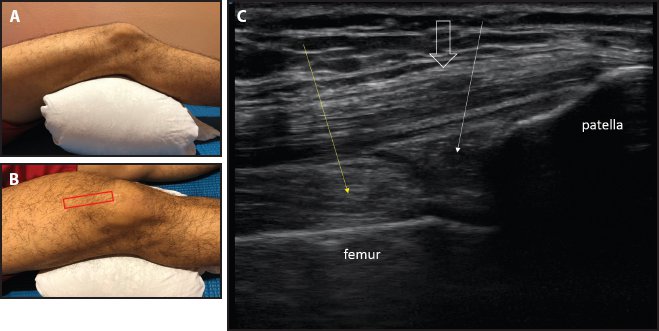
Figure 6-1. LX view of the suprapatellar region. (A) Limb positioning: supine with the knee flexed at 30 degrees and supported on a roll/pillow. (B) Probe placement. (C) LX view of the suprapatellar region showing the quadriceps tendon (big white arrow) and the suprapatellar fat pad (thin white arrow) separated from the prefemoral fat pad (yellow arrow) by the thin hypoechoic capsule.
b. Short axis (SX) view/transverse view: Place the probe transversely across the quadriceps tendon just proximal to its attachment at the patella to visualize the distal portion of the tendon in the SX view (Figure 6-2).
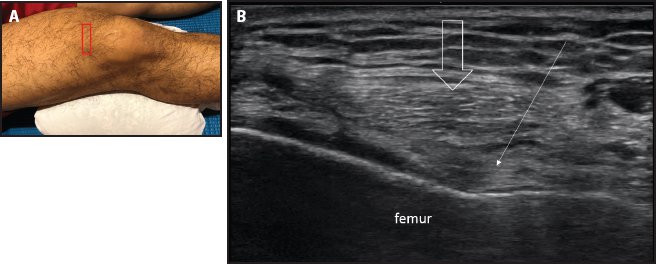
Figure 6-2. SX view of the suprapatellar region. (A) Probe placement. (B) SX view of the suprapatellar region showing the quadriceps tendon (big white arrow) and fat pad (thin white arrow) above the femur.
- Relevant anatomy: From superficial to deep, structures are visualized as skin, subcutaneous layer, quadriceps tendon attaching to the patella, prefemoral fat pad and suprapatellar fat pad, and femoral bony interface as the deepest structure (Figure 6-3).
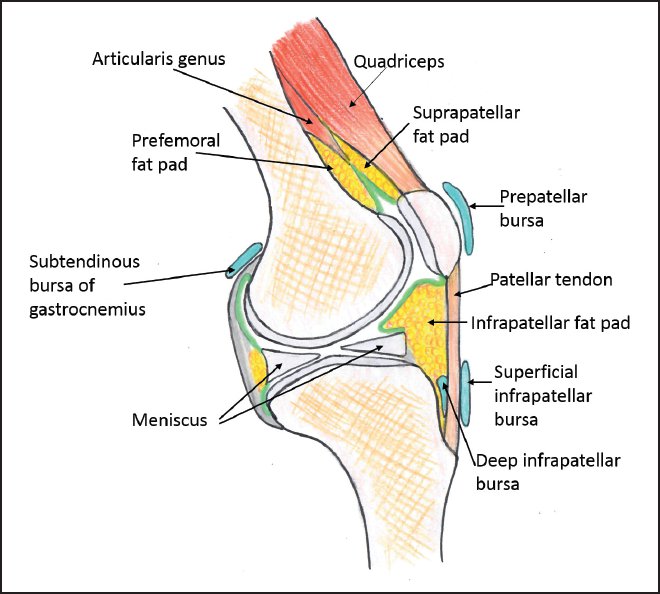
Figure 6-3. Sagittal section of the knee showing relevant anatomy of the suprapatellar region.
- Points to remember: Knee flexion at approximately 30 degrees is the optimal position to visualize the anatomy of the suprapatellar region to minimize anisotropy artifact due to tendon slack.
- Relevant anatomy: From superficial to deep, structures are visualized as skin, subcutaneous layer, quadriceps tendon attaching to the patella, prefemoral fat pad and suprapatellar fat pad, and femoral bony interface as the deepest structure (Figure 6-3).
- Patient position: Same as the position for a suprapatellar scan, with added flexion to take out the tendon slack if tendons show anisotropy artifact
- Probe/transducer position: Same as for a suprapatellar scan
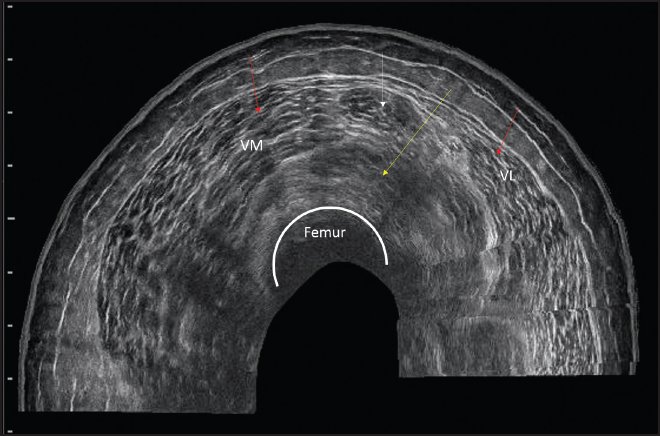
- Relevant anatomy: When scanned in the LX view, the quadriceps tendon shows a multilayer arrangement. From superficial to deep, there are 3 layers: the rectus femoris, vastus medialis/lateralis, and vastus intermedius (Figures 6-4 through 6-7).
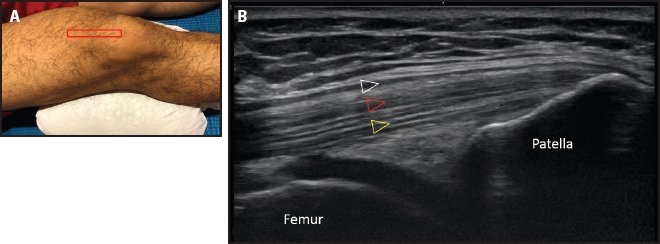
Figure 6-4. LX view of the quadriceps tendon. (A) Probe placement. (B) LX view of the quadriceps tendon showing the multilayer arrangement of the rectus femoris (white triangle), vastus lateralis/medialis (red triangle), and vastus intermedius (yellow triangle).
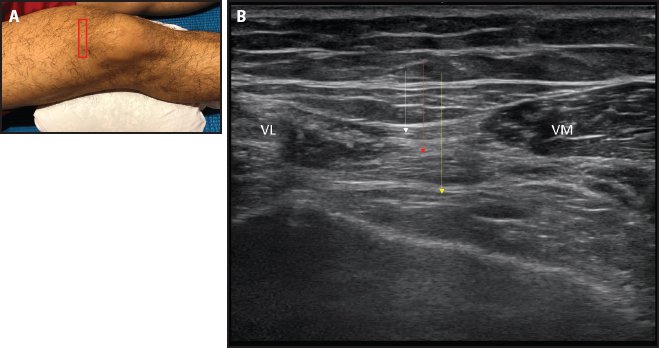
Figure 6-5. SX view of the quadriceps tendon. (A) Probe placement. (B) SX view of the quadriceps tendon showing the rectus femoris (white arrow) on top, vastus lateralis (VL) and vastus medialis (VM) in the middle (red arrow), and vastus intermedius (yellow arrow) as the deep layer.
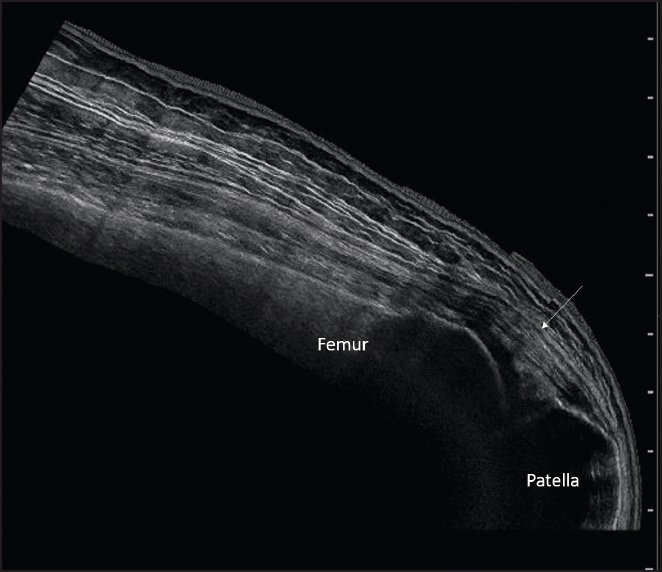
Figure 6-6. Panoramic LX view of the quadriceps (white arrow).
- Patient position: Supine with maximum knee flexion
- Probe/transducer position:
a. LX view/longitudinal view: With the patella as a bony landmark, the probe is oriented along the quadriceps tendon in the LX view (Figure 6-8).
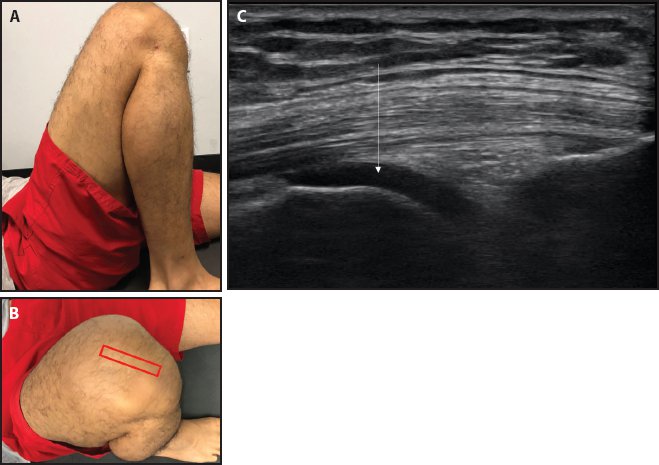
Figure 6-8. Femoral trochlear cartilage. (A) Limb positioning: supine with maximum knee flexion. (B) Probe placement for the LX view. (C) Femoral trochlear cartilage (white arrow) is seen as an anechoic structure over the femoral bony interface.
b. SX view/transverse view: Place the probe transversely at the level just proximal to the superior border of the patella to visualize the femoral trochlear cartilage (Figure 6-9).
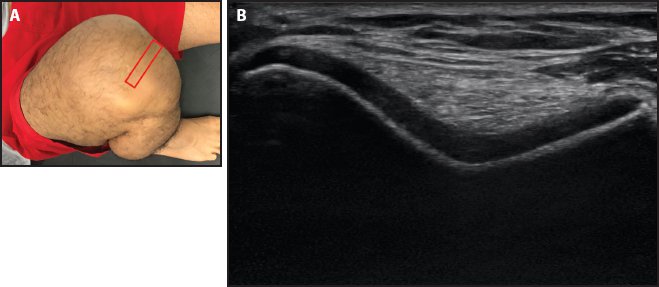
Figure 6-9. Sunrise view of the femoral trochlear cartilage. (A) Probe placement for sunrise view. (B) Sunrise view showing the anechoic cartilage overlying the femoral bony interface.
- Relevant anatomy: In the SX view, the femoral trochlear cartilage appears as an anechoic uniform area following the bony contour of the femoral trochlea. A sharp bony edge/protuberance on the medial aspect is the normal finding. Anechoic cartilage can also be seen in the LX view.
- Points to remember: Adding maximum flexion to the knee exposes the femoral trochlear cartilage anteriorly for sonographic visualization. If there is range of motion limitation of knee flexion, the femoral trochlear cartilage view may be restricted.
- Relevant anatomy: In the SX view, the femoral trochlear cartilage appears as an anechoic uniform area following the bony contour of the femoral trochlea. A sharp bony edge/protuberance on the medial aspect is the normal finding. Anechoic cartilage can also be seen in the LX view.
- Patient position: Supine with 30-degree knee flexion
- Probe/transducer position:
a. LX view/longitudinal view: Scan the patellar tendon longitudinally by bridging the patella and tibial tuberosity (Figure 6-10).
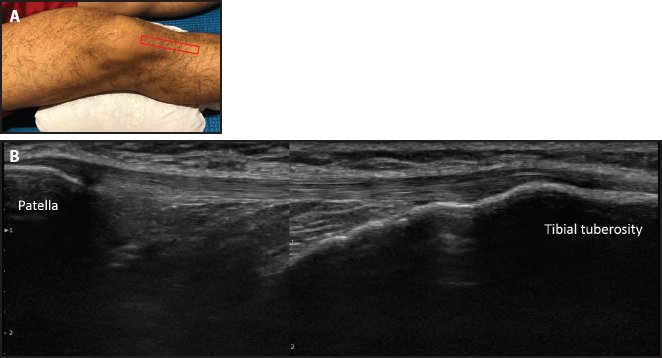
Figure 6-10. LX view of the patellar tendon. (A) Probe placement. (B) LX view of the patellar tendon.
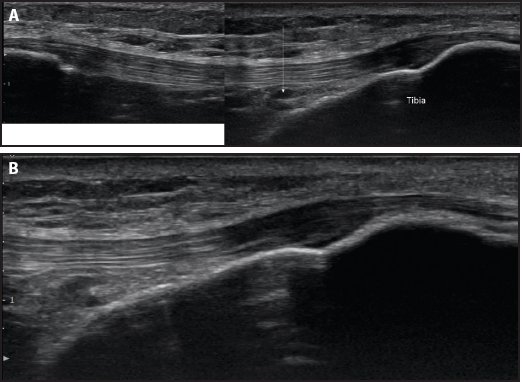
b. SX view/transverse view: Place the probe transversely across the patellar tendon. The tendon should be scanned along the length of the tendon in the SX view for complete evaluation (Figure 6-11).
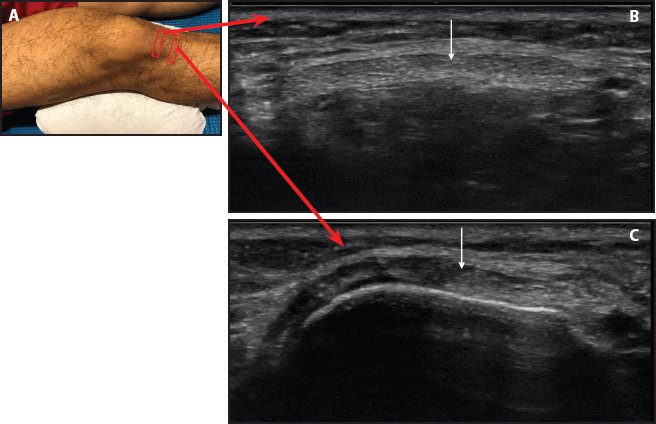
Figure 6-11. SX view of the patellar tendon. (A) Probe placement. (B) SX view of the patellar tendon (white arrow) at mid-length. (C) SX view of the patellar tendon (white arrow) distally over the tibia.
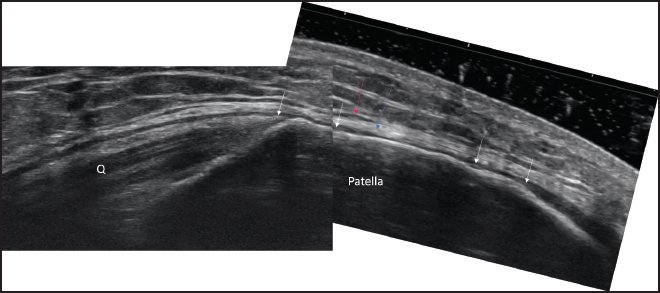
- Relevant anatomy: There is a proximal bony attachment of the patellar tendon at the patella and a distal tendon attachment at the tibial tuberosity. From superficial to deep, the structures are visualized as skin, subcutaneous tissue, patellar tendon attaching proximally to the patella and distally to the tibial tuberosity, and fat pad/Hoffa’s fat pad.
- Points to remember: The patellar tendon should be scanned in the LX and SX views from its proximal attachment site at the patella to the distal attachment site at the tibial tuberosity (Figure 6-12).
- Relevant anatomy: There is a proximal bony attachment of the patellar tendon at the patella and a distal tendon attachment at the tibial tuberosity. From superficial to deep, the structures are visualized as skin, subcutaneous tissue, patellar tendon attaching proximally to the patella and distally to the tibial tuberosity, and fat pad/Hoffa’s fat pad.
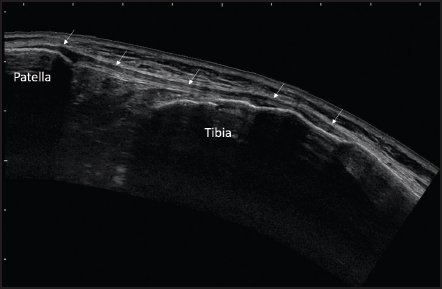
Figure 6-12. Panoramic LX view of the patellar tendon (white arrows).
- Patient position: Supine with slight knee flexion
- Probe/transducer position:
a. LX view/longitudinal view: The probe is placed longitudinally over the patella and then moved distally over the patellar tendon and tibial tuberosity with light pressure (Figure 6-13).
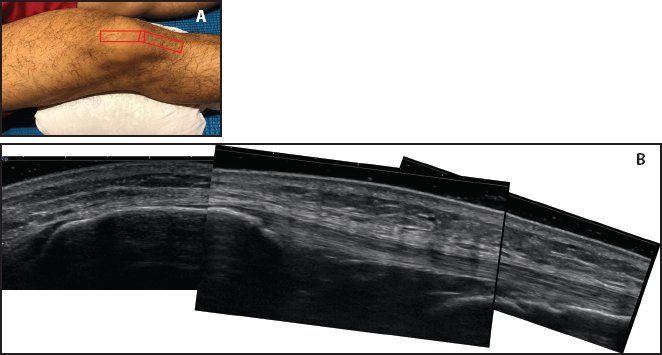
Figure 6-13. Anterior bursae. (A) Probe placement. (B) LX view of the anterior knee with light pressure to evaluate the subcutaneous bursae.
b. SX view/transverse view: The SX view is only used to confirm abnormal findings in the LX view.
- Relevant anatomy: There are 2 subcutaneous bursae on the anterior aspect of the knee: the prepatellar bursa, which is just above the patella, and the superficial infrapatellar bursa, which is just superficial to the distal patellar tendon and tibial tuberosity. There is a deep bursa called the deep infrapatellar bursa, which is present between the distal patellar tendon and the tibia (Figures 6-14 through 6-16).1
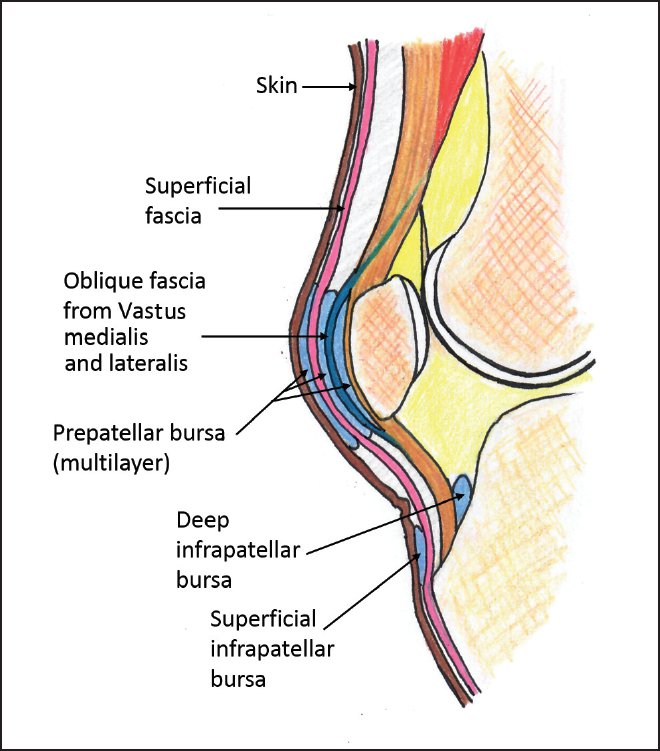
Figure 6-14. Relevant anatomy of the anterior bursae and fascial layers.
- Relevant anatomy: There are 2 subcutaneous bursae on the anterior aspect of the knee: the prepatellar bursa, which is just above the patella, and the superficial infrapatellar bursa, which is just superficial to the distal patellar tendon and tibial tuberosity. There is a deep bursa called the deep infrapatellar bursa, which is present between the distal patellar tendon and the tibia (Figures 6-14 through 6-16).1
Medial and Lateral Patellar Retinaculum
- Patient position: Supine with the knee extended and resting on the table
- Probe/transducer position: The probe is placed along the medial retinaculum bridging the patella and the medial femoral condyle (Figure 6-17). For the lateral retinaculum, the probe is placed along the lateral retinaculum bridging the patella and the lateral femoral condyle (Figure 6-18).
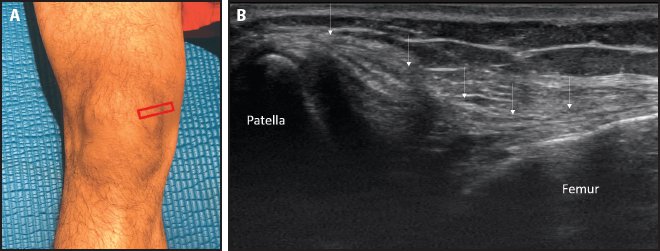
Figure 6-17. Medial retinaculum. (A) Probe placement. (B) Medial retinaculum (white arrows) as a bilaminar structure.
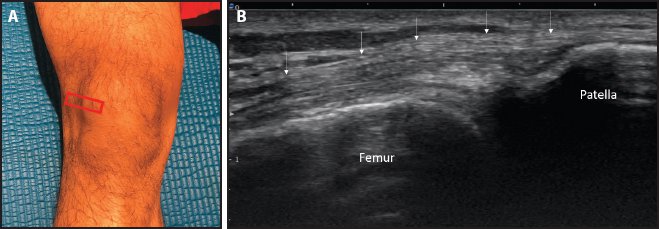
Figure 6-18. Lateral retinaculum. (A) Probe placement. (B) Lateral retinaculum (white arrows) as a bilaminar structure.
- Relevant anatomy: The patellar retinaculum appears as a bilaminar structure that stabilizes the patella in the transverse plane (Figure 6-19). With the knee extended, the medial patellar facet can be seen by pushing the patellar medially from the lateral edge. The medial patellar retinaculum is longer and laxer than the lateral patellar retinaculum, which allows the visualization of the medial patellar facet by pushing the patella medially from the lateral edge of the bone (Figure 6-20). The lateral patellar facet cannot be visualized by pushing the medial edge laterally.
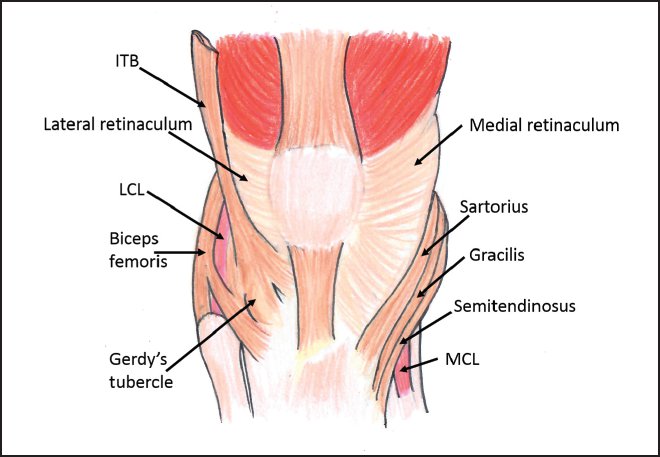
Figure 6-19. Relevant anatomy of the patellar retinaculum. (ITB = iliotibial band; LCL = lateral collateral ligament; MCL = medial collateral ligament.)

Stay updated, free articles. Join our Telegram channel

Full access? Get Clinical Tree


- Relevant anatomy: The patellar retinaculum appears as a bilaminar structure that stabilizes the patella in the transverse plane (Figure 6-19). With the knee extended, the medial patellar facet can be seen by pushing the patellar medially from the lateral edge. The medial patellar retinaculum is longer and laxer than the lateral patellar retinaculum, which allows the visualization of the medial patellar facet by pushing the patella medially from the lateral edge of the bone (Figure 6-20). The lateral patellar facet cannot be visualized by pushing the medial edge laterally.
