Pattern
Etiology
Flexor synergy with hemiparesis
CVA, traumatic or nontraumatic brain injury, cerebral palsy
Crouch gait
Cerebral palsy
Torticollis
Prematurity, cervical dystonia
Scissoring gait
Cerebral palsy
A comprehensive approach considering treatment options including stretching, ROM, splinting, orthotics, medications, chemodenervation injections, chemoneurolysis, intrathecal baclofen, and surgical correction should be taken. A thorough assessment of spasticity is necessary to determine the best treatment combination that fits the patient’s needs and goals. Spasticity due to spinal cord injury and multiple sclerosis tends to be more generalized, and therefore oral medications and intrathecal baclofen are usually the best treatment options combined with a therapy program. For patients with focal spasticity resulting from stroke or traumatic brain injury, botulinum toxin injections or chemoneurolysis procedures tend to be the treatment of choice, combined with therapy. Oral medications may be helpful but often are limited due to cognitive side effects. For more severe spasticity, intrathecal baclofen therapy may be more effective.
If chemodenervation with botulinum toxin is used for treatment, it is important to make sure the patient has not had botulinum toxin injections to other muscle sites within the past 3 months to avoid the risk of antibody formation. Patients that have developed antibodies to botulinum toxin A may be treated with botulinum toxin B. Risks and benefits of the procedure should be thoroughly discussed with the patient and/or caregiver as well as realistic goals for treatment. It is imperative to consider the patient’s functional goals when prescribing botulinum toxin. The effect of the toxin injection is to decrease spastic tone to improve pain or improve range of motion to allow for proper hygiene or to improve function. It is important to explain to the patient and caregivers that botulinum toxin does not increase strength as a result of the toxin itself. Decreasing the patient’s spasticity may secondarily improve the patient’s voluntary control over movement in antagonistic muscles (for patients that have or are recovering voluntary muscle control) as this would reduce or eliminate the barrier that spasticity imposes on voluntary movement. The physician should also be aware that the patient may have functional benefit as a result of their tone (e.g., stability in ambulation or when dressing) and that weakening certain muscles with botulinum toxin would result in a loss of function for the patient.
Botulinum toxin A and botulinum toxin B are used clinically for treatment of spasticity. There are three different formulations of botulinum toxin A available in the USA. They include onabotulinumtoxin A (Botox), abobotulinumtoxin A (Dysport), and incobotulinumtoxin A (Xeomin). Botulinum toxin B is known as rimabotulinumtoxin B (Myobloc). Table 9.2 includes details regarding the ingredients, mechanism of action, FDA and off-label indications and side effects of each of these botulinum toxin formulations. There is a lack of standardization of botulinum dosage between these agents, and the concentration of injections to different muscles often varies. When initiating treatment, start at the lowest dose and titrate up to minimize adverse reactions (see Table 9.2).
Botulinum toxin A | Botulinum toxin B | |||
|---|---|---|---|---|
Botox | Xeomin Incobotulinumtoxin A | Dysport Abobotulinumtoxin A | Rimabotulinumtoxin B | |
Onabotulinumtoxin A | ||||
Derivative/ingredients | Neurotoxin from Clostridium botulinum, human albumin | Neurotoxin from Clostridium botulinum | Neurotoxin from Clostridium botulinum | Neurotoxin from Clostridium botulinum, contains human albumin |
Mechanism of action | Prevents ACh release from presynaptic membrane—SNAP 25 | Prevents ACh release from presynaptic membrane—SNAP 25 | Prevents ACh release from presynaptic membrane—SNAP 25 | Prevents ACh release from presynaptic membrane—VAMP/synaptobrevin |
“Rule of 3s”—3 days to begin to see effect, 3 weeks to see maximal effects, 3 months to wear off (these are generalized) | ||||
FDA indications | Cervical dystonia, blepharospasm, overactive bladder | Cervical dystonia, blepharospasm | Cervical dystonia | Cervical dystonia |
UE spasticity in Biceps, FCR, FCU, FDS, FDP | ||||
Off-label use | Spasticity from stroke, MS, Parkinson’s disease, CP, SCI, TBI | Spasticity from stroke, MS, TBI, CP, SCI, headache | Spasticity from stroke, TBI, CP, MS, SCI | Spasticity associated with cerebral palsy, chronic anal fissure |
Focal dystonias | Sialorrhea associated with ALS or Parkinson’s disease | |||
Additional benefits | Made without binding proteins, theoretically decreasing the formation of antibodies, formation of which theoretically decreases therapeutic response [8] | |||
Does not need refrigeration until reconstitution—good in severe weather conditions/blackouts | ||||
Side effect/pitfalls | All botulinum toxin type A has similar side effect profiles, including the following: weakness, flu-like syndrome | Same | Same | Headache, dry mouth, dysphagia, dyspepsia, injection site pain, flu-like symptoms |
Botulism: | Peripheral motor neuropathic diseases (e.g., ALS, motor neuropathy) | |||
Loss of strength and muscle weakness all over the body i.e. distal spread | Neuromuscular junctional disorders (e.g., myasthenia gravis, Lambert-Eaton syndrome) | |||
Double vision | Increased risk for severe dysphagia and respiratory compromise in pts. with neuromuscular disorders | |||
Blurred vision and drooping eyelids | Risk of respiratory compromise and death esp. in children treated off-label for cerebral palsy-associated spasticity | |||
Hoarseness or change or loss of voice | ||||
Trouble saying words clearly | ||||
Loss of bladder control | ||||
Trouble breathing | ||||
Trouble swallowing/dysphagia | ||||
Symptoms can happen hours to weeks after an injection | ||||
Collateral sprouting at 3 months → decreased effect Possible formation of antibodies | ||||
Dosage | Maximal initial dose: 400 units dosage is made to be 1:1 to Botox | For cervical dystonia: 120 units per treatment session | Recommended initial dose: 500 units, for both toxin-naïve and previously treated patients | Prior botulinum toxin injection: 2,500–5,000 units IM, divided among affected muscles |
In children, weight based: | Median doses injected during double-blind phase 3 study: | Dose modifications in 250-unit increments | Naive: Administer lower dose for initial treatment | |
12 units/kg | SCM—25 units | Initial dose by muscle (median): | ||
Splenius capitis/semispinalis capitis—48 units | SCM—125 | |||
Trapezius—25 units | Splenius capitis—200 | |||
Levator scapulae—25 units | Trapezius—103 | |||
Scalenus (medius and anterior)—20 units [9] | Levator scapulae—105 | |||
Scalenus (medius and anterior)—116 | ||||
Semispinalis capitis—132 | ||||
Longissimus—150 |
Onabotulinum toxin A is the oldest formulation and most commonly used by practitioners. Table 10.3 shows muscles commonly treated with Onabotulinum toxin A and typical dosages used for injection into specific muscles. Do not exceed 400 units of botulinum toxin A at an initial treatment session and do not inject greater than 50 units per injection site [10]. For children, the maximum recommended dosage per treatment session is 12 units/kg or 400 units, whichever is lowest [11]. FDA approval for botulinum toxin is limited to five muscles for upper extremity spasticity in adults: the biceps brachii, flexor carpi radialis (FCR), flexor carpi ulnaris (FCU), flexor digitorum sublimis (FDS), and flexor digitorum profundus (FDP). Use in other muscles and use for pediatric patients remain off-label at this time, but is commonly used by many practitioners (see Table 9.3).
Spastic clinical pattern | Muscles involved | Range of motion testing | Botox (units) (suggested dosage for normal size adult) | Dysport (units) (suggested dosage for adult) |
|---|---|---|---|---|
Hip flexion | Iliopsoas | Thomas test: positive if cannot keep opposite leg extended | Iliacus: 50–100 | Iliacus: 200–400 |
Crouched gait | Rectus femoris | Hip extension ROM | Psoas: 50–150 | |
Rectus femoris: 75–150 | ||||
Adducted hip | Hip adductors: adductor brevis, adductor longus, adductor magnus gracilis (knee flexion and hip adduction) | Hip abduction normal ROM 40° from midline | Adductor brevis: 50–100 | Adductor longus: 500–750 |
Scissoring gait | Adductor longus: 50–100 | Adductor magnus: 500–750 | ||
Adductor magnus:50–100 | ||||
Gracilis: 50–100 | ||||
Knee flexion | Medial hamstrings: semimembranosus, semitendinosus | Popliteal angle or supine knee extension | Medial: 50–150 | Medial: 150–400 |
Lateral hamstrings: biceps femoris | Lateral: 50–200 | Lateral: 150–400 | ||
Extended or stiff knee | Quadriceps: rectus femoris, vastus lateralis, vastus medialis, vastus intermedius | Ely’s test: positive if unable to flex heel to buttock, hip rises in prone position | Rectus femoris: 75–200 | Vastus lateralis: 150 |
Vasti: 25–50 each | Vastus medialis: 150 | |||
Equinovarus foot | Medial and lateral gastrocnemius, soleus, tibialis posterior | Gastrocnemius: ankle dorsiflexion with knee extended | Gastrocnemius: | Medial: 150–400 |
Soleus: ankle dorsiflexion with knee flexed | Medial: 25–75 | Lateral: 150–400 | ||
Tibialis posterior: ankle eversion | Lateral: 25–75 | |||
Soleus: 50–200 | ||||
Tibialis posterior: 25–150 | ||||
Toe curling | Flexor digitorum longus or brevis | Toe extension | 50 | 100 |
Adducted/internally rotated shoulder | Pectoralis major | Shoulder abduction | PM: 60–140 | PM: 150–300 |
Latissimus dorsi | Shoulder external rotation | LD: 80–160 | LD: 150–300 | |
Teres major | TM: 25–50 | TM: 100 | ||
Subscapularis | SS: 25–50 | SS: 100–150 | ||
Flexed elbow | Brachioradialis | Elbow extension ROM | Brachioradialis: 40–80 | Brachioradialis: 100–150 |
Brachialis | BR: elbow flexion in neutral position | Brachialis: 30–60 | Brachialis: 150–200 | |
Biceps | Brach: elbow flexion in pronated position | Biceps: 60–120 | Biceps: 200–300 | |
Pronator teres: proximal portion | Bic: elbow flexion in supinated position | Pronator teres: 25–50 | Pronator teres: 100–200 | |
Pronated forearm | Pronator teres | Forearm supination ROM | Pronator teres: 25–50 | Pronator teres: 100–200 |
Pronator quadratus | Pronator quadratus: 20–40 | Pronator quadratus: 100–200 | ||
Flexed wrist | Flexor carpi radialis | Wrist extension ROM | FCR: 40–70 | FCR: 100–200 |
Flexor carpi ulnaris | FCU: 20–40 | FCU: 100–150 | ||
Extrinsic finger flexors | Ext FF: 40–80 | Ext FF: 100–150 | ||
Clenched fist | Flexor digitorum superficialis | FDS: Proximal interphalangeal extension | FDS: 20–80 | FDS: 100–200 |
Flexor digitorum profundus | FDP: Distal interphalangeal extension | FDS: 20–80 | FDP: 100–200 | |
Thumb in palm | Flexor pollicis longus | Thumb extension | FPL: 20–30 | FPL: 100–150 |
Flexor pollicis brevis | FPB: 10–20 | FPB: 50–100 | ||
Adductor pollicis | AP: 10–20 | AP: 50–100 |
Forearm Flexor Spasticity: Clenched Fist/Thumb in Palm
Commonly targeted forearm muscles for upper extremity spasticity are wrist flexors, finger flexors, and pronators. The wrist flexors include the flexor carpi radialis and flexor carpi ulnaris. The finger flexors include the flexor digitorum superficialis which flexes the proximal interphalanges and the flexor digitorum profundus, which flexes the distal interphalanges. The flexor pollicis longus flexes the interphalangeal joint of the thumb. Pronator teres and pronator quadratus are responsible for forearm pronation.
Henzel et al. compared the ultrasound localization of forearm flexor muscles to anatomical landmarks described by Delagi for the flexor carpi radialis, pronator teres, and flexor pollicis longus, and the landmark mapping technique for the flexor digitorum superficialis developed by Bickerton [11, 13]. This study showed that ultrasound localization of the muscle bellies of certain forearm muscles, in particular the pronator teres, the flexor pollicis longus, the flexor carpi radialis, and the flexor digitorum superficialis to the 3rd or ring finger, was distinctly different from the points localized via surface landmarks or mapping. In a study by Munin, the mapping technique for the flexor digitorum superficialis muscle described by Bickerton was demonstrated to be feasible and effective to accurately target this muscle’s individual muscle bellies [14]. The mapping technique is time intensive, however taking 10 min in this study. The use of ultrasound would allow the identification of the muscle within several seconds to a few minutes, depending on the operator’s experience. Also, limitation in limb range of motion and positioning, as well as muscle atrophy and fibrosis, may interfere with anatomical mapping. Ultrasound identification of target muscles would likely be beneficial in these situations (Table9.4).
Table 9.4
Muscles targeted for clenched fist/thumb in palm
Pronator teres |
Flexor carpi radialis |
Flexor carpi ulnaris |
Palmaris longus |
Flexor digitorum profundus |
Flexor digitorum superficialis |
Flexor pollicis longus |
Scanning Technique and Anatomy to Identify
Position the arm in external rotation with forearm supinated. If this position is not possible due to spasticity, abduct and internally rotate the arm and pronate as much as possible. Begin scanning over the medial epicondyle in the longitudinal plane where the flexor tendon attachments will be identified. The transducer can then be rotated 90° into the transverse (axial) plane. Move the probe distally to the proximal third of the forearm where the pronator teres, flexor carpi radialis, and flexor digitorum profundus can be visualized. The pronator teres is the most lateral (radial) muscle, and the flexor carpi radialis and the palmaris longus are just medial to this muscle in the superficial compartment. In this same transverse view, the flexor digitorum profundus is visualized deep to these muscles. Moving the transducer more medial (ulnar) and slightly more distal, the flexor carpi ulnaris is identified along the medial ulna. The flexor digitorum superficialis (FDS) 2 and 3 are scanned at the midpoint of the forearm, and the bellies of the FDS 4 and 5 are visualized as the transducer is moved more medial. The flexor pollicis longus muscle is seen just lateral and superficial to the FDS 2 and 3 (Fig. 9.1).
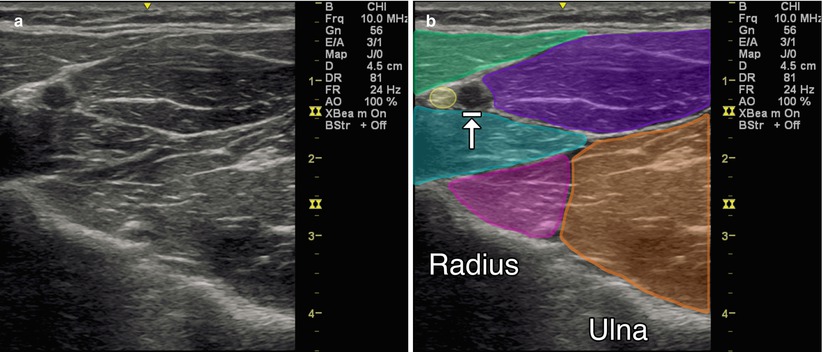
Fig. 9.1
(a) Transverse (axial) view of the anterior forearm. (b) Green indicates brachioradialis, purple indicates flexor carpi radialis, teal indicates pronator teres, magenta indicates flexor pollicis longus, orange indicates flexor digitorum profundus, yellow indicates radial nerve, arrow with stop indicates radial artery
Injection Techniques: In-Plane Axial Approach
Patient positioning: Seated comfortably and placed in a position with the forearm extended and supinated, preferably on a flat surface, with access to the anterior forearm.
Probe positioning: Place the transducer on the anterior forearm in the axial plane over the largest area of the muscle belly (Fig. 9.2a).
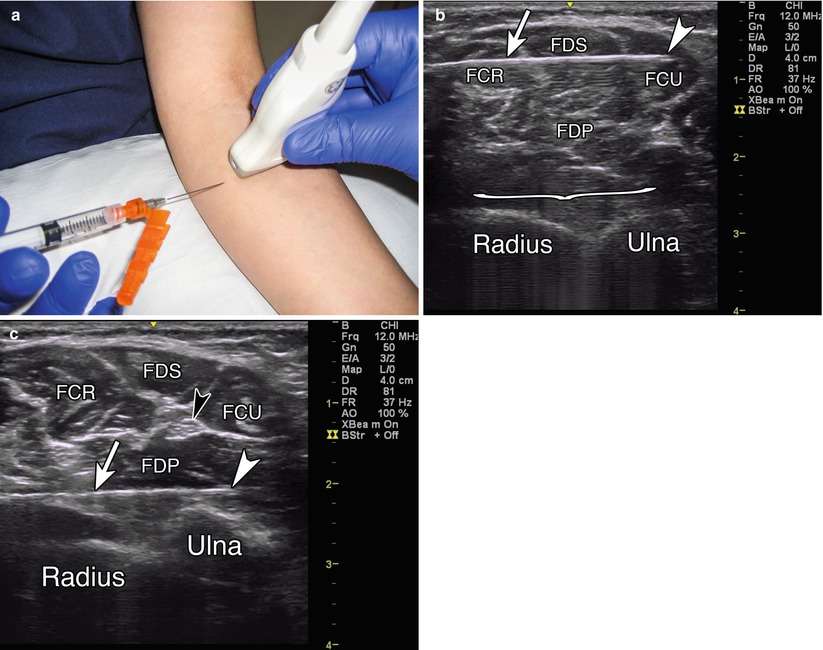
Fig. 9.2
(a) Example of axial probe position over proximal anterior forearm. (b) Arrowhead indicates needle tip in flexor carpi ulnaris, arrow indicates needle, bracket indicates needle reverberation, radius and ulna labeled, FCR flexor carpi radialis, FDS flexor digitorum superficialis, FCU flexor carpi ulnaris, FDP flexor digitorum profundus. (c) White arrowhead indicates needle tip in FDP, white arrow indicates needle, black arrowhead indicates ulnar nerve
Markings: Identify the brachial artery and median or ulnar nerves.
Needle position: Insert the needle adjacent to the probe from either the medial or lateral side, depending on the muscles of interest. Inserting the needle along the rounded sides of the forearm maintains the ability to stay parallel to the transducer for optimal visualization.
Safety considerations: Utilize Doppler to avoid injury to the radial or ulnar artery/vein. Avoid the median or ulnar nerve (see elbow chapter for locations of these nerves).
Pearls:
Isolate the individual components of the FDS or FDP by flexing at the PIP or DIP of the desired finger.
May consider applying topical lidocaine cream or cold vaporant spray to injection site prior to procedure.
If you use a longer needle, you can redirect to the different targets without having to repuncture the skin.
Equipment needed:
Linear array transducer with a frequency (10+ MHz)
Preparation of botulinum toxin
24+ gauge, Teflon-coated, injectable EMG/stimulator needle, 2.5″–3″
EMG or nerve stimulator for additional guidance
Iliopsoas Spasticity: Crouched Gait
The iliopsoas muscle is the primary hip flexor. It originates from the lateral vertebral bodies of T12 to L5 and inserts on the lesser trochanter of the femur. Spasticity of this muscle typically presents as hip and knee flexion, and internal rotation and adduction of the hip, known as “crouched gait.”
Two techniques for ultrasound-guided injections of the iliopsoas muscle have been described. The first technique described uses an anterolateral approach angled 45° medially from the anterior superior iliac spine and swept through a 30° arc proximally and medially [15]. This approach carries a high risk of perforation of the bowel, external iliac vasculature, ureters, and femoral nerve compared to alternative approaches. This approach also appears to be more challenging and have more risk of perforation in larger adults compared to the pediatric population in this study. Westhoff describes the injection of the muscle via an anterior approach under the ilioinguinal ligament [16]. All 13 pediatric patients were noted to experience improvement in tone or range of motion, and no complications from the procedure were observed. However, this approach delivers botulinum toxin primarily to the iliacus portion of the iliopsoas, and not the psoas muscle. The anterior approach to the iliopsoas muscle using EMG localization is typically accurate, and the use of ultrasound does not confer additional benefit.
When reviewing studies on motor end plate locations, the anterior injection approach to the iliopsoas delivers botulinum toxin into a region of the muscle distal to the primary motor end plate zone. Van Campenhout found that the proximal and distal limits of the motor end plate zone for the psoas muscle were located 30–70 % of the distance between the twelfth thoracic vertebrae and the inguinal ligament [17, 18]. Therefore, the dorsal approach is suggested to be an effective injection approach to deliver the botulinum toxin close to the primary motor end plates.
Ward described a blind technique using a dorsal approach to target the psoas by inserting the needle through the erector spinae at L2, L3, and L4 with a slight lateral approach to move just past the lateral border of the transverse processes. The needle is then advanced 1–1.5 cm to reach the psoas muscle [19]. The concern with a blind or EMG-guided technique using this approach is that there is little certainty that the needle has been inserted the correct depth to assure its placement in the psoas muscle. In order for a safe injection via the dorsal approach, visual guidance with ultrasound combined with auditory guidance from EMG is preferred. Takai found ultrasound to be reliable for determining the thickness and the cross-sectional area of the psoas muscle using a dorsal approach [20].
Spinner, Khan, and Kirschner recently demonstrated that ultrasound guidance combined with EMG guidance to inject the psoas muscle via a dorsal approach is feasible (in publication). In this approach, the psoas muscle is visualized in cross section adjacent to the L3 vertebra, and an in-plane technique is used to guide the needle into the muscle. The accuracy was confirmed by EMG. The combined ultrasound and EMG-guided dorsal approach to chemodenervation of the psoas muscle may prove useful as an alternative for the treatment of hip flexion spasticity for patients in which the traditional anterior approach to the injection has shown suboptimal results.
Scanning Techniques and Anatomy to Identify
The psoas muscle originates off the transverse processes of T12–L5. Begin scanning in an axial plane over the top of the sacrum where you will identify the hyperechoic dorsal bony surface. Slowly scan in this same plane cephalad until you identify a hypoechoic break between the sacrum and L5 spinous process. Slightly cephalad is the bony spinous process of L5. Continue scanning cephalad while counting levels until you reach L3. At this location, follow the hyperechoic bone down the laminae to the facet joints and then continue laterally until the hyperechoic tips of the transverse processes are seen (triple crown sign). The psoas muscle can be visualized in cross section laterally off of the transverse process (Fig. 9.3).
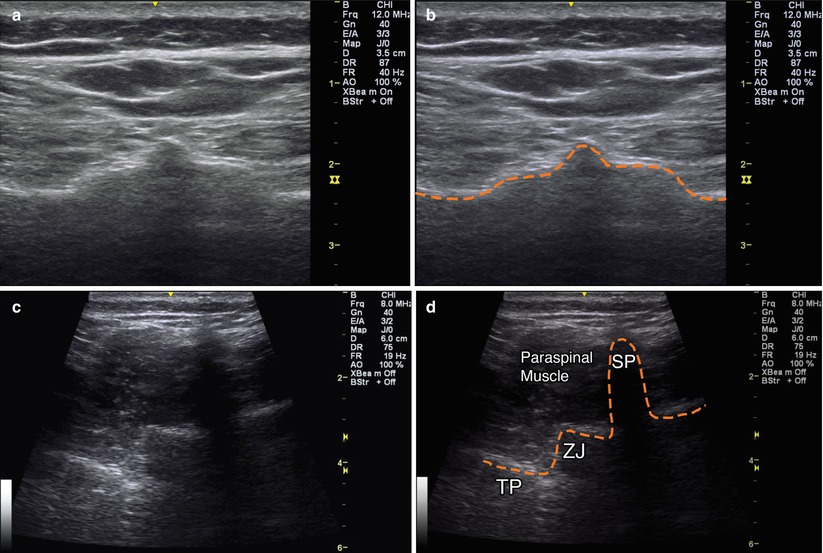
Fig. 9.3
(a) Axial view over sacrum. (b) Orange dashed line outlining hyperechoic bony cortex of sacrum. (c) Axial view over L5 vertebra. (d) Orange dashed line outlining bony anatomy of L5 vertebra, SP spinous process, ZJ zygapophyseal joint, TP transverse process, paraspinal muscle labeled
Injection Technique: Dorsal In-Plane Axial Approach
Patient positioning: Position prone or in the lateral recumbent position if hip flexion contracture or spasticity does not allow for prone lying.
Probe positioning: Place the transducer in the axial plane at the level of L3 centered over the psoas muscle belly (Fig. 9.4a).
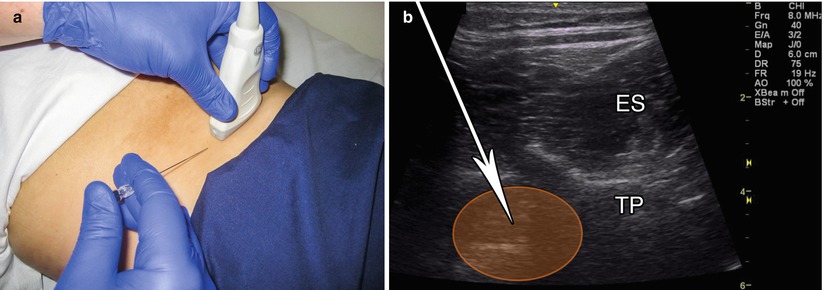
Fig. 9.4
(a) Example of axial probe position over L3 vertebra. (b) Example of in-plane axial approach, white arrow indicates needle trajectory, TP transverse process, ES erector spinae
Markings: Mark the spinal levels.
Needle position: Insert the needle in-plane from medial to lateral.
Safety considerations: Avoid the kidney by not injecting from the L1 to L2 level. Avoid bowel puncture by measuring depth and keeping the needle visualized throughout the entire course.
Pearls:
Passive ranging of the hip may be used to help identify the psoas muscle.
The depth of the psoas can be measured prior to injection and correlated with the needle selection to help prevent passing the needle too deep.
Equipment needed:
Curvilinear or linear array transducer with a frequency between 8 and 3 MHz
24+ gauge, Teflon-coated, injectable EMG/stimulator needle, 2.5″–3″
EMG or nerve stimulator for additional guidance
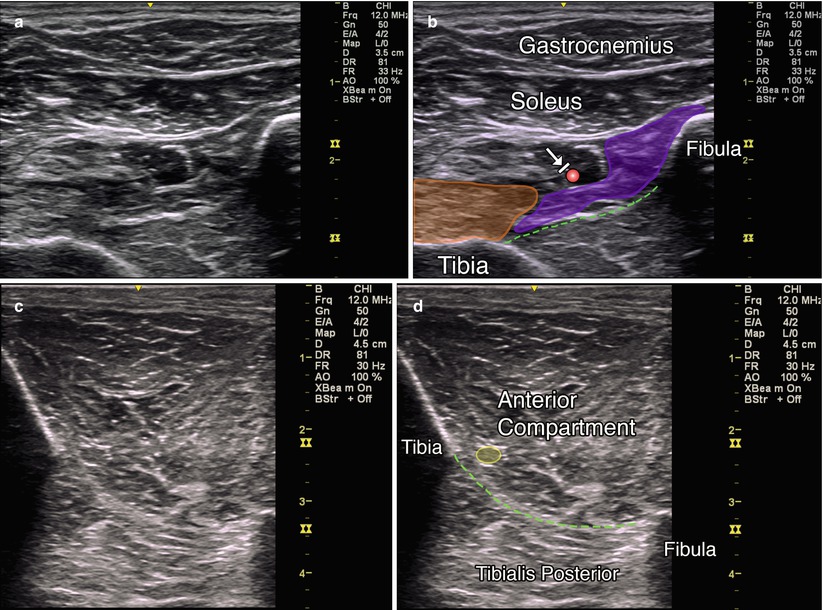
Tibialis Posterior Spasticity: Ankle Inversion or Equinovarus
The tibialis posterior originates from the interosseus membrane, proximal tibia, and fibula, and inserts on the navicular, cuneiform, cuboid, and second to fourth metatarsal bones of the foot. Activation of this muscle causes plantar flexion and inversion of the foot. Spasticity of the tibialis posterior muscle may result in an equinovarus deformity. Its location deep in the posterior lower leg makes this a more challenging muscle to target for electrodiagnosis and chemodenervation injections. The accuracy of using anatomical landmarks and palpation to target this muscle has been shown to be about 11 % [5].
Two techniques have been described for a tibialis posterior injection. For the posterior-medial approach is, the practitioner inserts the needle just posterior to the medial tibia at the midpoint of the lower leg, about halfway between the tibial tuberosity and the medial malleolus. Using ultrasound, Won et al. [21] assessed the safety window and depth for EMG needle insertion into the tibialis posterior muscle using a posterior-medial approach into the upper 1/3 distal border compared to the midpoint of the distance between the tibial tubercle and the bimalleolar line. The safety window was defined as the distance between the tibia and neurovascular bundle, and the depth was defined as the distance between the skin and tibialis posterior muscle. Compression of the medial calf was used to decrease the depth necessary to reach the desired muscle. The safety window was significantly greater at the midpoint compared to the upper 1/3 (1.47 cm vs. 1.16 cm, respectively), and the depth was significantly less at the midpoint in relation to the upper 1/3 (2.31 cm vs. 2.52 cm, respectively). Needle insertion in the posterior-medial approach is medial to the tibia and the neurovascular bundle (which is located just posterior to the tibialis posterior muscle). The needle is inserted through the medial gastrocnemius and flexor digitorum longus to reach the tibialis posterior. Compression widens the flexor digitorum longus and displaces the neurovascular border laterally, improving the safety window and decreasing needle depth. An anatomical study of cadavers performed by Oddy et al. determined that the motor point of the tibialis posterior is located in an area 22 % of the distance of a reference line from the fibular head and proximal medial tibia to the intermalleolar line [22]. Therefore, chemodenervation to the distal limit of the upper 1/3 of the tibialis posterior may theoretically provide better results due to proximity to the motor points.
The anterior approach between the tibia and fibula traverses through the tibialis anterior muscle and the interosseous membrane to reach the tibialis posterior muscle in the upper 1/3 segment, with the tibial neurovascular bundle located lateral to the targeted muscle. The safety window in the posterior-medial approach with compression is greater, and the depth is less than the anterior approach. Studies involving MRI and ultrasound of the tibialis posterior examining the posterior and anterior approach have shown that the safety window for needle insertion is greatest using an anterior approach in the proximal 1/3 of the tibia [23, 24].
Scanning Technique and Anatomy to Identify
Posterior-Medial Approach: Position the patient prone with the ankle off the end of the examining table. Begin scanning transversely with ultrasound probe at the midpoint of the lower leg, about halfway between the tibial tuberosity and the medial malleolus. The tibialis posterior muscle lays deep to the gastrocnemius and flexor digitorum longus muscles. Try to identify the posterior tibial artery, vein, and tibial nerve located lateral and just superficial to the tibialis posterior muscle.
Anterior Approach: Position the patient supine. Place the ultrasound probe axially along the proximal 1/3 of the anterior lower leg between the tibia and fibula. The tibialis posterior muscle lies deep to the interosseous membrane and the more superficial tibialis anterior muscle. Try to identify the anterior tibial artery and vein and deep fibular nerve, which lay medial to the fibula and along the lateral border of the interosseous membrane (Fig. 9.5).