, Jean-Philippe Bault2, Bernard Benoit3 and Gérard Couly4
(1)
Center of women and fetal imaging, Créteil, France
(2)
Center of fetal imaging Ambroise Paré, Les Mureaux, France
(3)
Princess Grace Hospital, Monaco, France
(4)
Department of maxillo-facial surgery, Necker Hospital, Paris, France
The ultrasound of the face is perhaps the most important moment in the examination of the fetus with regards to the impact for the parents who have come to “see their baby.”
This exam procures both anxiety about the potential discovery of a malformation and pleasure in seeing their future child on the ultrasound screen.
This exam is also very important for the ultrasonographer for screening and diagnosis. Like a pediatrician who first of all examines a newborn’s face, this view provides much information about potential pathologies. The same applies to the fetus, and yet, strangely, the “minimum” recommended exam minimalizes the examination of the face.
The chapters that follow will provide proof of the importance of this exam.
2.1 What Is Included in a Basic Sonographic Survey and a Diagnostic Sonographic Survey?
Elements that must appear in the second trimester screening report:

Continuity of the upper lip
Fig. 2.1
Continuity of the upper lip
Elements that must appear in the diagnostic report:

Continuity of the upper lip
Profile and nose bones with usual appearance
Orbits with usual appearance
Lenses with usual appearance
Fig. 2.2
Profile and continuity of the upper lip
One should note that three-plane examination is essential in order to exam the face:
The nose-mouth coronal plane
The strict sagittal plane for the profile
Stepped images on an axial plane, for the orbits, maxilla, tongue and mandible.
2.2 Routine Trimester Examinations
2.2.1 First Trimester
Locate biparietal and back
Profile: Herman image scoring sagittal view
Analysis of profile: forehead, nose, upper lip and position of chin
This is a quick analysis, which depends on the operator’s subjectivity and enables the operator to raise any alarms based on various key points, notably using the Herman score of the sagittal image.


Forehead: a smooth arch, not too domed, not too evasive
Upper lip: straight, not looking like a comma
Chin: aligned, individualized, not too far in advance, not too far behind
Fig. 2.3
Normal 2D profile
Fig. 2.4
Sagittal view, endovaginal probe
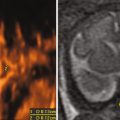
2.2.1.1 What 3D Can Do
Imaging volume from a strict sagittal view enables symmetrical restitution via the three planes—axial, sagittal, and coronal—which are orthogonal to one another:


A creation of structural symmetry, enabling one to see the strict sagittal view of the nose bones.
A declination of the axial views: frontal arch – orbital cut – maxillary arch – mandibular arch.
A “surface” coronal shot: to analyze the upper lip and the nose.
A “bone” coronal shot: to analyze the bone mass (metopic, actual bone junctions, maxilla).
Reconstruction of the face in both surface and bone mode.
Ear insertion: height and length
Fig. 2.5
Multiplane 3D images – different view levels
a. orbits and ears
b. maxilla and palate
c. mandible
d. orbits
Fig. 2.6
Aspects of the face in 3D
Fig. 2.7
Further images of the face
“Bone” mode, the retronasal bone triangle
At 12 SA the ears seem low because they are not yet in their final position
Face in “surface” mode
Face in “bone” mode
“Bone” mode – no nasal bones
“Bone” mode – nasal bones present
2.2.2 The Second and Third Trimesters
2.2.2.1 Proposed Screening Protocol
Example for a cephalic position
Starting point: biparietal diameter
- 1.
Right from the start, locate the biparietal and the back with an oblique translation of the probe, at a distance from the biparietal diameter view, using a lateral sliding movement and then a rotation of 20–30° from its initial position.
- 2.
Construction of the sagittal view with a 90° rotation of the probe around a fixed virtual point.
- 3.
Construction of stepped axial views, from the forehead to the mandible with successive parallel views shot during a slow sliding movement rotating 90°, with the circular path ending with the nose-mouth view.
- 4.
Arrival point: nose-mouth view.
2.2.2.2 Analysis of Sagittal and Parasagittal Views
The objective is to clear up the profile of a slightly bent head with the chin separated from the sternum.
This analysis makes it possible to check the various locations of facial anomalies:

the forehead
the angulation and the presence of the nasal bone
the form of the upper lip
the position of the chin
Fig. 2.8
2D profile and 2D nose-mouth view
2.2.2.3 Analysis of the Axial Views
The axial views enable the analysis of the face from top to bottom to view the orbits, the maxilla, the back edge of the palate, the tongue and the mandible.

orbits and crystalline lenses
maxilla
posterior edge of the palate
position of the tongue
mandible
Fig. 2.9
Stepped views (high definition, 2D)
a-orbits
b-upper maxilla
c-posterior edge of bone palate
d-mandible
Other views are added to this paradigm:
Ears
At least one ear could be analyzed if the examination is normal, and with frontal views, complete analysis of the various parts of the eye can be done.
The ears are round during the first trimester, slightly rimmed during the second trimester, but well rimmed during the third trimester.


Fig. 2.10
Normal ears
12 GW
22 GW
32 GW
Fig. 2.11
Abnormal ears
Eyes: full analysis of the various elements of the eye can be done on frontal views.
Fig. 2.12
Frontal view of the eye
Orbit, crystalline lens and pupil, 32 GW
2.2.2.4 Analysis of the Frontal View
Nose-mouth view: This comes at the end of the circular path of analysis used on a face presumed normal in order to obtain the view required by the basic report.
One must see the alignment of the nose, the lips and the tip of the chin.
Absence of visualization of the chin could be an indirect sign of retroganthia.

Fig. 2.13
2D nose-mouth view
Two remarks about the subjective analysis of the face during the second trimester:
Sometimes the mid-level can show a pseudo-exophtalmy, which is physiological.
At the chin level, the fetus sometimes appears to have retroganthia as a result of having a slightly bent head. This is why tools such as facial angle biometrics are so important.
2.2.3 Spotlight on the Third Trimester
Coronal, sagittal and axial views are sometimes difficult to capture, particularly when the examination is done at 32 GW, right before maternity leave begins, on a tired patient, or a fetus that is already low.
During the third term, capturing a perfect profile is particularly difficult, considering how the chin is bent onto the sternum, yet one should try to capture it by mobilizing the fetus’s head using the abdominal hand to create a slight lifting movement in order to eliminate the possibility of real retroganthia, which would require a level-three team at birth and a pediatric team with ENT skills.
An important part of the routine is checking the nose-mouth view to confirm that there is no labial cleft. One should do this, not so much because such a cleft is a neo-natal emergency, but rather because it could be the sign that one should look for other syndromes.
2.2.3.1 What 3D Can Do
During the second and third trimesters, a 3D ultrasound enables one:


To create symmetry of the views and the position of the tongue
Fig. 2.14
Capturing a strict profile in (a), checking the perfect position in (b) and (c), and then 3D rendering
To work with the three planes—sagittal, axial and coronal, or the different views that are useful for ultrasound diagnosis of a normal face.
Fig. 2.15
Use of the 2-mm “thick view” with a mix of max mode and x-ray mode in order to accentuate the contrasts
Fig. 2.16
Use of the omniview mode with the 2-mm “thick slice”
1. Sup. maxilla, palate
2. Frontal view with anterior portion of the mandible and the maxilla
3. Frontal view of palate
To capture a restitution of the skeleton in “bone” mode, and of the face in “surface” mode
Fig. 2.17
It may be necessary to visualize the bone structures (with maximum mode)
Profile with sutures. Face: note separated nasal bones. Occipital bone, note the presence of two bones
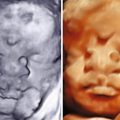
When the captured images are of good quality, the volume restitution in “surface” mode renders an actual photographic map of the fetal face:
Eyelid inclination and openings
Eyelashes
Implantation of hair
Mouth and philtrum aspect
Fig. 2.18
Various surface modes
Surface texture
Gradient light
Mix of gradient light and texture
Surface texture
Enhanced surface
Mix enhanced and smooth
The technique for capturing 3D volume depends on which rendering one is looking for.
An aesthetic rendering of the face is possible from a capture that takes in three-quarters of the fetal face in an oblique sagittal view.
An analytical “anthropometric” rendering of the soft parts and the bone structures of the face requires a capture from a strict sagittal view.
An important moment in the examination: KNOWING HOW TO PLACE THE PROBE FOR 2D AND 3D.
Placing the ultrasound probe is essential for both the 2D view and for quality 3D capturing: the best example is that of visualizing the posterior edge of the palate.


Fig. 2.19
Placement of the probe to look for the posterior edge of the bony palate
Fig. 2.20
Placement of the probe for a sagittal view
Starting 2D view
3D result
Fig. 2.21
Placement of the probe for an oblique view
Starting 2D view
3D result
Fig. 2.22
Placement of the probe under the chin. Starting 2D view
3D result
Fig. 2.23


Coronal view—nose-mouth view
Related posts:
Stay updated, free articles. Join our Telegram channel
Full access? Get Clinical Tree
