Pelvic Ultrasound in the Nongravid Patient
Jeanne Jacoby
Michael Heller
INTRODUCTION
The use of pelvic ultrasound for the threatened first trimester pregnancy has long been well accepted in emergency department (ED) practice; however, its application to the nonpregnant patient has become better defined only in the last few years (1, 2, 3). The ability of pelvic ultrasound (both transvaginal and transabdominal) to characterize solid and cystic masses and to identify abnormal fluid collections makes it well suited to the investigation of many types of pelvic pathology (4). The purpose of this chapter is to describe both the normal and the abnormal anatomy of the nongravid female, identify common variants, and outline how pelvic ultrasound may be incorporated into routine ED practice.
CLINICAL APPLICATIONS
The pelvic ultrasound examination may be performed as part of the evaluation of pelvic pain or masses reported by the patient, found on physical exam, or visualized by other imaging modalities. Indeed, many clinicians have found that performing a pelvic ultrasound contemporaneously with each pelvic exam, regardless of pregnancy status, increases skill level and appreciation for normal anatomy as well as providing additional valuable clinical information. Once comfortable with the sonographic appearance of normal pelvic anatomy, the emergency sonographer should be able to recognize the findings discussed in this chapter.
IMAGE ACQUISITION
Transabdominal sonography (TAS) and transvaginal sonography (TVS) complement each other; each offers unique advantages and disadvantages in terms of visualizing pelvic anatomy. Transabdominal sonography is noninvasive and affords a broad view of all of the pelvic structures (including the uterus, cervix, vagina, and ovaries) and their relative relationship to each other and any mass seen. The utility of TAS is strikingly dependent on the degree of bladder filling; this is a serious disadvantage in ED practice, where a urine sample has usually been obtained prior to the exam. In contrast, a relatively empty bladder is optimal for TVS. The full bladder optimizes transabdominal scanning for two reasons. First, it provides an excellent acoustic window, which allows for greater resolution of the pelvic structures in question. And second, the full bladder displaces bowel loops from the pelvis and acts as a spacer between the transducer and the pelvic organs, allowing the areas of interest to be more optimally aligned with the focal length of the usual transabdominal probe (3.5 to 5 MHz). In contrast to TVS, visualization of pelvic anatomy with TAS may be limited somewhat by marked obesity due to the attenuation that occurs as the
ultrasound beam passes through the anterior abdominal wall and subcutaneous fat (1, 2, 3, 4, 5, 6, 7, 8, 9).
ultrasound beam passes through the anterior abdominal wall and subcutaneous fat (1, 2, 3, 4, 5, 6, 7, 8, 9).
TVS offers the emergency physician several advantages over TAS. The transvaginal approach places the probe in closer proximity to the object of interest and allows for the use of a higher frequency probe (5 to 7.5 MHz) with better resolution. Because it does not allow for an all-inclusive picture of the pelvic organs, the transvaginal approach is most useful when directed at a small area of interest, such as an area of tenderness or mass found previously on pelvic exam or TAS. The examiner can determine whether a visualized mass or cyst is the source of the patient’s pain by applying gentle pressure to the structure and asking if that reproduces the pain. TVS is not typically performed by emergency physicians in premenarchal or virginal patients although it can be performed in any patient in whom a bimanual exam is appropriate (1, 2, 3, 4, 5, 6, 7, 8, 9).
The TAS exam is begun with the standard abdominal transducer, approximately 3.5 MHz, placed just above the pubic symphysis, which is easily palpated in the midline, well below the umbilicus (Fig. 14.1). The bladder is an easily identified anechoic cystic structure through which the uterus and adnexa can be visualized. The area should be scanned in both the sagittal and the transverse planes (Figs. 14.2 and 14.3). While in each plane, angling the probe on its point of contact allows the pelvic organs to be fully visualized (1).
In nonemergency medicine practice, TAS is performed first, and then the bladder is emptied to facilitate TVS. In any case, an adequate explanation of the TVS procedure is important, including informing the patient that only part of the transducer, usually 3 to 4 cm, will be inserted. In the ED, a pelvic exam is often performed either immediately before or after TVS. In some circumstances, for example, the confirmation of a normal intrauterine pregnancy, the performance of the speculum exam may be obviated.
The vaginal transducer is prepared by placing a small amount of conductive ultrasound gel on the tip of the probe, which is then covered with a condom or probe cover. It should be noted that if the condom has a reservoir tip, the tip should be completely filled with gel in order to avoid artifacts that occur when ultrasound waves pass through gas. The examiner then applies lubricating gel to the covered tip of the probe and inserts it into the vagina (Fig. 14.4). Although practice may vary, the chaperone policy for the exam should be the same as for the pelvic exam. It is easiest to perform the exam with the patient on a gynecologic exam table in the dorsal lithotomy position, but if this is not possible, a support such as an overturned bedpan or a rolled blanket may be placed beneath the buttocks in order to tilt the pelvic floor anteriorly (1,5,9).
The transducer should be advanced slowly into the vagina until there is optimal visualization of the pelvic organs. During insertion the orientation of the transducer and identification of pelvic structures is facilitated by noting the position of the bladder, which is easily identified with even a small amount of residual urine. There are four basic scanning maneuvers in TVS. The transducer is placed in the vagina with the transducer indicator oriented vertically, and then slowly moved on its long axis right and left, allowing for continuous sagittal slices (Fig. 14.5). The transducer should sweep slowly from the midline through the uterus, through each adnexa and out to the lateral pelvic walls. The transducer is then rotated from 0 to 90 degrees on its long axis in order to obtain coronal views of the uterus and ovaries (Fig. 14.6). In this orientation the transducer is then angled superiorly and inferiorly in order to obtain coronal slices through the entire uterus (from the fundus through the cervix) and adnexa. The transducer can be inserted further or withdrawn slightly to allow structures to be placed in the optimal range of the probe’s focal length. Between uses the transducer should be cleaned and/or disinfected utilizing a procedure in accordance with current hospital guidelines and manufacturer’s recommendations (1,5,9).
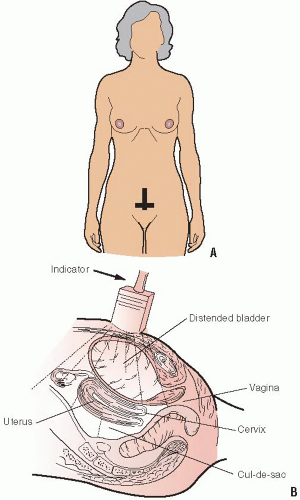 FIGURE 14.1. Transabdominal Scan. Place the transducer in the midline just above the pubis (A). Place the transducer indicator to project to the patient’s head to the left of the screen to obtain a sagittal view. Rotate the transducer 90 degrees counterclockwise to obtain a transverse view. In each view, gently rock the transducer to obtain a three-dimensional view of the uterus and adnexa. When possible, scan with a distended bladder to optimize the acoustic window to the pelvis (B). The internal landmarks of the TAS are visualized (B). (Part B is redrawn from Simon B, Snoey E, eds. Ultrasound in Emergency and Ambulatory Medicine. St. Louis, MO: Mosby-Yearbook; 1997.) |
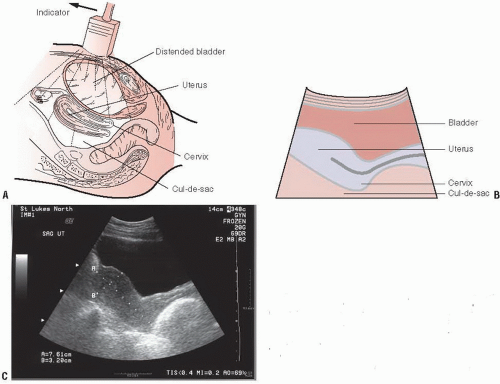 FIGURE 14.2. Transabdominal Scan of the Female Pelvis, Sagittal View. The transducer is placed in the midline, just above the pubis, using the bladder as an acoustic window (A). The arrow notes the indicator positioned toward the patient’s head to obtain a sagittal orientation (A). A schematic of the anatomy of the normal female pelvis (B). Ultrasound of the normal female pelvis (C). The vaginal stripe is visible. The angle between the cervix and the uterine fundus approximates 90 degrees. (Part A is redrawn from Simon B, Snoey, E, eds. Ultrasound in Emergency and Ambulatory Medicine. St. Louis, MO: Mosby-Yearbook; 1997.) |
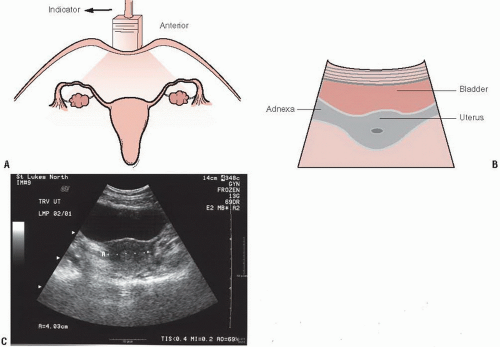 FIGURE 14.3. Transabdominal Scan of the Female Pelvis, Transverse View. The transducer is placed in the midline just above the pelvis in a transverse orientation (A). The indicator points to the patient’s right (A). A schematic of the anatomy of the normal female pelvis is seen in transverse orientation (B). Ultrasound of the normal female pelvis in transverse orientation (C). (Part A is redrawn from Simon B, Snoey E, eds. Ultrasound in Emergency and Ambulatory Medicine. St. Louis, MO: Mosby-Yearbook; 1997.) |
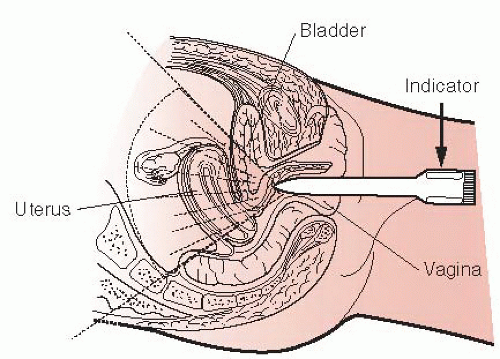 FIGURE 14.4. The Transvaginal Scan of the Female Pelvis. Place the endovaginal transducer in the vaginal vault, just as you would a speculum. Begin in the sagittal plane with the transducer indicator pointed up. Advance only as far as necessary to visualize the uterus. Find the endometrial stripe to identify the midline of the uterus. Rotate the transducer 90 degrees counterclockwise (indicator pointing toward the patient’s right side) to obtain a coronal view. In each orientation, gently rock the transducer in all planes to obtain a three-dimensional view of the uterus and adnexa. (Redrawn from Simon B, Snoey E, eds. Ultrasound in Emergency and Ambulatory Medicine. St. Louis, MO: Mosby-Yearbook; 1997.) |
NORMAL ULTRASOUND ANATOMY
Uterine Anatomy
The uterus is a muscular, hollow organ with an average size of 7 × 4 cm in nulliparous and 8.5 × 5.5 cm in multiparous women. It is bounded by the rectum posteriorly, the bladder anteriorly, and the two bands of the broad ligament laterally (10). In TAS, the bladder acts as an acoustic window through which the uterus can be visualized. The position of the uterus can vary with the relative state of distention of the bladder and rectum. Except when displaced by a distended bladder, the uterus usually forms a right angle with the cervix; this is also called anteflexion (Fig. 14.7). Version refers to the axis of the cervix relative to the vagina, and flexion, the axis of the uterine body to the cervix. The uterus may be retroflexed (Fig. 14.8); this normal variant may make it difficult to visualize the uterine fundus.
The deep layer of the endometrium does not change significantly during menses, unlike the mucosal lining of the uterine canal whose function and appearance varies throughout the menstrual cycle. The opposing surfaces of the endometrial lining form a hyperechoic line that is referred to as the endometrial stripe or endometrial echo complex. The proliferative phase immediately follows menses and begins with a thin, 1- to 2-mm lining that grows under the influence of estrogen in preparation for implantation of the fertilized ovum (Fig. 14.9). Ovulation occurs near day 14 of the menstrual cycle and is followed by the secretory phase. Under the influence of progesterone secreted by the corpus luteum, the endometrium develops protein-rich secretory products and grows up to 12 mm in width (Fig. 14.10) (11, 12, 13, 14). The endometrial echo complex is best visualized in the sagittal plane. The central canal, when viewed in the coronal plane, appears as an echogenic “core” (Fig. 14.6). The thickness of the endometrial lining should be measured between the basal layers, which appear as hyperechoic lines surrounding the hypoechoic functional layer (Fig. 14.11) (1, 2, 3, 4, 5, 6, 7, 8, 9,14,15).
 FIGURE 14.5. Transvaginal Ultrasound of the Normal Female Pelvis, Sagittal Orientation. The transducer is placed in the vaginal vault and advanced until the uterus is seen (A). The indicator is placed up to obtain a sagittal orientation (A). A schematic of the anatomy of the normal female pelvis (B). An ultrasound of a normal anteverted uterus as seen in sagittal orientation (C). Compare (C) to Figure 14.2C (same patient). Note the improved visualization of the endometrial echo complex with the higher resolution transvaginal transducer. (Part A is redrawn from Simon B, Snoey E, eds. Ultrasound in Emergency and Ambulatory Medicine. St. Louis, MO: Mosby-Yearbook; 1997.) |
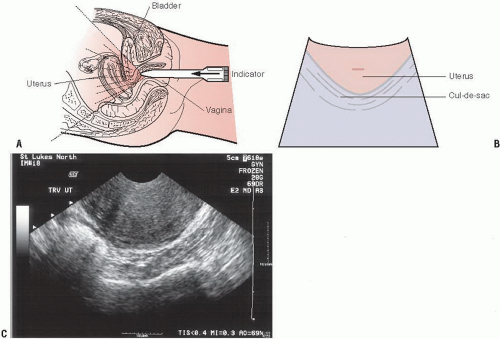 FIGURE 14.6. Transvaginal Ultrasound of the Normal Female Pelvis, Coronal Orientation. The transducer is placed in the vaginal vault and advanced until the uterus is seen (A). The indicator is placed on the patient’s right side to obtain a coronal view (A). A schematic of the anatomy of the female pelvis (B). An ultrasound of a normal anteverted uterus (C). Compare Part C to Figure 14.3C (same patient). Note the improved visualization with the transvaginal view. In this coronal view of the uterus, the endometrial echo complex appears as a core in the center of the image. (Part A is redrawn from Simon B, Snoey E, eds. Ultrasound in Emergency and Ambulatory Medicine. St. Louis, MO: Mosby-Yearbook; 1997.) |
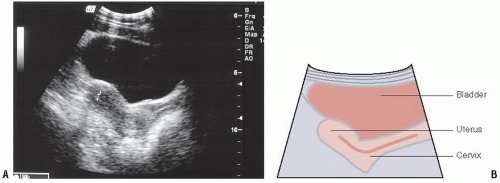 FIGURE 14.7. A: Transabdominal Scan of the Uterus-Anteflexion. The uterine fundus (left) usually forms a right angle with the cervix (right), called anteflexion. B: Schematic representation of ultrasound image. |
Ovarian Anatomy
The ovaries are paired oval-shaped organs that are approximately 3 cm long, 1.5 cm wide, and 1 cm thick. The ovaries lie anterior and medial to the internal iliac vessels, which can serve as a useful landmark when attempting to locate the ovary (Figs. 14.12 and 14.13). The ovaries effectively have a dual arterial blood supply; the ovarian artery arises from the aorta and runs in the suspensory ligament of the ovaries, where it anastomoses with branches of the uterine artery (9,10). This additional blood supply becomes important when evaluating a patient for ovarian torsion as evidence of some blood flow to the ovaries does not rule out torsion.
On ultrasound examination of the premenopausal woman, ovaries often appear as foamy structures secondary to the presence of multiple follicles (Fig. 14.14). Prior to the onset of menses, fluid accumulates in a cohort of follicles that increase in size. When they reach 1 to 2 mm in size, they can be visualized on TVS. Multiple small follicles are seen from day 5 to 7, and by day 8 to 12 one or more dominant follicles can be seen. Although up to 10% of women have
two dominant follicles, each month there is usually only one follicle that achieves complete maturation (Fig. 14.14). Nondominant follicles are usually <14 mm in diameter. In the 4 to 5 days prior to ovulation (usually day 14 of the menstrual cycle), the dominant follicle grows 2 to 3 mm per day, reaching a maximum diameter of 16 to 28 mm. At the time of ovulation, bleeding occurs into the follicle, which decreases in size and may become filled with echogenic debris. The follicle, now called the corpus luteum, may retain fluid over the next 4 to 5 days and increase in size to 2 to 3 cm. If pregnancy does not occur, the corpus luteum gradually involutes and atrophies (5,9).
two dominant follicles, each month there is usually only one follicle that achieves complete maturation (Fig. 14.14). Nondominant follicles are usually <14 mm in diameter. In the 4 to 5 days prior to ovulation (usually day 14 of the menstrual cycle), the dominant follicle grows 2 to 3 mm per day, reaching a maximum diameter of 16 to 28 mm. At the time of ovulation, bleeding occurs into the follicle, which decreases in size and may become filled with echogenic debris. The follicle, now called the corpus luteum, may retain fluid over the next 4 to 5 days and increase in size to 2 to 3 cm. If pregnancy does not occur, the corpus luteum gradually involutes and atrophies (5,9).
Related posts:

Stay updated, free articles. Join our Telegram channel

Full access? Get Clinical Tree


