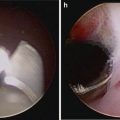
Fig. 6.1
View through the Visiport as anterior rectus fascia is incised horizontally. Left rectus m. belly is the red structure visible through incised fascia, midline is the yellow area to the right
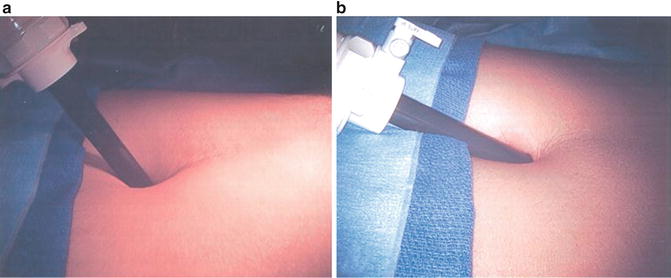
Fig. 6.2
Angles shown during initial incision of anterior rectus fascia (a) and then as space of Retzius is entered (b)
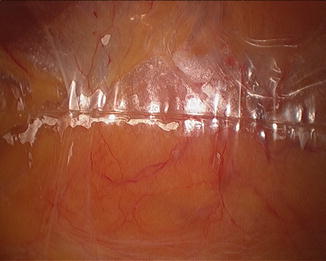
Fig. 6.3
View of the pelvis from within the just-deployed balloon that is creating the potential space in which the operation will take place
At this point the remaining ports are placed, all with blunt trocars, and essentially in a fan-shaped position around the pubic midline. 3 mm × 8 mm Reusable metal robotic ports are used, as well as a 12 mm disposable assistant port (Ethicon Xcel for example). The configuration is as in (Fig. 6.4), with ports angled caudally about 45–70° from the vertical and generally placed along the line from the anterior superior iliac spine (ASIS) to the umbilical incision, with a minimum of 8 cm between robotic ports. The first port is 8–9 cm left lateral to the umbilical port along the line to the left ASIS; then that is used to insert a blunt alligator grasper which can facilitate dissection of the peritoneum cranially and posteriorly for right lateral-most port placement 2 cm superior and 2 cm medial to the right ASIS. This port gets tunneled subcutaneously until it reaches the line between the right ASIS and the umbilical port. It then gets pushed in deeper and into the true pelvis gliding over the spermatic cord and lateral to the peritoneal reflection which is often noted here (Fig. 6.5). Finally, the right medial 8 mm robotic trocar is placed 8–9 cm to the right of the umbilical port along the line toward the right ASIS, and then the left-most 8 mm robotic port for the fourth robotic arm is placed near the left ASIS but again some 2 cm superior and medial to it, then tunneled subcutaneously toward the left ASIS–umbilical port line, before passing into the pelvis and over the spermatic cord. It is crucial to angle all of the ports approximately 45–70° caudally on insertion (e.g., toward the legs) in order to avoid the peritoneal space, which is often visible at the time of port placement, and to watch the trocars go in under direct vision.
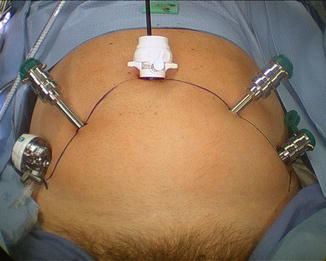
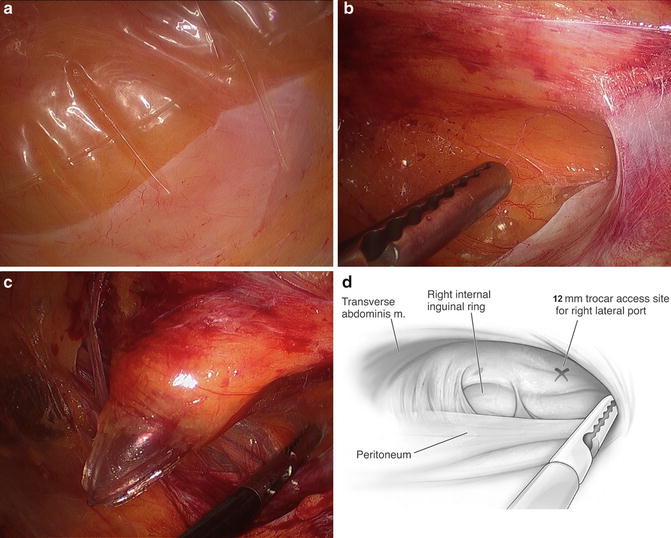
Fig. 6.4
Port configuration for extraperitoneal robotic-assisted radical prostatectomy. The four robotic ports (the metal ports plus the midline camera port must each be at least 8 cm from each other
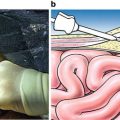
Fig. 6.5
(a) The peritoneal reflection is noted in the right lower aspect of the figure, appearing as a pale line going across the image from lower left to upper right. The balloon is pushing it inferiorly as it is being inflated. (b) Here the balloon has been removed and an alligator grasper is being used to push the peritoneum more inferiorly and superiorly such that the sidewall can be identified over the spermatic cord. (c) The spermatic cord is being held down as the assistant port is being placed caudal and superior to the peritoneal lining in the right lower quadrant. (d) A graphic depiction of (b)
The patient is then placed in modest Trendelenburg (full Trendelenburg is rarely needed) and the space is analyzed. A peritoneotomy would be noticed at this point as the space would appear small and its supero-posterior wall (peritoneum) would be billowing into the field. This relatively rare occurrence (about 1/20 cases in experienced hands) need not change one’s operative plan. A small/microscopic peritoneotomy which lets gas into the peritoneal cavity can be managed by inserting a Veress needle into the abdomen for continuous venting of this space during the operation. Alternately, since the bladder has been “taken down” already, a small inadvertent peritoneotomy can purposely be enlarged on one or both sides side to render the extra- and trans-peritoneal spaces contiguous but still without losing some of the advantages of extraperitoneal surgery, such as the fact that the bladder is already taken down, and the veil of tissue composed of the urachus and medial umbilical ligaments maintain separation between the patient’s bowels and the pelvic space.
The Da Vinci robot is then moved into place between the legs. If the legs need to be spread a bit more or lowered to avoid clashing with the robot, this is easily accomplished by adjusting the Allen stirrups. Docking is done carefully and remembering to keep the ports angled even while docking to avoid inadvertent peritoneotomy. The fourth robotic arm (robot arm “3”) comes in left lateral-most and must be docked such that it does not clash with the stirrup, left knee, left foot or pelvis. Then, under direct vision, the robotic instruments should be advanced into the retropubic space. Our preference is for a ProGrasp forceps in the arm at far left, a bipolar Maryland grasper in the left arm, a monopolar scissor in the right robotic port, and a 0° lens in the camera port. The 12 mm assistant port is used for a right-sided assistant and allows for retraction, suction, clip placement, and also specimen (lymph node packet(s)) extraction.
The Extraperitoneal Space
The extraperitoneal space at this point only needs to be expanded a bit in order to appear identical to the standard open retropubic space that surgeons have grown accustomed to over the last decades. It is worthwhile to spend several minutes dissecting through areolar tissue until the entire pubis and midline symphysis are clearly identified (Fig. 6.6a, b show the area first as it looks on removal of the balloon and subsequent insufflation, then after the areolar tissue has been cleared away). It then helps to defat the area as well until the endopelvic fasciae are visible (Fig. 6.6c). The superficial dorsal vein is usually apparent as fat gets dissected off of the anterior prostate and it should be taken with electrocautery. The fat overlying it generally ramifies along with its proximal branching to the right, left, and center over the prostate toward the bladder, but with bipolar diathermy these branches can easily be taken and the fat and superficial dorsal venous complex removed to better expose the prostate. We have in recent years been sending this fatty tissue for pathologic analysis as a minority of patients (5–15 %) will have periprostatic lymph node(s) contained within.
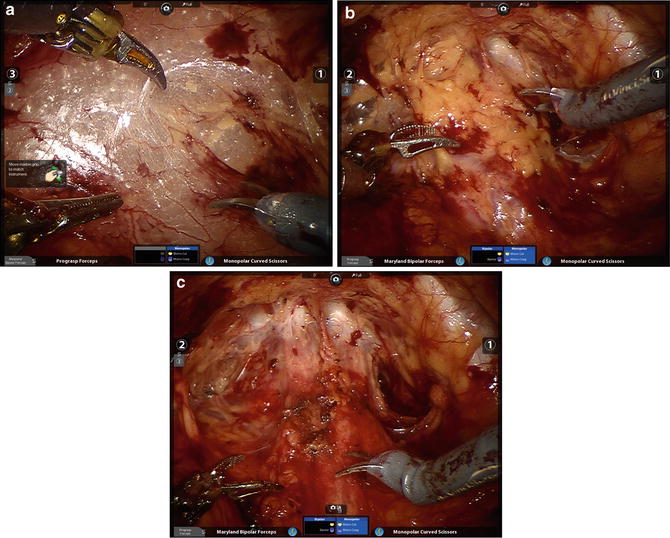
Fig. 6.6
(a) The space of Retzius after the balloon has been removed and all ports have been placed and instruments loaded. (b) The same space (and patient) after the areolar tissue has been cleared away, leaving residual periprostatic fat. (c) After the fat has been cleared away the endopelvic fascia and puboprostatic ligaments are more identifiable
Flimsy tissues overlying the external iliac vessels and spermatic cords should then be incised to facilitate easy access to the pelvis for the assistant and fourth robotic arm. Any inguinal hernias or herniated fat that are in the way should be reduced. Finally, identification of important landmarks should ensue, the puboprostatic ligaments and endopelvic fasciae for the prostatectomy, and the external iliac veins (EIV) and obturator nerves for men who will be receiving pelvic lymph node dissection (PLND). It is particularly important to make sure to assess the position of the right EIV in comparison to the right assistant port, and ideally to advance that port past the vein such that instruments that are placed through the port do not risk traumatizing it.
Pelvic Lymph Node Dissection
We prefer to perform the PLND prior to the prostatectomy, though it certainly can be accomplished subsequent to the mobilization of the prostate. In either case, preparation for PLND involves identifying the EIV and obturator nerves. The former can usually be found, even if there is much fat overlying them, by looking for venous waveforms just above the pelvic brim. Once found, the fascia overlying the EIVs must be incised and the sidewall accessed under the veins. The assistant’s suction device can be placed in this space while the operator dissects the nodes off the EIV and looks for the obturator nerve. If not obviously under the EIV it can often be found by looking for the obturator foramen which often has a fat plug in it. The nerve courses through the foramen and out of the pelvis by hugging the foramen superolaterally; once it is found the nodal packet under the EIV and above the obturator nerve should be clipped distally and handled with the ProGrasp for dissection as proximally as indicated. A standard PLND can certainly be performed in this space, taking all level I and II nodes, as the bifurcation of the iliac vessels is reachable (as in open radical prostatectomy which, as mentioned, is performed in the same space and with the same limitations). With the ProGrasp holding the nodes anteriorly, two arms remain for dissection, cautery, and retraction (Fig. 6.7). In addition, the wrist of the arm on the side of the PLND can be used to hold back pre-peritoneal fat if it gets in the way, while still allowing the instrument to be used as a grasper/dissector. Extended PLND depending on the definition may or may not be able to be performed, as presacral nodes are not reachable without mobilizing the bladder more than can be done extraperitoneally; a 30° lens may be used to facilitate deeper and more medial dissections at the internal iliac artery(ies) and vein(s). In any case, we favor using Hem-o-lok™ clips (Weck, Teleflex, Limerick, PA) to secure lymphatic pedicles, rather than bipolar cautery or suction whenever possible. A harmonic scalpel is also a great tool for PLND and for sealing small lymphatics, but is certainly not necessary. The nodes are typically extracted after the dissection, through the 12 mm assistant port (Fig. 6.8), though they can also be left in their location for later extraction with the prostate specimen. A drain should be placed at the conclusion of the case whenever PLND is performed, particularly when confined to the extraperitoneal space.
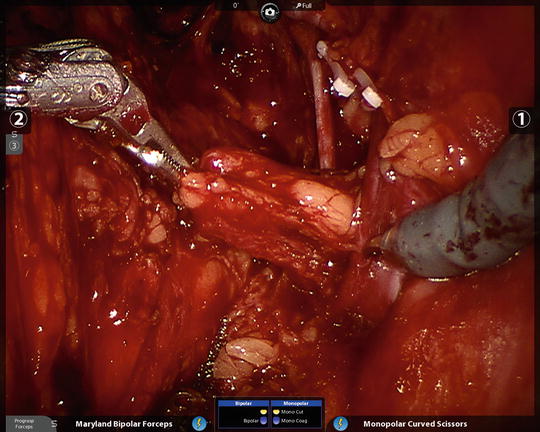
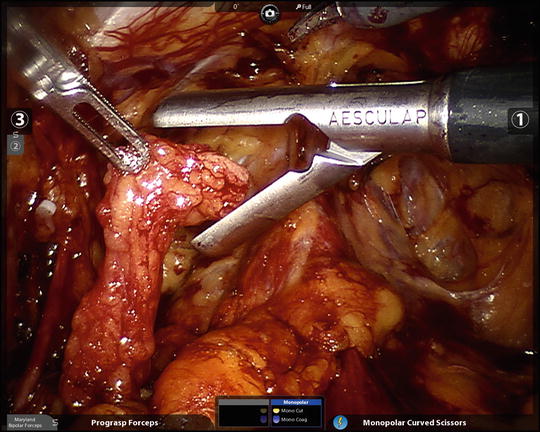
Fig. 6.7
The ProGrasp is an excellent tool for atraumatically grasping lymph node packets and leaving the other robotic arms free for dissection. The right obturator nerve and right external iliac vein are in plain view
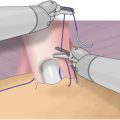
Fig. 6.8
The freed right pelvic lymph node packet is being given to the assistant for extraction through the assistant 12 mm port with a spoon forceps. An alligator grasper often does the trick as well if the specimen is too bulky. Remember to open the port for specimen extraction
Radical Prostatectomy
The subsequent steps can be performed in much the same manner as a radical prostatectomy would be done in open retropubic fashion or in transperitoneal laparoscopic/robotic fashion. The order of the steps and the tools used may differ, but fundamentally the retropubic potential space, once expanded, allows for a comparable retropubic view of the cancerous prostate. An advantage to remaining extraperitoneal, or preperitoneal, as in open radical retropubic radical prostatectomy, is that steep Trendelenburg is not necessary prior to docking the robot, although some minor Trendelenburg is helpful. The reason is that the bladder and peritoneum form a natural superior and posterior floor to the operation until Denonvilliers’ fascia is reached, preventing small and large bowel and any prior intra-abdominal adhesions from complicating access to the prostate. The critical aspect of the case that differs from most other approaches and that must be mastered in order to perform successful extraperitoneal radical prostatectomy is identification, dissection and taking of the posterior genital structures the vasa deferentia and seminal vesicles. These are taken after bladder neck transection and not accessed transperitoneally nor retrograde as in open retropubic radical prostatectomy. Nerve sparing on the other hand, may be accomplished antegrade, retrograde, or in a combined manner regardless of the approach to the prostate and is performed as per the preferences of the operating surgeon.
Step 1: Incising the endopelvic fasciae and puboprostatic ligaments
The surgeon should search for the relatively avascular plane between the prostate and its lateral attachments. The optimal place to start is at the proximal shoulder of the prostate on either side, just distal to the vasculature of the bladder at the lateral prostate–bladder interface. The endopelvic fascia at its proximal origin is easily identifiable and can be swept toward the apex until at one point it needs to be incised and will no longer sweep away. This incision line, made by scissor or with monopolar cautery (Fig. 6.9), should be continued to the puboprostatic ligaments, which are then carefully taken at their midpoint in order to allow for better ligation of the deep dorsal vein beneath them. The more distal and inferior aspects of the puboprostatics should not be taken as they lend support to the urethra as it exits the prostate apically. Ideally, after incision of the endopelvic fascia, the lateral prostatic fascia is kept on the prostate, the levator ani fascia is left on the levator ani muscle, and a plane between them develops with venous channels (often quite prominent) notable on the prostate side and just covered by lateral prostatic fascia. For intrafascial dissections, if desired, these veins can be left lateral to the plane of dissection and contiguous with the levator fascia, allowing the surgeon to get right onto the prostate capsule. This dissection is however more difficult, associated with more bleeding, and should ideally only be undertaken in low–intermediate risk patients with minimal to no apparent disease on that side. As an additional note, accessory pudendal arteries are sometimes identified during dissection through the endopelvic fasciae and are spared when possible to assist in preservation of erectile function. Electrocautery is kept to a minimum to prevent damage to the neurovascular bundles and external urethral sphincter.

Related posts:
 Challenging Cases in Robotic Radical Prostatectomy
 Postoperative Management and Preoperative Considerations: Urinary Incontinence and Anastomotic Stricture
 Patient Positioning; Incision/Port Placement
 The Transperitoneal Robotic-Assisted Radical Prostatectomy
 Surgical Anatomy
 Open Radical Retropubic Prostatectomy

Stay updated, free articles. Join our Telegram channel

Full access? Get Clinical Tree


