Author
Location of injectate
Type 1
Type 2
Type 3
Within tendon sheath
Inside tendon, tendon sheath, and surrounding area
Outside tendon sheath
Hashiuchi, 2011
Ultrasound-guided
86.7 %
13.3 %
0 %
Unguided
26.7 %
40.0 %
33.3 %
Scanning Technique and Anatomy to Identify
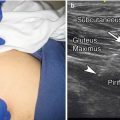
For an optimal view of the biceps tendon, the patient’s hand should be supinated with the elbow flexed, lying on the ipsilateral thigh. With the transducer placed in the axial plane over the proximal humerus, the hyperechoic tendon of the long head of the biceps brachii can be visualized within the bicipital groove. The transverse humeral ligament lies superficial to the tendon. The subscapularis tendon can be seen medially. Using Doppler imaging, the ascending branch of the circumflex humeral artery may be visualized laterally. Turn the transducer 90° to view the tendon longitudinally. Sweep medially to view the pyramid shape of the lesser tuberosity (Fig. 2.1) [7].

Fig. 2.1
(a) Short-axis view of the biceps tendon with circumflex humeral artery in red. (b) GT-greater tuberosity, IG intertubercular groove, LT lesser tuberosity, arrow with stop indicates circumflex humeral artery, deltoid labeled, purple subscapularis muscle, orange circle biceps tendon, dotted green line transverse humeral ligament. (c) Longitudinal view of biceps tendon. (d) Humerus deep to biceps tendon (orange) with thin bursa overlying it marked by black arrows, deltoid labeled
Injection Techniques: In-Plane Axial Approach
Patient positioning: Sit the patient with the hand supinated and elbow flexed.
Probe positioning: Place the transducer in the axial plane on the patient’s proximal humerus, visualizing the greater and lesser tuberosities and the bicipital groove (Fig. 2.2a).
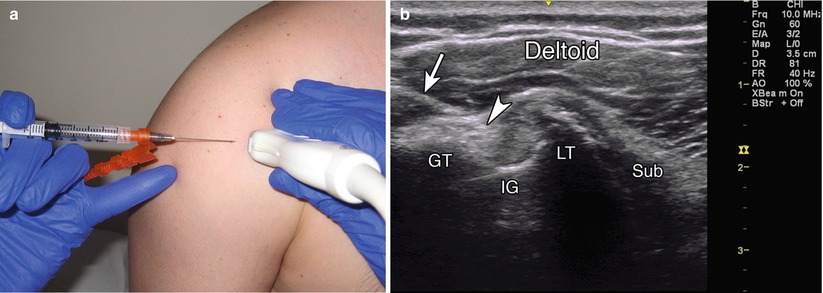
Fig. 2.2
(a) Example of axial probe position over biceps tendon with in-plane needle position. (b) Example of in-plane axial injection into the biceps tendon sheath, GT greater tuberosity, IG intertubercular groove, LT lesser tuberosity, arrow indicates needle, arrowhead indicates needle tip, sub-subscapularis muscle, deltoid labeled
Markings: Identify the ascending branch of the circumflex humeral artery using power Doppler imaging. This vessel runs up the lateral side of the bicipital groove.
Needle position: Insert the needle from lateral to medial in-plane with the probe targeting the biceps tendon sheath situated between the biceps tendon and the transverse humeral ligament.
Safety considerations: Avoid directly injecting the tendon, as this may increase susceptibility to tendon rupture [8, 9]. Although the space between the tendon and the greater tuberosity can also be injected, the circumflex humeral artery should be properly visualized and avoided.
Pearls:
The subacromial/subdeltoid bursa lies just superficial to the biceps tendon sheath and may be injected at the same time if so desired.
Make sure injectate is seen flowing around the biceps tendon (“donut sign”) and not in the bursa.
Injection Techniques: In-Plane Sagittal Approach
Patient positioning: Same as above
Probe positioning: Place the transducer sagittally to visualize the length of the biceps tendon within its groove and the pyramid shape of the lesser tuberosity (Fig. 2.3a).
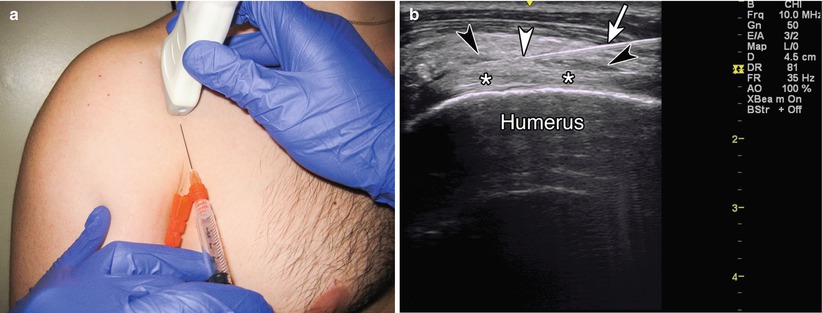
Fig. 2.3
(a) Example of longitudinal probe position over biceps tendon with in-plane injection technique. (b) Example of in-plane long axis approach, asterisk indicates biceps tendon, black arrowheads indicate tendon sheath filling with injectate, white arrow indicates needle, white arrowhead indicates needle tip
Markings: The lesser tuberosity will appear medial to the bicipital groove. Fluid may be seen in the tendon sheath.
Needle position: Enter the skin from caudad to cephalad and in-plane with the probe.
Safety considerations: Same as above
Pearls:
Supinate the hand to rotate the bicipital groove anteriorly.
Angulate the transducer cephalad to eliminate anisotropy caused by the deep course of the biceps tendon.
Equipment needed:
High-frequency linear array transducer (10 MHz+)
25 gauge, 1.5″ needle
0.5 ml of steroid preparation (typically 40 mg of triamcinolone or methylprednisolone)
1 ml of local anesthetic
Acromioclavicular (AC) Joint
The AC joint is formed by the articulation of the distal end of the clavicle and acromion process of the scapula, where a step-off can be palpated. Osteoarthritis of the AC joint is a frequent source of pain and occurs due to trauma or overuse from frequent rotational motion, shear stress, high compressive forces, or failure of the surrounding muscles [1, 10].
Ultrasound-guided AC joint injections can help diagnose AC joint mediated pain. Physical exam maneuvers such as the cross body arm abduction (scarf) sign and focal tenderness have low sensitivity [10]. Palpation-guided AC joint injections range in accuracy from 40 to 66 % (Table 2.2), while image-guided injections have been shown to have a much higher degree of accuracy [11–15].
Table 2.2
Accuracy of AC joint injections
Author | Specimen | Guidance | Accuracy | Verification |
|---|---|---|---|---|
Partington, 1998 | Cadaver | Blind | 67 % | Dissection |
Peck, 2010 | Cadaver | Blind/US | Blind (40 %) | Dissection |
US (100 %) | ||||
Pichler, 2009 | Cadaver | Blind | 57 % | Dissection |
Bisbinas, 2006 | Clinical | Blind | 39.4 % | Fluoroscopy |
Sabeti-Aschraf, 2011 | Cadaver | Blind/US | Blind (72 %) | US expert |
US (95 %) |
Scanning Technique and Anatomy to Identify
The patient can be positioned supine or seated upright. The medial acromion or lateral clavicle can be palpated and the ultrasound probe placed in the anatomic coronal plane over the AC joint. Alternatively the joint can be found by scanning superiorly from the bicipital groove in the transverse plane [7]. With the probe directly over the AC joint, an anechoic joint space can be visualized separating the hyperechoic cortex of the acromion and clavicle (Fig. 2.4). The hyperechoic fibrocartilaginous disk interposing the joint may be visualized in younger patients [2].
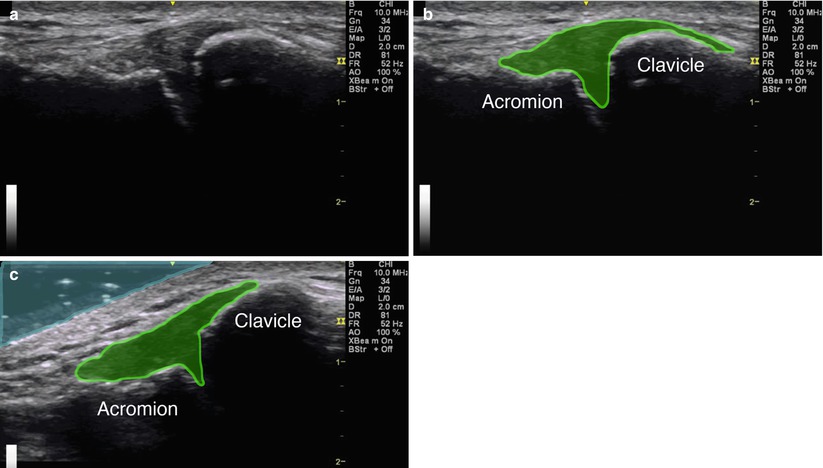
Fig. 2.4
(a) Coronal view of the acromioclavicular joint. (b) Green indicates AC joint fluid within the joint capsule, acromion and clavicle labeled. (c) Coronal view for a gel standoff approach, light blue indicating gel
Injection Techniques: In-Plane Coronal Approach
Patient positioning: Sit the patient with the arm in a neutral position, hanging at the side. This position is optimal as the weight of the shoulder and arm maximally opens the joint space. Downward traction on the arm can further accentuate this.
Probe position: Center the probe over the AC joint in the coronal plane (Fig. 2.5a).
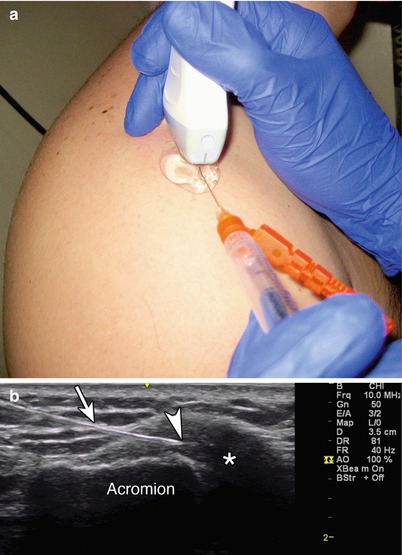
Fig. 2.5
(a) Example of coronal probe position over AC joint with gel standoff in-plane injection technique. (b) Asterisk indicates injectate in AC joint space, arrow points to needle, arrowhead points to needle tip, acromion labeled
Markings: No significant vascular or neural structures need to be marked.
Needle position: Insert the needle in-plane from lateral to medial aiming at the lateral margin of the clavicle. A gel standoff technique can be utilized.
Safety considerations: The subacromial space is approximately 4 mm below the capsule, so the needle should be carefully placed to avoid puncturing the deep capsule and entering the subacromial space.
Pearls:
Direct the needle parallel to the probe, as the joint lies relatively superficial.
Immediately after successful injection, the capsule may appear elevated and the joint space wider.
A gel standoff technique may be used to allow more room for the needle approach.
Equipment needed:
High-frequency linear array transducer (10 MHz+)
25 gauge, 1.5″ needle
0.5 ml of steroid preparation (typically 40 mg of triamcinolone or methylprednisolone)
1–2 ml of local anesthetic
Suprascapular Nerve Block
The suprascapular nerve innervates the supraspinatus and infraspinatus muscles and provides sensory branches to the posterior glenohumeral joint capsule, acromioclavicular joint, subacromial bursa, coracoclavicular, and coracoacromial ligaments [16]. A nerve block can be used to temporarily relieve pain or provide local anesthesia to any of these structures [17].
Scanning Technique and Anatomy to Identify
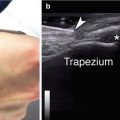
Place the ultrasound probe transversely over the superior medial border of the spine of the scapula, over the supraspinatus muscle. Follow the orientation of the superficial supraspinatus muscle and the deeper bony scapula; move the probe laterally along the axis of the supraspinatus muscle until the suprascapular notch appears (Fig. 2.6a) [18]. The suprascapular nerve will be visualized beneath the transverse scapular ligament in the suprascapular notch [19]. The nerve may be difficult to visualize but can be seen adjacent to the suprascapular artery, which can be identified with Doppler.
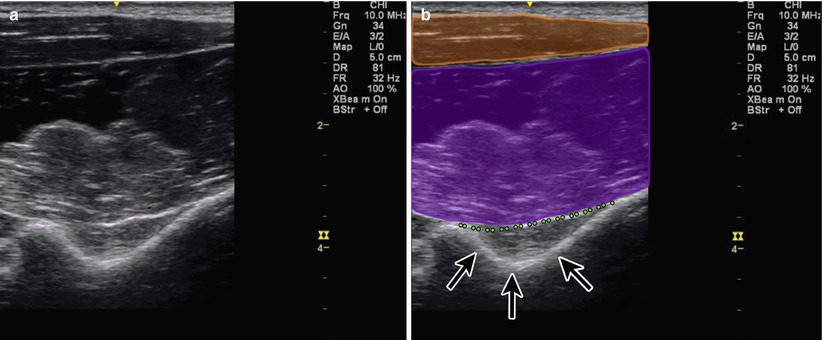
Fig. 2.6
(a) Coronal view of suprascapular notch. (b) Orange indicates trapezius muscle, purple indicates supraspinatus muscle, black arrows point to suprascapular notch, green dotted line indicates suprascapular ligament
Injection Technique: In-Plane Coronal Approach
Patient positioning: Sit the patient with the arm in lap or with the hand of the side being blocked resting on the contralateral shoulder [19].
Probe positioning: The probe is placed parallel to the superior aspect of the scapular spine and then moved laterally and cephalad in a coronal plane to visualize the scapular floor and the suprascapular notch. Toggling the probe from axial to coronal planes may help to visualize the suprascapular nerve and the transverse ligament (Fig. 2.7a).
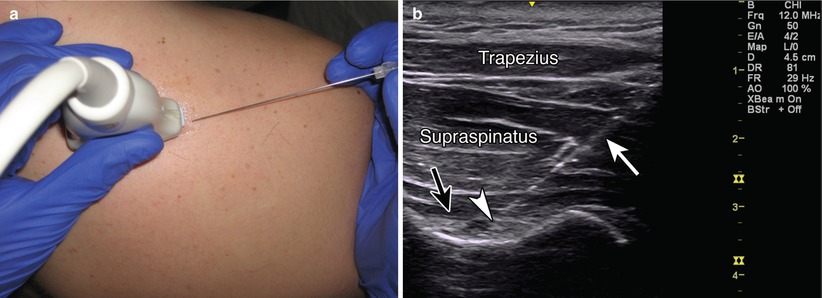
Fig. 2.7
(a) Example of coronal probe position over suprascapular notch. (b) Example of in-plane needle approach, black arrow point to suprascapular ligament, white arrow indicates needle, white arrowhead points to needle tip adjacent to suprascapular nerve, trapezius and supraspinatus muscles labeled
Markings: The trapezius and supraspinatus will be clearly visualized deep to the subcutaneous tissue. The suprascapular artery can be confirmed with Doppler.
Needle position: The needle is directed from the lateral side of the probe in-plane toward the nerve sheath.
Related posts:


Stay updated, free articles. Join our Telegram channel

Full access? Get Clinical Tree


