![]()
KEY WORDS
Activated Partial Thromboplastin Time (APTT). A measure of how well blood clots; APTT measurement is particularly useful in patients taking heparin, a commonly used blood thinner.
Coaxial Catheters. Two or more catheters nested within one another.
Cordocentesis. Puncture of the umbilical cord. See PUBS.
Chorionic Villi Sampling (CVS). Placental tissue is analyzed for the fetal karyotype. A needle is put into the region of the placenta closest to the amniotic fluid, and a portion of the placenta is sucked into a tube. The placenta may be approached through the cervix or through the abdominal wall.
Dermatotomy. Skin incision.
Fentanyl. A drug (narcotic, similar to morphine) used to decrease pain during a procedure.
French. Measure of catheter size.
Hysteroscope. A small, fiberoptic tube inserted through the cervix so the interior of the endometrial cavity can be viewed and samples can be obtained.
Indigo Carmine. A harmless dye that may be inserted into the amniotic fluid when there is a possibility of twins.
International Normalized Ratio (INR). A test designed to better measure the prothrombin time (PT). Most procedures may be safely performed if the INR is less than 1.5.
Laminectomy. Surgical removal of the posterior arch of a vertebra.
Lecithin/Sphingomyelin (L/S) Ratio. Surfactants present in the amniotic fluid that are used as biochemical markers to determine fetal lung maturity. The L/S ratio is gradually being replaced by the fluorescent polarization test, a newer laboratory test on amniotic fluid that can be performed in half the time of the L/S ratio. A third test for assessing fetal lung maturity, the phosphatidylglycerol method, is useful in certain limited situations.
Midazolam. A drug (benzodiazepine, similar to Valium) used for its antianxiety and amnestic (helps the patient forget the procedure) properties during painful procedures.
Myelotomy. Surgical incision of the spinal cord.
Needle Stop. A small clamp that attaches onto any gauge needle; it helps prevent the needle from being inserted past the predetermined depth.
Percutaneous Umbilical Blood Sampling (PUBS, Cordocentesis, Funisocentesis). A small needle is placed in the umbilical cord, and fetal blood is aspirated.
Pigtail Catheter. A catheter with a circular shape at one end. It tends to remain within a cavity. The side holes are placed within the curved region that is known as the pigtail.
Platelet Count. The number of platelets in the blood. Platelets are important for clotting. Most procedures may be safely performed if the platelet count is greater than 50,000.
Prothrombin Time (PT). A measure of how well blood clots; PT measurement is particularly useful in patients taking warfarin, a commonly used blood thinner. See INR.
Syrinx. A fluid collection in the center of the spinal canal.
Tandem. A tube containing radioactive material that is put within the endometrium.
Thermal Ablation. Destroying tumor tissue with either heat (radiofrequency or microwave) or cold (cryoablation).
Trocar. Central insert placed within a tubular needle to give it a point. When it is withdrawn, tissue or fluid can be aspirated.
Vacutainer Tube. Tube that is used for drawing blood. Built-in suction within the tube pulls the blood out at a more rapid rate.
RELEVANT LABORATORY VALUES
Platelet Count: 160–370 K/L
International Normalized Ratio: 0.9–1.1
Activated Partial Thromboplastin Time: 25.0–35.0 seconds
Lecithin-Sphingomyelin (L/S) Ratio in amniotic fluid: values <1.5–2.0 indicate an increased risk of respiratory distress syndrome at delivery
Reference ranges for individual laboratories may vary slightly.
The Clinical Problem
Ultrasound is now used to guide a variety of invasive procedures that previously relied on fluoroscopic or computed tomography (CT) localization or experienced guesswork. Ultrasound is guiding more and more procedures every year that were previously the province of other imaging modalities. If a structure can be seen by ultrasound, it is generally amenable to ultrasound-guided intervention. For abdominal and pelvic pathology, ultrasound is generally cheaper, safer, quicker, and more efficacious than CT. Sonographic guidance allows one to compress the abdominal wall, essentially halving the distance to lesions when compared with CT, making procedures easier in our increasingly obese culture. Ultrasound is also used daily to guide interventions in the operating rooms and in the neck and breast; it is also increasingly used for procedures in the chest wall and mediastinum. Ultrasonic localization should take place immediately before (or during) any potentially difficult fluid aspiration or biopsy.
Approaches to Puncture Procedures
LOCALIZATION WITHOUT GUIDANCE
If the lesion is large and close to the skin, localization is performed with ultrasound but no guidance is necessary. Make sure, however, to use a high-frequency linear or curved linear transducer with color Doppler technology to ensure that there are no prominent blood vessels in the region of the expected puncture site. If these vessels are present, either move the puncture site far away or use direct ultrasound guidance to ensure that these vessels are avoided (Fig. 54-1).
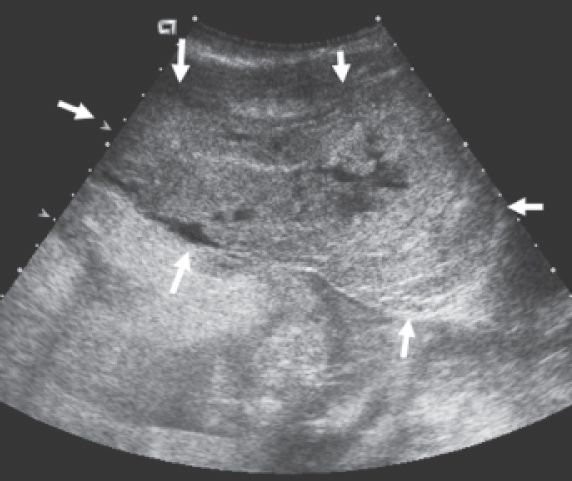
Figure 54-1. ![]() Large (>15 cm) hematoma (white arrows) in the anterior abdominal wall after the inferior epigastric artery was inadvertently punctured during a paracentesis.
Large (>15 cm) hematoma (white arrows) in the anterior abdominal wall after the inferior epigastric artery was inadvertently punctured during a paracentesis.
RIGHT-ANGLE APPROACH
If the target is located in a space that has an accessible acoustic window at a 60- to 90-degree angle (Figs. 54-2 and 54-3), the following technique is best.
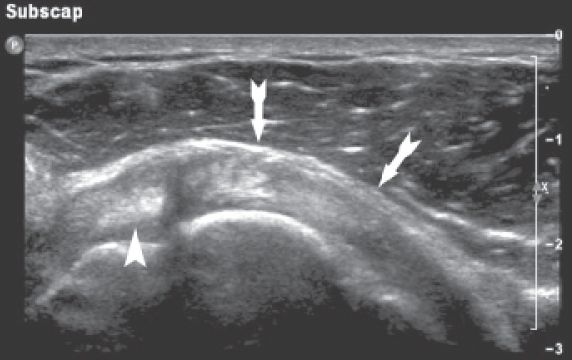
Figure 54-2. ![]() The right-angle technique is used predominantly in obstetrics and for kidney (both native and transplant) biopsies. The transducer is placed over an easily accessible path into the target. The needle insertion site is found by pushing on the skin and watching the image closely. The needle is then placed at approximately right angles to the ultrasonic beam into the mass. Excellent visualization is obtained.
The right-angle technique is used predominantly in obstetrics and for kidney (both native and transplant) biopsies. The transducer is placed over an easily accessible path into the target. The needle insertion site is found by pushing on the skin and watching the image closely. The needle is then placed at approximately right angles to the ultrasonic beam into the mass. Excellent visualization is obtained.
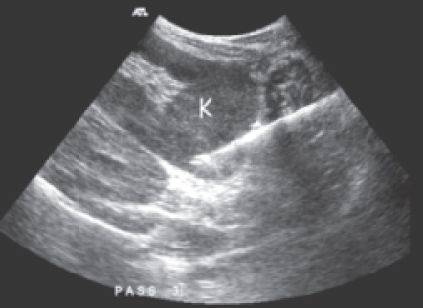
Figure 54-3. ![]() Right-angle approach to biopsy of a transplant kidney (K) in the iliac fossa. Note how probe and needle are almost at right angles to each other, allowing for an excellent specular reflection from the needle as it passes into the lower pole of the kidney.
Right-angle approach to biopsy of a transplant kidney (K) in the iliac fossa. Note how probe and needle are almost at right angles to each other, allowing for an excellent specular reflection from the needle as it passes into the lower pole of the kidney.
1. Choose a needle insertion site where the lesion can be seen well and where the course of the needle is safe. Avoid a path where you must angle around the bowel or gallbladder.
2. Place the transducer at a nonsterile location where the lesion and needle track can be viewed and that is at approximately right angles to the needle insertion angle. The procedure is usually performed with a curved linear transducer so the angle of the transducer beam to the needle can be readily seen. The transducer should be turned so that the beam is in the same plane as the needle. It is critical to follow subtle angulation changes in the needle position with the transducer; aligning the two is essential for successful needle visualization.
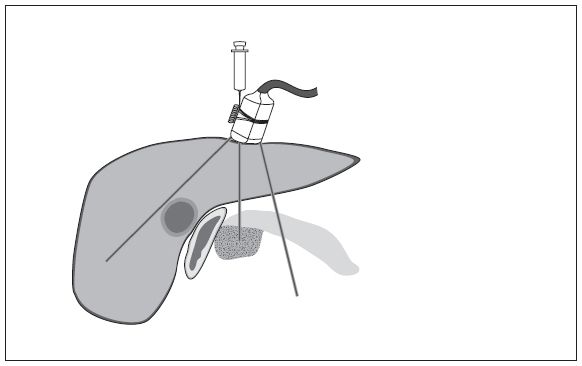
Figure 54-4. Oblique technique. This pancreatic mass could only be punctured with a needle alongside the transducer because the area around it was obscured by gas. It is difficult to see the needle with this oblique approach, but it can be used if the access is limited. A biopsy guide is helpful with this approach.
3. Before inserting the needle, press with your finger on the skin at the approximate needle insertion site to help show where the needle is about to enter the image. The finger movement can be seen.
4. Localize the lesion in two planes.
5. Provide continuous guidance during the procedure.
Providing the needle location and axis are successfully followed by the sonographer (and this requires skill, experience, and communication between the sonologist and sonographer), even 22-gauge needles can be clearly seen.
It is of particular importance when using a 22-gauge needle to align the bevel and the scan plane to avoid having the needle bend out of the field of view. Needles with centimeter calibrations on them can be very helpful in determining how far the needle has been inserted.
FREEHAND AT AN OBLIQUE AXIS TO THE NEEDLE
The needle can be placed alongside the transducer at an oblique axis to the ultrasound beam (Fig. 54-4). The needle will generally be guided by the physician, who holds both the needle and transducer. The transducer is placed within a sterile plastic cover that has some gel within it. Use a sterile rubber band to tighten the plastic bag neck around the transducer. Sterile tube gauze can be placed around the cable to keep the sterile field intact. Commercially available sheaths cover both the transducer and a good portion of the cable, allowing one to easily maintain a sterile field.
This technique is used when the lesion is large and superficial, access is limited, and some guidance is required. Recognizing the needle path requires skill, because the echoes from the needle may be subtle and only the tip is easily seen. The needle often cannot be seen near the skin. An up-and-down motion with the needle (jiggling), movement of the inner stylet within the needle, rotating the needle to expose the beveled tip, use of modern cross-beam technology, and use of a sonographically reflective coating on the needle tip all help with needle visualization.
USING A BIOPSY ATTACHMENT
Biopsy attachments are occasionally helpful when the ultrasonic access is limited and the target is small (Fig. 54-5). Biopsy attachments are available for almost all transducers. The needle is inserted through a guide so the needle enters the image and the body at a preset oblique axis, shown on the monitor as a dotted line or template. The transducer axis can be changed so that the target lies in the middle of the dotted line. The needle may not be easy to see unless it is large because the needle is almost on the same axis as the sound beam; however, improvements in ultrasound hardware and software make needle visualization easier and easier. Needle tip visualization is improved by using a needle that has a roughened tip or commercially applied polymer coating to make it more echogenic. The sonographer must be adept at recognizing subtle tissue movement as the needle enters the tissues. The needle will enter the image obliquely and may not follow the expected template route. Thin needles tend to bend out of the plane as they meet tissues of different consistency. Although very experienced sonographers and sonologists may not need to use a biopsy guide for any but the most difficult of procedures, we find that use of a guide generally makes procedures much easier for beginners or those who only practice ultrasound intermittently.
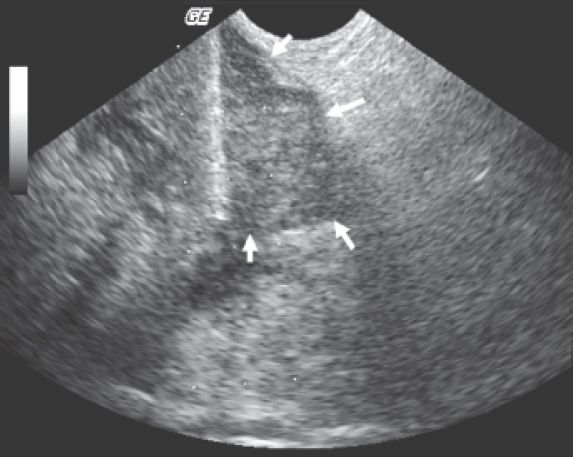
Figure 54-5. ![]() Lung cancer metastasis (white arrows) on the pelvic sidewall in an elderly smoker being biopsied with a transvaginal approach using a biopsy guide. Because the tumor deep in the pelvis could not be safely approached percutaneously (from the front or back) because of overlying structures, a biopsy guide and an endovaginal approach were used for a safe and easy successful biopsy. Note dotted lines from the biopsy guide software, which predict the needle trajectory. Needle (heavy white line) passing into the mass.
Lung cancer metastasis (white arrows) on the pelvic sidewall in an elderly smoker being biopsied with a transvaginal approach using a biopsy guide. Because the tumor deep in the pelvis could not be safely approached percutaneously (from the front or back) because of overlying structures, a biopsy guide and an endovaginal approach were used for a safe and easy successful biopsy. Note dotted lines from the biopsy guide software, which predict the needle trajectory. Needle (heavy white line) passing into the mass.
Practical Steps
OBTAIN CONSENT FORMS
Punctures of any kind carry potential risks, and a full explanation of the risks and benefits of the procedure must be given to the patient. The alternative diagnostic and therapeutic maneuvers that are available should be discussed. The patient will then sign a consent form before the puncture. Consent forms are obtained by the physician performing the procedure, but such matters can be overlooked in any busy laboratory; the sonographer should therefore double-check that the form has been signed. The sonographer usually acts as a witness to the consent.
FIND THE PUNCTURE SITE
Demonstrate the following:
1. Where the mass or collection is
2. How deep it is
3. What lies between the patient’s skin and the mass, such as bowel or vessels
DETERMINE THE OPTIMUM NEEDLE DEPTH
1. Make sure that the patient is comfortable. This is imperative because the patient must lie still for the duration of the procedure. However, the position should give the physician easy access to the target, preferably in a vertical axis without the need to angle the needle. If an oblique position is necessary, stabilize the patient with sponges or pillows.
2. Move the patient so that as few structures as possible lie in the path of the needle. Piercing the liver, small bowel, or stomach is undesirable if it can be avoided by a change in the angulation of the patient or the approach. One should never puncture the large bowel (colon).
3. Watch the patient’s respiration. Scanning and locating the site during quiet breathing is best. Respiration should be suspended when the needle is inserted. The needle may move greatly, especially in the kidney, when the patient breathes.
4. The puncture site must be marked in such a way that the mark will not be scrubbed away when the patient’s skin is cleaned. A simple but effective method is to imprint the skin by pressing on it with a localizer. Among the many possible “scientific puncture site localizers” that are used are retracted ballpoint pens, plastic needle caps, and pen caps. Anything that is not too sharp to cause the patient discomfort will do. Press on the skin just before the skin is cleansed, and a small red circle will remain.
5. Once the lesion has been found and the puncture site has been marked, leave an image on the screen with the calipers demonstrating the depth of the lesion and angle of approach. This can serve as a reference during the set-up for the procedure, enabling the physician to review the depth and approximate angle.
REMOVE GEL
The gel that has been used in performing the scan must be thoroughly removed before the skin antiseptic cleaning solution is applied, or otherwise adequate sterility cannot be obtained. A dry towel, or rarely alcohol, is usually sufficient to remove the gel. The povidone-iodine (Betadine, Purdue Pharma L.P., Stamford, CT) skin-cleaning solutions of the past are gradually being supplanted by chlorhexidine-isopropyl alcohol mixes (ChloraPrep, Medi-Flex, Inc., Leawood, KS); the latter have the advantage of better antimicrobial activity and do not cause staining of the patient’s clothes.
DOCUMENT THE PROCEDURE
Make sure that the ultrasound of the actual puncture site has been recorded on film or the Picture Archiving and Communication System. No matter how carefully a procedure is carried out, tissue or fluid is not always obtained, and documentation of an appropriate approach is therefore important. For example, an apparent collection may in fact be an organized hematoma, and nothing can be aspirated even though the needle is correctly placed. If a procedure using a biopsy guide allows visualization of the needle placement, this also should be documented. CINE clip capability, if available, allows definitive recording of the needle pass into the target.
The following sterile supplies should either be available as a basic tray or assembled before a procedure (Fig. 54-6). Prepackaged kits for specific examinations are readily available and should include the following:
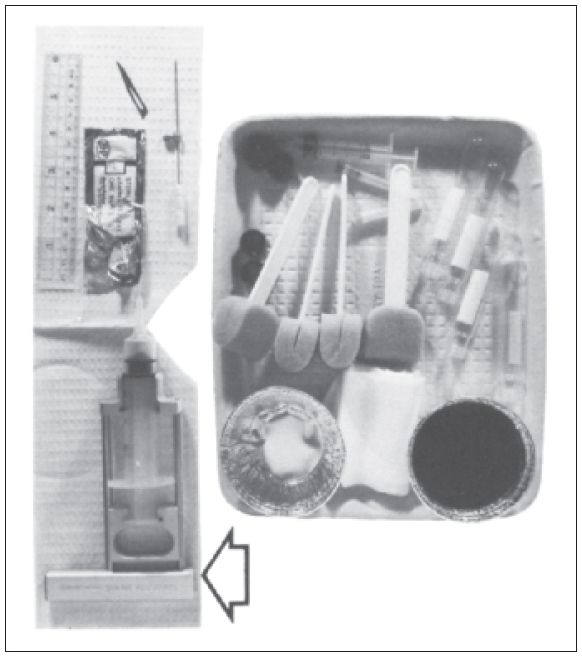
Figure 54-6. ![]() Supplies needed for a basic tray for a sterile procedure include containers for iodine and alcohol; prep sponges; a 5-mL syringe; 18- and 30-gauge needles for drawing up local anesthetic and then producing a skin wheal; glass culture tubes; some 3 × 4 gauze pads; and sterile drapes (at least one fenestrated). A sterile ruler, a scalpel blade, and the appropriate needle and sterile needle stop must be added. Aspiration device (arrow) that can be attached to a 20-mL syringe to help apply more negative pressure during biopsies.
Supplies needed for a basic tray for a sterile procedure include containers for iodine and alcohol; prep sponges; a 5-mL syringe; 18- and 30-gauge needles for drawing up local anesthetic and then producing a skin wheal; glass culture tubes; some 3 × 4 gauze pads; and sterile drapes (at least one fenestrated). A sterile ruler, a scalpel blade, and the appropriate needle and sterile needle stop must be added. Aspiration device (arrow) that can be attached to a 20-mL syringe to help apply more negative pressure during biopsies.
Sterile drapes (one with a hole for access to the puncture site).
Two containers (for antiseptic solutions).
Glass tubes (for collecting specimens).
5- or 10-mL syringe and 30- and 22-gauge needles (for local anesthetic); 30-gauge needles cause much less pain at the skin surface when injecting lidocaine than do 25-gauge needles.
Cleansing sponges.
To be added:
Needle of choice; should have an echogenic tip for improved visualization. If commercial polymer enhanced-visualization needles are not available, simply roughing the tip with a scalpel blade improves sonographic visualization.
20- and 2-mL syringes for amniocentesis.
Syringe of choice (depends on the size of the collection).
Extension tubing (desirable for targets that move with respiration; e.g., kidney).
Sterile ruler (to measure the correct depth on the needle).
Needle stop (to screw on the needle at the correct depth).
Stay updated, free articles. Join our Telegram channel

Full access? Get Clinical Tree


