Pericardiocentesis
Introduction
Performing a pericardiocentesis in an unstable patient with cardiac tamponade is a lifesaving procedure. Pericardial fluid is a common finding on point-of-care echocardiography examination and can occur from many systemic disease processes or trauma. The normal pericardial space usually contains 15 to 50 mL of fluid, which acts as a lubricant between the visceral and parietal layers of the pericardium. An increase in fluid can easily be detected on point-of-care echocardiography and is often present before the onset of clinical symptoms. Clinical symptoms vary greatly and are dependent on the amount and rate of accumulation of the fluid. Cardiac tamponade occurs when cardiac filling is compromised due to compression of the heart by the pericardial fluid. This can occur with either small or large volumes. Signs of impending tamponade on point-of-care echocardiography often reflect the collapsing or “scalloping” thin-walled right atrium and ventricle. This will progress to complete collapse of the right ventricle during diastole, which is the definition of cardiac tamponade on point-of-care echocardiography. Pericardiocentesis removes excessive fluid from the pericardial sac, allowing the heart to fill. This procedure often will be followed by a pericardial window by a cardiac surgeon.
Indications
Patients with significant pericardial effusions with signs or symptoms of cardiac tamponade require emergent pericardiocentesis. Ultrasound guidance is used to increase success and decrease complications of pericardiocentesis and should be considered the standard of care.
Anatomy
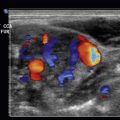
The normal anatomy visualized on a subxiphoid point-of-care echocardiography view is seen in ![]() . This view will show all four chambers of the heart. Notice the circumferential bright white or hyperechoic pericardium that surrounds the heart. The pericardium is visualized on all four normal point-of-care echocardiography views.
. This view will show all four chambers of the heart. Notice the circumferential bright white or hyperechoic pericardium that surrounds the heart. The pericardium is visualized on all four normal point-of-care echocardiography views.
Sonographic Findings
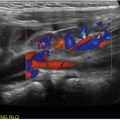
The most commonly used views when performing a pericardiocentesis is the subxiphoid view ![]() ( ) and the parasternal long-axis view
( ) and the parasternal long-axis view ![]() ( ). However, optimal views and approach for the procedure will depend on the patient’s position, habitus, and whether the primary operator has assistance while performing the procedure. Other views, like the apical four-chamber view or the parasternal short-axis view, may also be used if they are deemed most optimal.
( ). However, optimal views and approach for the procedure will depend on the patient’s position, habitus, and whether the primary operator has assistance while performing the procedure. Other views, like the apical four-chamber view or the parasternal short-axis view, may also be used if they are deemed most optimal.
Pathology
Early cardiac tamponade is seen on the subxiphoid view of the heart in ![]() . In early tamponade, the right ventricle free wall is struggling to contract and is noted to be “scalloping.” This phenomenon will progress to become complete tamponade, as seen in
. In early tamponade, the right ventricle free wall is struggling to contract and is noted to be “scalloping.” This phenomenon will progress to become complete tamponade, as seen in ![]() . In this video of the subxiphoid view, the right ventricle is completely collapsed even during diastole.
. In this video of the subxiphoid view, the right ventricle is completely collapsed even during diastole.
Procedure and Technique
If able, appropriate consent should be obtained. The procedure should be explained to the patient and the patient made aware of potential risks that include puncture of the myocardium or coronary artery, pneumopericardium, pneumothorax, arrhythmias, cardiac arrest, infection, or puncture of surrounding structures.
When at all possible, pericardiocentesis should follow sterile conditions, with the operator wearing a gown, gloves, hat, and mask. The ultrasound probe should be draped in a sterile protective cover. Resuscitative equipment and drugs should be readily available at the bedside.
If possible, the patient should be lying with the head of the bed elevated at 30 to 40 degrees to help pool the pericardial fluid. However, if not possible, the patient should lie in the supine position. The chest wall is prepped and draped in sterile fashion. The ideal puncture site will be where the fluid has collected the most and is closest to the chest wall. It is recommended that multiple views be assessed before selecting the optimal site. For a subxiphoid approach, use a phased array probe (5–1 MHz) that is placed in a sterile probe cover and a 16- to 18-gauge needle as demonstrated in Fig. 29.1 . Note the needle is parallel and adjacent to the probe and directed at a 45-degree angle toward the left scapula tip. The needle will appear on the screen as a hyperechoic structure with reverberation artifact as it is advanced toward the pericardium ![]() ( ). If using the parasternal long-axis approach, the position will look like Fig. 29.2 . The needle should be inserted at a 45-degree angle in-plane to the probe on the anterior chest wall and directed down toward the effusion
( ). If using the parasternal long-axis approach, the position will look like Fig. 29.2 . The needle should be inserted at a 45-degree angle in-plane to the probe on the anterior chest wall and directed down toward the effusion ![]() ( ). In any approach, make sure to aspirate every 1 to 2 mm as the needle is advanced and that the needle tip is visualized the entire time on the screen until fluid is obtained. To confirm placement, use the “activated saline technique.” To do this, simply inject agitated saline through the needle, creating a “snowstorm appearance” within the pericardial effusion and confirming placement within the pericardial sac.
( ). In any approach, make sure to aspirate every 1 to 2 mm as the needle is advanced and that the needle tip is visualized the entire time on the screen until fluid is obtained. To confirm placement, use the “activated saline technique.” To do this, simply inject agitated saline through the needle, creating a “snowstorm appearance” within the pericardial effusion and confirming placement within the pericardial sac.


Complications
Complication rates for ultrasound-guided pericardiocentesis have reported to be between 1.2% and 4.7%. The parasternal long-axis view is considered advantageous over the subxiphoid approach, as it allows for visualization of the heart in the same plane as the needle, in addition to being in closer proximity to the effusion. It also avoids other vital structures like the lung and liver.
Paracentesis
Introduction
Ascites is accumulation of fluid in the peritoneum. Paracentesis involves aspirating ascitic fluid from the peritoneal cavity. This is done either for diagnostic or therapeutic purposes. Emergent diagnostic paracentesis involves removing a small amount of ascitic fluid to evaluate for spontaneous bacterial peritonitis (SBP). A therapeutic paracentesis involves removing a large volume of ascitic fluid, typically several liters, from a patient who is symptomatic due to the presence of the ascites.
Indications
A patient with ascites presenting with abdominal pain, fever, altered mental status, diarrhea, or any of a variety of other symptoms may have inflammation of the peritoneum, or peritonitis. Peritonitis is usually caused by a bacterial or fungal infection. When there is clinical concern for peritonitis, a diagnostic paracentesis should be performed and the fluid analyzed.
Patients can also accumulate a large volume of ascites that causes severe pain, respiratory compromise, and early satiety. This requires therapeutic paracentesis to relieve the patient’s symptoms. If there is no concern for peritonitis, the fluid collected does not need to be analyzed.
Anatomy
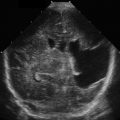
To determine whether there is ascites, use the curvilinear probe (5–2 MHz). When there is no ascites in the abdomen, the peritoneal cavity is composed of gas-filled bowel. ![]() shows a normal right upper quadrant of the abdomen without ascites.
shows a normal right upper quadrant of the abdomen without ascites.
Sonographic Findings
When simple ascites is present, anechoic fluid can be seen accumulating around peritoneal structures, forming a “pointed” or “triangular” shape. ![]() demonstrates fluid surrounding the liver.
demonstrates fluid surrounding the liver. ![]() demonstrates fluid accumulating posterior to the bladder in the pelvis. Note the acute angles as the fluid accumulates around fixed structures.
demonstrates fluid accumulating posterior to the bladder in the pelvis. Note the acute angles as the fluid accumulates around fixed structures. ![]() demonstrates bowel floating in large-volume ascites.
demonstrates bowel floating in large-volume ascites.
Ultrasound guidance can improve the procedure by localizing the largest pocket of fluid available, identifying structures such as organs and vessels to avoid, or confirming a sufficient amount of ascitic fluid for a successful procedure. Ultrasound-guided paracentesis has been associated with fewer rates of adverse events, including postparacentesis infection, hematoma, and seroma.
Ultrasound can be used statically or dynamically during a paracentesis. With static use of ultrasound, the most accessible and deepest pocket of fluid is identified just before the procedure and marked on the patient. With dynamic use of ultrasound, the ultrasound is used during the procedure. Dynamic use of ultrasound requires more dexterity in holding the ultrasound probe with one hand while aspirating with the other. However, an assistant can also help by holding the ultrasound probe during the procedure. The preference for dynamic or static ultrasound guidance will be at the discretion of the clinician performing the procedure.
An ideal pocket of fluid identified on ultrasound will be at least 3 cm deep, measured from the peritoneal lining of the abdominal wall. As the curvilinear probe is used to identify the pocket of fluid for aspiration, continue to use this probe dynamically during the procedure. Decrease the depth so that the view is more superficial and so that it can be ascertained if there are abdominal wall structures such as blood vessels, especially the epigastric arteries that tend to course through this region, or other fluid collections that should be avoided. Some clinicians may prefer to identify the pocket of ascites with the curvilinear probe, then use the high-frequency linear probe dynamically ![]() ( ) with greater resolution to better visualize the needle and evaluate the abdominal wall to avoid puncturing blood vessels
( ) with greater resolution to better visualize the needle and evaluate the abdominal wall to avoid puncturing blood vessels ![]() ( ).
( ).
Pathology
Distinguishing between SBP and large-volume ascites can be difficult clinically. Early paracentesis and treatment of SBP improves mortality. Diagnosis of SBP is made through laboratory analysis of the ascitic fluid aspirated during paracentesis. Fluid should be sent for cell count and differential, Gram stain, and culture. SBP is defined as having a polymorphonuclear count (PMN ≥250/m 3 ) in ascitic fluid. Studies have shown high predictive value in the rapid diagnosis of SBP using a leukocyte esterase reagent strip test.
Procedure and Technique
Once the clinical concern for SBP exists, the only true contraindication to performing a paracentesis is a surgical cause of SBP. These cases need to be treated operatively. Although there is frequently cited clinical concern regarding the hypercoagulable state of the patient with ascites, large studies have demonstrated no significant procedure-related complications even with elevated international normalized ratio (INR) or thrombocytopenia.
Explain the procedure to the patient and obtain informed consent. Ask the patient to urinate immediately before the procedure to decompress the bladder. If the patient cannot spontaneously void, consider placing a urinary catheter before the procedure to decompress the bladder. If performing therapeutic paracentesis, place the patient on a monitor.
Gather supplies to perform a sterile technique. Paracentesis kits are commercially available. If these are not available, the supplies required are readily available in most emergency departments.
Place the patient in a position of comfort, typically supine or in a lateral decubitus position, depending on the optimal location for the paracentesis.
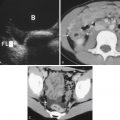
Assess the location of the liver, spleen, bowel, and bladder. Preferentially, it should be performed in the left or right lower quadrant 5 cm cephalad and medial to the anterior superior iliac spine ( Fig. 29.3 ). Alternatively, the procedure can be done 2 cm below the umbilicus; however, the risk of iatrogenic bladder perforation is higher in this location ( Fig. 29.4 ). Once the location for paracentesis has been identified, do not move the patient. If the patient is moved, repeat the ultrasound.


Cleanse and prep the skin in a sterile fashion. Cover the ultrasound probe with a sterile probe cover and again identify the pocket of fluid to aspirate. Create a wheal of anesthesia using a small 25- to 27-gauge needle, then exchange the needle for a larger 18- to 20-gauge and anesthetize down to the peritoneal layer. Pull the skin taut while inserting the large-bore needle perpendicular to the skin at the site of entry. Once the peritoneal lining has been penetrated, aspirate fluid into the syringe. Then release the taut skin. This will create a “Z”-tract down to the peritoneal layer, which will help to seal the tract after the procedure and decrease spontaneous leakage of peritoneal fluid. Next, exchange the syringe for a larger syringe for fluid collection. Remove the amount of ascites fluid desired. If performing a therapeutic paracentesis, consider using a larger blunt cannula housed over a hollow needle with side holes for the procedure after providing adequate anesthesia. However, if this is unavailable, using a larger needle with a stopcock is acceptable for therapeutic paracentesis. For therapeutic paracentesis, insert a stopcock into the cannula, connect to tubing, and hang to gravity. Use of a vacuum container can improve the rate of flow of the fluid. Remove the needle. Place a bandage over the puncture site. Assess the patient for immediate complications and again within 30 minutes for complications such as leakage.
Complications
Complications from a paracentesis are uncommon. They include hemorrhage, hematoma, persistent ascitic fluid leakage, peritonitis, perforation of bowel or bladder, liver or splenic puncture, epigastric artery pseudoaneurysm, and shearing of the catheter. Therapeutic paracentesis can cause hypotension or hyponatremia. Using sterile technique with ultrasound guidance will minimize these potential complications.
Thoracentesis
Introduction
A pleural effusion is fluid that accumulates in the thoracic cavity between the parietal pleura, which abuts the chest wall, and the visceral pleura, which surrounds the lung parenchyma. This occurs most commonly from heart failure, malignancies, infections, or pulmonary embolism. Signs and symptoms of a pleural effusion include chest pain, shortness of breath, cough, tachypnea, and hypoxia. However, at times a pleural effusion may be asymptomatic. In these instances, appropriate diagnosis is still warranted. Thoracentesis involves aspirating pleural fluid from the thoracic cavity. This is done either for diagnostic or therapeutic purposes. The use of ultrasound to perform thoracentesis reduces costs and complications.
Indications
Diagnostic thoracentesis is performed on new accumulations of pleural fluid or for concern for infection of a pleural effusion. Therapeutic thoracentesis entails removing a larger volume of fluid for patient comfort. In the emergency department, this procedure can be lifesaving when performed for the patient with respiratory compromise.
Anatomy
Ultrasound imaging of the right or left upper quadrant in the oblique coronal view at the midaxillary line during the focused assessment with sonography for trauma (FAST) examination may reveal an anechoic or hypoechoic fluid collection above the echogenic diaphragm. Fig. 29.5 shows the normal anatomy at the right upper quadrant. Fig. 29.6 shows a pleural effusion in the thoracic cavity.


Sonographic Findings
Ultrasound has repeatedly been shown to be more sensitive in detecting pleural fluid than plain film radiography. Small quantities of pleural fluid that can more readily be seen with ultrasound may not be amenable to thoracentesis. As such, it is important to scan through the entire thoracic cavity to delineate the extent of the pleural effusion. Ultrasound guidance is associated with a decreased number of attempts, which in turn reduces the rates of complications. Using a phased array (5–1 MHz) or curvilinear (5–2 MHz) probe, position the ultrasound probe perpendicular to the skin so as to avoid overestimating or underestimating distances, which can occur by angling the probe obliquely. Scan vertically from the inferior portion of the scapula to the upper lumbar region. Scan laterally from the paravertebral region to the posterior axillary line. An adequate pleural effusion appropriate for thoracentesis should measure at least 10 mm deep from the parietal pleura to the visceral pleura ( Fig. 29.7 , ![]() ). Mark the extent of the effusion with ink. Evaluate the effusion with M-mode ( Fig. 29.8 ), looking for a region where lung parenchyma is visualized at least 10 mm away from the parietal pleura during several respiratory cycles. With ink or a needle cap, mark the intercostal space for thoracentesis. One guide is to approach the effusion at least one intercostal space inferior to the most superior extent of the effusion for a diagnostic thoracentesis and two to three intercostal spaces for a therapeutic thoracentesis, always heeding caution to avoid the diaphragm.
). Mark the extent of the effusion with ink. Evaluate the effusion with M-mode ( Fig. 29.8 ), looking for a region where lung parenchyma is visualized at least 10 mm away from the parietal pleura during several respiratory cycles. With ink or a needle cap, mark the intercostal space for thoracentesis. One guide is to approach the effusion at least one intercostal space inferior to the most superior extent of the effusion for a diagnostic thoracentesis and two to three intercostal spaces for a therapeutic thoracentesis, always heeding caution to avoid the diaphragm.