Fig. 18.1
Neonatal peripherally inserted central catheter (PICC) access. A common target for placement of a PICC is the basilic vein. While an easier target to hit, the cephalic vein is sometimes not ideal for PICC placement as it makes an acute turn as it empties into the subclavian vein, which often makes it difficult to pass the catheter. The basilic vein, however, empties directly into the axillary vein without kinking. The brachial vein is located more deeply, and it is anatomically just next to the brachial artery, making it a more challenging target. Using the transverse transducer orientation, the needle tip is visualized in the soft tissue of the upper extremity in a 485-g neonate before it is advanced under direct visualization into the basilic vein
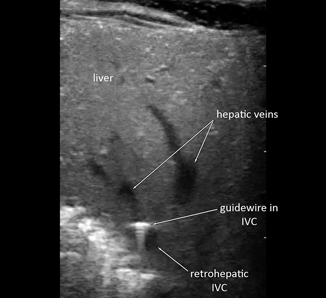
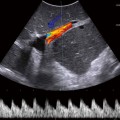
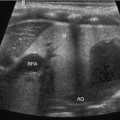
Fig. 18.2
Wire in retrohepatic inferior vena cava (IVC). The guidewire is seen in the retrohepatic IVC after femoral vein cannulation
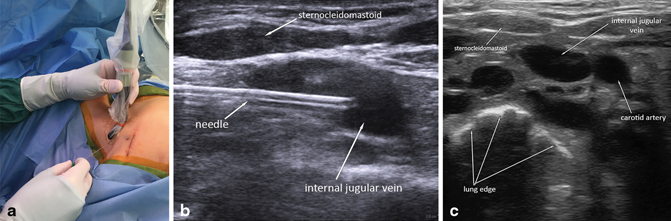
Fig. 18.3
In-line transducer orientation. a Using the in-line orientation for internal jugular (IJ) vein access, the needle is inserted along the length of the probe, beginning from the end opposite the handle (for a hockey stick probe). b This allows excellent longitudinal visualization of the entire length of the needle, which is inserted lateral to the sternocleidomastoid (SCM) and guided into the IJ vein. c The IJ vein is usually anterolateral to the carotid artery. The SCM is visible superficially and laterally. The bright outline of the lung is visible deep to the vessels, with loss of signal beyond this in the air-filled lung
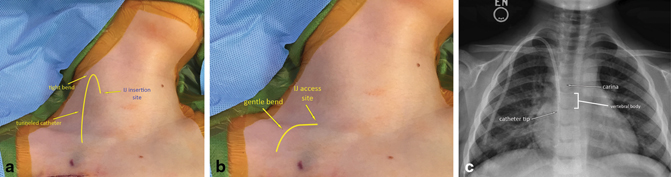
Fig. 18.4
Tunneled internal jugular (IJ) catheter placement. a The standard ultrasound (US)-guided IJ approach uses a transverse US probe orientation and a cranio-caudal needle insertion angle. This produces a high IJ insertion site and a tight, 180 ° bend of the tunneled catheter high in the neck. b The lateral approach uses an in-line US probe orientation low in the neck, just above the clavicle. This allows a low IJ access site and a gentle, 90° bend of the tunneled catheter. c A post-procedure chest X-ray shows a gradual curve of the tunneled catheter just above the clavicle, without kinking. The tip of the catheter rests approximately 1.7 vertebral bodies below the carina, corresponding to the cavo-atrial junction
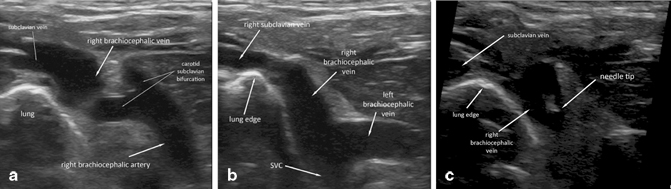
Fig. 18.5
Brachiocephalic access. a The ultrasound (US) probe is placed low above the clavicle and directed caudally to visualize the right brachiocephalic vein and artery. Medially, the bifurcation of the brachiocephalic artery into the carotid and subclavian arteries is clearly visualized. The subclavian–IJ venous junction is seen laterally, just above the apical lung. b With a slight adjustment in transducer position, the junction of the right and left brachiocephalic veins can be visualized, as well as the beginning of the superior vena cava (SVC). c The needle is directed under US guidance directly into the right brachiocephalic vein
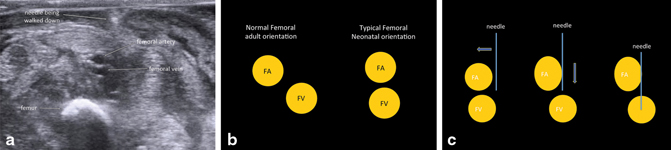
Fig. 18.6
Femoral access. a The femoral vein (FV) of a neonate commonly lies directly deep to the femoral artery (FA), which can obstruct needle access. b This is in contrast to adults and older children, who typically have the classic anatomic relationship of the FV lying medially to the FA. c Under US guidance, the needle can be placed just medial to the FA and moved laterally to push the artery aside, allowing FV cannulation
Technique
Transducer Orientation: A “Third-Dimension” Problem
A linear US probe displays a planar image that includes depth along the vertical axis and the linear orientation of the probe along the horizontal axis. At any given time, the probe is only able to display a “slice” of a target vessel and the needle—either in cross section or longitudinally. Therefore, the x–y plane of the two-dimensional screen is excellent, but the z-axis (in and out of the screen) requires moving the transducer and manually processing the image information in the operator’s/surgeon’s mind. This training takes effort and time in order to be comfortable and effective at it. Given that limitation, the two US transducer orientations relative to the needle are transverse and in-line. By becoming versatile in changing the transducer orientation and location, one can accurately map out the course of a target vessel and accurately visualize the needle during the entire course of cannulation. This provides the fundamental safety benefit of US-guided vascular access—at no point during the procedure is the tip of the needle not visualized.
Transverse Orientation (Peripheral Access, Femoral Access, Arterial Access)
The transverse orientation is classically used most frequently. The transducer head is oriented perpendicular to the needle axis, creating a cross-sectional image of the vessel and needle (Fig. 18.7a, b). This creates a clear picture of the relationship of the vessel to other structures. During needle insertion, it provides excellent left-to-right spatial resolution, though it is difficult to establish the location of the needle tip. In general, if the target vessel is very small, the transverse orientation provides the best approach and, in general, is most useful for vascular access in all scenarios except supraclavicular central venous access.
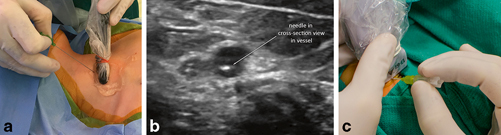
Fig. 18.7
Transverse transducer orientation. a Using the transverse orientation for internal jugular (IJ) access, the probe is placed perpendicular to the underlying vessel, and the needle is placed under the middle of the probe. b The needle is seen in cross section in the vessel when the transverse orientation is used. c Using the transverse orientation for peripheral access, the needle is oriented at a 45° angle to the skin with the transducer held so that the needle is positioned at the middle of the transducer
When using the transverse orientation during needle insertion, extra care must be taken to ensure proper localization of the needle tip. To safely gain intravascular access using the transverse US orientation, the needle is placed at an approximately 45 ° angle perpendicular to the transducer at the midway point (Fig. 18.7c). The needle is then advanced through the skin, and as it is advanced through the subcutaneous tissues, the US probe is used to “walk” down the needle to find the tip at regular intervals. The goal is to be able to identify the exact location of the needle tip, which in cross section can only be identified by moving the transducer down the needle until it disappears. Then, while keeping the needle still, the transducer is moved back until the tip reappears, confirming its location. The transducer is then moved slightly past the tip, and the needle is advanced into the field of view while keeping the transducer stationary. The needle is thus advanced slowly, regularly verifying the tip location, until the tip is watched as it enters the target vessel. Figure 18.1 shows the needle tip in soft tissue in the upper extremity of a 485-g neonate as the needle is being walked down to the target vessel.
On needle insertion into the target vessel, one may encounter significant “tenting” of the vessel if it is a vein, especially in the setting of low venous pressure. It is important to note the shape and location of the venous wall through which the needle is being inserted. If it invaginates significantly during needle advancement, one may not actually be intraluminal although the needle position appears this way. In this case, a short but aggressive push of the needle to “pop” through the venous wall can be helpful. If the needle is inadvertently advanced completely through the vessel, then the needle can be carefully withdrawn until the tip returns to the vessel lumen. Alternatively, instead of the aggressive push, the needle can simply be walked further up the lumen of the vessel for a centimeter or so and the same “pop” will occur as the needle tip becomes intraluminal. This is described below.
Related posts:


Stay updated, free articles. Join our Telegram channel

Full access? Get Clinical Tree


