Fig. 27.1
The patient is positioned on a specialized table that can apply traction to the leg to distract the femoral head from the acetabulum to facilitate intraarticular visualization and instrumentation. The table attachment also allows manipulation of the leg so that the hip can be rotated and flexed as needed. Fluoroscopy can be brought in between the legs or from the contralateral side of the table
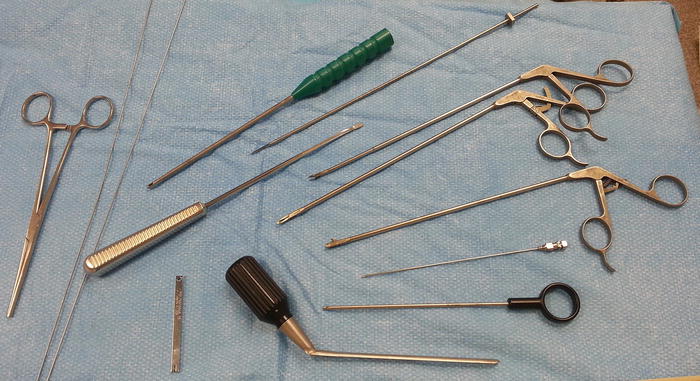
Fig. 27.2
Cannulated systems are commonly used for hip arthroscopy to safely establish portals and efficiently pass equipment into the joint. Hip arthroscopic instruments are longer than standard arthroscopic instruments to permit intricate procedures to be performed deep within the body. Some surgeons use curved instruments to navigate the spherical and concave structures within the hip joint
Two distinct arthroscopic spaces are recognized within the hip joint, the central compartment between the femoral head and acetabulum and the peripheral compartment within the hip capsule but outside the femoroacetabular articulation (Fig. 27.3). In general, traction affords access to the central compartment, while the peripheral compartment is accessed out of traction and with some degree of hip flexion to relax the anterior capsule.
Fig. 27.3
During arthroscopy, two distinct compartments within the hip are recognized, the central and peripheral compartments. The central compartment comprises the space within joint encompassed by the acetabular labrum. Traction is required to pull the femoral head out of the acetabular fossa for access to the central compartment. Structures within the central compartment include the acetabular labrum, the articular cartilage surfaces of the femoral head and acetabulum, the cotyloid fossa, and the ligamentum teres. The peripheral compartment is accessed out of traction and with the hip in some flexion to relax the anterior capsule. Structures within the peripheral compartment include the femoral head/neck junction, femoral neck, medial and lateral synovial folds, zona orbicularis, and hip joint capsule
Depending on the planned procedure, two to five portals are used during hip arthroscopy. The neurovascular anatomy surrounding the hip joint has been well studied and safe zones for portal placement have been described [11]. Standard portals include an anterolateral portal (just anterior to the tip of the greater trochanter), posterolateral portal (posterior to the tip of the greater trochanter), and an anterior portal (lateral and distal to the intersection of a line drawn transversely from the greater trochanter and a line drawn distally from the ASIS) [2] (Fig. 27.4). Modifications of these portals and additional portals have been introduced as techniques and instrumentation have evolved [12].
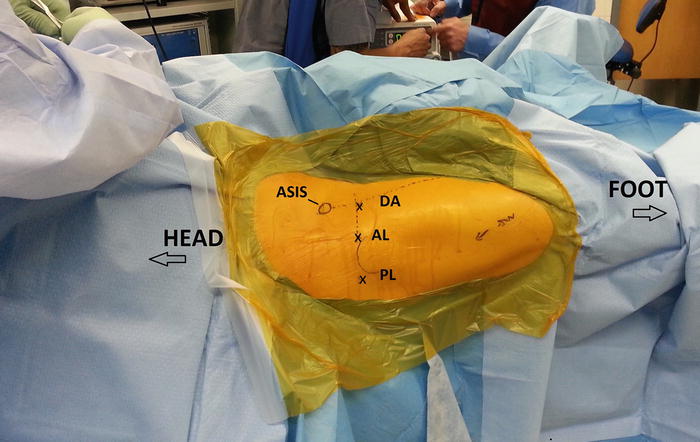
Fig. 27.4
Standard portals described for hip arthroscopy include the anterolateral (AL), anterior (DA), and posterolateral (PL) portals. Modifications of these portals and additional portals are commonly used depending on the procedure. The ASIS and greater trochanter are the key surface landmarks for portal placement. The anterolateral (AL) and posterolateral (PL) portals are adjacent the anterior and posterior aspect of the greater trochanter. The direct anterior (DA) portal is positioned lateral and distal to the intersection between a line drawn distally from the ASIS and medially from the tip of the greater trochanter. Fluoroscopy may be used to verify position
Arthroscopic Anatomy
Central Compartment
Most hip arthroscopic procedures start with gaining access to the central compartment. Traction is applied to the leg to open the femoroacetabular articulation, and fluoroscopy is used to verify adequate distraction and guide the initial portal placement. The anterolateral portal is established under fluoroscopic guidance and the 70° scope is inserted into the joint. Through the anterolateral portal, a cursory initial inspection of the joint may be performed. An anterior portal for instrumentation may then be made under arthroscopic visualization.
Orientation within the joint may be confusing given the round concave configuration of the acetabulum and the spherical femoral head. A clockface applied to the acetabulum centered on the cotyloid fossa can be used for a systematic assessment of the joint and documentation of findings (Fig. 27.5). The clockface is positioned so that 6 o’clock marks the center of the transverse acetabular ligament and the apex of the cotyloid fossa is at the 12 o’clock position. On a right hip, the anterior joint is at the 3 o’clock position, while 9 o’clock references the posterior joint. On a left hip, some surgeons keep the clock facing forward and assign the 9 o’clock position to the anterior joint, while others invert the clockface to maintain consistency. An alternative geographic zone method has also been described [13].
Fig. 27.5
For orientation and documentation, a clockface is often applied to the acetabular fossa. The 6 o’clock position is set at the transverse acetabular ligament with the 12 o’clock position directly opposite at the apex of the cotyloid fossa
Once the viewing and instrumentation portals have been established, the joint is inspected for pathology. With the arthroscope in the anterolateral portal, the structures of the superior, anterior, and medial joint are examined. A probe inserted in the anterior portal is helpful to palpate and manipulate intraarticular structures (Fig. 27.6a–e). Most chondrolabral pathology tends to be anterior to the 12 o’clock position and this area should be emphasized in the diagnostic arthroscopy. Rotating the 70° scope in the anterolateral portal 180° brings the posterior labrum into view. A posterolateral portal may be established for access to the posterior joint. Visualization of far posterior and posteroinferior pathology may require placing the arthroscope into the posterolateral portal. The superolateral and lateral labrum and acetabulum are best visualized with the arthroscope in the anterior portal with the lens directed laterally (Fig. 27.7a–c). Use of cannulas in each portal that can accommodate the arthroscope aids efficient movement between portals. Capsulotomies of varying sizes and orientations also facilitate maneuverability within the joint.
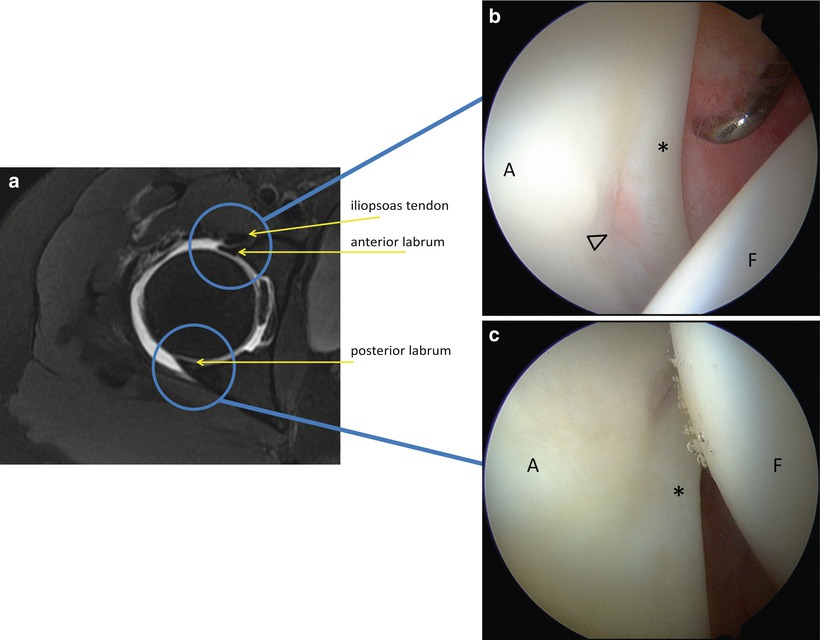
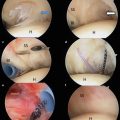
Fig. 27.6
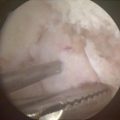
(a) Axial T2 MR-arthrogram of the right hip. The outline of the anterior and posterior labrum may be seen on this sequence. The labrum conforms to the femoral head and the articular aspect blends into the articular cartilage. (b) Arthroscopic photograph of the anterior labrum (asterisk) at approximately the 3 o’clock position. The arthroscope is positioned in the anterolateral portal and the lens is directed anteriorly. The acetabulum (A) is on the left of the picture and the femoral head (F) on the right. The probe is inserted through the anterior portal and is used to examine the structure of the anterior labrum and adjacent cartilage. A normal smooth transition is evident between the labrum and articular cartilage. The recess in the acetabular rim here (arrowhead) corresponds to the approximate position of the iliopsoas tendon as it crosses the joint. (c) Arthroscopic photo of the posterior labrum (asterisk). The arthroscope is in the anterolateral portal and the lens is directed posteriorly. (d) Anatomical rendering of the anterior labrum viewed from the anterolateral portal with the 70° arthroscope. (e) Anatomical rendering of the posterior labrum viewed from the anterolateral portal by rotating the 70° arthroscope 180° and directing it posteriorly. Further visualization of the posteroinferior joint is afforded by moving the arthroscope to the posterolateral portal
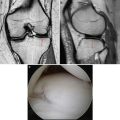
Fig. 27.7
(a) Coronal T2 MR-arthrogram of the right hip demonstrating the superolateral labrum (arrow). (b) Arthroscopic photograph of the lateral labrum. The arthroscope is in the anterior portal and the lens is directed laterally. The acetabulum (A) is at the top right of the picture and the femoral head (F) is at the bottom. Metal cannulas are positioned in the anterolateral (AL) and posterolateral portals (PL). (c) Anatomical rendering showing that moving the 70° arthroscope into the anterior portal allows visualization of the superolateral labrum
Similar to the glenoid labrum in the shoulder, a variety of acetabular labral variants have been observed in the hip. Sublabral sulci or recesses may be present in up to 20 % of patients and can be found at all anatomic positions around the acetabular labrum [14, 15]. On MRI, several features of a sublabral sulcus help differentiate it from a tear. A linear MR appearance and lack of secondary findings including cysts, chondral damage, or edema are suggestive of a normal anatomic variant [16]. The location on the acetabulum of the finding is also important. Sublabral sulci frequently occur posteriorly or inferomedially [14, 16] (Fig. 27.8a, b). Additionally, at the junction between the labrum and the transverse acetabular ligament, contrast may appear to penetrate the labrum. While labral variants may also occur anteriorly or superiorly, a higher index of suspicion for pathologic labral tear should be maintained in these locations. Underlying pincer morphology or acetabular dysplasia warrants consideration of true labral pathology [17].
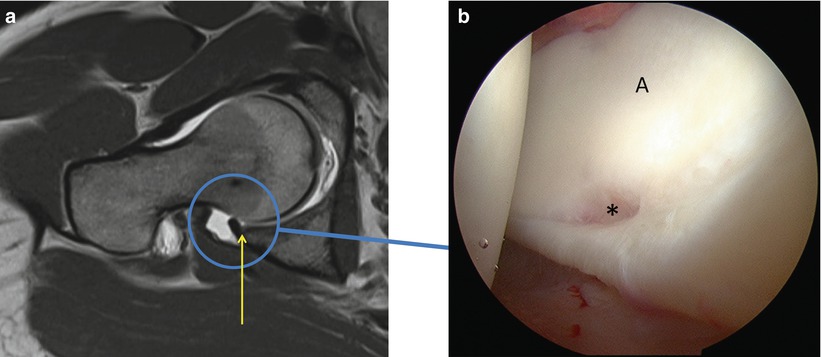
Fig. 27.8
(a) Coronal T1 MR-arthrogram of the right hip demonstrating a posterior labral recess (arrow). The contrast is visible penetrating the articular interface between the labrum and articular cartilage. The lack of signal within the substance of the labrum, the absence of secondary findings, and the posterior location suggest that this finding is not pathological. (b) Arthroscopic photograph of the posterior labral recess. A cleft is visible between the labrum (asterisk) and acetabular cartilage (A). This is a common labral variant and does not represent a tear.
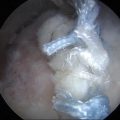
The cotyloid fossa is situated at the most medial aspect of the acetabulum. This location cannot be accessed without traction and special care must be taken to avoid the femoral head as the arthroscope is moved into position. While the acetabular rim is best visualized by the 70° arthroscope, changing to a 30° arthroscope improves visualization of the medial joint. The cotyloid fossa contains the ligamentum teres and the accompanying fat pad (Fig. 27.9a, b). The femoral head often presents a navigation obstacle and alternating among the portals may be necessary for complete inspection. Internal and external rotation of the hip may also be necessary for a thorough evaluation of the structures within the cotyloid fossa. Petechiae within the fat pad are often seen with the negative intraarticular pressure generated by the traction and should not be confused with a traumatic injury to the ligamentum teres (Fig. 27.9c).
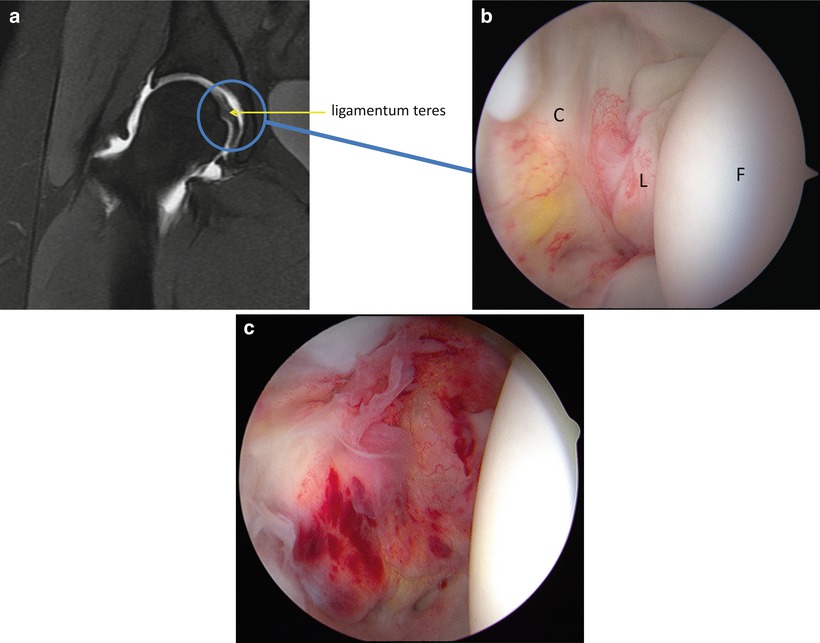
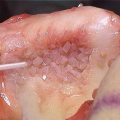
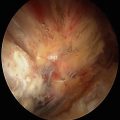
Fig. 27.9
(a) Coronal MR-arthrogram of the right hip demonstrating the acetabular fossa and ligamentum teres (arrow). (b) Arthroscopic photograph of the cotyloid fossa (C) and ligamentum teres (L) attaching to the femoral head (F). For adequate evaluation, an arthroscope with a 30° lens may be needed as well as visualization through multiple portals. (c) The negative intraarticular pressure created by applying traction to the hip may cause petechiae and localized hemorrhage within the fat pad and synovium within the fossa
The adult acetabulum is made up of three bones, the pubis, ilium, and ischium, which normally fuse at the triradiate cartilage during adolescence. Persistence of a physeal scar anteriorly between the ilium and pubis or posteriorly between the ilium and ischium has been described [18]. These anatomical variants are difficult to identify on MR but may appear as a linear signal extending radially from the cotyloid fossa at the confluence between the two ossification centers (Fig. 27.10a, b).