Chapter 30 Accessory organs of the gastrointestinal tract
Salivary Glands
Plain radiography imaging alone cannot be considered an accurate imaging method as only 50% of parotid gland and 20% of submandibular gland sialoliths are radio-opaque.1 Therefore, contrast enhancement of the ducts is required or other imaging modalities must be considered: computed tomography (CT), ultrasound (US), magnetic resonance imaging (MRI) and radionuclide imaging (RNI) all have increasing roles to play in demonstrating this area and will be discussed briefly later in this chapter. In addition to diagnosis, imaging is also a precursor to interventional techniques, such as basket removal of sialoliths.
Contrast-enhanced X-ray imaging of the salivary glands has traditionally remained relatively constant in its technique; usually only parotid and submandibular glands are imaged using contrast agents, as it is considered more difficult to cannulate the sublingual gland. Submental occlusal radiography can be used to assess the sublingual region but will only show radio-opaque calculi (see Chapter 21).
Sialography
Additional equipment
Patient preparation
• Removal of artefacts, including false teeth
• After plain radiography has been undertaken, the sialogogue is administered to promote salivation and maximise visualisation of the salivary duct
• Explain to the patient that it will be necessary for them to indicate when the salivary duct feels full of contrast agent. Arrange for a distinctive sign to be given by the patient (e.g. raising a hand) when the relevant area feels tight or full. It is important that the patient understands the process before the procedure starts, as explanation while undergoing cannulation often proves ineffective
• Explain to the patient that it will be necessary for them to keep their lips closed gently over the cannula, to ensure it stays in place in the duct
For all areas, control images are taken prior to administration of the contrast agent; basic information on head positioning can be found in corresponding position descriptors in relevant chapters on radiography of the head or teeth (Chapters 16–22), although centring and collimation differ for sialography. Some slight modifications from basic head positions will be outlined, if relevant.
Parotid glands
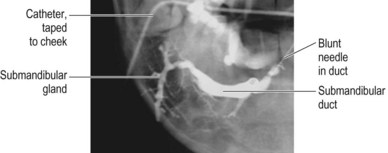
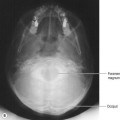
1 Anteroposterior (AP) (fronto-occipital (FO) position) projection with the head rotated 5° away from the side under investigation. Centre midway between the symphysis menti and the angle of the mandible on the side under examination. Collimate to include soft tissues of the neck and face, symphysis menti and zygoma on the side under examination. Figure 30.1 shows an AP projection (of the right submandibular gland) after contrast injection
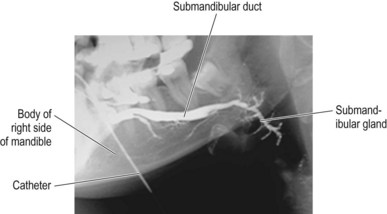
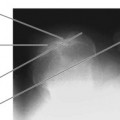
2 Lateral, centred to the angle of mandible. Collimate to include soft tissues of the neck and under the chin, external auditory meatus, zygoma, and to level with the ala of the nose anteriorly. Figure 30.2 shows a lateral projection (of the right parotid gland) after contrast injection
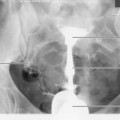
3 Lateral oblique with the patient’s head tilted 15° towards the side under investigation. Tube angle of 10–15° cranially, centre midway between the angles of mandible. Figure 30.3 shows a lateral oblique projection (of the right submandibular gland) after contrast injection
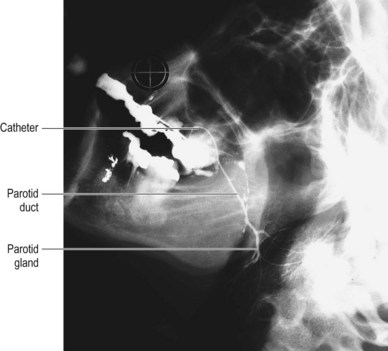
Figure 30.2 Lateral – parotid gland.
From Ryan S, et al. Anatomy for diagnostic imaging. 2nd ed. Edinburgh: Saunders; 2004.
Technique
• If the gland is not visible, the sialogogue may be used to promote salivation
• Saliva is blotted away from the duct area using a gauze swab and the duct is dilated with a lacrimal dilator
• The duct is cannulated, using the blunt-ended sialographic needle/catheter apparatus
• Following cannulation, up to 2 mL of contrast are injected until the patient indicates that the gland feels ‘full’ (see the preparation section with regard to a signal for this)
• The catheter tubing is taped to the skin surface, away from the duct and gland area
• The precontrast images are repeated
• After the images have been taken the patient is given a mouthwash to promote saliva secretion and a lateral view can then be taken to demonstrate drainage of the duct and any sialectasis if present
Other imaging techniques for the salivary glands
Digital subtraction sialography
On the whole this technique is as described for traditional sialography with contrast agent but using digital subtraction. It is similar in its imaging process to arterial radiography by the fact that an increased frame rate (usually approx. 2 frames per second) is used and the resultant image is subtracted; therefore, only the contrast-enhanced area is visualised. This method has been shown to be of high quality compared to CT, MRI and US, particularly in demonstrating pathology in the parenchymal part of the gland.4 There is, however, an increase in patient radiation dose compared to conventional technique, therefore the benefit of image quality versus radiation dose should be considered when using this technique.
Magnetic resonance sialography
This is a non-invasive technique and, with advances in equipment and availability, is becoming more popular. Indeed, it has been stated that it is now ‘routinely’ used to image the salivary parenchyma but that contrast X-ray is still mainly used to show the ducts.5 It has long been compared favourably to conventional techniques.6 Its obvious advantage is that it uses hydrographic technique (relying on the presence of the patient’s own saliva), so no cannulation is required, and of course there is no ionising radiation. However, to combat the spatial resolution difference a number of methods have been used: these include the use of a sialogogue for dynamic studies and also the use of small surface coils.7,8 A recent study showed that using a sialogogue and a passive occlusion device (a pad used to compress and occlude the opening of the duct) is comparable with interventional methods, particularly when assessing the parotid gland;5 however it must be noted that the investigators had undertaken research on volunteers, recognising that further study on patients was required in order to assess diagnostic performance and the practicality of this technique.
Ultrasound
This has an increasing role in assessing the salivary glands, particularly when using Doppler. All major pathologies exhibit classic signs of hypoechoic, anechoic or inhomogeneous areas that can be recognised and aid in differential diagnosis.9 Owing to its non-invasive nature and capability in detecting numerous pathologies, ultrasound can be extremely useful as a front-line investigation but it is known to be difficult to detect sialoliths with ultrasound, or in chronic cases where the gland does not function.9
It is particularly useful for assessing solid mass salivary gland pathology, and also effective in conjunction with fine needle aspiration because of the high resolution that can be attained. It has also been advocated as a quick and simple process to use in assisting fine needle aspiration of tumours.6
Gallbladder and Biliary Tree
Oral cholecystography
Oral cholecystography remains an excellent method of gallstone detection but its role has diminished, mainly due to the advantages of alternative imaging methods (especially ultrasound11). It is rarely carried out in the UK but is still considered to be an option in some imaging departments.
The examination has three phases:
First stage of the examination and patient preparation
• Prior to the examination a control image is taken. Its use was advocated by Twomey et al.,12 who estimated that it could aid in the diagnosis of up to 5% of calculi. The projection used for this is the 20° left anterior oblique (LAO) described in the second-stage examination procedure and positioning technique
• An information sheet and contrast agent are given to the patient to take home; this provides instructions on appointment time for the second stage of the examination, contrast agent and dietary preparation
• The patient is instructed to follow a light, fat-free diet on the day before the examination and to fast from 6 pm the night before their cholecystogram appointment.2 They are encouraged to drink water to ensure hydration
• They are then instructed to take the contrast agent 12 hours prior to their appointment and are asked not to smoke
Second stage: examination procedure and positioning technique
For prone and supine projections the IR is horizontal, employed with an antiscatter grid
