Additional Ultrasound-Guided Procedures
Invasive procedures are frequently performed in the ED. Traditionally, these procedures have been performed by emergency physicians who relied on physical assessment for making the correct diagnosis and surface landmarks for determining the correct approach. In recent years, the use of point-of-care ultrasound has been incorporated into the practice of many emergency physicians to guide or assist in the performance of a variety of invasive procedures.
The use of ultrasound guidance (dynamic guidance) or ultrasound assistance (static guidance) to perform certain procedures can decrease complications when utilized correctly. Before performing any procedure under ultrasound guidance, it is imperative that clinicians have a thorough understanding of sonographic anatomy, know the basic principles of ultrasound, and have practical training with phantoms or models to develop the hand–eye coordination required. Lack of familiarity with ultrasound and the orientation of the image on the screen can lead to complications even in the hands of a physician skilled at performing the procedure in a “blind” fashion.
 PHYSICIAN TRAINING
Ultrasound is a highly operator-dependent technology and the success of an ultrasound-guided or -assisted procedure will depend on the skill of the physician performing the procedure. The amount of training required to successfully perform these procedures has not been well defined in the literature. In the 2008 American College of Emergency Physicians (ACEP) Emergency Ultrasound Guidelines, performance of a minimum of ten ultrasound-guided procedures or completion of a module on ultrasound-guided procedures with simulation on a high-quality ultrasound phantom is recommended for hospital privileging.1 However, it is acknowledged that the training process for emergency ultrasound should move beyond strict numbers and should include experiential and competency components.
 GENERAL PRINCIPLES
DYNAMIC GUIDANCE AND STATIC GUIDANCE
Procedures can be performed using either ultrasound guidance (dynamic) or ultrasound assistance (static). Ultrasound guidance entails performing the procedure while imaging the target and needle in real-time during the procedure. Ultrasound assistance entails performing the procedure in the traditional fashion after the anatomy and any pathology has been mapped by ultrasound and the entry point marked.
The decision to perform a procedure under ultrasound guidance or ultrasound assistance is based on the procedure itself. Procedures involving small target structures or procedures requiring precise placement of the needle are best performed under ultrasound guidance. Procedures such as paracentesis, thoracentesis, and abscess drainage are frequently performed using ultrasound assistance since the fluid collections tend to be larger, and once anatomy and pathology are marked out, it is typically safe to proceed blindly.
NUMBER OF OPERATORS
Ultrasound-guided procedures can be performed using either a one-operator or two-operator technique. In a one-operator technique, the operator controls the transducer while simultaneously performing the procedure. In a two-operator technique, a second operator (assistant) controls the transducer while the first operator simultaneously performs the procedure. For those just learning to perform ultrasound-guided procedures, it is recommended that the one-operator technique be emphasized. In a study involving ultrasound guidance for internal jugular central venous cannulation, the one-operator technique appeared to be equivalent to the two-operator technique for successful ultrasound-guided internal jugular central venous catheterization with respect to overall success.2 The hand–eye coordination and neural feedback obtained by the single operator is much more accurate than the verbal communication that occurs between two operators. Changes in transducer placement or orientation by an assistant may go unnoticed by the operator performing the procedure until it is too late. This mishap may result in the need for another attempt or more significantly may result in the inadvertent puncture of an adjacent structure.
TRANSDUCER SELECTION
Transducer selection is based on the size of the scanning area and the depth of the target structure. The depth of the target structure determines the frequency selection. Superficial target structures are best imaged using high-frequency transducers, while deeper structures are best imaged using low-frequency transducers. Array transducer choice is based on the size of the surface scanning area. Easy to access superficial structures are best imaged using a high-frequency linear transducer, while difficult to access superficial structures are best imaged using a high-frequency, small footprint curvilinear transducer. Peritonsillar abscesses are best imaged using a high-frequency endocavitary transducer. Easy to access deeper structures are best imaged using a low-frequency curvilinear transducer.
SPATIAL ORIENTATION
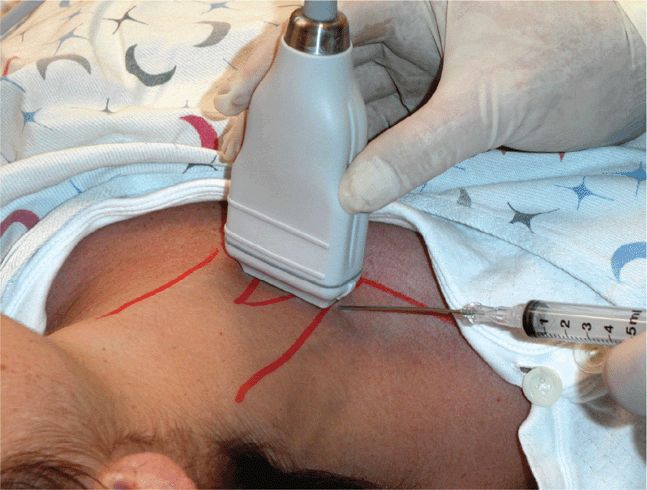
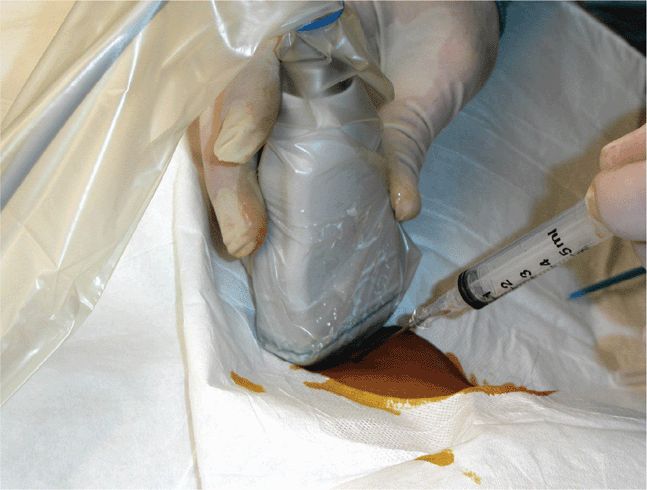
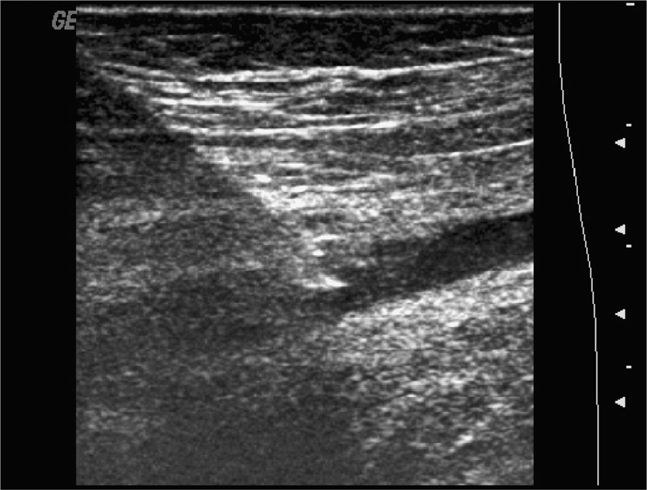
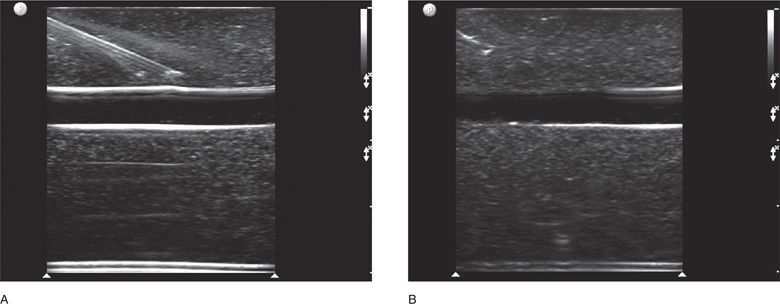
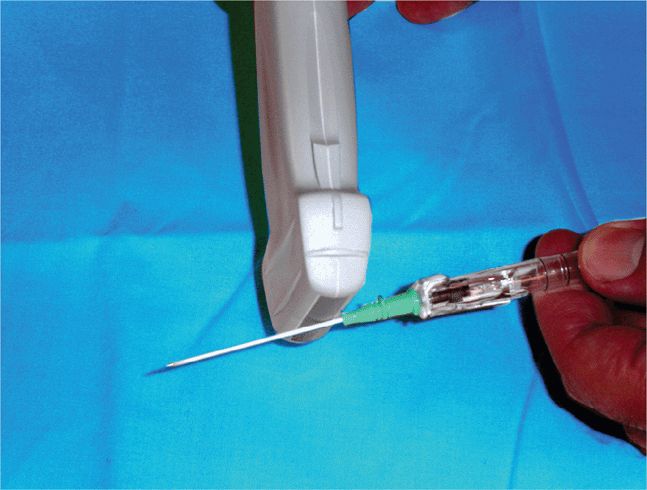
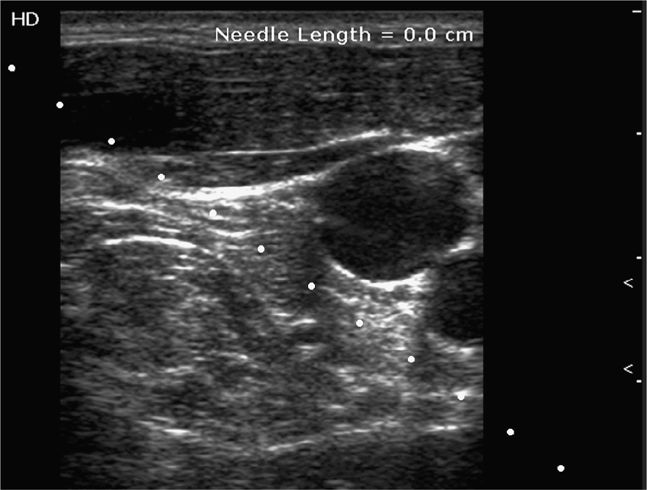
Ultrasound-guided procedures can be performed using an infinite combination of imaging and needle axis planes. When describing the approach, it is most accurate to define both the imaging plane (long, short or oblique axis to the target structure) and also define the plane of the needle path. With respect to the transducer, the needle can travel parallel to the image slice or perpendicular to the image slice. Clinicians commonly refer to these needle paths as either an “in-plane” (long-axis) or “out-of-plane” (short-axis) approach. When the imaging plane is not defined, a “long-axis approach” indicates that the transducer is in plane with the needle (Figure 22-1). A “short-axis approach” indicates that the transducer is 90° to the long axis of the needle (Figure 22-2). The long-axis approach provides the advantage of allowing the needle to be visualized in its long axis, so the location of the needle tip in relationship to the target structure can be identified with certainty throughout the entire path taken by the needle (Figure 22-3). The main disadvantage of this approach is that the needle must be kept in line with the ultrasound beam and this requires reasonable hand–eye coordination, a steady hand, and significant practice. Failure to keep the beam in line with the needle can result in complete loss of visualization of the needle (Figure 22-4A,B).
Figure 22-4. (A) Long-axis approach with the needle visualized. (B) Long-axis approach with complete loss of visualization of the needle due to slight movement of the transducer.
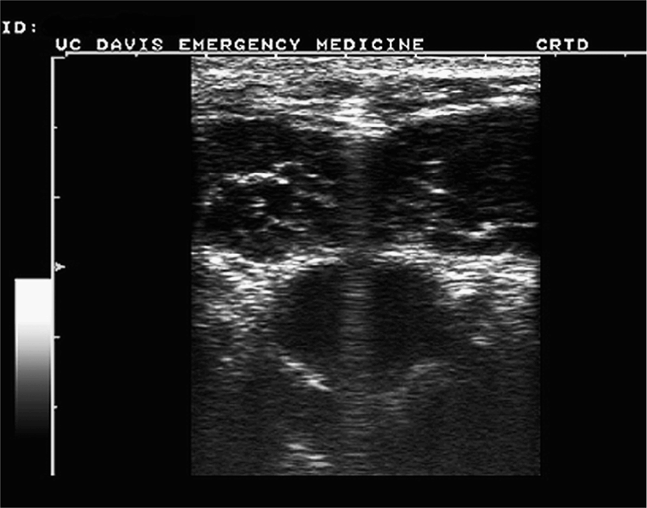
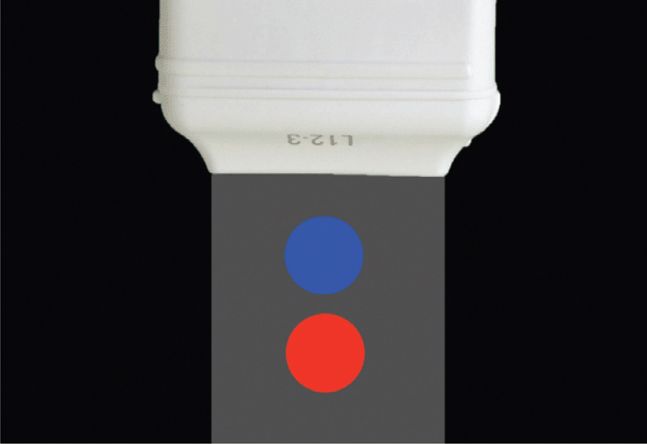
The short-axis approach relies on the centering of the vessel or target structure on the screen and using the center of the long face of the transducer as the entry point (Figure 22-5). The transducer indicator is always directed to the operator’s left so that transducer adjustments correlate with the direction of movement visualized on the screen. Using this approach, the shaft of the needle will be seen only in its short axis (Figure 22-6). The main disadvantage of this approach is that the tip of the needle may be hard to localize. When using this technique to perform ultrasound-guided vascular access, it is not uncommon to penetrate the anterior and posterior wall of the vessels and occasionally unintended structures posterior to the target vessel (Figure 22-7).3,4 Therefore, the presence of key structures, such as adjacent arteries or nerves, posterior to the target structure should be noted when performing a short-axis approach in order to minimize the risk of inadvertent puncture.
Figure 22-5. Short-axis approach. Note that the needle is perpendicular to the axis of the transducer beam.
Figure 22-6. Image obtained using short-axis approach. Note needle artifact centered above vein. (Courtesy of John S. Rose, MD)
Figure 22-7. Target structure (blue circle) placed under the center of the long face of the linear transducer. Note the presence of structure (red circle) directly posterior to the target structure. Avoid approaches in which a key structure is present posterior to the target structure.
Regardless of the approach taken and the instrument used, the operator should always know where on the ultrasound screen the instrument should appear once under the skin. In the case of a long-axis approach, it is prudent to decide whether the needle will appear from the right or left side of the screen. This can be accomplished by setting the transducer in the desired orientation on whatever body surface the procedure will take place. Using a finger, disturb the skin on the side of the transducer from which the instrument will penetrate the skin. The resulting disturbance on the ultrasound screen will indicate where on the screen the instrument will appear under the skin as long as the same orientation is maintained. For short-axis approach, the structure of interest should be aligned under the center of the transducer and the needle puncture done under the center of the transducer face with the transducer indicator always to the operator’s left side. Some find it useful to place a permanent mark on the center of the linear array transducer to mark this location. Others use a technique of placing the needle flat between the transducer face and the skin to align the needle artifact with the intended structure before tilting the needle up to the intended puncture angle.
TECHNICAL ASPECTS
For ultrasound guidance or assistance to be successful, the desired structure must be easily and clearly visible with ultrasound. Difficulty in visualizing a structure that is normally readily imaged with ultrasound can be due to numerous technical factors such as difficult scanning plane, body habitus, inadequate gel use, and interference from adjacent structures. In these difficult patients, developing an alternative plan may be the best option if the target structure cannot be imaged despite addressing the pitfalls just listed. Trying to target a structure that cannot be clearly visualized decreases the success rate and increases the complication rate of the procedure.
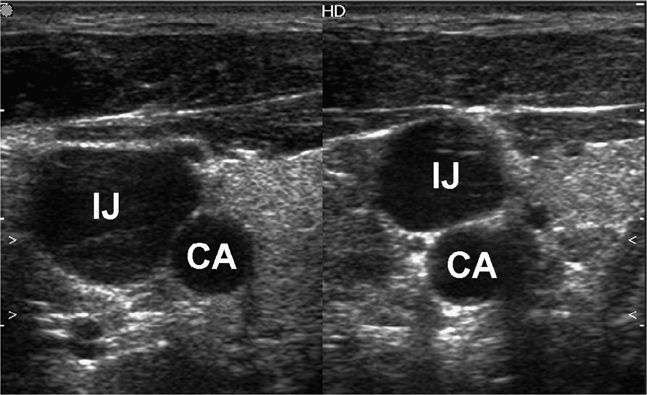
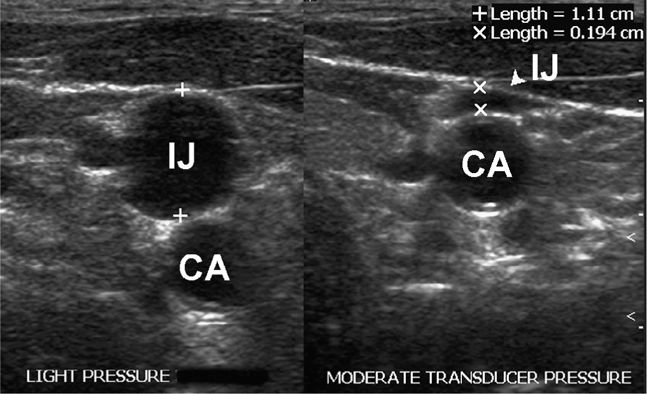
Once an initial scouting ultrasound examination confirms that the target is accessible, the next step involves procedure preparation and setup. These are essential aspects of an invasive procedure. The patient should be optimally positioned prior to beginning the procedure. Experiment with different patient positions prior to beginning in order to see which position will improve the chance of success. If ultrasound assistance is used to mark a location, it will be important for the patient to maintain the same body position used for marking the skin and needle entry. An obvious example of this is fluid marking for paracentesis. If the patient moves, fluid may shift away from the path of the needle and bowel penetration may occur. A more subtle example is the slight but important realignment of vascular structures that may occur with movement (Figure 22-8).
Figure 22-8. Split-screen image demonstrating the effect of head turning on the relationship of the internal jugular vein and the carotid artery. This emphasizes the importance of performing the procedure in the same position that the scan was performed. IJ = internal jugular vein, CA = carotid artery.
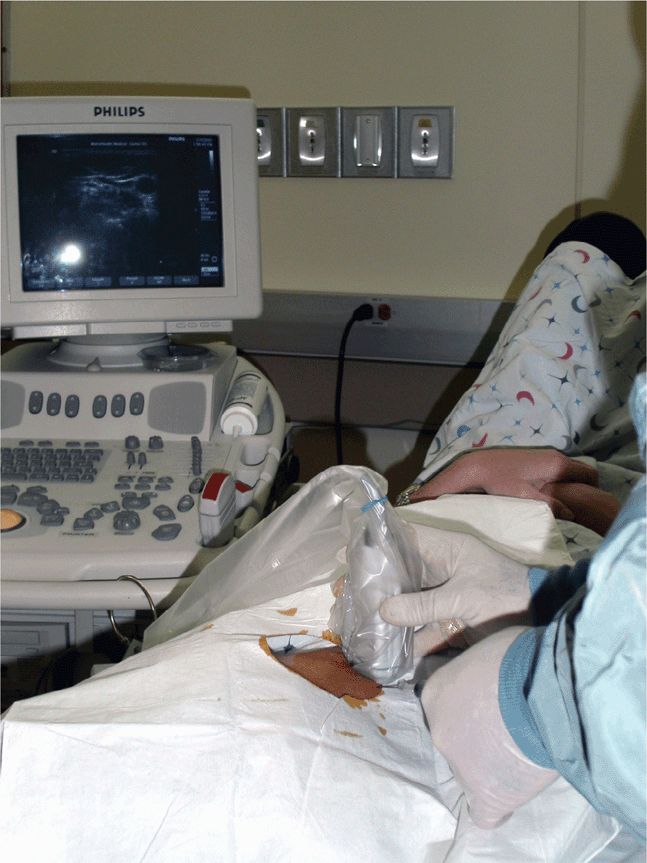
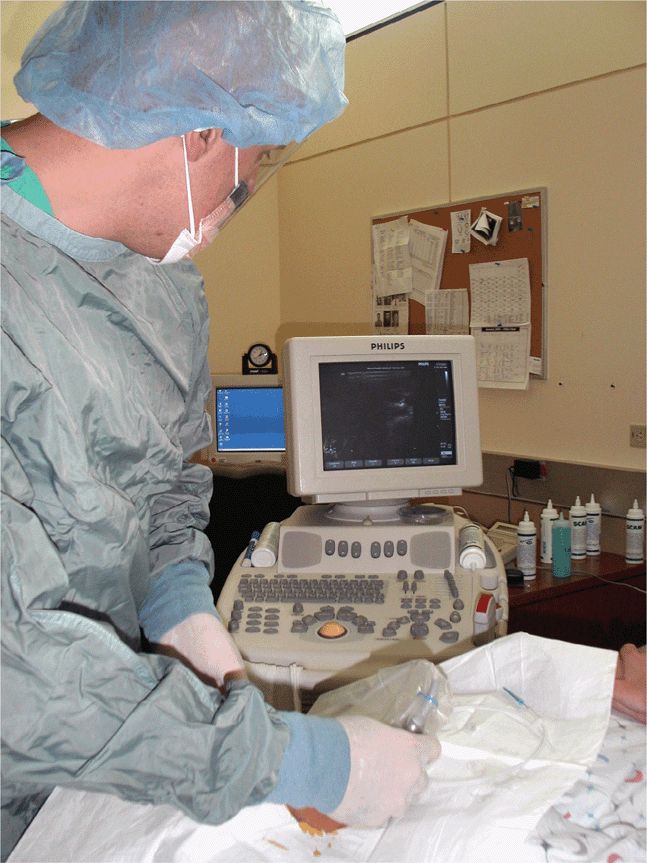
The location of the ultrasound machine in relationship to the operator and the patient must be carefully considered. Place the machine in a location where the operator can easily visualize the screen, ideally without turning his or her head and simply by glancing up or slightly to the side (Figure 22-9). Placing the machine in a location where the operator is forced to turn around or be in an awkward position will make the process less comfortable and increase the likelihood of failure (Figure 22-10). Make correct ultrasound image adjustments before the final preparations for the procedure so that both hands are free and can remain gloved and sterile.
Figure 22-9. Appropriately positioned equipment. Note that the screen is in direct line with the operator’s vision.
Figure 22-10. Inappropriately positioned equipment. Note that the operator has to turn his head to see the screen.
 GETTING STARTED IN PROCEDURAL GUIDANCE
HOLDING THE TRANSDUCER
The development of good hand–eye coordination and control of the transducer are essential for success. Poor technique may not lead to failure in straightforward cases such as an abdomen filled with 10 L of ascites. However, in the case of a small peritonsillar abscess, poor technique will lead to failure and possibly iatrogenic injury.
When scanning a patient, always have a comfortable grasp of the transducer and maintain light hand contact with the patient. Holding the transducer too close to the cable will limit fine motor control and make it difficult to keep the transducer in one position on the patient’s skin. This loss of fine motor control will cause the operator to apply more pressure on the skin with the transducer and may compress or distort the target structure (Figure 22-11). The ability to maintain alignment of the ultrasound beam and instrument requires that the transducer be held steadily, which is made possible by keeping a finger or edge of the hand in contact with the patient’s skin.
Figure 22-11. Split-screen image demonstrating the effect of compression of the internal jugular vein (arrowhead) by heavy transducer pressure. IJ = internal jugular vein, CA = carotid artery.
CONTROLLING THE INSTRUMENT
Move the needle, hemostat, or other instrument in a slow, controlled fashion during an ultrasound-guided procedure. Fast movements may result in loss of instrument visualization or result in operator confusion. Using short, controlled movements is usually the best way to advance the instrument through the soft tissue. Occasionally, a short jab may be called for to move the instrument through soft tissue. However, this must be performed with control to avoid over penetration and damage of vital tissues. One example is in the case of an interscalene nerve block where a noncutting spinal needle is used to avoid cutting nerve tissue and must be gently thrust to penetrate the sheath surrounding the brachial plexus. Without sheath penetration, delivery of anesthetic will be compromised. At the same time uncontrolled jabbing with the needle may result in nerve injury, even with a noncutting needle.
PROCEDURE GUIDES
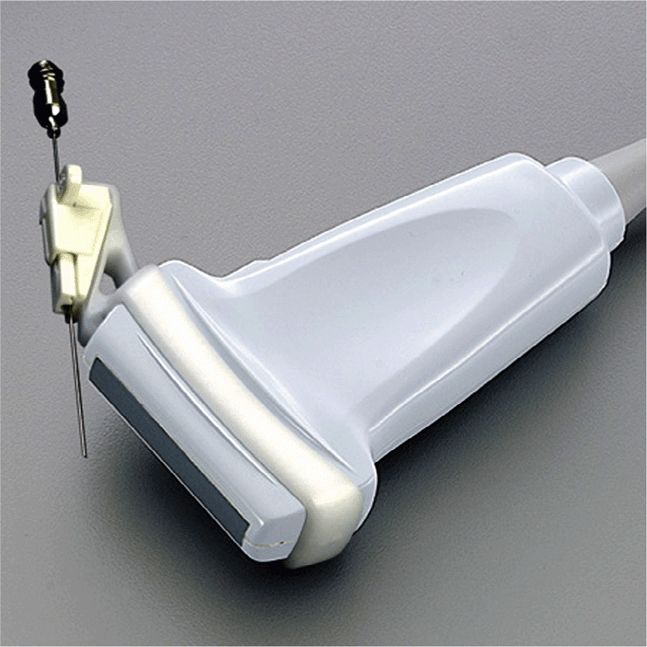
Mechanical guides are commercially available to assist in ultrasound-guided procedures and can be used for both out-of-plane (short axis) and in-plane (long axis) approaches (Figure 22-12). The utility of mechanical guides in ultrasound-guided procedures is controversial.5,6 Mechanical guides can minimize challenges associated with needle-beam alignment and may be helpful for the less experienced operator, but they also restrict needle redirection. These guides are useful for keeping the needle in a predictable path so that intersection of the needle and ultrasound beam occurs at a known depth in case of a short-axis needle guide. Studies looking at the use of mechanical guides (out-of-plane approach) in ultrasound-guided needle biopsies found that procedure time was significantly reduced with the use of mechanical guides, especially for less experienced operators.7 However, for biopsies of smaller targets <3 cm in diameter, the freehand technique fared better than a short-axis needle guide suggesting that the precision of needle tip placement with these guides may be inadequate.8 For guides that place the needle in an in-plane orientation to the transducer, a needle will travel directly under the ultrasound beam for its full length, eliminating the requirement for some hand–eye coordination and adjustments. The main disadvantage of using mechanical guides is that the angle of entry is fixed on some guides (Figure 22-13). Furthermore, in the case of deep structures, the needle guide itself typically uses up a considerable length of the common needle, thus making it difficult to reach areas over 2–4 cm deep.
Figure 22-13. Note the fixed trajectory for needle entry when using a mechanical needle guide. The path of the needle is indicated by the dotted line. If the internal jugular vein was the desired target, then the transducer would need to be repositioned since the internal jugular vein is not currently in the path of the needle.
FACTORS AFFECTING INSTRUMENT VISUALIZATION
Instrument visualization is critical in ultrasound-guided procedures, regardless of whether the instrument is a needle, hemostat, trocar, or some kind of transducer. Despite what appears to be good alignment of the instrument and the ultrasound beam, visualization can occasionally be surprisingly difficult. Composition of the soft tissue, instrument type, needle gauge, bevel position, instrument movement, and the ultrasound beam angle all affect visualization.9,10–13
Needle visualization will be improved by using a larger diameter needle and by keeping the needle as close to perpendicular to the axis of the ultrasound beam as possible.11–13 Unfortunately, an operator may not always be in a position to place the needle or other instrument perpendicular to the ultrasound beam in all situations. In these cases, keeping the ultrasound beam to instrument angle close to 60° will improve visualization (see Figure 22-13).11 Echogenic needles are commercially available and are engineered to increase the reflection of the ultrasound waves back toward the transducer. These devices can be used to aid in needle visualization when traditional needles provide poor visualization.10
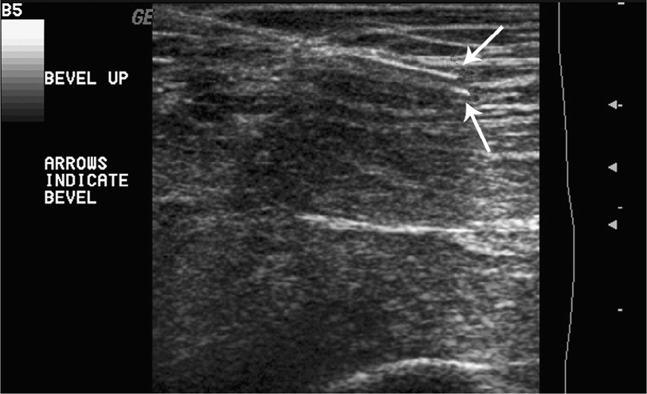
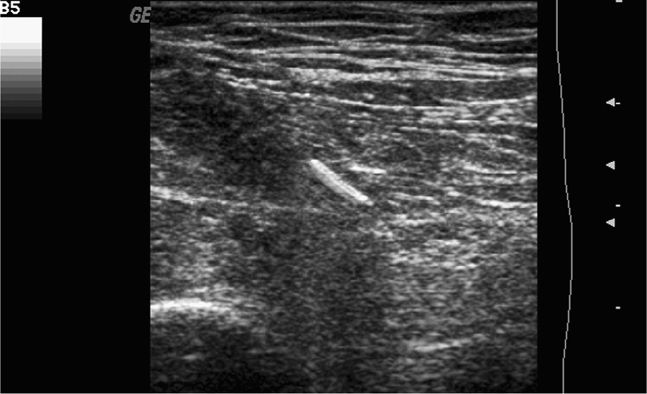
A needle tip will be better visualized if the bevel of the needle faces either toward or away from the sound beam (Figure 22-14).10 When the bevel of the needle is rotated 90° in either direction, the needle tip will not be clearly visualized. It has been suggested that scattering of the beam away from the transducer when the bevel is in the 90° position from the ultrasound beam results in the return of fewer echoes to the transducer. In difficult patients or in cases where the needle angle is suboptimal, the use of an echogenic needle may be beneficial (Figure 22-15). Traditional needles with a smooth surface will demonstrate significantly fewer returning echoes (and poor needle visualization), especially when the needle angle is not perpendicular to the ultrasound beam.
Figure 22-14. Good visualization of the needle tip (arrows) is noted with the needle bevel directed toward the transducer.
Figure 22-15. Echogenic needle with a roughened surface at the tip. Note the improved echogenicity at the tip.
LOCATING THE INSTRUMENT UNDER THE SKIN
When the instrument is difficult to visualize or cannot be visualized, first reassess the relationship of the instrument to the ultrasound beam. In long-axis procedures, the most common reason for not visualizing a needle is lack of alignment of the needle and ultrasound beam. Continued advancement of the needle is inadvisable since needle advancement will not improve needle visualization if the needle and ultrasound beam are not aligned. Gently reposition the transducer, either panning or rocking from side to side, until the instrument is visualized. If the instrument cannot be clearly visualized at this point, gently wiggle the instrument to see if this improves visualization. Avoid large motions since this may allow a sharp instrument to lacerate deep structures. In cases where the needle tip cannot be clearly identified, inject a small amount of sterile saline rapidly into the soft tissue so a small anechoic collection of fluid develops. Once the instrument is visualized, move the transducer in the same plane toward the target. Redirect the instrument toward the target while keeping in mind which direction the transducer was moved. Attempting the procedure from another entry location, changing the instrument angle after withdrawing it, or the use of a more echogenic instrument may be considered at this time if the instrument is still not visualized.
 ARTHROCENTESIS
CLINICAL CONSIDERATIONS
Emergency and acute care physicians are commonly called upon to evaluate patients with a painful or swollen joint where definitive diagnosis and treatment will depend on joint fluid being obtained for analysis. Some patients will benefit from simply having their effusion drained for therapeutic reasons, and many patients will be appropriate candidates for intra-articular steroid injections. While many acute care physicians feel comfortable tapping a knee effusion using standard clinical-examination based techniques, the comfort level for performing arthrocentesis in other joints is often much lower. The provider’s discomfort with the procedure may be due to any one of a number of factors, including lack of experience with joint aspiration at a given location, lack of familiarity with the regional anatomy around a given joint or with techniques traditionally relied on for the procedure, or absence of recognizable landmarks secondary to patient obesity. Arthrocentesis of less commonly tapped joints such as the elbow, ankle, shoulder, hip, acromioclavicular, or metatarsophalangeal joints have traditionally been referred to rheumatologists, interventional radiologists, or orthopedists for further care. The use of point-of-care ultrasound for procedural applications is changing this historical pattern. Arthrocentesis of any of these joints can be added to the armamentarium of procedures performed by emergency and acute care providers who understand basic procedural principles and ultrasound anatomy. Point-of care ultrasound is becoming more common in the field of rheumatology.
Numerous studies have documented improved performance characteristics and outcomes when ultrasound is used for arthrocentesis and/or intra-articular steroid injection. Ultrasound-guided knee injection with hyaluronic acid in patients with osteoarthritis had a significantly greater accuracy rate than blind injection (95.6% vs. 77.3%, p = 0.01) in a series of 89 patients.14 In a study comparing ultrasound-guidance with palpationguided knee arthrocentesis and steroid injection, ultrasound use was associated with 183% greater aspirated fluid volume, 48% less procedural pain, and improved clinical outcome at 2 weeks, in a series of 64 patients.15 A study on the management of knee effusions noted less pain, a shorter procedure time, more fluid removed, and greater provider comfort when ultrasound guidance was used for the procedure.16 A study evaluating the cost-effectiveness of ultrasound guidance for intra-articular injection of the osteoarthritic knee reported a 13% reduction in cost per patient per year when ultrasound was used for the procedure.17 Studies on other joints reported similar improved performance characteristics when ultrasound guidance was used for the procedure. Patients injected with steroids for shoulder pain were noted in one review to have significant improvement in pain and function at 6 weeks when ultrasound-guidance was used compared with landmark-guided injection.18 In a related report, ultrasound-guided injections for subacromial bursitis resulted in significant improvement in shoulder range of motion when compared with a blind injection technique.19 In a study of steroid injection of many different joints, ultrasound-guided injection by rheumatology residents was found to be more accurate than clinical examination-guided injections performed by more experienced rheumatologists (83% vs. 66%, p = 0.010). More accurate injections were also noted to lead to greater improvement in joint function at 6 weeks.20 In a series of 148 painful joints randomized to steroid injection by palpation versus an ultrasound-guided technique, sonographic guidance was noted to result in a 43% reduction in procedural pain, a 58.5% reduction in absolute pain scores at 2 weeks, and a 25.6% increase in the responder rate. Sonography also increased detection of effusion by 200% and volume of aspirated fluid by 337%.21 Increased procedural success has also been noted when ultrasound guidance was utilized for aspiration of PIP and MCP joints. Intra-articular needle placement was noted in 96% of ultrasound-guided injections as opposed to 59% with a palpation-guided technique.22
In summary, most performance characteristics for arthrocentesis are improved when ultrasound is used for the procedure (better effusion detection, more accurate diagnosis, decreased procedural pain, more fluid removed). Additionally, ultrasound-guided intra-articular steroid injections are associated with significantly improved pain and range of motion outcomes compared with palpation-guided techniques.
CLINICAL INDICATIONS
• Diagnostic fluid sampling from a joint for laboratory testing
• Therapeutic fluid drainage from a joint
• Intra-articular steroid injection
ANATOMICAL CONSIDERATIONS
Joints in the human body, while built on similar principles, vary in their individual design and size. Sampling fluid from each requires knowledge of the particular anatomy of the specific joint. The following section contains a brief discussion of the sonographic anatomy of joints that are commonly aspirated or injected.
TECHNIQUE AND ULTRASOUND FINDINGS
Most ultrasound machines in point-of-care settings are outfitted with a linear array transducer suitable for performing arthrocentesis. Use a 5–12 MHz linear array transducer for most joints except the hip, where a curvilinear 5 MHz or lower frequency transducer may be utilized. Adjust image depth appropriately for the joint in question (the 80/20 rule applies: 80% of the image should focus on the anatomic area of interest, with 20% left over in the far field so as to see adjacent anatomy) and optimize image focus for the joint in question. Perform Doppler evaluation to identify any vascular structures surrounding the effusion or along the planned aspiration approach in order to avoid inadvertent vascular puncture.
For precise localization, map the joint fluid collection in two orthogonal planes and mark the skin with an indelible skin marker on either side of the middle of the transducer. A squeezable gentian violet skin marker that expresses the marking ink even when in contact with ultrasound gel is preferable; other markers will frequently cease to function once the coupling gel contacts the marker tip. Connecting the lines will create a target with the aspiration site in the center of the “+”. In addition, determine the optimal aspiration angle. Appreciate the depth from the skin surface to the deepest portion of the effusion so that an appropriate length needle can be chosen for the procedure. Most effusions will be mapped and marked, and subsequently aspirated using a freehand technique. If real-time guidance is used, skin marking will not be required. Prepare the site in a sterile manner, as with all procedures, and cover the ultrasound transducer with a sterile adhesive dressing or a sterile transducer cover. Guiding the needle to a joint effusion in real-time is similar to ultrasound-guided vascular access or abscess drainage techniques.
Graded compression and power Doppler can help distinguish complex synovial fluid or clot from synovial proliferation. A color flow signal may be noted at the border between synovium and where joint fluid is moving due to compression caused by the transducer. Freely mobile loose bodies will occasionally be seen within a joint effusion and will typically reveal themselves by virtue of their hyperechoic acoustic profile and accompanying posterior acoustic shadowing. They are typically found in the suprapatellar bursa of the knee or in the elbow joint and they can be seen to move with either gentle palpation of the effusion or pressure on the transducer.
Knee
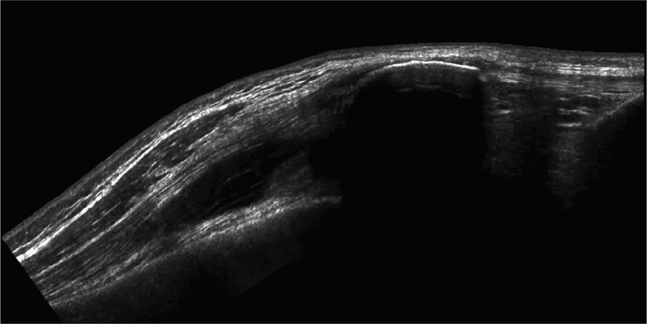
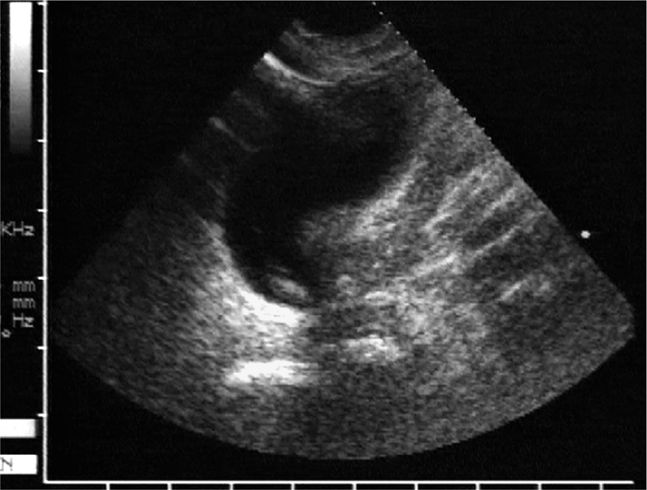
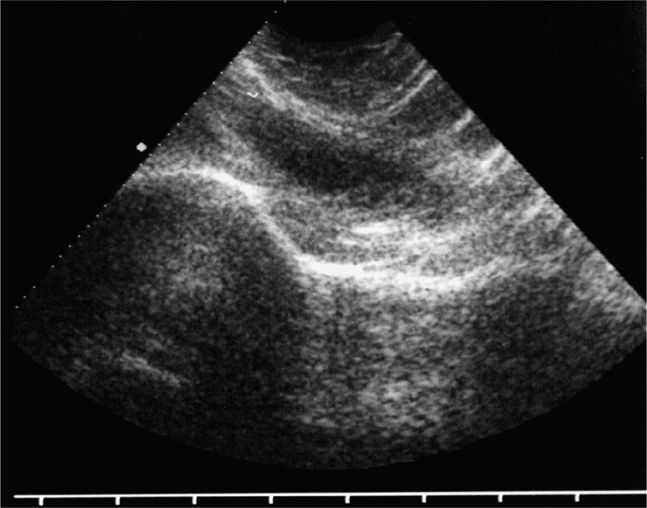
The suprapatellar bursa is a large synovium-lined pouch that is really an extension of the joint space of the knee. It is located at the anterior distal femur extending about a hand breadth above the adult knee joint, bounded superiorly by skin, subcutaneous tissue, and quadriceps tendon and inferiorly by prefemoral fat and the femur. When the knee joint is distended with fluid, the deepest collections will be found in the suprapatellar bursa (Figure 22-16) or where the suprapatellar bursa bulges out on either side of the quadriceps tendon particularly at the lateral suprapatellar recess (Figure 22-17). The suprapatellar bursa is the largest bursa in the body and can distend to accommodate a large volume of fluid. Numerous other bursae also surround the knee joint. Two that are of clinical relevance are the gastocnemiussemimembranosus bursa (found in the medial popliteal fossa) and the subcutaneous prepatellar bursa. The former often communicates with the knee joint, when distended can cause pain and swelling in the poplitealfossa, and is commonly known as a Baker’s cyst. The subcutaneous prepatellar bursa lies immediately below the skin over the lower patella and proximal patellar ligament, does not communicate with the knee joint, and may become swollen and infected due to local trauma.
Figure 22-16. Midline longitudinal panorama image of a patient with a large knee effusion. This large volume hypoechoic collection high above the knee joint represents the distended suprapatellar bursa. The hyperechoic surface of the patella, patellar ligament, and the proximal tibia are seen in the near field on the right half of the sonogram. A dense posterior acoustic shadow is noted beneath the patella.
Figure 22-17. Transverse sonogram of a knee effusion at the lateral suprapatellar recess. The anechoic suprapatellar bursa is surrounded by a very thickened synovial lining, consistent with a chronic arthritic process.
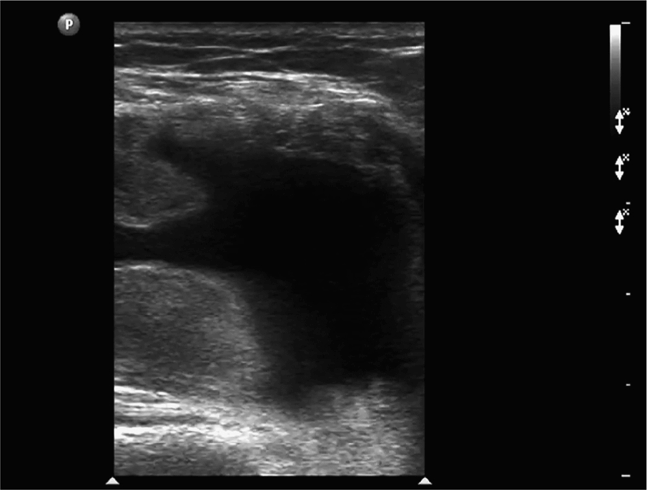
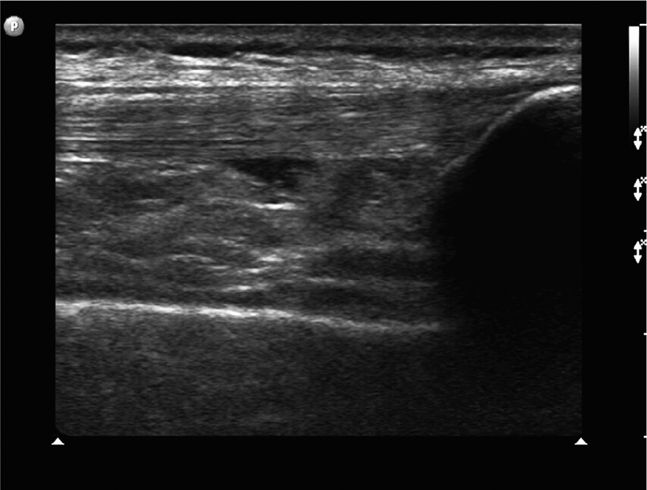
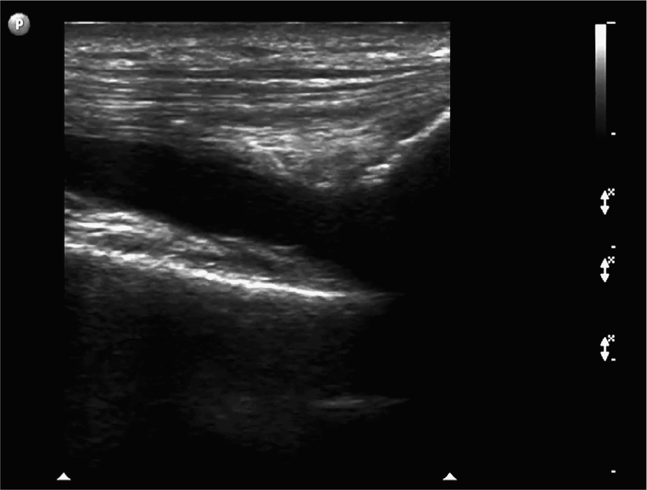
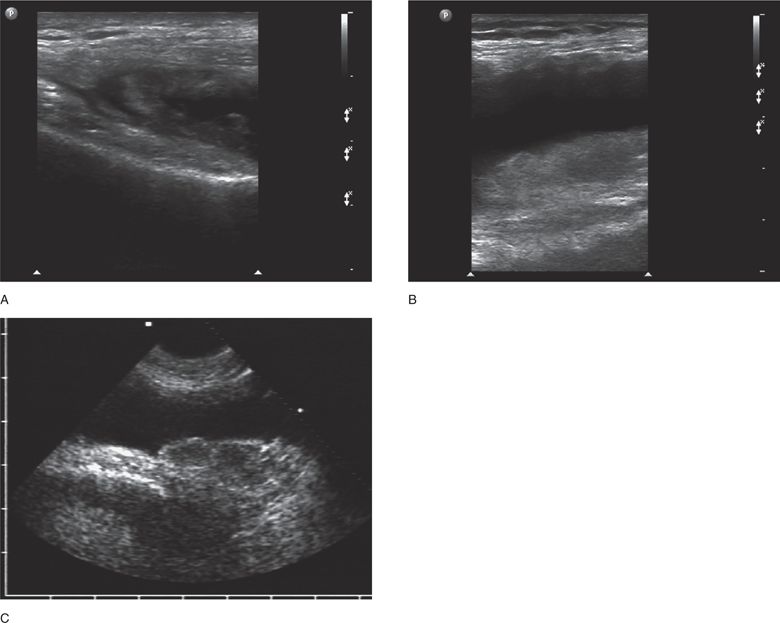
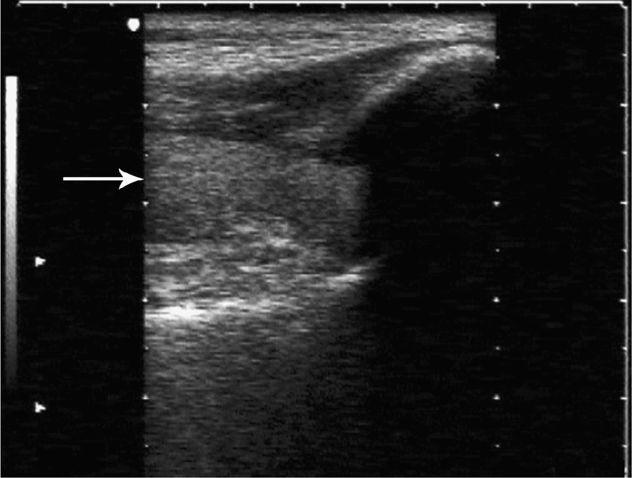
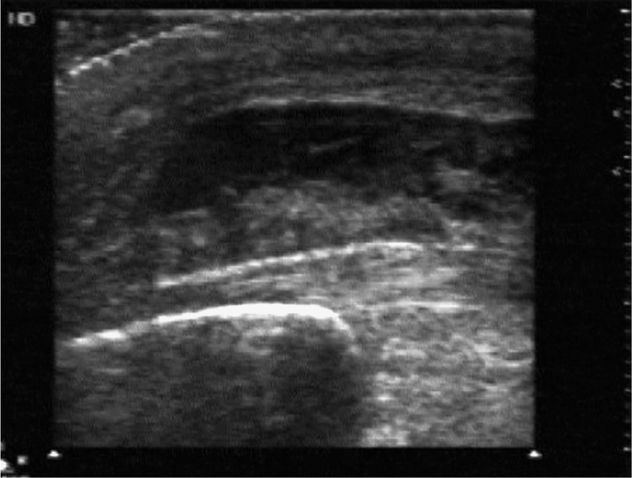
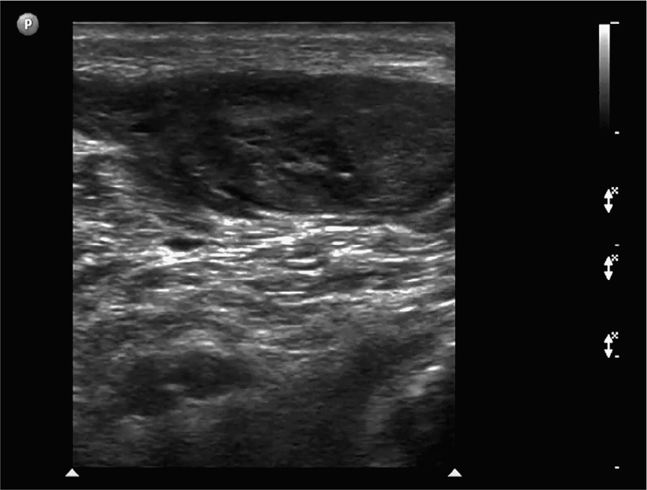
The normal knee joint will have little or no fluid visible within the joint space (Figure 22-18). The highest yield sites for detection of an effusion will be in the lateral and medial recesses of the suprapatellar bursa, and compression on the contralateral recess will help increase fluid detection if the effusion is small. A simple effusion appears as a hypoechoic fluid collection separated from the brightly echogenic femoral cortex by a thin layer of hyperechoic prefemoral fat (Figure 22-19). With a more chronic process, inflammatory synovial changes (pannus) may be appreciated and will appear as a thickening of the synovium or hyperechoic lobulations within the joint space (Figure 22-20A–C). An effusion due to intra-articular hemorrhage may initially appear echo-free but later exhibit a homogenous mid-level gray echotexture consistent with clotted or partially clotted blood (Figure 22-21). A knee joint effusion should not be confused with other fluid collections that can be found around this joint. A prepatellar bursitis appears as a hypoechoic fluid collection that is seen in the subcutaneous tissue just anterior to the inferior patella and proximal patellar ligament and will typically be surrounded by hyperechoic edematous soft tissue typical of cellulitis (Figure 22-22). A Baker’s cyst communicates with the knee joint and classically appears as a hypoechoic stomach-shaped fluid collection in the medial posterior fossa of the knee. On occasion this bursa may exhibit complex echogenicity due to synovial thickening and appear more like a complex cyst (Figures 22-23 and 22-24).
Figure 22-18. Midline longitudinal sonogram of a normal knee. Beneath skin and scant subcutaneous tissue, the striated appearing quadriceps tendon is seen to insert on the superior patella. A scant amount of physiologic joint fluid is noted; the anterior suprapatellar fat pad can be seen on the immediate right of the fluid collection. The echogenic anterior surface of the femur is noted below; a layer of prefemoral fat will always be seen just anterior to the femur on this view.
Figure 22-19. Midline longitudinal sonogram of a simple knee effusion. The image is centered over the suprapatellar bursa; echogenic femur and prefemoral fat are noted in the far field; a portion of the superior patella is seen on the right side.
Figure 22-20. (A,B,C) Evidence of chronic inflammation is apparent in all these knee effusions; synovial hypertrophy may appear layered, smooth and thickened, or lobulated depending on the chronicity of the process.
Figure 22-21. Midline sagittal sonogram of a knee hemarthrosis. The curved shadow of the patella is seen on the right side of the image and the bright echo of the anterior femoral cortex below. Just above the prefemoral fat there is a homogenous mid-gray echotexture layer (arrow) consistent with hematoma.
Figure 22-22. Sagittal midline sonogram of a prepatellar bursitis. Note the thickened hyperechoic skin, some debris within the fluid-filled prepatellar bursa, the shadow from the echogenic patella on the left inferior border of the image, and a portion of the fibrillar proximal patellar ligament.
Figure 22-23. Transverse sonogram at the medial popliteal fossa demonstrating the characteristic stomach-shaped fluid collection of a Baker’s cyst.
Figure 22-24. Synovial hypertrophy and chronic inflammation make this Baker’s cyst appear sonographically similar to a soft tissue abscess. Several popliteal vessels are noted in cross section in the left far field of the sonogram.
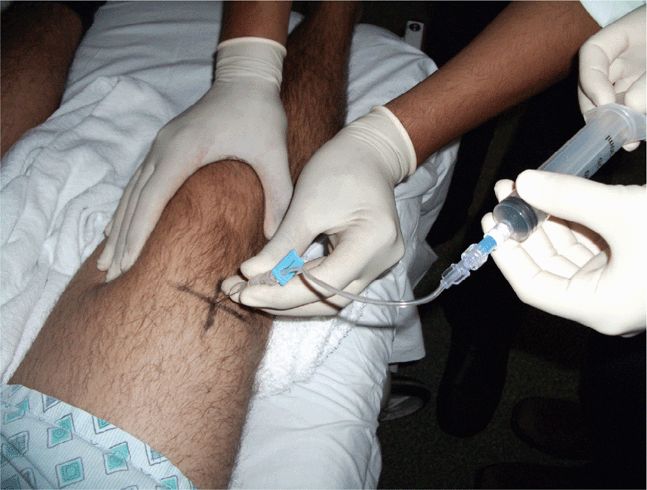
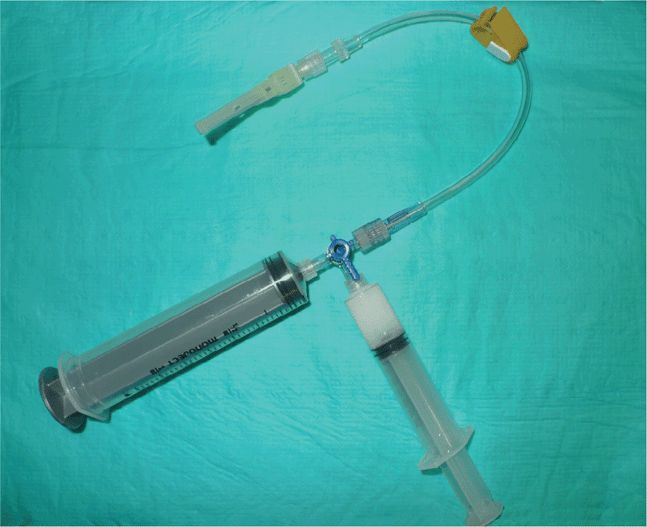
Scan the knee with the patient supine and with the slightly flexed knee supported from behind with a sheet or towel for patient comfort. Scanning is most easily performed in a paramedian longitudinal plane just above the patella. Small volumes of fluid will first be seen in the lateral or medial recesses of the suprapatellar bursa. Detection and aspiration of smaller effusions will be enhanced by placing pressure on the contralateral side of the knee so as to maximally distend the suprapatellar bursal recess at the chosen scanning/aspiration site. Longitudinal and transverse scanning of the fluid collection is followed by marking of the skin with indelible ink to form a “+” designating the optimal site for aspiration (Figure 22-25). Note the depth from the skin surface to the effusion and the optimal aspiration angle. Perform the aspiration freehand; from this point, the procedure does not differ from a blind aspiration technique. If real-time guidance is preferred, dress the transducer in a sterile sheath and use sterile coupling gel. An in-plane approach allowing for long-axis visualization of the aspirating needle is best and is identical to other needle guidance techniques. Since many patients with large knee effusions have chronic arthritic conditions, the joint aspiration may frequently be coupled with an intra-articular steroid injection. If a steroid injection is being simultaneously performed, a double syringe and needle setup with 80 mg of methylprednisolone acetate suspension and a local anesthetic agent can facilitate the aspiration and injection process (Figure 22-26).
Figure 22-25. Knee aspiration technique at the lateral suprapatellar recess: two-person technique where pressure is applied to the contralateral recess for maximal joint cavity distension and maximal fluid removal. Sterile drape omitted for purposes of illustration.
Figure 22-26. Equipment setup for combined knee effusion aspiration and intra-articular steroid injection. Several large volume syringes may be filled in the case of large effusions. When the fluid is maximally drained, the stopcock is switched to the syringe containing the steroid and local anesthetic and the medication is then instilled into the joint. A two-person technique is optimal so that the needle remains in the correct location. Knee range of motion after the injection helps distribute the medication throughout the joint.
Hip
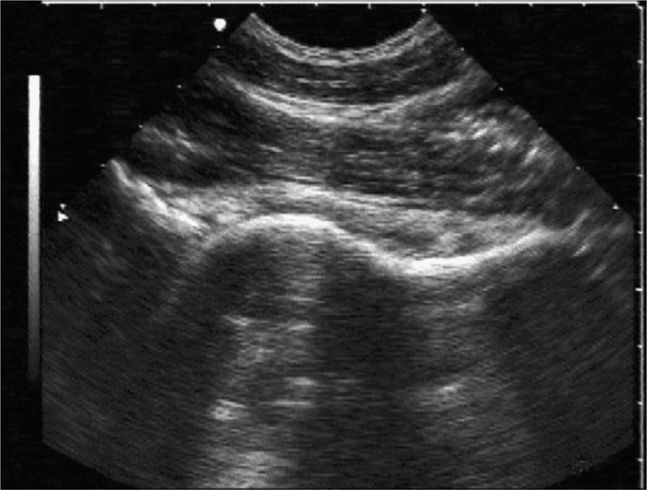
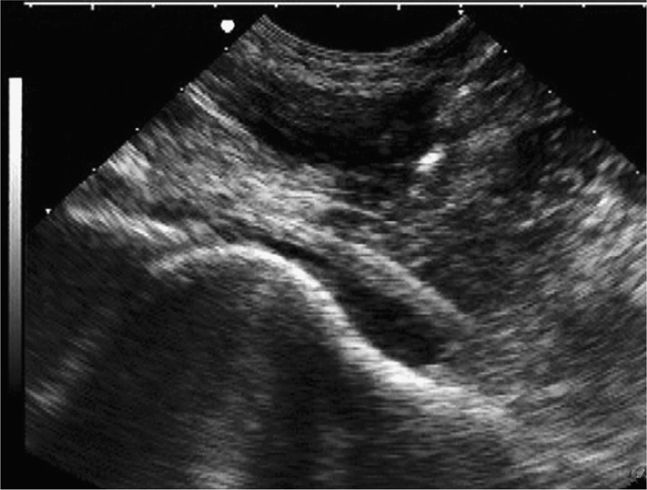
Sonographic evaluation of the hip joint can be successfully accomplished with a variety of transducers, ranging from a 3–5 MHz curved array or sector transducer to a 7.5–10.0 MHz linear array transducer. With the transducer aligned along the long axis of the femoral neck (orientation marker pointing toward the umbilicus), the normal hip will appear as a brightly curved line about 3–6 cm below the skin surface, convex along the surface of the femoral head on the left side of the image, and then gently concave along the femoral neck to the right. The area just anterior to the femoral neck is termed the anterior synovial recess and represents the potential space between the femoral neck and the joint capsule where a hip effusion will preferentially collect (Figure 22-27). A thin line of hypoechogenicity may be noted adjacent to the cortex of the femoral head; this line corresponds to the articular hyaline cartilage. The acetabular labrum will often be seen as an echogenic area to the immediate left of and slightly superior to the femoral head. The joint capsule is of variable echogenicity, sometimes difficult to identify, other times clearly visible as an echogenic layer 3–8 mm in thickness extending from the acetabular labrum to the base of the femoral neck (Figure 22-28). The joint capsule is usually readily identified when an effusion is present. The commonly accepted sonographic criteria for defining a hip effusion in a native hip include14 a convex bulging joint capsule with a fluid stripe >5–6 mm, or15 when compared with the asymptomatic joint, a >2 mm increase in the distance from the cortical echo to the joint capsule. A perpendicular measurement of the effusion is taken at its widest anteroposterior dimension between the surface of the femoral neck and the inner surface of the joint capsule. Comparison with the contralateral hip should be routine (Figure 22-29).
Figure 22-27. Ventral oblique sonogram of the normal hip. The prominent curve of the femoral head is seen on the left side of the image and leads to a concave region along the femoral neck where an effusion will preferentially collect.
Figure 22-28. Ventral oblique sonogram of the hip. The joint capsule is seen as a hyperechoic, horizontally oriented layer extending from the acetabular labrum to the femoral neck. A small amount of joint fluid is noted below the joint capsule.
Figure 22-29. Ventral oblique sonogram of a hip effusion in a patient with reactive arthritis. The anterior synovial recess is distended with fluid and the capsule is seen to bulge anteriorly. The hyperechoic echo from the approaching aspirating needle is seen in the upper right of the image.
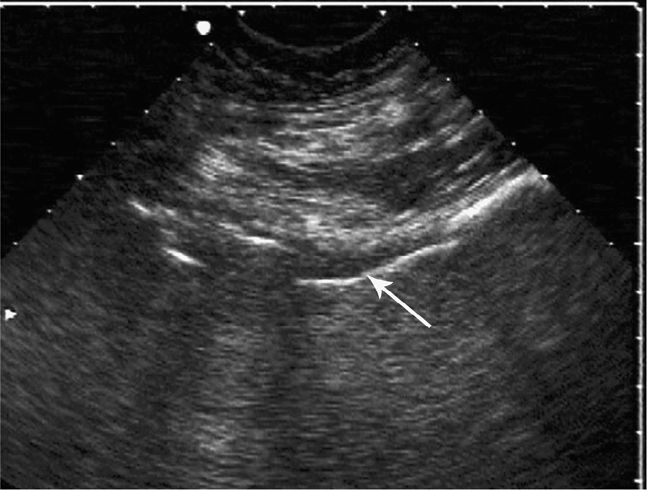
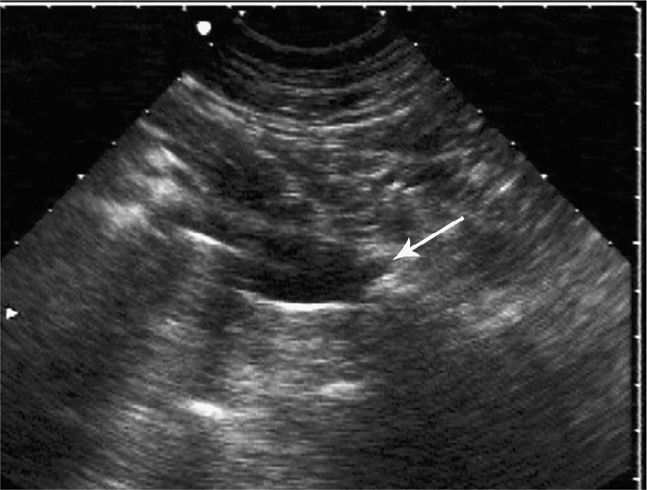
In the prosthetic hip, the sonographic landmarks will obviously be different. Transducer alignment should still be along the long axis of the prosthetic femoral neck aiming toward the umbilicus. A series of four horizontally oriented hyperechoic lines will be noted. First, a short segment to the left of the image may be seen that corresponds to the acetabular component of the prosthesis. Adjacent to this line is a somewhat wider, more superficially located horizontal line that represents the head of the prosthesis. A prominent metallic reverberation or ring-down artifact will be seen behind the prosthesis during real-time scanning. To the immediate right, a longer and somewhat deeper echogenic horizontal line will be seen, corresponding to the neck of the hip prosthesis, and a metallic ring-down artifact will be noted here as well. Finally, a bright and somewhat thicker echo will be noted to the far right of the image. This echogenic line is located a few millimeters superficial to the echo from the prosthetic femoral neck and represents the anterior surface of the most proximal portion of the remaining native femur into which the prosthesis has been inserted. It is typical to see a small amount of hypoechoic fluid surrounding the neck of the prosthesis. Of note, the native joint capsule will no longer be present since it will have been removed during hip replacement surgery (Figure 22-30). A perpendicular measurement is taken of the width of the fluid collection located between the superior surface of the most proximal edge of the remaining native femoral cortex and the edge of the pseudocapsule above. A fluid collection with a width of >3.2 mm at this location is considered to be abnormal (Figure 22-31).23
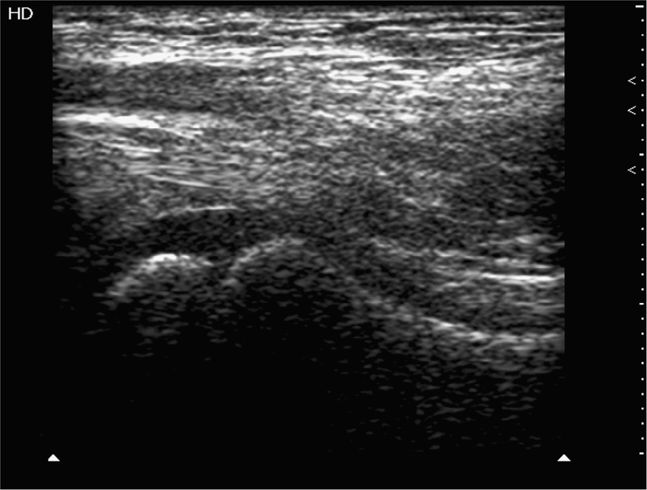
In children, the sonogram of the hip appears somewhat different from that of the adult. The growth plate of the femoral capital epiphysis produces a curved notch in the convexity of the femoral head and, depending on the degree of ossification, a linear lucency in the anterior head of the femur. The hypoechoic region anterior to the notch represents the cartilaginous acetabulum and should not be mistaken for an effusion (Figure 22-32).
Figure 22-30. Ventral oblique sonogram of a normal prosthetic hip. Four echogenic lines are noted. From left to right: a short segment that corresponds to the acetabular component of the prosthesis; next, a wider more superficially located line that corresponds to the femoral head (a prominent metallic reverberation is noted below it); next, the long prosthetic femoral neck; and finally, a somewhat more anterior and more echogenic line that corresponds to the most proximal portion of the remaining native femur. A small amount of fluid is normally seen anterior to the prosthetic femoral neck (arrow).
Figure 22-31. Ventral oblique sonogram of a septic prosthetic hip. A reverberation artifact is seen emanating from the prosthetic femoral head. A large fluid collection is seen anterior to the prosthetic femoral neck. A 5-mm fluid collection was measured between the most proximal native femur and the pseudocapsule above (arrow) (>3.2 mm is considered abnormal).
Figure 22-32. Ventral oblique sonogram of a pediatric hip. A notch is seen in the femoral head that corresponds to the growth plate of the femoral capital epiphysis. The hypoechoic area adjacent to this notch corresponds with the still cartilaginous acetabulum and should not be mistaken for an effusion.
Stay updated, free articles. Join our Telegram channel

Full access? Get Clinical Tree


 PHYSICIAN TRAINING
 GENERAL PRINCIPLES
 GETTING STARTED IN PROCEDURAL GUIDANCE
 ARTHROCENTESIS
 LUMBAR PUNCTURE
 NERVE BLOCKS
 PARACENTESIS
 THORACENTESIS
 PERICARDIOCENTESIS
 TRANSVENOUS PACEMAKER PLACEMENT
 PERITONSILLAR ABSCESS DRAINAGE
 SUPRAPUBIC BLADDER ASPIRATION