Introduction
Ultrasound examination of the ankle and foot is one of the most common examinations in musculoskeletal ultrasound. The superficial location of most structures means that ultrasound plays an important role in the management of many patients with painful conditions of the foot. As in many other joints, symptoms guide the ultrasound approach. Patients who present with pain that is located to a single area are most often helped by ultrasound. Patients who present with more global symptoms, rather than pain localized to a particular area, require MRI for more complete assessment and in particular to assess the joint surfaces.
Many of the structures of the ankle benefit from being examined under stress. It is therefore important to be able to move the foot and the patient’s position should allow for this. This can be achieved by having the patient’s ankle and foot overhang the edge of the couch or by placing a rolled up towel underneath the distal calf so that the ankle and foot are elevated above the couch. The medial, anterior and lateral aspects of the foot are examined with the patient supine. The hindfoot is internally rotated to examine the lateral side, and externally rotated for the medial side assessment. The posterior and plantar aspects are best assessed with the patient prone.
Position 1: Medial Ankle Proximal
Imaging Goals
- 1.
Identify tibialis posterior tendon (TPT).
- 2.
Locate flexor hallucis and its fibroosseous tunnel.
- 3.
Identify tibial nerve and proximal branches.
Technique
The examination begins with the probe in an axial position just above the medial malleolus ( Fig. 23.1 ). The posteromedial margin of the tibia is easily identified and the largest and most medial of the tendons is the TPT. Deep to the TPT, a low-reflective band overlies the tibial cortex representing the hyaline cartilage of a pulley enthesis. This assists with the smooth passage of the tendon around the malleolus. The presence of cartilage at this location explains why enthesopathy can occur and why bony spur formation is a component of patients with chronic TPT disease. The tendon should have a normal internal structure comprising areas of low reflectivity, representing the tendon fibres interspaced with areas of increased reflectivity from the intervening connective tissue support structures. The most medial aspect of the tendon is in line with the medial border of the tibia.

Lying along the lateral margin of tibialis posterior in close proximity with it is the tendon of flexor digitorum longus (FDL). This is a much smaller tendon than TPT with a lower musculotendinous junction. The other structures in the proximal part of the tarsal tunnel include the posterior tibial artery and veins. The medial border of the posterior subtalar joint is identified deep to the flexor digitorum tendon as it passes below the sustentaculum. Immediately lateral to this is the tibial neurovascular bundle. The posterior tibial artery and its multiple surrounding veins separate flexor digitorum from the tibial nerve. The tibial nerve is a brighter, more reflective structure than the nearby tendons. Once again low-signal elements can be identified within it, representing the neural bundles, and these are separated by intensely bright components representing epineural tissue. The tibial nerve divides to form the medial and lateral plantar nerves. This branching can occur at any point and may already have occurred at the level of the medial malleolus. A smaller branch, the medial calcaneal nerve, arises directly from the tibial nerve and can be seen deep and slightly posterior as it heads towards the posterior medial corner of the os calcis. Another important branch, the inferior calcaneal nerve, arises from the lateral plantar nerve. It is sometimes referred to as the first branch lateral plantar nerve. This nerve also passes deep and somewhat posteriorly to pass around the underside of the hind foot close to the origin of the plantar fascia. It traverses the hind foot to supply abductor digiti minimi. This nerve may be impinged by plantar fasciitis, leading to atrophy of the aforementioned muscle. Compression of the nerve more proximally may also lead to a syndrome that mimics plantar fasciitis, called Baxter’s neuropathy.
Tibialis posterior is held in place by the overlying medial (or tarsal) retinaculum, which can be identified as a thick striated connective tissue structure that passes over tibialis posterior, forming the roof the tarsal tunnel. The flexor digitorum tendon and tibial neurovascular bundle are also contained within the tarsal tunnel. Medially it blends with the fascia and periosteum of the tibia.
Although flexor hallucis longus (FHL) is often considered in association with tibialis posterior and flexor digitorum, (the so-called Tom, Dick and Harry), it is in fact separated from the other two tendons and has its own fibroosseous tunnel on the dorsal aspect of the os calcis. The tendon is located by moving the probe medially and distally and using the overlying tibial nerve as a landmark for the tendon. Gentle movement of the big toe helps identify the deeply positioned FHL tendon. The groove in which it is contained is bridged by a short retinaculum creating a fibroosseous tunnel helping to guide movement of the tendon. Occasionally the retinaculum is thickened and tendon nodules may develop, creating a triggering phenomenon similar to trigger finger. If an os trigonum is present, FHL is medial to this accessory bone.
The tendon should be examined in both short and long axis with and without movement. Rotating the probe 90° once the tendon is identified and then moving the toe will serve to demonstrate that there is no adhesion or catching as the tendon passes into its fibroosseous tunnel. The proximal part of the tendon just below the musculotendinous junction is usually the first to be identified and it is not uncommon to see fluid around it in this location. This is particularly obvious if ankle joint effusion is present as the tendon sheath communicates directly with the tibiotalar joint. Generally, simple effusions are not associated with an increase in Doppler activity.
Position 2: Medial Ankle Distal
Imaging Goals
- 1.
Locate tibialis posterior/tibiotalar/spring ligaments.
- 2.
Find where flexor hallucis crosses flexor digitorum.
- 3.
Identify the medial and lateral plantar nerves.
Technique
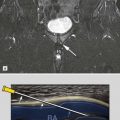
As the probe is advanced distally following tibialis posterior, the medial malleolus disappears from view. The structure which now is found deep to TPT is the tibiotalar ligament, a major component of the deltoid ligament complex ( Fig. 23.2 ). This ligament is said to have two components, although the posterior component is more dominant and blends with the anterior component in most cases. In the relaxed position the normal internal structure of the ligament is difficult to discern due to anisotropy as the fibres are oriented at various angles to the probe. Tensing the ligament, by dorsiflexing the foot, brings the fibres into alignment and reveals the true internal structure.
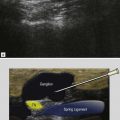
The normal ligament is triangular or sail shaped with its narrow end superiorly attached to the medial malleolus and its wide portion distally attaching to the talus. The tibiotalar joint is deep to the ligament. If the tibialis posterior is followed a little more distally, the spring ligament appears deep to it ( Fig. 23.3 ). The posterior part of this ligament, the component that is attached to the sustentaculum tali, is identified first as this is its widest portion. If the upper end of the probe is rotated anteriorly, the middle and anterior parts of the ligament come into view, passing around the reverse S shape of the talus towards the navicular. A small bursa, little more than a potential space, is located between the TPT and the spring ligament. This is called the gliding layer. A small quantity of fluid may be present around the tibialis posterior in this location. The other significant component of the medial ligament complex is the tibiospring ligament ( Fig. 23.4 ), which is orientated in the coronal plane, linking the tibia to the spring ligament. The tibiocalcaneal and tibionavicular can be usually found in most individuals but with a more variable appearance.


The examination of tibialis posterior is concluded by following it to its insertion onto the navicular. The insertion is complex with slips to the underside of the cuneiforms and cuboid as well as the navicular. A component also passes over the navicular to insert into the medial cuneiform. In view of the widely diverging configuration of the tendon insertion, anisotropy can be problematic.
An accessory ossicle may be present close to the navicular insertion. There are several types depending on the size of the ossicle and the relationship with the underlying bone. Type 1 is a small ossicle located within the tendon which otherwise inserts normally. A type 2 insertion is the most problematic. This is where a substantial portion of the tendon inserts into a large accessory ossicle which in turn forms a pseudarthrosis with the underlying navicular. Type 3 is where the ossicle has fused with the navicular: a stable condition, but one which may impact on TPT function.
Variations include congenital duplication of TPT and a common tendon sheath for tibialis posterior and flexor digitorum. An accessory FDL may be seen to pass through the tarsal tunnel adjacent to FHL. Its distal attachment to flexor digitorum usually helps to distinguish it from a significant mass.
Position 3: Posterior Ankle
Imaging Goals
- 1.
Identify Achilles tendon and enthesis.
- 2.
Identify plantar fascia and surrounding muscles.
- 3.
Locate plantaris and the paratenon.
Technique
The posterior aspect of the hind foot is best examined with the patient prone and the foot extended over the end of the examination couch. If patients cannot lie prone, a supine examination with the foot overhanging can be used. The imaging goals are to identify the Achilles tendon, the plantaris tendon and the plantar fascia.
The Achilles tendon is easily located by placing the probe in long axis in the midsagittal plane above the os calcis ( Fig. 23.5 ). It is one of the largest tendons in the body. It can be tracked proximally to where it is joined by the soleus muscle (soleal incorporation) and further proximally where it is formed within the gastrocnemius muscle. Note should be made of the distance between the level of soleal incorporation, usually referred to as the musculotendinous junction, and the insertion to the os calcis. A low incorporation is said to predispose to Achilles tendinopathy. Just before its insertion, the anterior relation of the Achilles tendon is Kager’s fat triangle and the pre Achilles bursa. Normally a very small amount of fluid can be identified within the bursa. Gentle flexion and extension of the foot reveal the movement of the posteroinferior tip of the fat pad within the bursa, helping to define it. This manoeuvre also helps to exclude some forms of pre Achilles bursitis that are more complex and may have ultrasound characteristics similar to the fat pad. The retro Achilles bursa lies posterior to the tendon at the same level. This rarely contains fluid in normal individuals and in many cases can be difficult to identify. It is important not to press too hard with the ultrasound probe as the soft-walled bursa can be easily obscured.

A number of other signal characteristics may be found at the tendon insertion. A low-reflective structure may be seen on the dorsal aspect of the underlying os calcis. This is entheseal hyaline cartilage and may coexist with low-signal sesamoid cartilage within the tendon itself, though the latter can be rather subtle and difficult to identify.
The insertion footprint is quite large. The most superficial fibres can be seen to pass over the os calcis and contribute to the formation of the superficial fibres of the plantar fascia. This is especially apparent in children, and is similar to the relationship between the rectus abdominis/adductor and quadriceps/patellar tendon. A relationship between symptoms from the Achilles tendon and plantar fascia is well recognized and both should be examined when pathology in the other is suspected.
The probe is then turned 90° to examine the Achilles tendon in short axis. In this plane, the tendon is oval in shape with a convex posterior border and a flat or slightly concave anterior border. The internal structure should resemble tendons elsewhere, with multiple low-signal speckles representing the tendon fibres interspaced with the bright connective tissue epitenon. With the probe held centrally, the medial and lateral margins of the tendon may be difficult to identify in thin individuals as there is often an edge artifact extending from them and giving the impression that the medial and lateral tendon margins are of low signal. The probe needs to be moved first medially then laterally and tilted in the opposite direction to provide clear visualization of the margins.
On the medial side, the plantaris tendon is usually visible ( Fig. 23.6 ). This short-bellied muscle has its origin on the posterior aspect of the lateral femoral condyle. It forms into a long tendon that passes from lateral to medial between the soleus muscle and the medial head of gastrocnemius to emerge on the medial aspect of the Achilles tendon. It may then insert directly onto the os calcis, but more commonly it blends with the Achilles tendon itself at some point along its length. Some form of plantaris tendon can be identified in the majority of patients, though it can be quite vestigial. A retinaculum similar to the tarsal retinaculum extends over the Achilles and plantaris tendons. Like the retinaculum of the knee, this can be a little thickened at the level of the middle and distal thirds of the Achilles tendon. The presence of a prominent retinaculum is also said to predispose to Achilles tendinopathy.