2
Catheters and Guidewires
 Catheterization Techniques
Interventional radiology uses imaging technology to perform diagnostic and therapeutic procedures at target organs distant from a percutaneous access site. Virtually all interventional radiology techniques rely on a combination of needle, catheter, and guidewire systems. The basic principles of interventional radiology are remarkably similar across procedure types and organ systems. This chapter addresses the basic instrumentation and techniques used for percutaneous access, using arteriography as the prototype. Later chapters illustrate how the process can be adapted to manage a wide range of clinical situations.
The initial method used in diagnostic angiography was direct needle puncture with contrast injection into the arterial system. In 1953, Seldinger first described the combined use of a needle, guidewire, and catheter to access the arterial system for selective catheter angiography safely and without surgical exposure.1 The Seldinger technique for catheter access consists of initial needle insertion into a blood vessel. Then a guidewire is placed through the needle and passed into the blood vessel lumen. The needle is “exchanged,” leaving the guidewire in place, and finally a catheter is guided over the guidewire to the desired location. Initially, rubber urinary catheters were used; however, the emergence of plastics enabled the production of small-diameter, complex-shaped catheters. Seldinger’s technique has remained relatively unchanged since its initial description for vascular access and has been adapted as a method to provide percutaneous access to nearly every organ system. The venous system, biliary tree, renal collecting system, peritoneal space, pleural space, and abscess cavities can be accessed using the Seldinger technique.
Vascular access
The basic steps for arterial access using the Seldinger technique are as follows: The skin is sterilized with a bactericidal solution, and the patient is draped to allow clean access to the puncture site. Bony landmarks and the abdomen are checked by use of fluoroscopy to ensure that the planned needle puncture is infrainguinal for femoral access and that there is no bowel contrast present that may potentially obscure the region to be examined. Local anesthetic is infiltrated, and a small dermatotomy is made with a no. 11 scalpel. The artery is palpated both proximally and distally to the puncture site, lining up the fingers along the vessel, and the needle is placed parallel to the artery and at an approximately 60-degree angle to the skin. The tip of the needle is place within the vessel using either a single- or double-wall technique (to be described later), at which point, strongly pulsatile blood return should be observed. If the observed blood return is weak, the needle might be only partially within the blood vessel, directed toward the side wall or a plaque, partially occluded with thrombus, within a vein, or within a branch arterial vessel; the needle must be repositioned or removed.
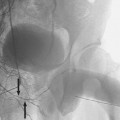
The needle is tipped downward to become more parallel to the vessel, and a guidewire then is placed through the needle into the lumen, thus securing access. The guidewire should pass easily into the vessel. Fluoroscopy is used to confirm guidewire position. If the guidewire cannot pass easily, one of several circumstances may be occurring. The needle may be partially embedded in the vessel wall, the needle tip may be pointing at the side wall of the vessel, a branch vessel has been punctured, the vessel is extremely tortuous, or an atherosclerotic plaque or occlusion may be present. If the needle is partially buried, subintimal passage of the wire can occur, raising an intimal flap, which may be flow limiting or even occlusive (Fig. 2-1). If any resistance to wire passage is encountered, the wire should be removed. If pulsatile flow is still present, another attempt to pass the guidewire may be made, adjusting the needle to facilitate passage. A contrast injection may help to clarify the position of the needle tip. If these maneuvers are unsuccessful, the needle should be withdrawn and compression maintained at the access site for 5 to 10 minutes to avoid hematoma formation.
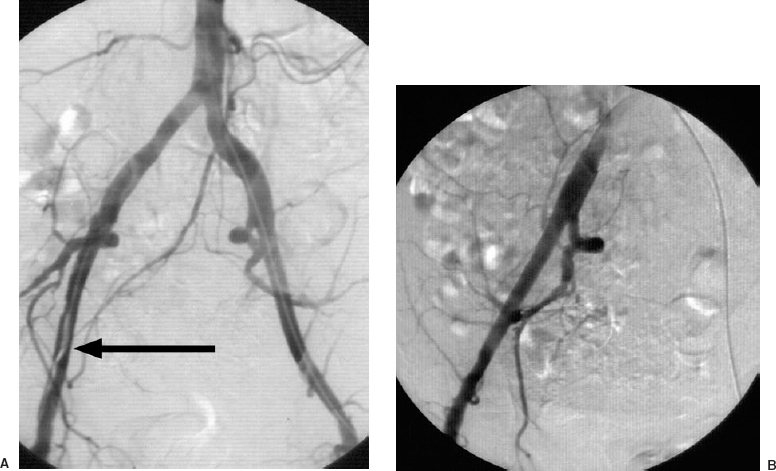
FIGURE 2-1. A: Iliac arteriogram from a left common femoral artery approach demonstrates an intimal dissection (arrow) caused by a previous right transfemoral catheterization. B: The dissection was “tacked down” by insertion of a Wallstent.
The needle is removed over the guidewire while manual pressure is maintained over the puncture site to prevent bleeding and hematoma formation. Clots that may have formed on the guidewire resulting from the needle removal should be wiped off using nonfriable gauze such as Telfa (Kendall Healthcare, Mansfield, MA, U.S.A.). A catheter now can be passed easily over the guidewire into the vessel, with tension being maintained on the guidewire to prevent catheter or guidewire kinking. The tapered catheter tip must closely approximate the size of the guidewire so that the catheter tip does not catch on the vessel wall or kink the guidewire. The catheter can be advanced to the desired location, using the wire as a guide. The guidewire can be removed so that saline flush and contrast may be injected through the catheter. When the catheter is within the vessel and the guidewire is removed, heparinized saline must be flushed through the lumen approximately every 2 to 3 minutes to prevent formation of a clot within the catheter. Catheter flushing consists of aspiration of 3 to 5 mL of blood with a heparinized saline-filled 20-mL syringe, followed by injection of 5 to 10 mL of saline. The syringe tip is angled 45 degrees downward to allow the blood to settle in the dependent portion of the syringe and to prevent the introduction of air bubbles or reintroduction of blood. Double flushing, commonly used during cerebral angiography, consists of the aspiration of blood from one syringe followed by a heparinized saline flush using a second syringe.
Venous puncture is made in much the same way; however, there are slight differences. Single-wall and double-wall techniques may be used; however, suction must be applied because venous pressure is usually insufficient to drive blood through the needle.
Following completion of the procedure, the pulses distal to the catheter insertion site must be assessed before and after removal of the catheter. Occult emboli or pericatheter thrombosis may have occurred, necessitating thrombolysis. The catheter and guidewire need to be removed from the patient, ensuring minimal vessel trauma and little bleeding or hematoma formation.
Compression is maintained focally at the arterial puncture site, not the skin entry site, for 10 to 15 minutes in patients with a normal coagulation status. Coagulopathic patients, whether pathologic or iatrogenic, will require longer compression, as will sites that have had large catheters placed. The pulse should not be eliminated during manual compression, but no oozing should be observed. If no pulse is felt, the vessel may be occluded by overzealous compression or by compression that is not being applied over the artery. Devices (e.g., Femostop) have been designed that mechanically maintain compression once it is set up in the appropriate position. Percutaneous access closure devices have been developed recently and include collagen plugs deposited along the subcutaneous catheter tract and direct suture of the artery at the access site to aid in the suppression of bleeding.2 Closure devices may be useful in anticoagulated patients or following removal of large-diameter catheters.
Access needles
Access needle diameter should be less than the catheter to be used; otherwise, the hole in the artery will be too large and blood will leak around the catheter. A 19-gauge needle is roughly the same size as a 4F catheter (19 gauge = 1/19 inch). The walls are made of thin steel to allow passage of guidewires of sufficient size. The proximal end is called the hub and has handles or a flange for better control. The tip of the needle may be blunt, with a sharp inner stylet, or it may be sharply beveled, with no inner stylet.
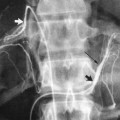
The method of access dictates the design of the needle. Seldinger’s original double-wall technique uses a needle with a blunt hollow cannula into which a sharp, solid stylet is placed. Initially, the needle is placed through both walls of the vessel, and the stylet is removed. The blunt cannula tip is pulled back slowly until it enters the lumen and pulsatile blood return is seen. A wire then can be passed into the vessel (Fig. 2-2).
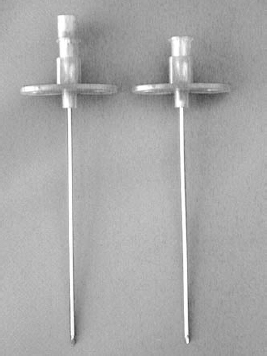
FIGURE 2-2. Access needles. Seldinger needle (left). One-wall needle (right).
The one-wall technique employs a sharp, hollow, beveled needle with no inner stylet. The needle is inserted slowly until pulsatile blood return is seen (indicating an intraluminal position), and then the wire is passed through the needle. Only the more superficial wall of the vessel is crossed.
The choice of technique is primarily one of operator preference, but there are several technical considerations. The needle puncture in the far wall with the two-wall method might create a potential problem with bleeding, although this does not typically occur. The stylet punctures the wall, spreading the fibers rather than slicing them as with the single-wall needle. When the needle is removed, the elastic arterial wall tends to seal the defect. If thrombolysis is to be performed or the patient is coagulopathic, however, the one-wall approach may be preferred. Double-wall punctures in patients with aorto-bifemoral grafts (which usually are placed anterior to the native vessels) may enter the deep native vessel first on withdrawal of the needle, with good blood return seen.3 The guidewire, however, will not pass through the diseased native arterial segment. A single-wall puncture is more likely to enter the graft first, enabling access to more proximal vessels. Similarly, when placing an inferior vena cava filter, the occasional femoral artery, which is immediately anterior to the vein, especially with low punctures, will be noted on the way in (by the presence of pulsatile return) before the vessel is accidentally dilated to the size needed to accommodate the filter. Single-wall needles are, by necessity, cutting needles, and they are helpful in scarred, postoperative groins. Even with a one-wall puncture, however, the pressure needed to enter the lumen may cause the vessel to collapse, with the net result of blood return being seen only after puncturing both walls and withdrawing the needle anyway.
The single-wall needle also is associated with several pitfalls. Because the needle is hollow, it may become occluded with tissue. Flushing is therefore recommended between passes. A more potentially serious problem is a result of the steep bevel that must be made to enable the needle to cut the arterial wall. A portion of the needle tip still may be within the vessel wall while the remainder of the needle tip is within the vessel lumen. Pulsatile blood return will be observed, but a wire passed with the needle in this position can be directed subintimally, thus causing a dissection of the vessel wall. When blood flow is seen, the needle should be repositioned (slightly withdrawn, rotated, or occasionally advanced) a millimeter or two to place the entire bevel within the lumen.
Specialty needles exist for various uses. Translumbar aortography is performed by using a long, hollow 18- or 19-gauge needle with a Teflon outer sheath. Biliary access is made with long, fine (21- or 22-gauge) needles. A Micropuncture access set (Cook, Bloomington, IN, U.S.A.) is available with a 21-gauge needle and a 0.018-inch guidewire (Fig. 2-3). The use of a small needle minimizes the risk of bleeding in the event multiple passes are required to obtain vascular access. The needle and guidewire are coupled with 4Fr or 5Fr coaxial dilators that allow the operator to place a standard 0.035-inch or 0.038-inch guidewire needed to pass a standard sized catheter into the lumen.
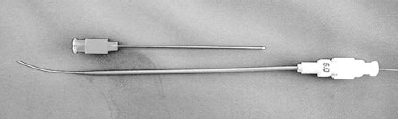
FIGURE 2-3. Micropuncture access set. Micropuncture needle, 21-gauge (top) coaxial dilators over an 0.018-inch guide-wire (bottom).
Sheaths and dilators
If large-diameter catheters are to be used, or if there is dense scar tissue or a tough synthetic graft is to be crossed, the use of graduated Teflon dilators may facilitate catheter passage. Dilators are short, stiff, thick-walled sections of catheter, available in a variety of sizes, with a long, tapered end that spread tissues more easily than a diagnostic catheter. Advancing a catheter over a stiffer wire also may facilitate passage of the catheter into the vessel and prevent guidewire kinking.
Vascular sheaths are used during cases that require multiple catheter manipulations and catheter exchanges. Sheaths should be used during complex manipulations, such as embolization; if the catheter tip becomes occluded, precluding passage of a guidewire, the catheter still can be removed via the sheath without losing vascular access. The use of a sheath decreases the friction on the catheter at the puncture site, allowing better transmission of the forces applied, and protects the groin and vessel from excessive trauma. Sheaths are also useful in patients with groin scarring from previous surgery, vascular bypass grafts, and obese patients.
Sheaths are constructed from short segments of thin-walled catheter material, often Teflon, and are sized according to the largest catheter they will accommodate. For example a 5Fr sheath will accommodate a 5Fr catheter but is actually approximately 6.2 in outer diameter. They are placed into the vessel at the puncture site and left for the duration of the case, usually, so that all wires and catheters pass through them. A hemostasis valve is attached on the trailing end so that catheters and guidewires can be exchanged with minimal blood loss. A flushing sideport is provided and should be connected to a pressurized continuous saline flush whenever a nonocclusive catheter, guidewire, or nothing at all will be in the sheath for more than several minutes, as a large volume of clot may form in the lumen.
Insertion of a sheath is performed with a dilator in its lumen. If difficulty is encountered, a fluoroscopic check should be made to ensure the stiff dilator is following the wire into the vessel. The sheath should also be inspected to ensure that the thin leading edge has not become crimped by attempted insertions.
Vascular access sites
Femoral artery access
Related posts:
Stay updated, free articles. Join our Telegram channel

Full access? Get Clinical Tree


