Fig. 6.1
Normal soft tissue of the volar surface of the distal lateral forearm
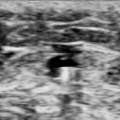
Cellulitis
Sonography of cellulitic skin will show a thickened hyperechoic appearance to the skin (Fig. 6.2). The underlying tissue has a cobblestoned manifestation, which is classic for cellulitis (Fig. 6.3). Deep to this the tissue takes on a reticular pattern. It is important that abscess formation is ruled out during this exam. The entire area should be systematically scanned to evaluate for an abscess cavity.
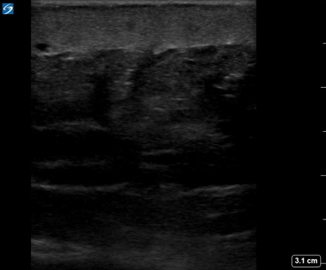
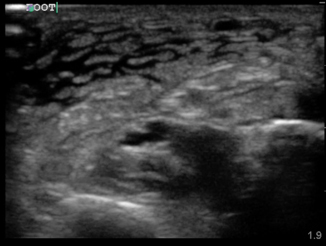
Fig. 6.2
Thickened hyperechoic skin in cellulitis
Fig. 6.3
Cobbelstoning of the distal medial surface of the lower extremity
Ultrasound may have some prognostic value in cellulitis. One small study showed that when a patient’s scan contains only skin thickening without cobblestoning, the patient had higher rates of treatment success and faster recovery times [7].
Abscess
A subcutaneous abscess is identified most commonly as a discrete spherical area of hypoechoic fluid with surrounding hyperechoic rim and posterior acoustic enhancement (Fig. 6.4). It should be noted that abscesses can take on varying levels of echogenicity. For example, an infected sebaceous cyst typically has a hyperechoic fluid collection and minimal posterior caustic enhancement. Care should be taken to note any septations within the cavity itself, identify any deeper abscesses that may exist, and document proximity to any neurovascular structure. Finally, color Doppler should be used to evaluate the cavity for any vascularity prior to incisional drainage (Fig. 6.5).
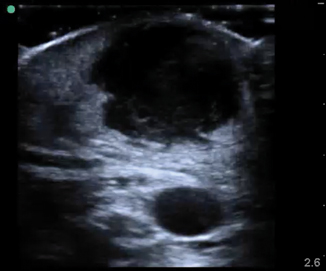
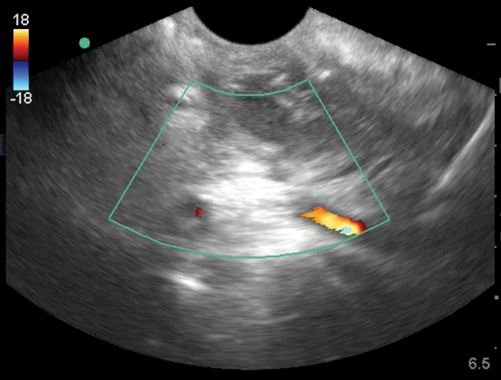
Fig. 6.4
Abscess cavity
Fig. 6.5
Peritonsilar abscess with carotid artery seen posterior to abscess cavity
The most common error a novice sonographer makes is to misidentify an enlarged lymph node for an abscess. Lymph nodes generally have a hypoechoic appearance with an internal hyperechoic mushroom-like structure that should demonstrate flow on color Doppler (Fig. 6.6). Another possible pitfall is a soft tissue mass such as a lipoma. Lipomas generally are hyperechoic spherical masses, but lack thickening of the skin or posterior acoustic enhancement(Fig. 6.7). Felons are difficult to image due to the small surface area of the distal digit, but with use of a water bath the area can be successfully visualized (Fig. 6.8).
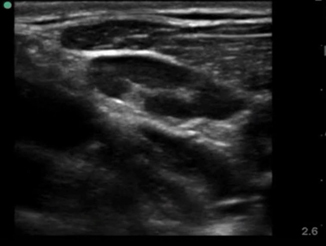
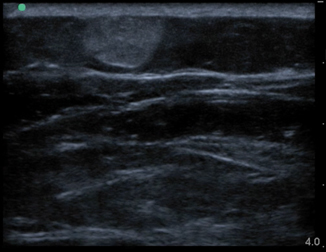

Fig. 6.6
Normal lymph node
Fig. 6.7
Lipoma
Fig. 6.8
Felon imaged in a water bath
Necrotizing fasciitis represents a true surgical soft tissue emergency, in which time to diagnosis is critical. Unfortunately, it is often a clinical diagnosis, as traditional imaging techniques have proven to be insensitive. Ultrasound can help in the early recognition and diagnosis of necrotizing fasciitis [8, 9]. Typically, the subcutaneous layer will show edema and cobblestoning as with cellulitis ; however, in necrotizing fasciitis there should be a pre-fascial fluid collection just above the deep fascial plane measuring greater then 4 mm (Fig. 6.9). Depending on the organism responsible for the infection subcutaneous air may be present. This is seen as an area of hyperechogenicity within the subcutaneous layer with “dirty” posterior shadowing and reverberation artifact (Fig. 6.10).
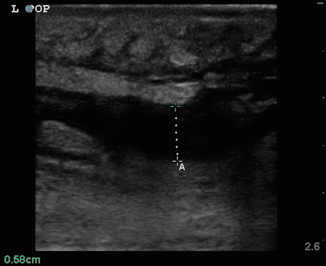
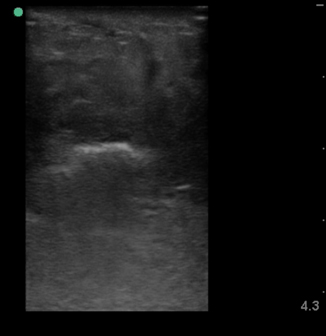
Fig. 6.9
Pre-fascial fluid collection seen in necrotizing fasciitis
Fig. 6.10
Hyperechoic subcutaneous air with dirty posterior shadow
Summary
Having knowledge of the anatomy you are evaluating is indispensable.
Use the high-frequency probe for superficial structures.
Use ultrasound as a tool to improve your clinical skills. Soft tissue infections remain a clinical diagnosis.
Foreign Body Recognition
Clinical Consideration
Wounds contaminated with foreign bodies represent a particular difficulty for the provider. Even with careful examination foreign bodies are routinely missed on exam [10, 11]. These missed foreign bodies represent a disproportional amount of medico-legal litigation and monetary awards [12, 13]. Missed foreign bodies can lead to poor wound healing, cellulitis , and systemic infection [14–16]. Typically, plain films are performed to evaluate for the possibility of foreign bodies. Levine et al.’s review of 490 cases showed x-rays missed 25 % of all glass objects and 93 % of wood [17]. These radiolucent materials have both a high miss rate and a high propensity for infection.
Ultrasound has shown to be an efficient modality at detecting these radiolucent foreign bodies with up to 95 % sensitivity [18–21]. Once the object has been identified ultrasound can be utilized to guide its removal. This procedural use of ultrasound improves time to detection and outcomes [20, 22, 23]. Given that ultrasound provides a low-cost, real-time, noninvasive way to evaluate and treat foreign bodies with higher sensitivity than other imaging modalities, it can be said that ultrasound has become the imaging modality of choice for the detection, localization, and removal of foreign bodies.
Anatomic Considerations
The provider should have an understanding of the underlying anatomy of the affected area. It is common that foreign bodies occur in the hands and feet, so it is prudent to have an understanding of these areas, in particular. It is advisable to evaluate the contralateral uninjured area if any question exists.
Technical Considerations
The exam should be performed with a high-frequency linear array transducer (5–15 MHz). It is important to image the suspected foreign body in both longitudinal and cross-sectional planes. Most foreign bodies are relatively superficial and may require some distance between the transducer and the object. This distance places the object of interest within the transducer;s optimal focal zone. The best way to gain distance between a superficial object and the transducer is the use of a water bath [24, 25]. If the location of the foreign body prohibits the use of water bath, a standoff pad or mound of coupling gel can be used to obtain the proper amount of distance from the object. Once the depth is optimized, the surrounding anatomical structures should be identified with particular attention paid to any neurovascular structures.
Foreign Body
Foreign bodies can have a variety of appearances on ultrasound depending on the physical characteristics of the object, the length of time the object has been retained, and any surrounding infection. In Fig. 6.11, a piece of wood is identified in the transverse view. Note the wood’s hyperechoic nature with small posterior caustic shadow and surrounding tissue edema and inflammation. In Fig. 6.12, the same wooden object is seen in the longitudinal plane. Here the posterior shadow is more prominent due to the larger surface area of the object being imaged. In Fig. 6.13, a large hyperechoic foreign body is identified with signs of surrounding cellulitis. This image represents a tightly rolled up piece of paper that an inmate had been stabbed with several days prior to presenting to the emergency department. These sonograms are in contrast to the metal foreign body seen in Fig. 6.14, with a reverberation artifact. Once the object has been identified, local anesthesia can be infiltrated into the area and a decision can be made as to whether to retrieve the object.
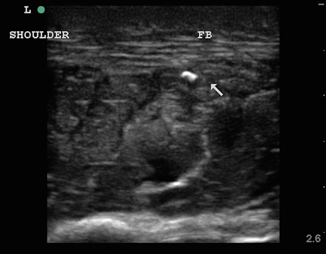
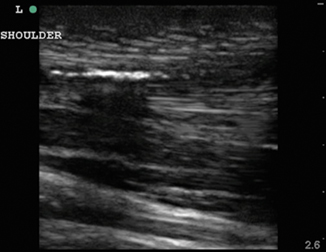
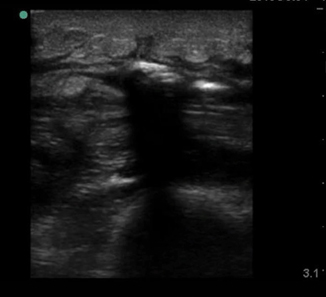
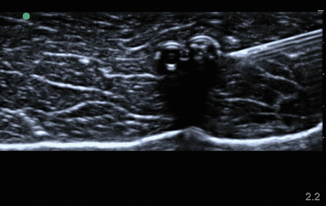
Fig. 6.11
Transverse image of wooden foreign body
Fig. 6.12
Longitudinal image of wooden foreign body
Fig. 6.13
Transverse image of paper foreign body with surrounding cellulitis
Fig. 6.14
Metal needle in longitudinal view
Musculoskeletal Injuries
Ultrasound has revolutionized the provider’s ability to diagnosis and treat musculoskeletal injuries. The advent of high-resolution ultrasound imaging and advanced soft tissue software has enabled ultrasounds to achieve resolution of musculoskeletal structures once only obtainable with magnetic resonance imaging. This has led to widespread use within the orthopedic, sports medicine, rheumatology communities [26, 27]. In this section we will only cover a few of the many uses of ultrasound to evaluate musculoskeletal injuries including tendon and muscle tears, dynamic evaluation of tendons, joint dislocations, and joint injection/aspiration.
Anatomical Considerations
Musculoskeletal structures tend to be superficial in nature, thus lending themselves to sonographic evaluation. Tendons are made of parallel collagen fibers forming a single homogenous bundle. Each of these bundles is surrounded by endotendon, which is in turn bound together by the epitendon. The entirety of the tendon is surrounded by a double-walled synovial sheath.
Prior to sonographic evaluation of the joint space, the provider should have a detailed understanding of articulations, overlying tendons, and surrounding neurovascular structures.
Technical Considerations
In general, a high-frequency linear array transducer (5–15 MHz) should be used to image these superficial musculotendinous structures. Certain areas like the Achilles tendon are superficial and not conducive to a water bath due to their location. It is suggested for these to use a standoff pad.
It is important to have an in-depth understanding of what normal musculoskeletal structures should look like on ultrasound. The skin should appear as a thin hyperechoic layer immediately at the top of the image. The subcutaneous layer will take on a reticular appearance due to the fat in this layer, and varies in thickness based on the patient’s body mass index. Deep to this layer we will find muscle, tendons , fascia, bones, and neurovascular structures in varying degrees. Muscle takes on a hypoechoic appearance with characteristic hyperechoic striations on longitudinal view (Fig. 6.15) and speckled appearance in transverse (Fig. 6.16). The thin fascial layers separating the muscles should follow the muscle and appear intensely hyperechoic on ultrasound. Tendons appear hyperechoic and linear in nature in long axis (Fig. 6.17) [28]. In short axis the tendon will appear to be of moderate echogenicity with hyperechoic bundles giving tendon its signature echo-texture (Fig. 6.18). Due to the intricate design of tendons , they display a particular imaging artifact called anisotropy. Anisotrophy occurs due to an increased angle of incidence; when the beam angle is anything less than perpendicular, the hyperechoic tendon appears hypoechoic due to beam refraction (Fig. 6.19). This is important because the majority of tendon injures will appear hypoechoic. To overcome this artifact, the sonographer should adjust the angle and watch for resolution of the hypoechoic defect. If the defect remains, it is indeed a tendon injury [29]. Bone will appear to have an intensely hyperechoic rim with posterior shadowing. Nerves will appear as hyperechoic grape-like clusters and typically are adjacent to anechoic blood vessels.
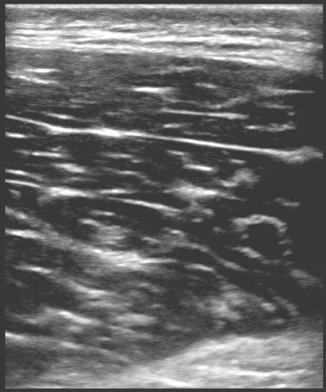

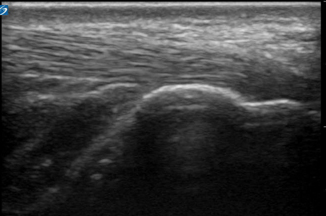
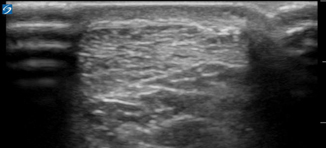
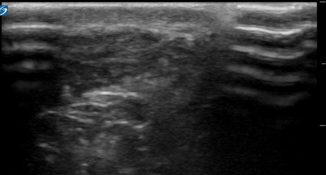
Fig. 6.15
Muscle in longitudinal view
Fig. 6.16
Muscle in transverse view
Fig. 6.17
Long axis of Achilles tendon insertion on calcaneus
Fig. 6.18
Short axis of Achilles tendon
Fig. 6.19
Short axis of Achilles tendon displaying anisotrophy
Tenosynovitis
Prior to intrinsic tendon damage occurring many overuse injuries produce synovitis, fluid, and hypoechoic edema in the surrounding structures. On sonography tenosynovitis is seen as tendon thickening, fluid within the synovial sheath, and pain on compression with the transducer. It is important to rule out any joint space effusion prior to making the diagnosis of tenosynovitis, because some joints communicate with the adjacent synovium. Thus, the diagnosis of tenosynovitis can only be made if the fluid collection is localized to the tendon sheath itself.
Tendinopathy
Tendinopathy can be caused by degenerative changes, impingement, or overuse. On ultrasound the tendon will begin to show signs of thickening, followed by a loss of fibrillar pattern, and eventually areas of hypoechogenicity will form within the tendon itself (Fig. 6.20). If these areas of hyoechoic tendon are found on exam, a full dynamic tendon exam should be performed to evaluate for any tendon disruption [30].
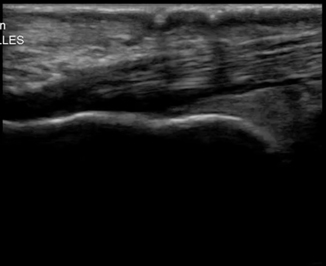
Fig. 6.20
Achilles tendon showing tendinopathy
Tendon Disruption
Joint Dislocation
Joint dislocations are commonly encountered in the emergency setting. Approximately 50 % of all large joint dislocations involve the glenohumeral joint [32]. Until recently, plain radiographs have been the imaging modality of choice for shoulder dislocations. Current studies have demonstrated the distinct advantages ultrasound has over plain radiographs for both anterior and posterior glenohumeral dislocations [33–35]. Ultrasound allows for rapid, real time evaluation of the joint space. Once the joint space has been evaluated and a dislocation has been identified, ultrasound can be used to inject the joint with anesthetic [36]. Once anesthetized, the joint can then be reduced under ultrasound guidance [37].
Anterior shoulder dislocations arise from an inferiorly directed force pushing the humeral head out of the inferior portion of the glenoid fossa. After the head has disarticulated the more powerful pectorals and biceps muscles pull the head anteriorly. Posterior and inferior dislocations are far more rare then anterior dislocations.
Imaging of the glenohumeral joint is best accomplished with a curvilinear transducer set to a high frequency setting (5 MHz). The sonographer should stand at the patients back with the patients arm adducted and supported. The transducer should be placed parallel and inferior to the scapular spine with the indicator to the patient’s left, at the level of the glenoid. The depth should be adjusted to ensure both the glenoid and the humeral head are visible. The humeral head will appear as a hyperechoic circular structure lateral to the glenoid. In the setting of an anterior shoulder dislocation the humeral head will be visible deep to the glenoid, and hyperechoic clot can be visible in the joint space (Fig. 6.22). Once the dislocation has been identified, anesthetic can be placed in the joint space under direct guidance. Once anesthetized and the joint is reduced, ultrasound can be used to confirm reduction. With the same technique, the transducer is placed posteriorly on the patient and if the reduction is successful the humeral head will be seen abutting the glenoid (Fig. 6.23). Slight internal-external rotation of the adducted arm will show the rotational articulation between the humeral head and glenoid fossa.
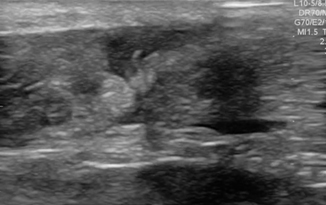
Fig. 6.21
Achilles tendon showing tendon ruptured
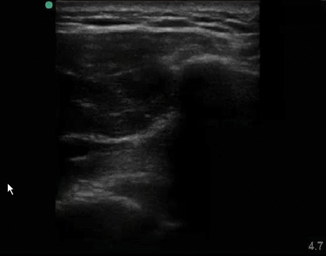
Fig. 6.22
Anterior glenohumeral dislocation
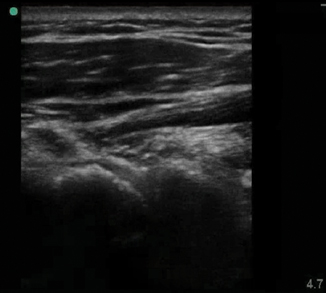
Fig. 6.23
Reduced glenohumeral dislocation
Joint Aspiration/Injection
Painful swollen joints are a commonly encountered condition, which sometimes requires synovial fluid analysis. While anatomical landmark-based techniques have been traditionally taught, radiology and other specialties have been performing ultrasound-guided arthrocentesis for decades [38, 39]. Ultrasound-guided joint aspirations and injections have proven superior to landmark-based techniques [40, 41]. Most joints are superficial, and can imaged with a standard high-frequency linear array transducer (Fig. 6.24); however, some deeper joints, like the adult shoulder and hip, are best imaged with the curvilinear transducer (5 MHz). A familiarity with the joint anatomy is recommended prior to beginning the exam. When performing the sonographic evaluation of the hip, the patient is placed supine with the leg slightly abducted and externally rotated. The transducer is placed in the longitudinal plane with the indicator pointed cranial. The femoral neck, head, and acetabulum are identified by the hyperechoic rim (Fig. 6.25). The anechoic cartilage on the femoral head is identified. At the angle of the femoral head and neck lies the joint space being evaluated. An effusion is generally defined as a 2-mm increase, when compared to the asymptomatic hip, in the distance from the cortical echo to the joint capsule or as a convex bulging joint capsule with a fluid stripe greater then 5 mm (Fig. 6.26). If an effusion is noted, a needle can be placed in plane with the transducer under sterile conditions. The sonographer should note the position of the femoral vessels prior to aspiration. This can be performed by turning the transducer 90° and insuring the vessels lay well out of the path of the needle [41, 42].
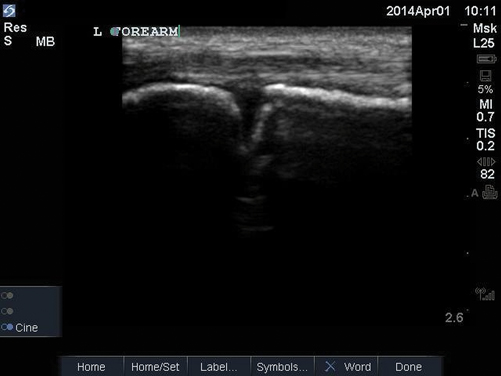
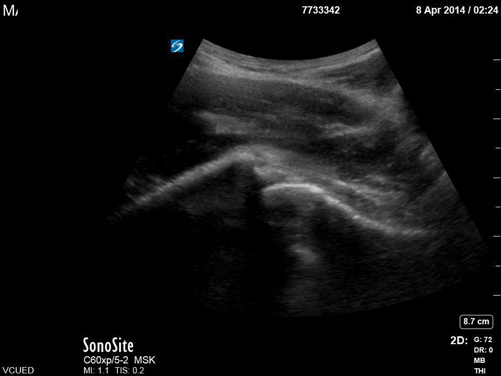
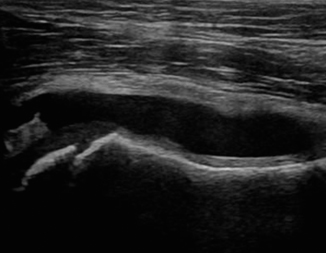
Fig. 6.24
Normal radiohumeral joint
Fig. 6.25
Normal longitudinal hip sonogram
Fig. 6.26
Hip effusion in child
Summary
Use the high-frequency probe.
Gain expertise in performing ultrasound before intervening.
The angle of the probe might change your visualization and your perception of the structures visualized. Since ultrasound is a dynamic examination, you will be able to overcome this obstacle by scanning the area in different angles before intervening.
Maintain sterile technique when performing any ultrasound-guided procedure.
Abdominal Wall Hernia
Clinical Considerations
Abdominal wall hernias can occur in multiple different locations. Abdominal wall sonography is a fast, inexpensive, and accurate way to assess for abdominal wall hernias , making it the first-line tool for investigating the for the presence of hernias [43]. Approximately 4 % of all abdominal surgeries have a delayed complication of hernia and are therefore routinely encountered in the emergency setting [44]. Typically, hernias are diagnosed from the patient’s history and physical; however, sometimes the patient’s history is inconclusive or the physical exam is limited by external factors like obesity or hernia location. Spigelian hernia occurs through a slit-like defect in the anterior abdominal wall adjacent to the semilunar line, a curved tendinous line placed on either side of the rectus abdominis. Because a spigelian hernias are typically covered by the external oblique aponeurosis, it is difficult to appreciate on physical exam [45].
Anatomical Considerations
General knowledge of the surface anatomy of the abdominal wall and the expected location of hernias is essential to provide an anatomical framework within which to look for pathology. The abdominal wall is composed of skin, superficial fascia, fat, muscles, transversalis fascia, and the parietal peritoneum. The panniculus adiposus or Camper’s fascia is made up of fat deposits in the superficial fascial layer. Scarpa’s fascia is deep to this, and contains more fibrous tissue. The muscular layer gives strength to the abdominal wall with its four paired muscles and their respective aponeuroses. The lateral abdominal wall contains the oblique muscles: the external, internal, and transverse abdominal muscles. The aponeurosis of these three muscles joins together to surround the more midline rectus abdomens muscles, then fuse medially to form the line alba, a single central fascial layer [46].
Technical Consideration
Abdominal wall is best evaluated with linear array transducer (5–15 MHz) in the lean patient and a curvilinear transducer (2–5 MHz) in the patients of larger body habitus. The patient should be scanned in the supine position to start and if no pathology is appreciated, intermittent valsalva maneuver or standing position should be utilized to better elucidate an pathology. Typically, the abdominal wall is broken into three main regions: the midline region, the paramedian region, and the inguinal region. The midline region contains the linea alba medially, which appears as a hyperechoic structure bordered on each side by lateral rectus muscles. Beneath the rectus muscles lays the thin hyperechoic peritoneal membrane. The bowel adjacent to the peritoneum can be seen peristalsing with pockets of echoic fluid and hyperechoic commit tails (Fig. 6.27).
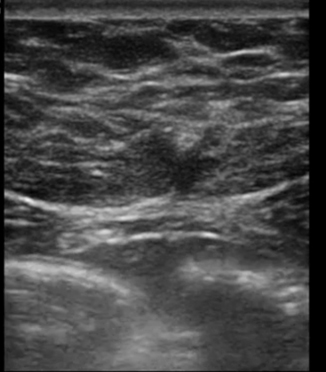
Fig. 6.27
Transverse image through the linea alba
Related posts:
 Other Important Issues: Training Challenges, Certification, Credentialing and Billing and Coding for Services
 Clinical Applications of Ultrasound Skills
 Basic Abdominal Ultrasound in the ICU
 Vascular Ultrasound in the Critically Ill
 Cardiac Ultrasound in the Intensive Care Unit: Point-of-Care Transthoracic and Transesophageal Echocardiography
 Basics of Ultrasound
Stay updated, free articles. Join our Telegram channel

Full access? Get Clinical Tree


