Key Points
- •
A thorough understanding of joint anatomy is key to efficient and accurate ultrasound imaging. Bone landmarks are critical to guide transducer placement and identify soft tissue structures by musculoskeletal ultrasound.
- •
Diagnostically, musculoskeletal ultrasound use has progressed beyond demonstration of fluid collections in or around joints and has shown benefit in identification of subclinical joint inflammation and erosion, as well as in prediction of joint damage progression.
- •
Therapeutically, substantial evidence supports the use of ultrasound for guidance of joint and soft tissue aspiration and injection.
Background
Musculoskeletal ultrasound is becoming increasingly prevalent at the point of care in hospital and clinic settings to aid in diagnosis and guide needle insertion. Advantages of musculoskeletal ultrasound as a diagnostic tool include immediate availability of high-resolution images, avoidance of ionizing radiation exposure, and minimization of patient discomfort. Disadvantages include a relatively limited field of view compared to other imaging modalities, lack of visualization of deep structures due to shadowing from bones, and dependence of diagnostic accuracy on operator skills. The American Institute of Ultrasound in Medicine (AIUM) in collaboration with the American College of Radiology has developed guidelines for the use of musculoskeletal ultrasound, which includes pathologies of joints, tendons, ligaments, soft tissues, and nerves. The American College of Rheumatology has published an evidence-based review of ultrasound to evaluate musculoskeletal conditions or guide interventions, such as arthrocentesis, intra-articular joint injections, aspiration of cysts or abscesses, and synovial biopsies. This chapter reviews normal ultrasound appearance of large joints, common joint pathologies, and ultrasound-guided joint injection techniques.
Special Considerations
Anisotropy
Anisotropy is one of the most common imaging artifacts specific to musculoskeletal ultrasound and is defined as exhibition of properties with different values when measured in different directions. Anisotropy is encountered when the ultrasound beam is not perpendicular to the plane of the structure being imaged, resulting in artifactual hypoechogenicity of the structure. Reflective fibrous structures of tendons and ligaments exhibit more anisotropy than nerves, muscles, and other tissues. Thus, tendons are hyperechoic when imaged at a 90-degree angle but may appear hypoechoic or even anechoic when imaged at an oblique angle, leading to misinterpretation of a tendon for a fluid collection. Experienced providers can use anisotropy to help differentiate normal tendons from other tissues by tilting the transducer and watching the tendon change echogenicity more than the surrounding structures. Due to anisotropy and other ultrasound artifacts, it is imperative to evaluate all potential abnormalities in both longitudinal and transverse planes (orthogonal planes) to reduce the risk of mistaking an artifact for true pathology.
Doppler Settings
The Doppler effect is defined as a shift in frequency of sound waves resulting from motion of the source, receiver, or reflector. Doppler ultrasound is increasingly being used to identify increased tissue perfusion due to inflammation. In musculoskeletal ultrasound, Doppler ultrasound can be used to detect synovial inflammation. Important Doppler parameters in musculoskeletal ultrasound include pulse repetition frequency, wall filter, and gain. The pulse repetition frequency (PRF) represents the number of pulses emitted by the transducer per unit time. Lowering the PRF allows more time for the transducer to listen for returning pulses and increases the sensitivity for low flow states, such as synovial tissue. The ideal PRF range for musculoskeletal ultrasound is between 0.5 and 1 kHz, much lower than the PRF for vascular Doppler studies. A wall filter is used to minimize effects of arterial wall pulsation on Doppler signal, and as blood flows through small synovial vessels with essentially no pulsatile wall motion, the wall filter should be minimized to optimize Doppler sensitivity. However, if the wall filter is set too low, “flash” artifact is seen in the Doppler box from minimal transducer motion. obscuring the true Doppler signal. Gain regulates amplification of Doppler signal returning from tissues. Gain setting should be adjusted by first increasing the gain until artifactual Doppler signal is seen, and then steadily decreasing the setting until artifactual Doppler signal disappears.
Image Acquisition
The ultrasound machine should be positioned in front of the provider to minimize head turning. The body part being scanned should be between the provider and ultrasound screen. Most musculoskeletal ultrasound exams are performed with a linear array transducer, except for hip exams, which require the wider field of view and deeper penetration of a curvilinear transducer. In general, the highest frequency that allows visualization of the bone surface should be used. A frequency of 12–18 MHz is typically used for digits and wrists, 10–12 MHz for ankles, elbows and knees, and 8–12 MHz for shoulders and hips.
Shoulder
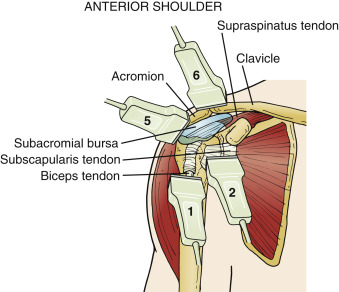
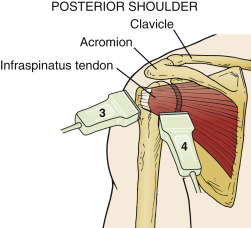
Nine standard views of the shoulder can help identify the most commonly injured tendons of the rotator cuff tendons, biceps tendon, acromioclavicular joint, and glenohumeral joint ( Figure 37.1 ). The provider stands either behind or in front of the patient while the patient is in a seated position.
1 Biceps View (Transverse)
Technique : Patient should be sitting with the hand palm up on the thigh directly in front of shoulder. The transducer is horizontal with the greater tuberosity laterally and lesser tuberosity medially. Scan down to pectoralis major insertion to avoid missing a tendon tear. Externally rotate the arm to evaluate for biceps subluxation.
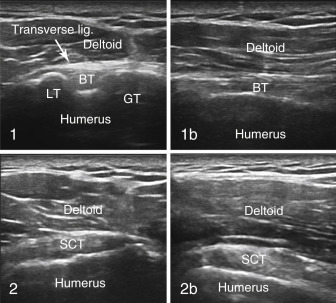
Findings : In a transverse plane, the biceps tendon should be seen between the humeral tuberosities. The transducer angle should be adjusted to maximize echogenicity to identify any tendonopathy or tendon sheath effusion. Sweep the transducer distally to the level of the pectoralis major insertion to avoid missing a biceps tendon tear.
1b Biceps View (Longitudinal)
Technique : Patient should be sitting with the hand palm up on the thigh directly in front of the shoulder. Place the transducer vertically between the greater and lesser tuberosities. Push in with the distal transducer edge to avoid tendon anisotropy.
Findings : In a longitudinal plane, providers have to press firmly with the distal transducer edge to position the transducer parallel to the tendon fibers to avoid anisotropy. In this view, do not mistake the peri-biceps tendon fat for the tendon itself—the fat does not have a fibrillar pattern like the tendon. Increased Doppler signal of the biceps sheath suggests inflammatory tenosynovitis, but a recurrent branch of the anterior circumflex humeral artery runs lateral to the tendon sheath and should not be mistaken for hyperemia.
2 Subscapularis View (Longitudinal)
Technique : Patient should be sitting, hand palm up, shoulder maximally externally rotated. Place the transducer horizontally over the lesser tuberosity.
Findings : Focus on the tendon attachment site. The subscapularis inserts on the lesser tuberosity and the infraspinatus inserts on the greater tuberosity. External rotation of the arm with slight translation of the transducer medially brings the subscapularis into view, while internal rotation of the arm with lateral translation of the transducer brings the infraspinatus into view.
2b Subscapularis View (Transverse)
Technique : Patient should be sitting, hand palm up, shoulder maximally externally rotated. Place the transducer vertically over the lesser tuberosity.
Findings : Focus on the tendon attachment site. The subscapularis inserts on the lesser tuberosity. The subscapularis tendon has a multipennate appearance—do not mistake this appearance for tendon injury.
3 Infraspinatus View (Longitudinal)
Technique : Patient should be sitting with arm internally rotated across body. Transducer is horizontal over the lateral shoulder including the posterior edge of the greater tuberosity.
Findings : Focus on the tendon attachment site. The infraspinatus tendon should be followed posteriorly until the glenohumeral joint is reached with the transducer in a longitudinal plane relative to the tendon. The depth setting should be increased and frequency decreased until the bone contour is well visualized.
4 Glenohumeral View (Longitudinal)
Technique : Patient should be sitting with the arm externally rotated. The transducer is horizontal, posterior, parallel to the spine of the scapula, and over the humeral head, glenoid, and labrum. The glenohumeral joint is reached with the transducer horizontally by following the infraspinatus tendon posteriorly.
Findings : The most sensitive region for showing shoulder joint effusion in a sitting patient is the caudal portion of the joint. Complete external rotation of the arm while viewing the posterior aspect of the glenohumeral joint maximizes sensitivity for detection of joint effusion, with prior studies showing 100% sensitivity (30/30) for 8 mL of fluid in this position compared to 17% (5/30) with the arm in neutral position. The labrum, synovial capsule, and bone contours of the glenoid and humeral head should all be visualized.
5 Supraspinatus View (Longitudinal)
Technique : Patient’s arm is put in a “Crass” position (arm is maximally internally rotated with the dorsal surface of the hand on the mid-back), or “modified Crass” position (hand is in the back pocket with the elbow pointed posteriorly). The transducer is vertical over the tip of the greater tuberosity for the Crass position with the transducer marker pointing proximally at the acromion, or pointing at the ear (oblique) for the modified Crass position.
Findings : The supraspinatus tendon can be visualized in the Crass position or modified Crass position. Both of these positions help bring the supraspinatus out from under the acromion. Crass or modified Crass position longitudinal views of the supraspinatus tendon should include visualization of the bone contour of the round, articular portion of the humeral head transitioning into the flat “footprint” portion of the greater tuberosity. As the supraspinatus fibers transition into infraspinatus fibers laterally, the bone transition becomes flat. The supraspinatus fibers curve at their insertion onto the greater tuberosity creating anisotropy—the most common cause of a false-positive diagnosis of tendon tear. Press in with the distal tip of the transducer to maximally brighten the distal tendon fibers. Visualization of the biceps tendon medial to the supraspinatus in a modified Crass transverse view ensures visualization of the most medial fibers of the supraspinatus, the fibers at greatest risk for injury. A potential pitfall is mistaking the shadow cast by the deltoid septum for a tear of the supraspinatus tendon in a transverse view, but orthogonal views should clarify this issue ( Figure 37.2 ). In addition, the hypoechoic deep muscle fibers of the deltoid can be mistaken for the subacromial bursa.

5b Supraspinatus View (Transverse)
Technique : Patient’s arm is put in a Crass or modified Crass (see #5 above). The transducer is placed horizontally for a Crass position or obliquely pointing at the xiphoid process for a modified Crass position.
Findings : The supraspinatus tendon should have similar thickness medially and laterally. If the tendon gradually thins to one side, then the transducer is likely positioned oblique to the tendon.
6 Acromioclavicular Joint View
Technique : Position the patient sitting with the arm at the side. The transducer is horizontal and moved to the top of the shoulder across the clavicle and acromion to visualize the acromioclavicular joint.
Findings : Asymptomatic acromioclavicular joint capsule distention and osteophytes are common in older age groups.
Elbow
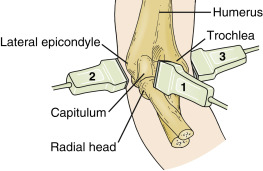
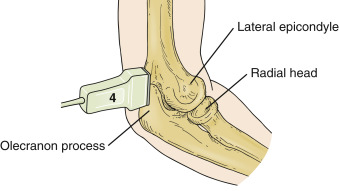
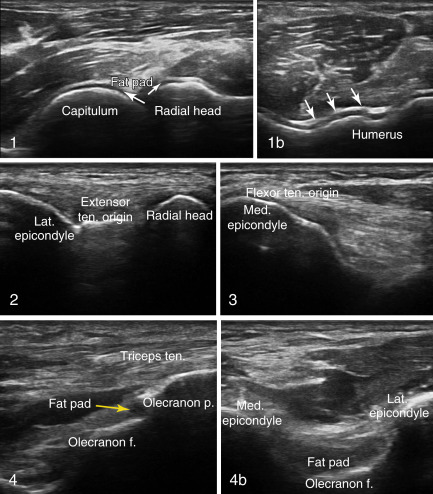
Five standard views of the elbow are obtained to identify common flexor and extensor tendon origins, joint capsule, synovium, humerus, and ulna. The provider should sit in front of the patient. Arm extension is needed for anterior views while 45–90 degrees of flexion is needed for other views. Transducer positioning is illustrated in Figure 37.3 .
1 Anterior View (Longitudinal)
Technique : Patient is sitting with the elbow extended. Place the transducer anterior, vertically over the capitulum (distal lateral humerus), and sweep medially to a position over the trochlea. View the proximal joint capsule as well as the “seagull” over the joint cleft.
Findings : In a longitudinal view, the anterior elbow joint capsule will have a “seagull” appearance between the capitulum of the humerus and radial head (tissue in joint cleft as the seagull “body” and capsule spread over the bone to either side as the “wings”). The “seagull” appearance disappears with a joint effusion because the capsule is pushed out of the joint cleft. The medial, humeroulnar portion of the joint is marked by the sharp, triangular coronoid process of the ulna, while the lateral, humeroradial portion of the joint has a square radial head.
1b Anterior View (Transverse)
Technique : Patient is sitting with the elbow extended. Place the transducer anterior, horizontally across the capitulum and trochlea of the distal humerus. Start over the hyaline cartilage–covered distal humerus and sweep over the joint recess.
Findings : In a transverse plane, the hyaline coverage of the distal humerus has a “w” appearance. The transducer should be swept proximally from this point to the radial and coronoid fossa to avoid missing an effusion.
2 Lateral View (Longitudinal)
Technique : The elbow is flexed 90 degrees and internally rotated. The transducer is placed on the lateral epicondyle along the longitudinal plane of the common extensor tendons. Image the extensor tendon fibers rather than muscle.
Findings : The capsule of the joint appears just deep to the extensor tendon origin.
3 Medial View (Longitudinal)
Technique : The elbow is extended to 45 degrees and externally rotated to avoid awkward patient positioning. The transducer is placed longitudinally over the medial epicondyle.
Findings : The flexor tendon origin is seen with a relatively short tendon band. Medial collateral ligament tears can be visualized in this view.
4 Posterior View (Longitudinal)
Technique : Posterior views of the elbow are obtained with the elbow flexed at 90 degrees, internally rotated, and resting on the examining table with the olecranon just off the edge of the table. The transducer is placed posterior, vertically from the olecranon across the olecranon fossa.
Findings : The posterior olecranon fossa is the most sensitive space to find an elbow joint effusion with ultrasound. Erosions are commonly seen just proximal to the triceps insertion on the olecranon process. Keep in mind that the olecranon bursa is easily compressed by transducer pressure, and floating the transducer on a layer of gel will help avoid missing an effusion.
4b Posterior View (Transverse)
Technique : Patient position—see #4 above. Place the transducer posterior, horizontally over the olecranon fossa. Sweep the transducer through the olecranon fossa.
Findings : The posterior olecranon fossa is the most sensitive space to find an elbow joint effusion with ultrasound.
Wrist
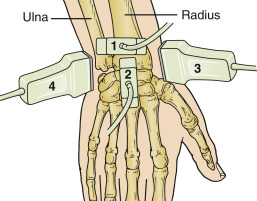
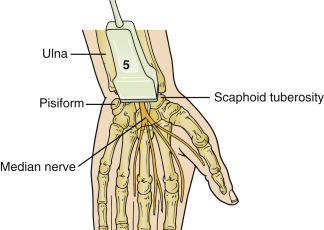
Eight standard views of the wrist exist to visualize the flexor and extensor tendons, joint compartments, and median nerve. The patient can sit in front of the provider with the palm pronated or supinated depending on the desired view. Excessive transducer pressure should not be applied to avoid missing fluid in the dorsal, medial, and lateral flexor tendon sheaths. Transducer positioning is illustrated in Figure 37.4 .
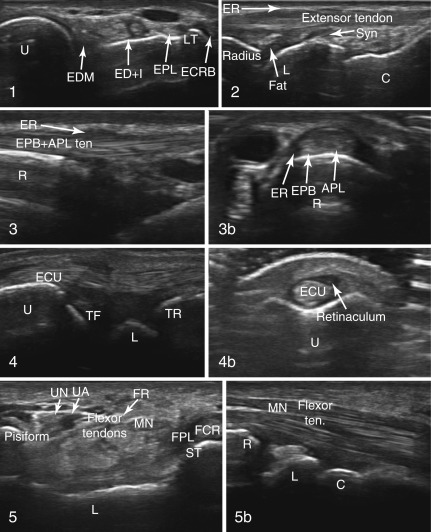
1 Dorsal View (Transverse)
Technique : Position the hand palm down in a neutral position. Place the transducer with one edge over Lister’s tubercle and the other edge over the ulna. Sweep from Lister’s tubercle, through the scapholunate ligament, to the capitate. This view allows assessment of the dorsal tendons and scapholunate ligament.
Findings : When scanning the dorsal wrist, maintain a neutral position because extension can lead to mistaking normal synovium for synovial hypertrophy. The normal extensor retinaculum of the dorsal wrist can be hypoechoic due to anisotropy and should not be mistaken for tenosynovitis. Providers should remember that normal Doppler signal in the distal dorsal wrist from the carpal arch should not be mistaken for synovitis.
2 Dorsal View (Longitudinal)
Technique : Patient position—same as #1 above. Transducer is placed with one edge of the transducer just ulnar to Lister’s tubercle and pointing the other edge to the third metacarpal. Sweep the transducer to both sides from this orientation.
Findings : Evaluate the joint capsule. The wrist should be in neutral position because synovial tissue will look more prominent if the wrist is extended. The lunate receives blood through a dorsal artery from the dorsal radiocarpal arch ; this vessel and its entry into the bone should be confirmed with color flow Doppler signal and should not be mistaken for an erosion. Also, ulnar impaction syndrome can cause cystic changes to the ulnar aspect of the proximal lunate, which could be mistaken for an erosion.
3 and 3b Radial Views (Longitudinal and Transverse)
Technique : Position the hand with the wrist rotated with the radial side up. Place the transducer longitudinally over the distal radius, then rotate the transducer 90 degrees to obtain a transverse view.
Findings : Evaluate the first compartment tendons (extensor pollicis brevis and abductor pollicis longus). Radial views are most useful for evaluation of de Quervain’s tendonitis (see “ Pathologic Findings ” below).
4 and 4b Ulnar Views (Longitudinal and Transverse)
Technique : Position the patient with the elbow flexed, and the hand and the wrist in a neutral position, slightly radially angled. Place the transducer longitudinally over the distal ulna, extensor carpi ulnaris, and triangular fibrocartilage. Rotate the transducer 90 degrees and place over the extensor carpi ulnaris (ECU) tendon in the ulnar sulcus to obtain transverse views.
Findings : Ulnar views are aimed at pathology of the extensor carpi ulnaris tendon, tenosynovium, and ulnar styloid, as well as the triangular fibrocartilage complex. In a longitudinal view, evaluate the triangular fibrocartilage complex for chondrocalcinosis. The extensor carpi ulnaris tendon can be evaluated for tenosynovitis, and ulnar erosion can be detected in transverse views
5 Volar View (Transverse)
Technique : Position the hand with the palm up, slightly palmar flexed. Place the transducer horizontally from the scaphoid tuberosity to the pisiform. Tilt the transducer to view the median nerve.
Findings : Volar views are dedicated to evaluation of the median nerve, flexor tendons, and volar aspects of the wrist joint. The pisiform and scaphoid tuberosity are used as landmarks to identify the carpal tunnel. The median nerve is measured with the transducer perpendicular to the nerve axis, otherwise the cross-sectional nerve area may be artificially increased. The transducer should be angled to maximize brightness of the flexor tendons and epineurial lining of the median nerve to differentiate median nerve from flexor tendons.
5b Volar View (Longitudinal)
Technique : Position the hand with the palm up, slightly palmar flexed. Place the transducer longitudinally along the median nerve. Visualize the median nerve superficially and radius, lunate, and capitate deep.
Findings : The flexor tendons and median nerve are seen superficially, and wrist bones are seen deeper. The wrist joint can be evaluated for volar synovitis.
Hip
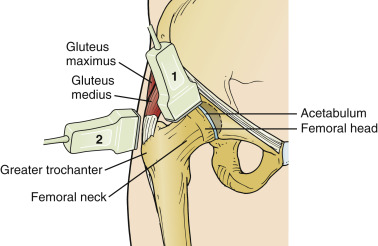
Three standard views of the hip are obtained to visualize the hip joint capsule, iliopsoas tendons, gluteal tendons, and trochanteric burs region. Deeper penetration is required to visualize the hip joint, and either a curvilinear transducer or virtual curvilinear setting on a linear transducer is used. Transducer positioning is illustrated in Figure 37.5 .
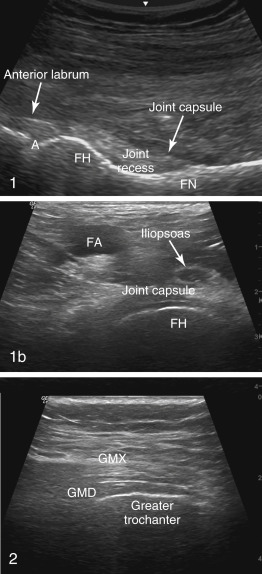
1 and 1b Anterior Views (Longitudinal and Transverse)
Technique : Position the patient supine with the leg externally rotated by 15 degrees. The transducer is placed medial to the greater trochanter and below the inguinal ligament along a line between the anterior superior iliac spine and the superior patellar pole. Longitudinal views are obtained with the transducer vertical, and transverse views are obtained with the transducer horizontal. For an anterior longitudinal view, press in (“heel-toe”) with the distal edge of the transducer to position it as parallel as possible to the portion of the joint capsule overlying the femoral head–neck junction.
Findings : Visualize the femoral head and neck, and joint recess and capsule. The joint capsule has to be clearly visualized to be able to detect a hip effusion deep to the capsule or an iliopsoas bursal effusion superficial to the capsule. Effusions in the hip joint should be suspected when the capsule is distended more than 7 mm, or 1 mm more than the asymptomatic side. This is the best hip view for joint aspiration. Additionally, when the capsule is curved away from the concave femoral head–neck junction, an effusion or synovitis should be suspected. Early avascular necrosis presents with hip pain and a noninflammatory hip effusion visible on ultrasound 65% of the time, but without visible changes to the bone contour. A herniation pit from femoroacetabular impingement could be mistaken for an erosion. Iliopsoas bursitis appears as an anechoic collection superficial to the joint capsule.
2 Lateral View (Longitudinal)
Technique : Lateral views are obtained with the patient in a lateral decubitus position with the hip partially flexed. Place the transducer longitudinally over the greater trochanter, along the plane of the gluteus medius. The “peak” of the greater trochanter separates the gluteus minimus anteriorly from the gluteus medius posteriorly, which is best seen in a transverse plane. By positioning the transducer longitudinal to the fibers of the gluteus medius over the greater trochanter, providers can visualize the fascial plane between the gluteus medius and gluteus maximus tendons and muscles.
Findings : This is the best view to evaluate for trochanteric bursitis or gluteus medius tendonosis. The greater trochanteric bursa can be visualized only when it is distended. Sliding the transducer slightly proximally and visualizing the region between the gluteus medius and greater trochanter allows visualization of the subgluteal bursa when it is distended.
Knee
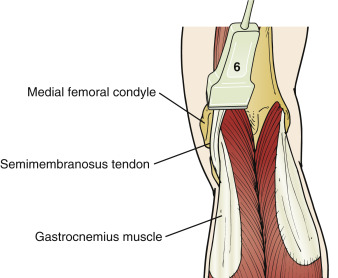
Nine standard views exist to examine the knee and identify the knee joint capsule, femoral cartilage, quadriceps and infrapatellar tendons, medial and lateral menisci and collateral ligaments, and popliteal fossa. The patient should lie supine with the knee extended or flexed. Positioning of the transducer is illustrated in Figure 37.6 .
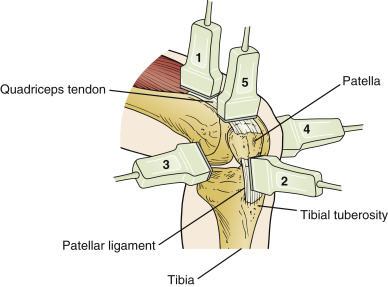
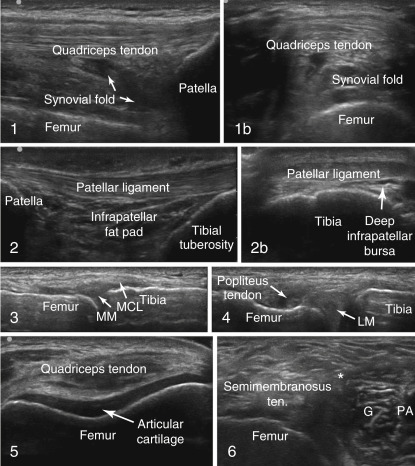
1 and 1b Suprapatellar Views (Longitudinal and Transverse)
Technique : The patient should be supine with the knee extended or flexed to 30 degrees. Flexion of the knee to 30 degrees or extension of the knee with quadriceps contraction maximizes the fluid seen in the suprapatellar recess. The transducer is positioned midline, longitudinally over the quadriceps tendon to its insertion on the patella, and then turned 90 degrees to obtain transverse views.
Findings : Suprapatellar views permit evaluation of the distal quadriceps tendon and suprapatellar recess for effusion. The view of maximal effusion will be lateral of midline, where joint aspiration can be performed. Care must be taken to avoid excessive compression when evaluating for an effusion, especially for prepatellar bursitis.
2 and 2b Infrapatellar Views (Longitudinal and Transverse)
Technique : Position the patient supine with the knee extended. Place the transducer vertically over the origin of infrapatellar ligament to its insertion of the tibial tuberosity for longitudinal views. Place the transducer horizontally over the infrapatellar ligament and proximal tibia for transverse views.
Findings : The infrapatellar tendon/ligament will be lax and wavy/partially anisotropic when viewed with the knee in extension. Thus, flexion of the knee to 30 degrees is helpful to pull the tendon taut and avoid anisotropic effect. These views can detect enthesitis of the infrapatellar ligament (origin and insertion), as well as infrapatellar bursitis.
3 and 4 Medial and Lateral Views (Longitudinal)
Technique : Position the patient supine with the knee extended or flexed to 30 degrees. The transducer should be placed vertically or longitudinally over the medial and lateral collateral ligaments.
Findings : From medial and lateral views, the meniscus can be very dark due to anisotropy and must be made maximally bright with transducer “rocking” when evaluating for a radial tear. Keep in mind that deep tears of the meniscus that cause mechanical symptoms cannot be viewed with ultrasound.
5 Suprapatellar Maximum Flexion View (Transverse)
Technique : The patient is supine with the knee maximally flexed. Place the transducer horizontally in a transverse plane over the distal femur and quadriceps tendon.
Findings : This view allows evaluation for a monosodium urate double contour, chondrocalcinosis, and cartilage loss.
6 Posterior View (Transverse)
Technique : Position the patient prone with the knee extended. Place the transducer horizontally to image the posterior knee in a transverse plane.
Findings : From a posterior view, identify the landmarks of the medial femoral condyle, the medial gastrocnemius muscle, and the semimembranosus tendon, as a Baker’s cyst will emerge between these structures. Finding all three structures will prevent confusing an anisotropic semimembranosus tendon for a Baker’s cyst. If a Baker’s cyst is detected on a posterior transverse view, then a posterior longitudinal view is needed; a rounded cyst in a longitudinal view suggests it is intact, whereas a pointed distal end suggests that it has ruptured.
Ankle
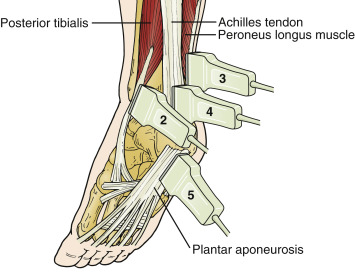
Eleven standard views exist to examine the ankle to identify the joint capsule, the extensor, medial, lateral, and posterior tendons, the subtalar joint, and the retrocalcaneal bursa. The patient should be lying supine with the knee flexed and the foot flat against the examining table for the anterior views. All of the remaining views can be performed with the patient lying supine with the foot hanging off the edge of the examining table. Positioning of the transducer is illustrated in Figure 37.7 .
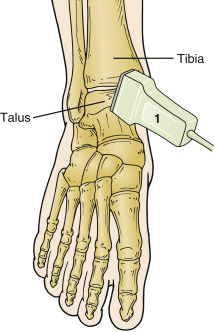
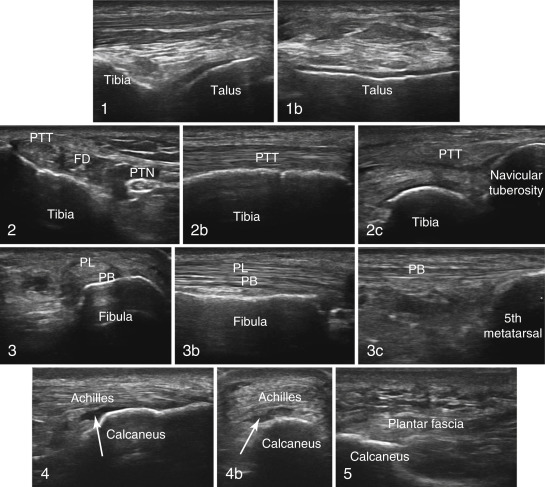
1 and 1b Anterior Views (Longitudinal and Transverse)
Technique : Anterior views are obtained with the patient supine or sitting with plantar surface flat on the examining surface. Place the transducer anteromedially over the tibiotalar joint, vertically and then horizontally, for longitudinal and transverse views, respectively. The triangular anterior joint space is seen between the tibia, talus, and anterior tibial tendon. Start over the anterior distal tibia and sweep distally through the talus.
Findings : The anterior views focus on the capsular space between the tibia and talus, where the usual intracapsular fat is displaced by effusion. The talar dome should be flat with an even, anechoic cartilage lining. The extensor tendons (tibialis anterior, extensor hallucis longus, and extensor digitorum, from medial to lateral) do not normally have any surrounding effusion. Sliding the transducer laterally and slightly obliquely allows imaging of the sinus tarsi.
2, 2b, and 2c Perimalleolar and Inframalleolar Medial Views (Longitudinal and Transverse)
Technique : Position the patient supine or prone with the medial malleolus upwards. For perimalleolar medial views, place the transducer proximal and posterior to medial malleolus to obtain transverse and longitudinal views. For an inframalleolar medial view, place the transducer from the navicular tuberosity to the tip of medial malleolus.
Findings : The medial ankle should be imaged with the transducer placed across the medial malleolus pointing straight back to the Achilles tendon; this position allow a pure transverse view of the medial tendons. For a longitudinal view, the transducer is placed along the axis of the posterior tibial tendon and then swept back until the flexor hallucis tendon is visualized. From the medial malleolus to the Achilles tendon, the medial tendons can be remembered with the mnemonic T om ( T ibialis posterior), D ick (flexor D igitorum) A nd V ery N ervous ( A rtery, V ein, N erve) H arry (flexor H allucis). The medial inframalleolar view is challenging due to the fan-shaped insertion of the posterior tibial tendon on the navicular and plantar surfaces of the first cuneiform. Tilting the transducer from bottom to top at the insertion on the navicular allows adequate visualization in most cases to detect enthesitis. Accessory ossicles, the os tibiale externum, are frequently found within the distal fibers of the posterior tibial tendon. Normally, up to 4 mm of fluid can be seen in the posterior tibial tendon sheath just distal to the medial malleolus. The flexor hallucis longus tendon sheath communicates with the ankle or subtalar joint in half of all cases, so fluid within this sheath may be tracking from the joint.
3, 3b, and 3c Perimalleolar and Inframalleolar Lateral Views (Longitudinal and Transverse)
Technique : Position the patient supine or prone with the lateral malleolus upwards. For perimalleolar lateral views, place the transducer proximal and posterior to lateral malleolus to obtain transverse and longitudinal views. For an inframalleolar lateral view, place the transducer from the tuberosity of the fifth metatarsal to tip of the lateral malleolus.
Findings : Scanning of the lateral ankle is performed in the same manner as the medial side to visualize the lateral tendons. Both the lateral tendons and fibula can be seen in one view if the transducer is positioned posterior to anterior. The peroneus brevis is adjacent to the fibula bone and medial to the peroneus longus. The os perineum (small accessory bone) is found in the peroneus longus tendon as it dives under the lateral edge of the foot and should not be mistaken for pathology. Normally, up to 3 mm of fluid can be seen in the peroneal tendon sheath just distal to the lateral malleolus. The inframalleolar lateral view shows the enthesis of the peroneus brevis on the tuberosity of the fifth metatarsal bone.
4 and 4b Posterior Views (Longitudinal and Transverse)
Technique : Position the patient prone or kneeling with the foot extending over the edge of an examining surface. Place the transducer parallel to the Achilles tendon at its insertion on the proximal calcaneus for a longitudinal view, then rotate the transducer 90 degrees over the insertion of Achilles tendon on the calcaneus for a transverse view.
Findings : Do not mistake normal anisotropy of the Achilles at its distal most insertion for tendon tear. On gray scale, you may need to apply subtle tension to the Achilles tendon to avoid anisotropy, but with Doppler scanning, tendon tension must be relaxed to avoid blanching of the small vessels. A copious amount of gel needs to be used to adequately visualize the borders of the Achilles tendon in the posterior transverse view. The Achilles has a paratenon superficially but no synovial sheath. Thus, there cannot be tenosynovitis of the Achilles. The retrocaneal bursa usually has a few drops of fluid in it, but normal fluid does not usually extend past the edge of the calcaneus. Kager’s fat pad should not be mistaken for a retrocalcaneal bursa effusion due to its hypoechogenicity.
5 Plantar View (Longitudinal)
Technique : Position the patient prone or kneeling with the foot extending over the edge of an examining surface. Place the transducer vertically over the medial portion of calcaneus at the origin of the plantar fascia.
Findings : The plantar fascia can be visualized from the plantar aspect of the heel. At the origin of the aponeurosis, any erosive changes should be evaluated. Due to the thick keratin over the heel, the frequency setting may need to be lowered to allow for adequate tissue penetration to see the fascia and calcaneal border. The fascia should have an equal thickness at its origin and more distally—thickening of the plantar fascia either at its origin or as fusiform swelling more distally is indicative of pathology.
Stay updated, free articles. Join our Telegram channel

Full access? Get Clinical Tree


