Chapter 18 L5-S1 Disc Access
We will also demonstrate the fluoroscopic axial view; this is an imaging technique that is unique to the L5-S1 disc.1
Note: Please see page ii for a list of anatomical terms/abbreviations used in this book.
1 Direct Trajectory Technique
This technique will result in an initial trajectory that is identical to that seen with standard disc access (see Chapter 17), as long as the iliac crest can be cleared. This technique is used if the iliac crest does not obscure access to the L5-S1 disc.
 Trajectory View
![]() Trajectory View Safety Considerations
Trajectory View Safety Considerations
 Remain immediately lateral to the junction of the S1 SEP and the inferior base of the S1 SAP, i.e., “low in the hole.”
 Superior or lateral migration can contact the spinal nerve.
 While advancing the needle toward the disc, do not drive too far medial until entering the disc. A medial straying needle can enter the dura.
![]() Notes on Positioning in the Trajectory View
Notes on Positioning in the Trajectory View
 The posterior iliac crest often obstructs the optimal trajectory visualization of the target needle entry site, despite other trajectory view optimization techniques.
 To visualize the entry site, a less ipsilateral oblique positioning of the intensifier may be required; this may complicate the positioning of the superior articular process bisecting the diameter of the superior endplate.
 Solving this visualization challenge while getting a reasonable trajectory may require one or both of the “tricks” described in this chapter; however, often the “over-tilt” will be all that is needed.
Confirm the level (with the anteroposterior view).
Tilt the fluoroscope’s image intensifier cephalad.
 Optimize the L5-S1 disc visualization by adjusting the degree of tilt and lining up the S1 superior endplate (SEP), the L5 inferior endplate (IEP), or both.
 Typically greater cephalad tilt is required as compared with the other disc levels to position the posterior iliac crest away from the point of disc entry. Therefore, preferentially lining up the S1 SEP (instead of the L5 IEP) will improve the likelihood of clearing the iliac crest as a result of the S1 SEP’s more cephalad orientation.
 An optional pillow can be placed under patient’s abdomen with greater posterior rotation on the ipsilateral side of needle entry to reduce lumbar lordosis and to obtain 5 to 10 degrees of additional rotation.
 Have patients with protuberant abdomens lie slightly obliquely so the needle entry side is slightly elevated; their abdomen may otherwise theoretically push the retroperitoneum into the needle’s trajectory.
Oblique the fluoroscope’s image intensifier ipsilateral to needle insertion (Figure 18–1).
 Attempt to position the fluoroscope such that the superior tip of the S1 superior articular process (SAP) is bisecting or nearly bisecting the diameter of the S1 SEP.
 The target needle destination is immediately anterior to the junction of the SAP and the S1 SEP.
 If you cannot clear the iliac crest with this technique, use one of the other ones described later in this chapter (i.e., “the cheat” or the curved-needle technique).
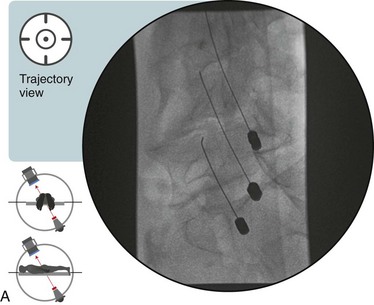
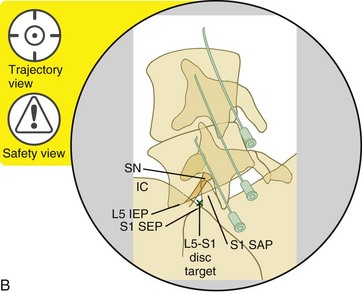
Figure 18–1 A, Fluoroscopic image of the trajectory view for the L5-S1 disc. B, Radiopaque and radiolucent structures. The 3 needles shown in the picture are already placed in the three cephalic discs. The green “X” identifies the trajectory. If the iliac crest does not block access to the L5-S1 disc then no other “trick” is necessary. Simply access the disc as described in Chapter 17.
2. The “Over-Tilt”
a Visualize the midpoint of the target L5-S1 disc with the appropriate ipsilateral oblique rotation. The S1 SAP should bisect the diameter of the S1 SEP, but the iliac crest will still overlap the target point (Figure 18–2, A and B).
Stay updated, free articles. Join our Telegram channel

Full access? Get Clinical Tree


