Chapter 2 Needle Techniques
There are many aspects involved in a technically successful, efficient, and safe spinal injection procedure. These aspects are discussed in Box 2–1. This chapter focuses on item 4 from that list: directing or “driving” the needle into proper position.
Box 2–1
Keys to a successful fluoroscopically guided interventional spinal procedure:
1 Identifying where the target is anatomically located
2 Respecting the structures to avoid and knowing their locations
3 Identifying which radiographic views (i.e., the trajectory and safety views) best facilitate a safe and direct pathway to the target while avoiding other structures as appropriate
4 Successfully directing the needle toward the target with the use of multiplanar imaging
5 Confirming placement with real-time contrast enhancement and multiplanar imaging
Note: Please see page ii for a list of anatomical terms/abbreviations used in this book.
Needle Anatomy
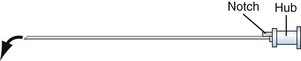
To understand spinal needle manipulation, the interventionalist needs to be completely familiar with the anatomy of a typical spinal needle (Figure 2–1).

Because of the angulation of the bevel, the needle moves in the direction of the pointed needle tip, which is away from the bevel (Figure 2–2). Understanding and using the needle’s property of movement away from the bevel is known as bevel control. This concept is useful primarily for sharp tip spinal needles.
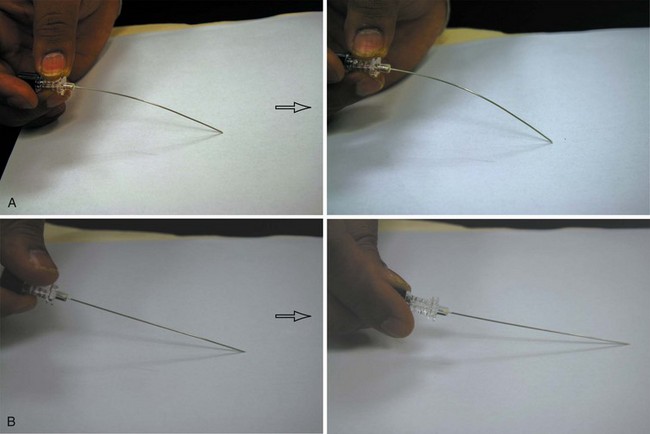
Bending the Needle TIP: Enhanced Steerability
An approximately 5- to 10-degree angle is typically placed at the needle’s tip. This angle bends away from the bevel and toward the tip to accentuate bevel control and to improve the user’s ability to “steer” the needle (Figures 2-3, 2-4, and 2-5). This allows for finer directional control. Since the needle does not have to be retracted and redirected as frequently, there may be less tissue damage, procedure time, and pain. An unbent needle will tend to move more directly from the skin to the target’s vicinity. However, a bent needle allows for finer control. When a bent needle is advanced, the needle’s direction may require more frequent adjustments as compared with a straight needle (Figure 2–6). Typically, the bend is most effective in the distal 1/2 to 1 cm closest to the tip. More bend is used when more maneuverability is needed. For example, L5-S1 or cervical discography may require a 30 degree bend, whereas a transforaminal steroid injection may require only 5-10 degrees.
Related posts:
 Cervical Spinal Cord Stimulation
 Cervical Zygapophysial Joint Nerve (Medial Branch) Radiofrequency Neurotomy and Nerve Injection, Posterior Approach
Stay updated, free articles. Join our Telegram channel

Full access? Get Clinical Tree


