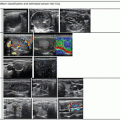
Figure 4.1
Ultrasound console units are manufactured in numerous versions. Shown here are the clinic- or radiology-based platform (a) and the portable, laptop-sized unit that can be mounted on a stand [as shown in (b)] or can be carried in a briefcase and thus be versatile in access to many locations of patient care
The ultrasound processing unit, essentially a sophisticated computer and keyboard, merges complex operations, yet the sonographer typically uses just a few basic functionalities: input of patient data, control knobs for gain adjustment, depth of view, localization and number of focal zones, frequency selection, zoom mode, freeze frame, Doppler imaging, measurement calipers, icon and labeling markers, and storage of still images or cine-clip segments. The standard transducer is a multi-frequency linear array probe in the 8–15 MHz range that optimizes imaging of superficial structures with fine structural details. Probes of this frequency come in different lengths (2, 4 cm; Fig. 4.2a–d) and also different widths of the footprint (Fig. 4.2b, d) that is positioned on the skin for imaging. Some manufacturers also build small linear or curved transducers that facilitate examination or biopsy in areas such as the sternal notch where clavicular heads limit the scanning path of larger linear probes (Fig. 4.3). Monitors range in display design from basic to sophisticated, with touch-screen features, and flexibility to swivel to be viewed from different angles. Additional monitors can be connected to the ultrasound unit and displayed so that the patient can view the exam in real time.
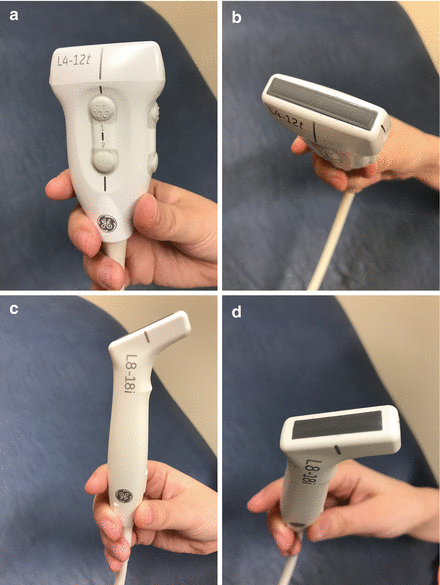
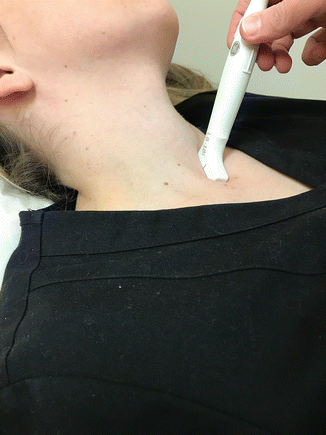
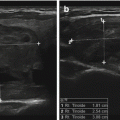
Figure 4.2
Examples of ultrasound transducer probes (a, c) and their linear “footprints” (b, d). The entire footprint surface should contact the patient’s skin for optimal image acquisition
Figure 4.3
A small linear footprint transducer is ideal for positioning in anatomical regions where the bone (clavicles and sternal notch as shown in model) or other anatomies prevent a good fit for traditional larger transducers
A practical necessity of any ultrasound usage is to set up a reliable method for image storage, backup, and transmission to electronic health records or radiology picture archiving and communication systems (PACS) if applicable. These methods will be unique to the ultrasound system, the user’s preference, the hospital or clinic regulatory requirements, and the need to access archived material. Additional adjuncts to the equipment include printers, ultrasound gel warmers, and storage cases for the console and transducer probes.
Scanning Technique
Patient Positioning
For a right-handed individual who performs ultrasound, the traditional setup entails the ultrasound unit being to the left of the exam table (Fig. 4.4), with the patient supine on the table. This allows the sonographer (henceforth this term will apply to any physician or radiology technician performing the ultrasound exam) to face both the patient and the monitor. The goals of positioning are to expose the neck to allow movement of the transducer probe to all relevant anatomic areas and to ensure that the patient remains comfortable during the process, protecting those who may have spine issues or arthritis (Fig. 4.5a, b). Typically, the position entails gentle hyperextension of the neck with a soft pillow for support beneath the shoulders. The sonographer can ask the patient to bend their knees for comfort and protection of the lower back. It is helpful to ask the patient periodically if they remain comfortable and to remind them to indicate if this is not the case.

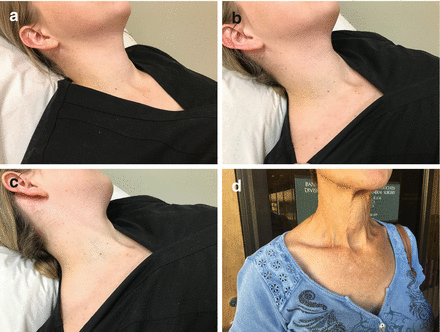
Figure 4.4
The traditional arrangement between the ultrasound console unit and the patient exam table. The sonographer stands facing the ultrasound and uses their right hand to move the transducer on the patient’s neck, thus simultaneously facing both the ultrasound monitor (on the left) and the patient’s face (on the right)
Figure 4.5
Optimal positioning and exposure of the neck for ultrasound of the thyroid and parathyroid glands (a, b) and lateral neck for lymph node examination and mapping (c). While the vast majority of patients are supine on the exam table with a pillow supporting the shoulders to allow gentle neck extension, keep in mind that some patients have beautiful anatomy (d) that allows ultrasound exam even in a sitting position. Other patients who have medical constraints (wheelchair-bound) can also have an effective ultrasound exam without needing to be repositioned on an exam table
For patients who need lymph node mapping in the setting of known or suspected thyroid cancer, positioning needs to provide wide exposure of the lateral neck from the hairline and the angle of the mandible to the clavicles, with the chin averted to the contralateral side (Fig. 4.5c).
It is important to realize that a good ultrasound exam can be achieved despite positional challenges. For example, patients in a wheelchair can remain so and be supported when they simply stretch their neck backward. A patient sitting or standing even may have adequate neck exposure to capture the needed ultrasound image, especially if they have a long, thin neck (Fig. 4.5d).
Basic Orientation
The simple acronym “PPP ” has remained a guiding cue to the authors since first receiving this instruction in 1994: patient, probe, and preset. These three topics represent, in order, the safest method to start an ultrasound exam. First, the patient information needs to be entered accurately to ensure that the subsequent imaging is linked properly for interpretation, documentation, and storage. Next, the probe is selected based on the type of imaging planned. This is most relevant when ultrasound machines have several different probes connected. To detect if the desired probe is actually selected and engaged for display on the monitor, the sonographer can quickly note the shape of the footprint on the monitor (linear or curved) and as quickly touch one end of the footprint on the transducer to see if motion appears on the monitor. Finally, the preset refers to the exam-specific programming for optimal image resolution with emphasis on small parts or vascular features or even on thyroid-focused features at a specific depth. This may change between exams if different users have access to the ultrasound, thus it is valuable to make sure that the desired display setting is selected prior to the start of each new patient exam.
The proper orientation of the transducer probe is that when placed transversely on the front of the patient’s neck, the anatomy touching the left of the probe is displayed on the left of the monitor. By convention, the probe is rotated 90° clockwise so that in longitudinal (sagittal) placement, the cephalad anatomy touches the left of the probe and remains displayed on the left of the monitor (“head on left, feet on right”). It is tempting to look at the various notchings, dots, or other markings that are etched on the transducer probe to determine if the orientation is correct. Please avoid this tactic. Manufacturers make different markings and none correlate to uniform orientation. Furthermore, the ultrasound console has a keyboard function that allows the image on the monitor to be flipped. The easiest, most reliable way to orient the probe correctly is to place ultrasound gel on the footprint and touch one end of the probe to see where it moves on the display; similarly, it is easiest then simply to turn the probe in the hand to change orientations.
Sequence of Examination
The ultrasound exam is best performed by the strategy of “do it the same way every time all the time.” The precise sequence may vary among specialists and sonographers. The main point is to form a consistent habit of the procedure that will maximize performing a complete exam and reduce omission of information needed for assessment and diagnosis. Protocols are available from respected professional associations: American Institute of Ultrasound in Medicine, AIUM [6] and Thyroid Cancer Care Collaborative, TCCC [7]. An example of a checklist protocol provided by the West Coast Ultrasound Institute (Phoenix, AZ) to sonography students during training is itemized in Table 4.1.
Table 4.1
Protocol for ultrasound scanning of the thyroid and parathyroid glands (West Coast Ultrasound Institute, Phoenix, AZ)
• Sequence |
– Neck should be hyperextended (as much as comfortably possible) |
– Bilateral TRV RT/LT, color |
– Isthmus, measure, color |
– RT TRV INF |
– RT TRV MID, measure, color |
– RT TRV SUP |
Video sweep RT TRV I-S |
– RT SAG LAT |
– RT SAG MID, measure, color |
– RT SAG MED |
Video sweep RT SAG L-M |
– LT TRV INF |
– LT TRV MID, measure, color |
– LT TRV SUP |
Video sweep LT TRV I-S |
– LT SAG LAT |
– LT SAG MID, measure, color |
– LT SAG MED |
Video sweep LT SAG L-M |
– RT TRV LYMPH CHAIN sweep I-S |
– LT TRV LYMPH CHAIN sweep I-S |
• Equipment protocol |
– Linear TX |
– Range of 10–14 MHz or greater can use lower frequency TX for depth penetration (curvilinear) |
– Virtual convex for full scan view |
– Power Doppler for full vascularity |
• Standards for documenting thyroid |
– Sonographic echogenicity of thyroid gland (overall) |
Normal: homogeneous mid-gray |
– Size (normal adult ranges) |
Isthmus: <0.4 cm |
Length: 40–60 mm |
AP: 20–30 mm |
Width: 15–20 mm |
– Size (normal child ranges) |
Length: 20–30 mm |
AP: 12–15 mm |
Width: 10–15 mm |
– Documentation of any nodules |
Size (in 3 dimensions) |
Architecture |
Location |
Color (vascularity) |
– Overall vascularity |
– Thyroid margins contour |
– Parathyroid region |
• Standards for documenting lymph node chain |
– Size |
– Architecture |
– Location |
– Suspicious features such as calcification, cystic areas, absence of a central hilum, round shape, and abnormal blood flow |
– Blood flow patterns detectable through Doppler |
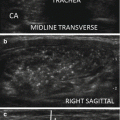
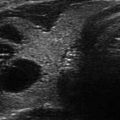
Highlighted here is a suggested sequence for a comprehensive endocrine neck ultrasound exam. Place the probe transversely on the anterior of the neck at the level of the isthmus, and scan superiorly until the hyoid bone (to detect the presence of a thyroglossal duct cyst in rare instances) and inferiorly into the upper mediastinum (Fig. 4.6). Note the visible portions of the thyroid lobes, the larynx/vocal cords, and the central neck and upper mediastinal lymph nodes (level 6 and 7; see schematic in Fig. 4.7). Move the probe to the center on the right thyroid lobe, and scan transversely to demonstrate the entire span of the right lobe from the upper pole to the lower pole, noting any abnormal findings. Rotate the probe 90° clockwise to acquire longitudinal images from the medial aspect adjacent to the trachea to the lateral edge adjacent to the carotid artery (Fig. 4.8). Repeat these same image acquisitions for the left thyroid lobe. Return to measure the thickness of the isthmus and three dimensions of the right and left lobes (anterior-posterior depth (D) × transverse width (W) × longitudinal length (L)). Volume if needed can be calculated for each lobe by the formula D × W × L × (π/6) which can be easily remembered as D × W × L × ½. Note and describe the abnormal thyroid pathology, and measure dominant nodules in the same three-dimensional convention. Categorize thyroid nodules in terms of the American Thyroid Association (ATA) risk of malignancy features [2]. Begin to form a diagnostic impression based on ATA pattern recognition strategies (thyroiditis, multinodular goiter, diffuse goiter, solitary nodule, thyroid cancer). Note the location of any abnormal parathyroid glands, and measure their size (normal parathyroid glands are not visible by ultrasound, but their expected distribution is depicted in Fig. 4.9). Note the presence of abnormal central neck lymph nodes, their features (reactive from thyroiditis versus abnormal from cancer metastases), and size. Apply the color Doppler analysis to assess overall thyroid gland vascularity and the vascular patterns specific to any discrete nodules. Scan the lateral neck briefly through levels 2–5 to detect any grossly evident lymphadenopathy. In real time, return to examine any area of the thyroid or the central and lateral neck that needs a more thoughtful or detailed evaluation.
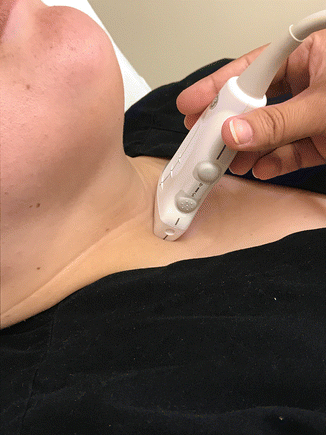
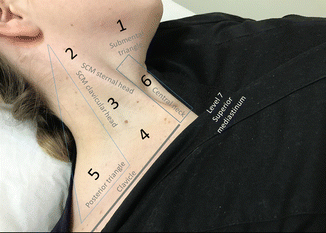
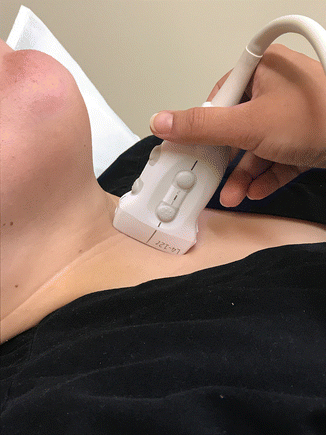
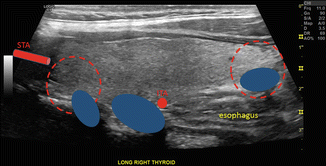
Figure 4.6
Orientation of the ultrasound in transverse position in the usual starting point of a thyroid ultrasound, centered on the thyroid isthmus
Figure 4.7
Levels of the neck used to classify anatomic location of cervical lymph nodes
Figure 4.8
Orientation of the ultrasound in longitudinal (sagittal) position achieved by 90° rotation clockwise from the transverse position
Figure 4.9


Typical anatomic distribution of normal superior and inferior parathyroid glands (within dotted circles) with superimposed examples for the location of enlarged parathyroid glands (blue ovals). The right thyroid gland is shown in longitudinal (sagittal) orientation. The superior thyroid artery (STA) is at the left of the image; inferior thyroid artery (ITA) is at the posterior midportion of the thyroid. Published with kind permission of © Mira Milas, MD 2017. All Rights Reserved
Related posts:

Stay updated, free articles. Join our Telegram channel
Full access? Get Clinical Tree
