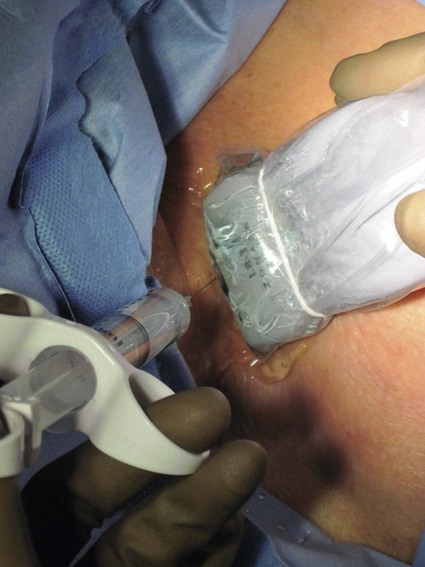
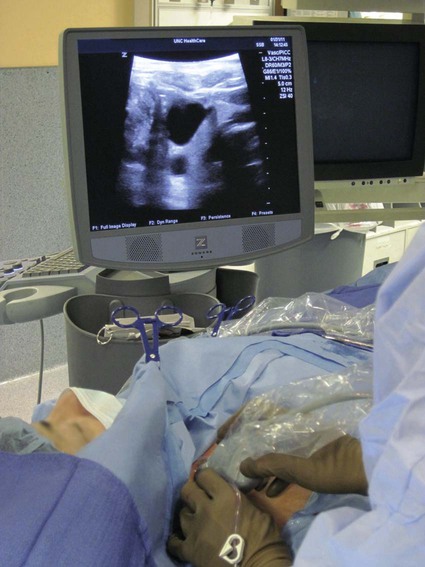
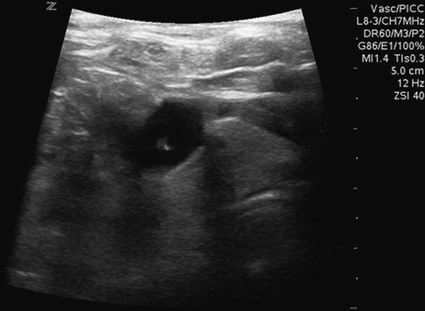
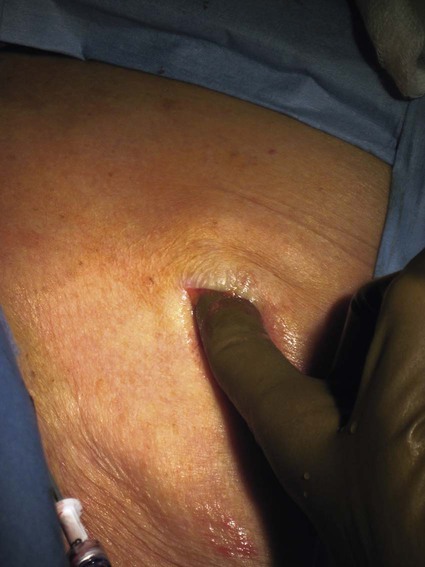
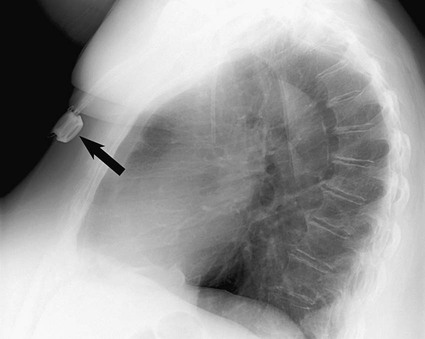
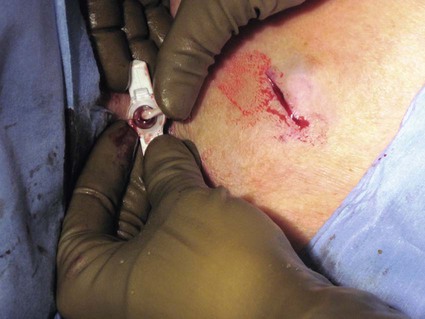
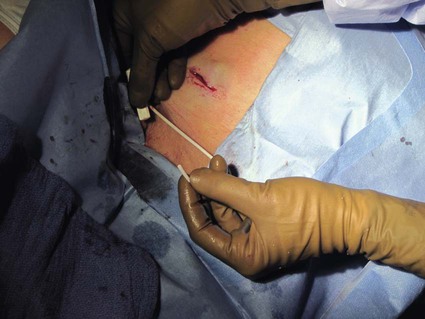
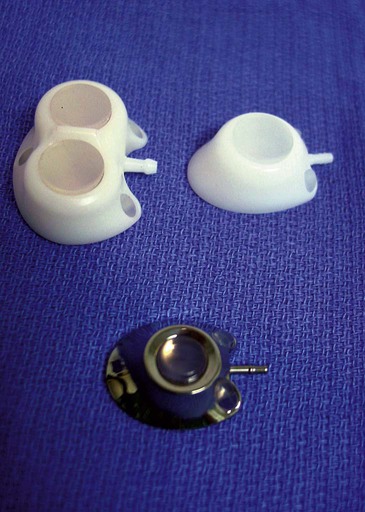
After the introduction of tunneled silicon central venous catheters (CVCs) in the 1970s by Broviac1 and Hickman,2 the next decade brought the development of subcutaneous ports.3 Though originally developed in the surgical arena, subcutaneous port insertion under image guidance soon evolved4,5 and improved the safety profile of the procedure by essentially eliminating the risk for pneumothorax and arterial puncture.4,6 Because insertion of subcutaneous ports is a routine part of most busy interventional radiology practices nowadays, familiarity with their insertion and management of related complications is requisite for today’s interventionalist. The choice of venous access device is based on the length of therapy and frequency of access required. Patient and physician preferences play a role as well. Insertion of subcutaneous ports is indicated if central venous access is needed intermittently for many months to years. If more frequent (daily) access is needed over a shorter time frame, peripherally inserted central catheters (PICCs) or tunneled CVCs should be considered (see Chapters 118 and 119). The most common indication for long-term central venous access is for chemotherapy administration.4,7 Additional indications include antibiotic therapy, administration of blood products, and total parenteral nutrition.4,7 A funnel-shaped subcutaneous port (Cathlink 20 [C.R. Bard Inc., Salt Lake City, Utah]) that accepts an 18-gauge intravenous needle has been used for erythrocytapheresis (red blood cell exchange)8 and therapeutic plasma exchange.9 Recently, ports have been developed (Vortex Port System [AngioDynamics, Latham, N.Y.]) through which erythrocytapheresis can be performed with noncoring 16-gauge access needles for patients with sickle cell disease; flow rates of approximately 30 to 60 mL/min have been achieved. However, little data regarding the long-term feasibility of this technology exists, and we have had mixed results at our institution. In many patients, multiple indications for port insertion may exist at any one time. Contraindications to the insertion of subcutaneous ports are related to two of the more common complications: infection and hemorrhage. Before inserting an implantable port, patients with active infection or bacteremia should be treated appropriately until the underlying process has resolved. Patients with a coagulopathy or those taking anticoagulants should ideally be corrected until the international normalized ratio (INR) is 1.5 or less. An uncorrectable coagulopathy would prohibit insertion of a port; nontunneled access should be used in this situation until the patient’s condition improves. If anticoagulation is of significant import, it may be necessary to convert to enoxaparin (Lovenox) to limit the period during which the degree of anticoagulation is subtherapeutic. Likewise, severe thrombocytopenia could also be prohibitive. Although a platelet count of over 50 × 109/L is traditionally recommended for invasive procedures, there is a paucity of data to support this threshold.10,11 Preoperative or intraoperative platelet transfusion will usually allow safe insertion in those with platelet counts below 50 × 109/L.12,13 Insertion of ports should be avoided in severely neutropenic patients. Venous access via the internal jugular (IJ), external jugular, or subclavian routes may be impossible secondary to central venous occlusion and may be severely limited because of anatomic constraints as a result of trauma, recent surgery, or burns. In this situation, access through the femoral vein or inferior vena cava (IVC) via a translumbar or transhepatic route should be considered. Finally, if there is no safe access to the central venous system, a port simply cannot be placed. Key equipment is listed in Table 120-1. TABLE 120-1 Key Equipment for Insertion of a Subcutaneous Port The IJ vein begins at the jugular foramen as a direct continuation of the sigmoid sinus and descends in the neck within the carotid sheath along with the carotid artery and the vagus nerve. Posterior to the medial portion of the clavicle, the IJ and subclavian veins join to form the brachiocephalic veins. The IJ vein is directly anterior and lateral to the carotid artery.6,14 The apex of the bifurcation of the two heads of the sternocleidomastoid muscle is the landmark for locating the distal IJ vein.14 The axillary vein begins at the lower border of the teres major as a continuation of the basilic vein and terminates at the lateral border of the first rib, where it continues as the subclavian vein. The subclavian vein ends at the medial border of the anterior scalene muscle, where it joins the IJ vein to form the brachiocephalic vein. Note that the second portion of the subclavian artery is posterior to the anterior scalene muscle, whereas the medial portion of the subclavian vein is positioned just anterior to it. The anterior scalene muscle is approximately 10 to 15 mm thick in adults and separates the artery and vein considerably; however, more laterally, the subclavian artery and vein lie much closer together, with the vein anterior and slightly inferior to the artery.5 • Review the patient’s history and any relevant previous imaging studies. • Use maximum barrier technique, and maintain sterility at all times. • Consider preprocedure administration of antibiotics. • During ultrasound-guided access of the IJ vein, optimize the angle of approach to avoid placing the carotid artery in the path of the needle. • Intravascular distance is measured with a 0.018-inch mandril wire. • Create a pocket with a “snug” fit to avoid migration or flipping of the port. • Plan and construct the tunnel with a gentle curve to prevent a kink from developing in the catheter. • Avoid air embolism by pinching the sheath or covering the open end of the peel-away sheath (or both) until the catheter is quickly inserted into the sheath. • Close the port pocket incision in two layers. • Leave the port accessed if chemotherapy is to be initiated within 3 days. Initially, surgically placed subcutaneous ports were inserted via a blind percutaneous subclavian vein approach3 or by cutdown.15 Although central lines placed by interventional radiologists were also initially placed via the subclavian vein under fluoroscopic guidance,16 insertion of ports soon evolved from an ultrasound-guided subclavian vein approach4 to the preferred ultrasound-guided IJ vein approach.5,6,17 Ultrasound-guided IJ access has become the preferred approach because it allows an easily compressible access (in the rare case of inadvertent arterial puncture), avoids the higher risk for pneumothorax associated with axillary/subclavian vein access,18 and avoids the “pinch-off syndrome” associated with medially placed subclavian catheters.19 Review of the patient’s history and any available relevant previous imaging studies is paramount. The goal is to uncover any evidence of central venous stenosis or occlusion. A history of multiple central venous lines or end-stage renal disease should be queried. Access via the subclavian vein should be avoided in dialysis patients in an attempt to preserve patency of the axillary and subclavian veins for any current or future surgical dialysis access (fistulas or shunts). Although it has traditionally been recommended to avoid the ipsilateral approach in patients who have undergone axillary lymph node dissection, it has been shown that the incidence of lymphedema after ipsilateral port placement is no higher than that reported after axillary lymph node dissection alone.20 In addition, any thoracic malignancy requiring external beam irradiation should be considered and the planned radiation field avoided. The technique described here is a minor modification of that previously described by Mauro, Jaques, and Morris.4,5 A routine procedure tray is augmented with a cutdown tray (see Table 120-1 and Fig. e120-1 The upper portion of the chest and neck are then prepared and draped in sterile fashion. Povidone-iodine solution has traditionally been used, but many institutions have switched to 2% chlorhexidine gluconate in 70% isopropyl alchohol (Chloraprep).21 The ultrasound probe is then also draped so it can be used for direct imaging during venous access. The procedure is typically performed with the patient under conscious sedation and continual monitoring of the electrocardiogram and pulse oximetry by a member of the radiology nursing staff. Local anesthesia is achieved at the entry site with 1% lidocaine with epinephrine, and this can be done under ultrasound guidance to plan the path of the access needle and avoid intravascular injection of lidocaine (Fig. 120-1). A small skin incision is made with a #11 blade. Through this small incision, a 21-gauge, 4-cm needle (some obese patients may require a 21-gauge, 7-cm needle) connected to a 20-mL syringe by short connector tubing is advanced in a medial and caudal direction under direct ultrasound guidance (Fig. 120-2). The operator should keep the needle tip visualized throughout the access process. Some operators prefer an 18-gauge needle to eliminate the need for a transition dilator. The operator can often optimize the angle of approach to avoid placing the carotid artery in the path of the trajectory of the needle. Gently “bobbing” the needle may improve localization of the needle tip. Once the tip of the needle “tents” the vein, a short, quick thrust will advance the needle into the vein. A tactile “pop” is often felt as the needle enters the vein. Again, with the aid of ultrasound guidance, care can be taken to avoid going completely through the vein into the carotid artery. Insertion of the tip of the needle within the vein is confirmed by observing the bright tip of the needle within the vein (Fig. 120-3) and by aspiration of blood through the 20-mL syringe. At times, the patient’s respirations will intermittently collapse the vein. In such cases, puncturing the vein during expiration will usually allow successful access. A 0.018-inch mandril wire is then advanced into the vein under fluoroscopic guidance so the access needle can be exchanged for a Cope transition dilator (Cook Medical, Bloomington, Ind.). Some operators prefer a micropuncture set (Cook Medical) to make the transition to a 0.035-inch system. The mandril wire is used to measure the distance from the access to the proximal aspect to midportion of the right atrium, and this access is then temporarily capped. The intravascular distance can be measured by placing the tip of the mandril wire in the desired location between the cavoatrial junction and the cephalad aspect of the right atrium, bending the exposed wire as it exits the transition dilator, and then pulling the wire back to the point of access in the vein, which can be visualized under fluoroscopy with a radiopaque marker at the skin. The wire should then be stored in a safe place on the table so it can be used for measurement after the catheter is tunneled to the right neck dermatotomy site. An incision is then made with a #15 blade, just long enough to allow insertion of the port. Though originally described as an incision caudal to the port pocket,4 we now make the insertion incision just cephalad to the pocket. This approach allows easy access to the catheter/port junction and gives some flexibility if last-minute tailoring of catheter length is necessary. However, some practitioners still prefer to use the inferior incision approach. Usually the port pocket can be easily created by blunt dissection with a Kelly hemostat and small tracheal retractors or simply with the operator’s finger (Fig. 120-4). This allows any fibrous bands encountered to be freed and gross estimation of the pocket size required (the length of one’s distal phalanx is approximately the depth required for many ports). The pocket should be large enough to allow the port to be inserted easily, the incision to be closed without tension on the skin, and the incision to not overlie the diaphragm of the port. If a snug fit is achieved, anchoring sutures are not usually needed.22 However, if the port pocket is too large or if the patient is obese, it is prudent to place anchoring sutures to avoid the complication of the port flipping within the pocket and thereby prohibiting access (Fig. 120-5). Usually, two nonabsorbable sutures adequately anchor the port. Once the port pocket is created, the catheter is tunneled from the infraclavicular incision to the right neck dermatotomy. The metal tunneling device is then shaped with a gentle curve (Fig. e120-2 Air embolism can be avoided by pinching the sheath while introducing the catheter into the sheath or by covering the open end of the peel-away sheath (Fig. 120-7) until the catheter is quickly inserted into the sheath. The catheter can then be advanced through the peel-away sheath (Fig. 120-8) and positioned with its tip in the region between the cavoatrial junction and the cephalad aspect of the right atrium. Dialysis catheter manufacturers have developed valved peel-away sheaths to minimize the risk of air embolism and diminish blood loss (AirGuard Valved Introducer [Bard Access Systems, Salt Lake City, Utah]). This technology is now available for the smaller-caliber sheaths used for port insertion. Other maneuvers may be used, such as having patients hold their breath or hum; however, following such simple commands may prove difficult, depending on the degree of sedation at that time. Attention to the patient’s respiratory cycle is critical at this step so that occlusion of the sheath is not released at the point of inspiration. The catheter should not be advanced through the peel-away sheath if the patient is agitated, coughing, or crying, because an air embolus could easily result. The length of the catheter should be checked before the entire peel-away sheath is removed. If the catheter is too long or short, this should quickly be remedied at this time. Placement of a new peel-away sheath, which could be temporarily capped while the appropriate alterations are made, may be required. In the event of central venous occlusion, unconventional venous access must be considered.4,5,7,23 Potential alternative routes include well-developed collaterals, recanalized occluded veins, femoral, translumbar, and transhepatic access.23 A femoral approach is rarely considered because of the increased risk of infection associated with this site; however, if it is used, maximal sterile barrier technique should be rigorously employed, and the port should be positioned over the ribs to allow a firm backing for access (Fig. 120-9). Once access to the IVC is established, a 0.018-inch mandril wire is advanced into the right atrium. With the use of a transition dilator such as the Cope, the system is upsized to a 0.035-inch system. Oftentimes there is difficulty advancing the catheter through the peel-away sheath at the point of entry into the IVC because of angulation; in such cases, the catheter can be advanced over a stiff hydrophilic guidewire and through the peel-away sheath.7,23 For port access, the pocket should be created over the lower lateral ribs to provide firm support. A two-stage tunnel may be necessary to allow a gentle curve of the catheter to the entry site. Translumbar catheter complications are similar to those encountered with other access routes and include infection, catheter tip migration, kinking, fibrin sheath formation, and rarely, caval occlusion.23 In the pediatric population, interval growth may result in migration of the catheter tip to an extravascular position, so plain radiographs should be obtained intermittently to ensure appropriate tip position.23 If both the SVC and IVC are occluded, the transhepatic route is another alternative.5,7,23 Access to the middle hepatic vein can be achieved with a 21-gauge needle under ultrasound and fluoroscopic guidance. Once access to the hepatic vein is confirmed by injection of contrast material, a mandril guidewire can be advanced into the right atrium to allow the system to be upsized to a 0.035-inch system. The port pocket should be created over the bony support of the rib cage and at a point that is easily accessible. This access is subject to respiratory movement, which may result in migration of the catheter to an extravascular position. Complications of transhepatic catheter placement include intraabdominal hemorrhage (any coagulopathy should be corrected) and hepatic vein thrombosis, although this is uncommon. Again, interval growth is an issue with children, and the catheter tip should be monitored with intermittent plain radiographs.7,23 Port pocket creation in the midaxillary line at the anterior border of the latissimus muscle has been described.24 Because this location requires a longer tunnel, it can be difficult to locally anesthetize the entire tunnel, so general anesthesia is preferred.24 In addition, the long tunnel length may leave the catheter at increased risk of migration. Because of this, the authors recommend strict attention to catheter position at the time of insertion but feel that this location provides a better cosmetic result and have found no increase in complications in this location.24 In patients with prior surgery (e.g., bilateral mastectomies), anticipated breast reconstruction, or radiation therapy or burns, alternative pocket locations may be required. The “trapezius port” with the subcutaneous pocket created over the trapezius muscle25,26 avoids any recent or anticipated treatment fields. A paramedian location or the upper extremities are other potential options as well.25 Perhaps no other topic is more passionately debated in the central venous access arena than the distal catheter tip position. This contentious topic is impacted by operators’ experiences, local policies, and conflicting recommendations27–32 and is further complicated by anatomic misinterpretations.33,34 At our institution, the catheter tip of a subcutaneous port is considered to be optimally placed if it is in the region between the cavoatrial junction and the cephalad portion of the right atrium (Fig. 120-10). This takes into consideration the expected cephalad migration with the patient in the upright position,18,28,35,36 and the improved function with the catheter tip in this position.28,36 However, other authors vehemently recommend that the catheter tip be placed in the SVC31 no deeper than the cavoatrial junction to avoid potential cardiac complications, including arrhythmias, tricuspid valve injury, and the most dreaded complication, cardiac perforation and tamponade.37 This is further complicated by the fact that positioning the catheter outside the atrium does not guarantee there will be no vascular perforation.29,38 Detailed discussion of this debate is beyond the scope of this chapter; the reader is directed to articles that discuss these points in detail.28,29,32 In addition, review of the anatomy is in order before further contemplating this debate, because the true cavoatrial junction in adolescents and young adults has been identified as more caudally located than commonly believed, and is best estimated by a point approximately two vertebral bodies below the carina.34 Most ports are made of either titanium or plastic (Fig. e120-3
Subcutaneous Ports
Clinical Relevance
Indications
Contraindications
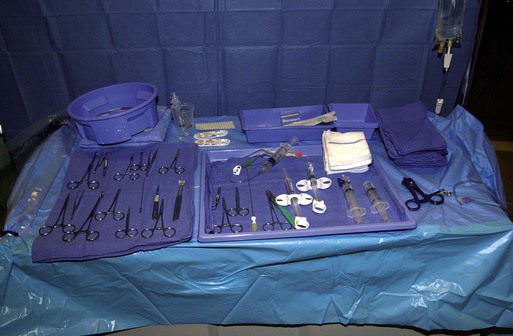
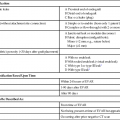
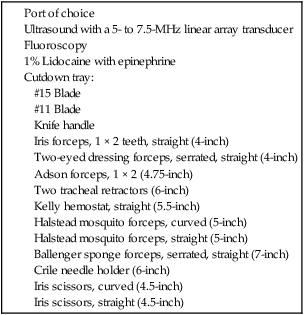
Equipment
Technique
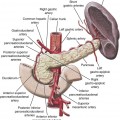
Anatomy and Approach
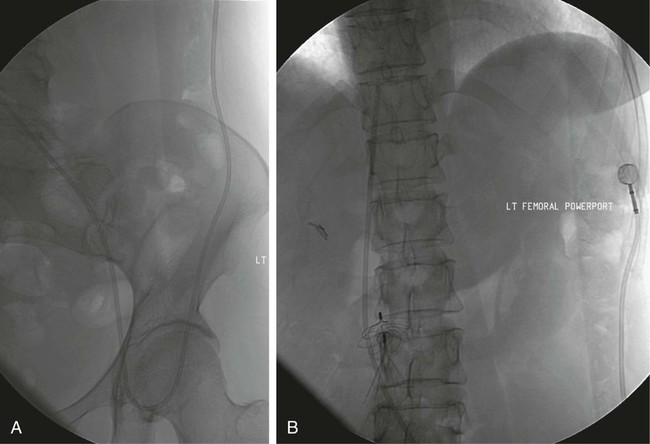
Technical Aspects
 ). The neck should be interrogated with ultrasound to confirm patency of the IJ vein, which is supported by easy compressibility of the vein and lack of adjacent collaterals. If ultrasound or previous imaging indicates that the IJ veins are occluded, the subclavian veins are a reasonable alternative. If there is complete central venous occlusion involving the brachiocephalic veins or superior vena cava (SVC), a femoral, translumbar, or transhepatic approach can be considered. Although these approaches are rarely required, they should be part of an interventionalist’s armamentarium.
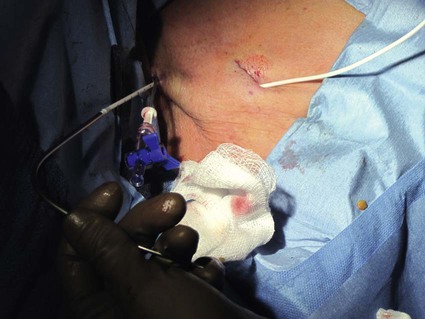
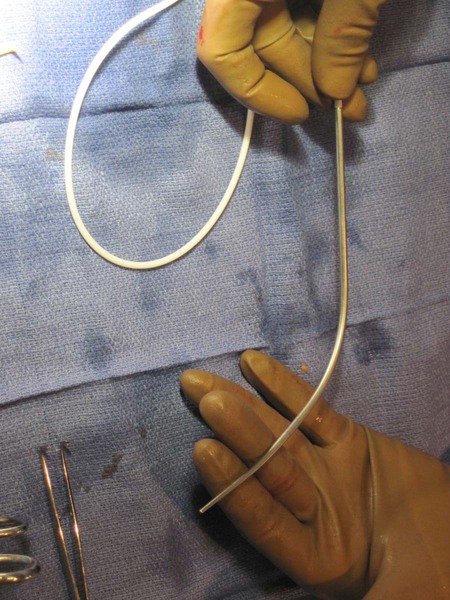
 ) to facilitate following a cephalad then medial path. The operator should initially tunnel cephalad, then use the curve of the tunneler to turn medially, all the while keeping a finger on the leading point of the tunneler to avoid inadvertent injury to surrounding structures. Attention to the tip of the tunneler is of particular importance when it is passing over the clavicle, to ensure it does in fact pass superficial to the clavicle and avoids an intrathoracic trajectory. Once the catheter is brought through the tunnel (Fig. 120-6), the port is positioned within the pocket. If anchoring sutures are going to be used, they can be placed at this time. The port may be held in place by accessing it with a noncoring Huber needle. The catheter is then cut to length with the previously marked mandril wire used for measuring the distance. The Cope transition dilator is then exchanged over a 0.035-inch wire for a peel-away sheath.
Alternative Access
Alternative Port Pocket Locations
Controversies
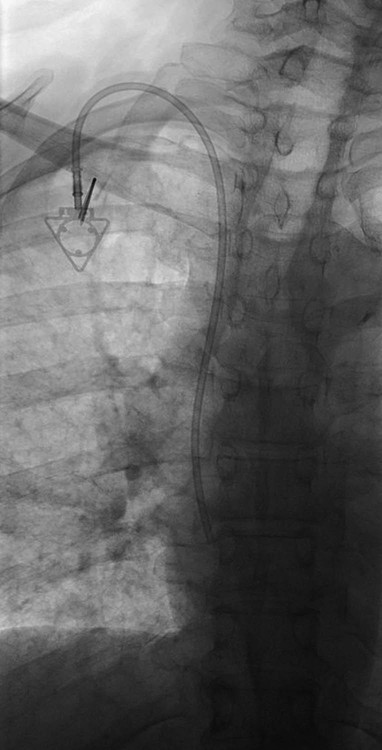
Tip Position
Port Selection: Material, Size, and Number of Lumina
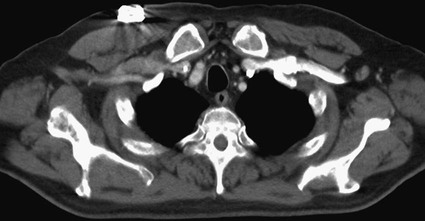
 ). Plastic ports cause only minimal if any imaging artifacts, whereas titanium ports cause minimal artifact on CT (Fig. 120-11) and only local artifact on magnetic resonance imaging (MRI). Both materials are MRI compatible. Single- and double-lumen ports are available, with single-lumen ports being smaller and less expensive and catheters ranging from 6F to 10F. Dual-lumen ports are larger and more expensive, possibly migrate more,35 and are attached to larger 10F to 13F catheters. Kowalski et al. showed a significant difference in migration between 10F single-lumen ports and 12F double-lumen ports, possibly because of the larger device settling within the soft tissues of the chest wall and thereby withdrawing the catheter.35 Because double-lumen tunneled catheters have been noted to result in more total venous occlusion than is the case with single-lumen catheters,39 and because catheters smaller than 2.8 mm in outer diameter are associated with few instances of thrombosis,40 the larger-caliber catheters used in double-lumen ports may also be at increased risk for venous thrombosis. Moreover, one should use central venous devices with the fewest number of lumens necessary to reduce the number of portals for colonization.41,42 However, dual-lumen ports offer the benefit of being able to administer incompatible medications or concomitantly administer fluids or blood products with chemotherapy. Therefore, double-lumen ports are usually reserved for situations in which incompatible chemotherapeutic agents or concomitant blood product and fluid administration are genuinely anticipated.
Related posts:
![]()
Stay updated, free articles. Join our Telegram channel

Full access? Get Clinical Tree


Subcutaneous Ports