1. Put 1.5 cm3 of 1 % Xylocaine into a 3 cm3 syringe and change the needle to a fresh 27-gauge needle.
2. Squirt a few drops out of the end to make sure the needle lumen is open.
3. Using ultrasound guidance, locate the path to the target and make sure it is clear of large veins or any arteries. Leave the transducer in this location.
4. With the bevel up, spread the skin taut and insert the needle all the way through the skin with a quick motion and inject a small amount of Xylocaine (0.1–0.25 cm3) under the dermis into the subcutaneous fat. The injection should not meet resistance. If it does, the needle tip is still in the dermis and do not inject until you push through to the sq fat. You will not be able to see the needle tip during step 4—it is all by feel since the bevel is to the side of the US beam.
5. Advance the needle slowly until the bevel appears on the ultrasound screen, then push it through the strap muscles and directly onto the capsule of the thyroid.
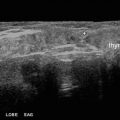
6. Slowly inject 0.75–1 cm3 of Xylocaine as the needle is withdrawn under direct visualization. The operator should be able to see the tissues spreading apart and the muscles becoming hyperechoic as the Xylocaine is injected.
7. Once the bevel disappears off the side of the ultrasound image, stop injecting and this will avoid injecting Xylocaine into the dermis, which is painful. Wait several minutes for the Xylocaine to diffuse.
8. Make a mental note of the angle the needle path traveled and use it to adjust your angle to the target for the actual FNA.
9. The most pain-sensitive areas for thyroid FNA are the dermis and the fascia of the strap muscles. Sufficient anesthetic needs to be applied directly to the fascia, and just underneath the dermis, to achieve the desired effect.
28.3 The Biopsy-Planning Ultrasound and the “Time Out”
Immediately prior to the FNA, the patient’s vital signs should be reviewed and recorded. Image each nodule considering the order in which the nodules will be biopsied, the optimal patient positioning and angle(s) of approach for each nodule, and the location of anesthetic to be placed, if desired. The anatomy, vascularity, capsule thickness, and calcifications in each nodule should be reviewed.
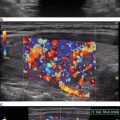
Prior to the biopsy, using light pressure on the transducer, the vessels between the skin and each target nodule should be interrogated with Doppler, and a route avoiding them planned. Although a 27-gauge needle will rarely cause a bleeding complication, traversing a vessel may introduce blood into the specimen, and should be avoided. Similarly, a Doppler image of the target nodule will provide information regarding the vascularity of the nodule, influencing the choice of entry site, biopsy technique (suction versus non-suction), needle size, and dwell time.
A brief “time-out” is held prior to the procedure to reconfirm the patient identity, planned procedure, location of the nodule(s), allergies, and answer any remaining questions. The informed consent document should be reviewed for completeness.
28.4 Performing the FNA: Technical Aspects
Proper room setup and availability of all necessary equipment is essential. A probe cover, several 10 cm3 syringes, biopsy needles, alcohol, povidone-iodine, gauze pads, sterile ultrasound gel or Surgilube, and a hemostat or needle driver should be present on the biopsy tray. The hemostat or needle driver is used to hold needles for slide making, and to transfer used biopsy needles to the needle disposal device. 22 and 25-gauge spinal needles should be available for deep targets or if a stylet is necessary, as discussed later. Extension tubing and stopcocks should be available.
Whether local anesthesia is chosen or not, 27-gauge needles are optimal for FNA and will minimize pain. A 27-gauge needle results in far less discomfort than larger needles, and will allow sampling of complete small follicles, sheets of cells from walls of macrofollicles, and may even provide tissue fragments (Fig. 28.1). Larger gauge or spinal needles are for special situations or for draining cyst fluid (see below). Echogenic needles and needle guides mounted on the probe are available but typically not needed. Before using any needles, the operator should confirm that the lumen of each is functional by pushing air through the needles.
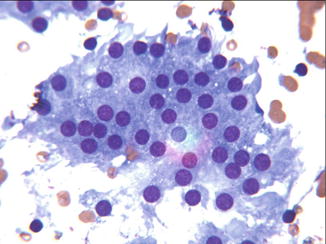
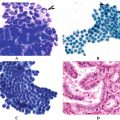
Fig. 28.1
Fragment of follicle. This segment of a benign macro-follicle was obtained through a 27-gauge needle
FNA is an antiseptic, not a sterile procedure. As with venipuncture, full sterile preparation is unnecessary. The skin should be cleaned with either alcohol, or with povidone-iodine followed by alcohol. Sterile draping of the patient is not necessary. Gloves are worn to protect the operator and to prevent contamination of the puncture site. A small amount of ultrasound coupling gel is placed on the uncovered probe, its cover applied, then cleaned with alcohol.
If local anesthesia is to be used, it can be applied at this time. The skin entry site should be anesthetized and a track to the nodule infiltrated with very slow injection. Allow adequate time for the anesthetic to take effect prior to the procedure (Table 28.1 “Steps for Local Anesthesia”)
To minimize discomfort, avoid going through the sternocleidomastoid muscle (SCM ) whenever possible. This is usually achievable with diagonal orientations of the biopsy needle or transducer, or with techniques including medial to lateral needle direction, but will be impossible in a small number of nodules and cervical lymph nodes or in very muscular individuals. When the head is rotated significantly away from the side of the FNA, the ipsilateral SCM will be pulled over the target site, and this position should be avoided. If avoiding the SCM is not possible, its superficial fascia, belly, and deep fascia may be anesthetized. A spinal needle may rarely be necessary for the USGFNA in muscular or obese individuals if the SCM must be traversed.
As shown in Videos 28.1, 28.2, 28.3, and 28.4, holding the skin taut at the time of needle entry, puncturing quickly, then slowly advancing to the target with US imaging will minimize patient discomfort and maximize visualization. The suction, rotation, or fine oscillations of the needle after the needle tip has entered the target will typically not cause discomfort, but the patient may describe pressure or referred pain to the ipsilateral ear at this time.
In solid thyroid nodules , FNA can be done using a suction technique (ST), or a non-suction technique (NST). The capillary action required for the NST depends on the distance the needle is moved forward as well as surface tension within the lumen, both of which allow material to travel up the needle. In solid nodules over 2 cm, the larger oscillations using NST are usually enough to drive the cell fragments up the needle quickly. In smaller solid thyroid nodules the oscillations must be shorter, so suction may be necessary. ST results in a larger volume, but more blood is introduced to the sample, potentially causing clot artifact and obscuration, whereas NST will result in a smaller volume that contains less blood and is often of better quality. With ST, sampling begins after the needle tip is within the target, whereas NST will result in acquisition of some cells from the intervening tissues.
The advantages and disadvantages of ST versus NST are summarized in Table 28.2. The initial biopsy can be performed without suction, or with very light (1–2 cm3) suction. If the first aspiration yields insufficient material, suction can be applied or increased during subsequent passes. If excessive blood or material is aspirated, the suction can be decreased or eliminated on subsequent passes. Suctionless techniques using a bare needle or a needle attached to a syringe without the plunger are shown in Videos 28.1, 28.2, 28.3, and 28.4. There are several devices and methods for applying suction during USGFNA . These are illustrated in Videos 28.5, 28.6, 28.7, 28.8, 28.9, and 28.10.
Table 28.2
Suction versus suction-less biopsy
Suction | Suction-less |
|---|---|
1. Larger volume of sample | 1. Smaller volume of sample |
2. More blood | 2. Less blood |
3. Begin sampling once in target | 3. Simpler |
4. Avascular nodules | 4. Vascular nodules |
5. Lymph nodes | 5. Superficial nodules |
6. Parathyroids | 6. Most nodules |
7. Complex cysts | |
8. Drain cysts |
In a palpation-based biopsy study using two passes with each technique in 260 thyroid nodules there was no difference in adequacy or accuracy when comparing aspiration (ST) with capillary action (NST). In an ultrasound-guided biopsy study, 88 nodules underwent fine needle aspiration with ST, and 92 underwent fine needle NST, with no difference between the results in terms of adequacy and quality of specimen. The authors concluded that the NST technique may offer more technical ease [13, 14].
Rotating the needle, without suction or oscillations, may reduce blood contamination in large or vascular nodules because it minimizes the number of vessels that are traversed. A combination of spinning and small oscillations can also be used (Videos 28.1, 28.2, 28.3, and 28.4). Avoid long oscillation strokes in nodules with high grade vascularity.
While some authors recommend covering the hub or syringe after the biopsy and prior to withdrawing the needle, this does not appear to be necessary to achieve adequate samples. However, covering the needle hub or syringe barrel is typically used when performing biopsy of complex cysts, so that capillary pressure does not draw cyst fluid into the needle prior to entering the solid target. Suction can then be applied once the needle tip is well within the solid component. Suction is always used in the drainage of cysts, and movement of the needle tip within the cyst may help if there is solid tissue plugging the bevel.
Adequacy of technique can be confirmed with rapid on-site cytologic analysis.
28.5 Imaging for FNA
Proper room setup and availability of equipment is essential to maximize the contribution of US to FNA procedures. Ideally, the monitor for the US should be across the patient from the operator, allowing the operator to visualize the patient’s neck and the monitor simultaneously. A second monitor connected to the ultrasound machine can be placed on the contralateral side attached to the wall with a C-arm, or on a movable table to allow visualizing the procedure from either side of the patient (Figs. 28.2 and 28.3).
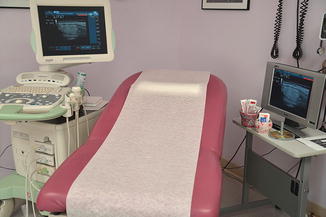
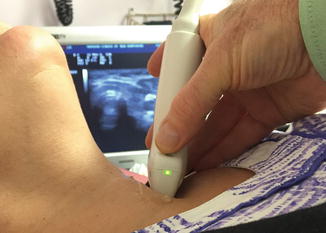
Fig. 28.2
Room setup. The use of an additional monitor allows the operator to line up the patient’s neck and the monitor, and observe both simultaneously
Fig. 28.3
Line–up transducer. Achieving perfect alignment of the needle and the long axis of the transducer is much easier when looking down the axis of the transducer
Visualization of the needle can be performed using either a parallel or perpendicular technique. In the parallel technique, the needle is inserted along the axis of the ultrasound beam (Fig. 28.4a, b, Videos 28.11 and 28.12) and is visualized throughout its course through the tissue and into the target. In the perpendicular technique, the needle is inserted perpendicular to the axis of the beam, and is visualized only at the point that it intersects the beam (Fig. 28.5, Video 28.13). Advantages of the parallel approach include visualization of the needle tip at all times during the biopsy, decreasing the probability of the needle tip leaving the target or traversing blood vessels. Multiple spots within the nodule can be sampled, and the needle can be redirected while being inserted. The perpendicular approach does not require accurate alignment of the needle and ultrasound beam, and may be simpler to perform, especially for superficial nodules .
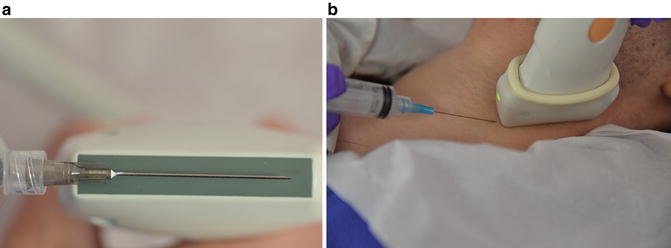

Fig. 28.4
(a, b). Parallel approach. In the parallel technique, the needle is inserted along the axis of the ultrasound beam and is visualized throughout its course through the tissue and into the target
Fig. 28.5
Perpendicular approach. In the perpendicular technique, the needle is inserted perpendicular to the axis of the beam, and is visualized only at the point that it intersects the beam
Operators should become skilled in all techniques, as the nodule size and location often will dictate which technique is preferred. There are several techniques to improve needle visualization when using the parallel approach. It is essential that the needle and the long axis of the transducer perfectly line up. Positioning yourself so that you can see the relationship between the needle and transducer head is essential. Having the transducer placed so that you can look down the needle and the transducer head (Fig. 28.3) will improve the ability to line the two items up. The bevel of the needle should be pointed toward the ultrasound transducer in all techniques (Fig. 28.6). Fine adjustments of the transducer, both rotation and lateral movement, will bring the needle into view if the axis is off by a small amount. The most important part of developing skill in properly lining up the needle is practice. It is highly recommended that the operator begin with work on phantoms until sufficient skill in lining up the needle is obtained, prior to performing biopsy in a clinical setting.
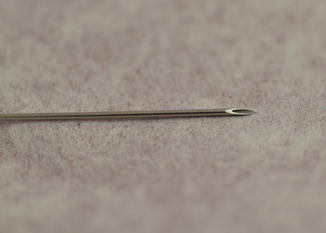
Fig. 28.6
 Ultrasound-Guided Laser Ablation
 Transcutaneous Laryngeal Ultrasonography: Clinical Variables
 Cytomorphology of Fine Needle Aspiration of Thyroid
 The Ultrasound Lexicon: Common Terminology for Thyroid and Parathyroid Sonography
 Feature Illustration: Vascularity
 Pattern Recognition: Diffuse Thyroid Disease


Bevel up. The strongest refection off of the needle will be from the flat bevel. The bevel, shown in this image, should be “up,” pointing toward the transducer
Related posts:
Ultrasound-Guided Laser Ablation
Transcutaneous Laryngeal Ultrasonography: Clinical Variables
Cytomorphology of Fine Needle Aspiration of Thyroid
The Ultrasound Lexicon: Common Terminology for Thyroid and Parathyroid Sonography
Feature Illustration: Vascularity
Pattern Recognition: Diffuse Thyroid Disease
Stay updated, free articles. Join our Telegram channel
Full access? Get Clinical Tree
