CHAPTER 5 Transcatheter fluid drainage
Technique
Although no longer novel, percutaneous fluid drainage (PFD) represents a paradigm shift in the treatment of sterile and infected fluid collections throughout the body, largely replacing traditional surgical incision and drainage and washout operations, which have been relegated to second-line therapies behind image-guided drainage. They are amongst the most common procedures performed in interventional radiology, and are frequently amongst the most satisfying, in that the effects of these procedures can often be immediate and provide significant relief of a patient’s suffering.1–5
Patient selection
Almost any fluid collection found in the chest, abdomen or pelvis, as well as much of the musculoskeletal system, may be amenable to percutaneous fluid drainage, whether by simple needle aspiration or placement of a drainage catheter, as long as a safe pathway for needle insertion is available and any underlying coagulopathy is corrected.6
Patient preparation
As with all interventional procedures, coagulopathies must be corrected before intervention (see Chapter 2). Study of previous cross-sectional imaging and plain radiography is crucial in proper patient positioning and sterile preparation. Often, patients with suspected infected fluid collections are already receiving antibiotics at the time of drainage. If not, the decision to provide prophylactic coverage is left to the discretion of the interventional radiologist and should be based on the patient’s current clinical condition. Although there is no consensus regarding first-line antibiotic coverage, commonly a second- or third-generation cephalosporin may be administered within 1 hour of the procedure, with a combination of clindamycin and gentamicin reserved for patients with penicillin allergy.7 This prophylaxis does not interfere with cultures of fluid aspirated from the collection. Many of these procedures may be performed with local anesthesia alone; conscious sedation may be provided intravenously for more anxious patients. General anesthesia is indicated for children and uncooperative patients. Proper informed consent must be obtained.
Imaging guidance and access
The route offering the shortest distance from skin to collection is often the preferred access window for needle and catheter placement. This is not always possible, however, because of the interposition of organs or vessels along the access route. Transpleural drainage of high abdominal fluid collections (i.e., perisplenic abscesses or liver abscesses), while often providing the shortest route, is less preferable and should be avoided if a safe subphrenic pathway is available to avoid potential empyema. Prior imaging studies are used in the selection of the access route, as well as in the positional preparation of the patient and choice of imaging modality for drainage guidance. The area to be drained is then examined with the imaging modality of choice to confirm the viability of the chosen access route. The patient is then prepped and draped in a sterile fashion, and local anesthetic is administered to the access site. Local anesthesia should be generously applied to both the skin surface and the deep tissues, particularly at innervated surfaces such as the peritoneum, pleura, or organ capsule (i.e., liver, kidney). Good local anesthesia maximizes patient comfort and minimizes the need for intravenous conscious sedation.
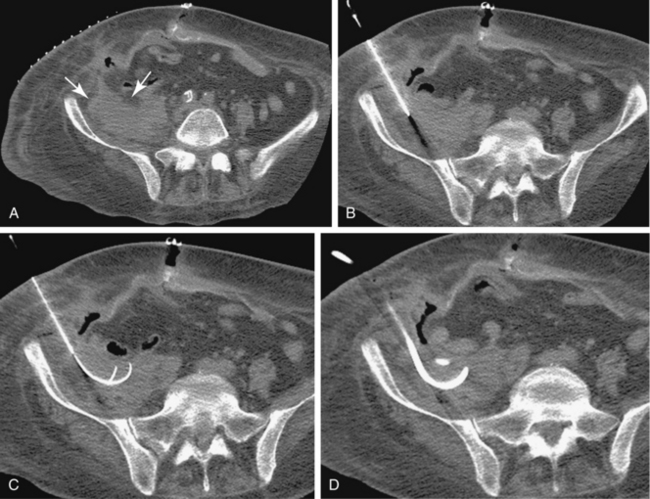
Sonography and fluoroscopy allow for needle localization under direct imaging guidance (Fig. 5-1). Imaging under CT is performed intermittently during needle insertion, advancing the needle before acquiring a limited CT slice to determine needle location and trajectory. Successful puncture of the collection, wire localization, and drainage placement are all confirmed by CT (Fig. 5-2).
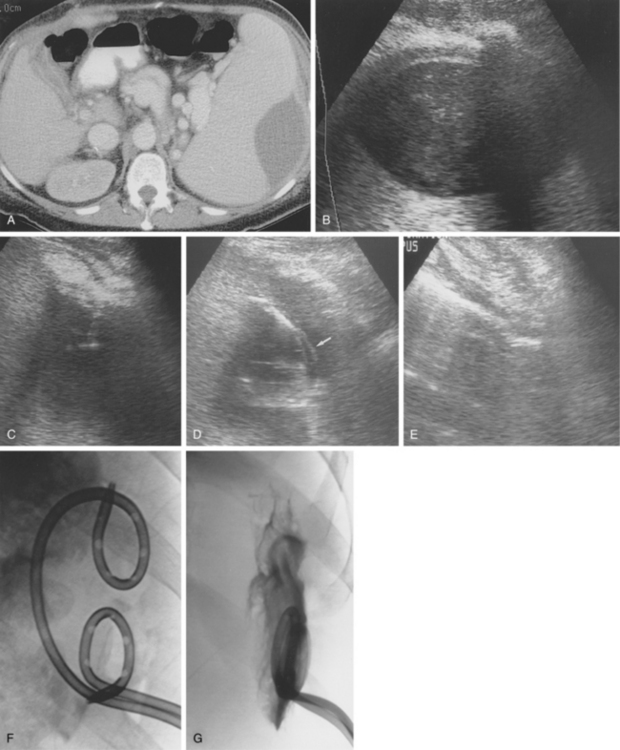
Figure 5-1 Ultrasound-guided drainage of a splenic abscess in a patient with portal hypertension and fever. A, Computed tomography shows a subcapsular splenic fluid collection. Note the enhancing varices in the splenic hilum and pericholecystic fluid around a collapsed gallbladder. B, Coronal sonographic image of the subcapsular cavity. C, A needle is inserted into the fluid collection with real-time sonographic guidance. D, A guidewire was advanced through the needle, over which a 10-Fr pigtail drainage catheter was placed (arrow).E, The cavity has completely collapsed after aspiration. F, A second drainage tube was placed. G, Follow-up tube injection 2 weeks later shows a small residual cavity.
Diagnostic aspiration
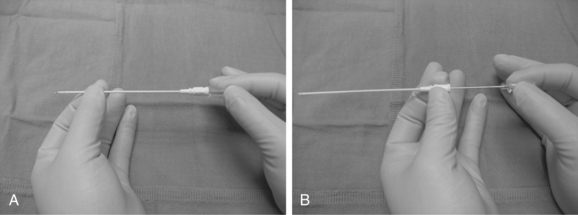
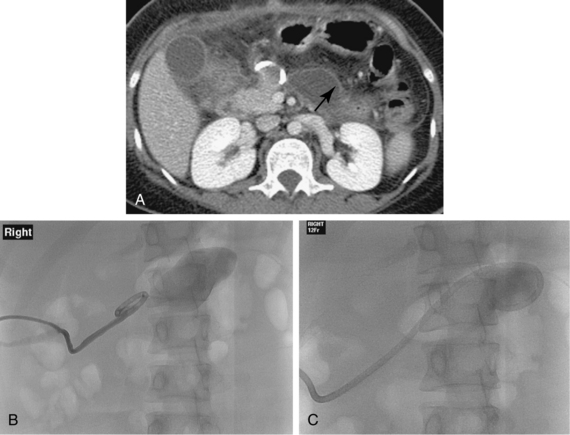
As noted in the previous section, small-caliber needles (18- to 22-gauge) are typically selected for aspiration. Alternatively, an over-the-needle catheter system may be employed, such as the Yueh or OneStep catheter systems. These are 4- and 5-French (Fr) catheters that slide into position over the introducer needle, much like a peripheral intravenous catheter. Such systems are useful for aspiration of simple fluid collections of some volume, in which a drainage catheter placement is not indicated, such as a therapeutic thoracentesis or paracentesis (Fig. 5-3).
Conversion of an aspiration procedure to drainage catheter placement is based on multiple factors. One small, retrospective study found that more than half of all sterile pancreatic fluid collections found in acute pancreatitis treated with long-term catheter drainage underwent bacterial colonization.8 Thus, by convention, sterile pleural effusions or ascites are often treated with therapeutic aspiration alone, because placement of an indwelling drainage catheter can promote infection of these collections. The same is true for fluid collections elsewhere, such as joint effusions. Infected collections often require placement of a drainage catheter; however, aspiration may be performed on collections that are too small for placement of a drainage catheter. Drains are placed for symptomatic collections that recur after therapeutic aspiration, such as cysts and pseudocysts. One-step needle aspiration without catheter insertion may be performed in certain locations without expected communication with the gastrointestinal, biliary, or urinary tracts. This approach has reported success rates up to 90% in selected cases.6,9–12
Catheter insertion
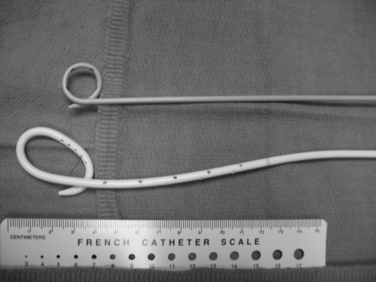
Choice of catheter size and type is determined by the type and character of the fluid to be drained. Air and thin fluids are drained with 8- and 10-Fr catheters. Viscous fluids and fluids containing particulates require larger drainage catheters ranging from 12- to 26-Fr. Most drainage catheters have an inner retention mechanism, such as the locking pigtail (Cope loop) or Malecot drains (Fig. 5-4).
The direct trocar technique can be safely performed on large superficial collections. After application of local anesthesia, the skin is incised with a scalpel and the incision spread with a Kelly clamp. The catheter is directly inserted into the collection with the inner cannula and stylet. The stylet is then removed and the cannula is aspirated. The catheter is then inserted over the cannula or guidewire.
The tandem-trocar technique is a variation of the trocar technique, in which the distance between the skin and collection is measured by imaging and marked on the catheter shaft. The catheter, with the metal cannula and stylet, is placed in the skin hole next to the previously inserted needle and advanced into the collection under imaging guidance. The stylet is removed, and material can be aspirated. A 0.035-inch guidewire is then advanced through the cannula, and the catheter is inserted over the cannula and guidewire into the collection. Use of the guidewire decreases the risk of perforation of the back wall of the cavity, disrupts septations allowing for better drainage, and assists in the coiling of the pigtail catheter.
The Seldinger technique is the most common method of catheter placement and is suitable for drainage of all collections, particularly those that are small or difficult to access. After access has been achieved with an 18-gauge needle, a 0.035-inch guidewire is inserted through the needle and coiled in the collection (see Fig. 5-2). The tract is serially dilated and the catheter is inserted over the guidewire using the metal cannula without the stylet. The catheter is then advanced over the cannula and wire and coiled in the collection.
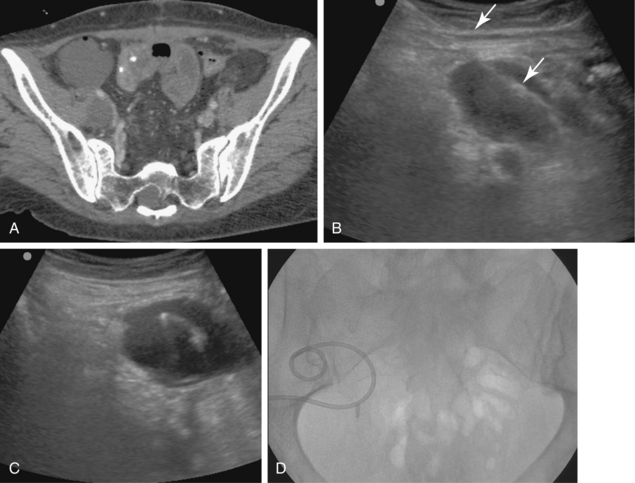
After catheter insertion, postplacement imaging is performed to document proper catheter location. The collection is then evacuated. Fluid levels determined by specific gravity are not uncommon, and one can often find a collection that initially yields thin fluid, followed by viscous aspirate and finally serosanguineous fluid. The fluid can become blood tinged when the cavity is nearly empty and suction is applied to the dry walls of the former collection (Fig. 5-5).
Catheter care
Gravity drainage to a collection bag is typical in most cases, particularly when the fluid being drained is nonviscous. Thicker material may require a suction drainage bag or application of low intermittent wall suction, as well as frequent irrigation to break up viscous material and prevent catheter clogging. Continuous low wall suction is used for thoracic collections. Drains placed in the pleural space are connected to a Pleur-evac water-seal device, which contains a fluid collection chamber and a safety mechanism to prevent excessive suction. The Pleur-evac is then attached to wall suction (Fig. 5-6). High-output collections, which often involve gastrointestinal and urinary fistulas, may require continuous low wall suction to keep the cavity dry and promote healing.
Postprocedure care
A 2- to 4-mg dose of tissue plasminogen activator (t-PA) in 10 to 20 mL or more of normal saline may be instilled in drains that are properly positioned in viscous collections that are refractory to drainage after normal routine irrigation. Typically, such collections are loculated (e.g., infected hematomas). In such cases, t-PA is infused through the catheter, which is then capped for 1 to 2 hours to allow the t-PA to liquefy the collection. The catheter is then reopened to drainage. Several prospective studies suggest that routine catheter flushing using fibrinolytics instead of saline decreases the total time to abscess resolution, length of hospital stay, and therefore total cost of care.13,14 In general, the patient’s acute condition resolves within 24 to 48 hours after drain placement.
Clinical management: postprocedure imaging, catheter manipulation and removal
Management of drainage catheters is based on the patient’s clinical course and the output of the drainage catheter (Table 5-1):
Table 5-1 Algorithm for Percutaneous Fluid Drain Management
| Clinical Status | ||
|---|---|---|
| Improved | Stable/Declined | |
| Decreased drainage output | Remove catheter | Reimage and reassess |
| Increased or stable output | Sinogram to evaluate for fistula | Leave catheter in place and continue maintenance |
A stiff 0.035-inch guidewire is inserted into the tube after the hub is cut off to release the internal locking mechanism. Under fluoroscopy, the wire is manipulated into the collection outlined by contrast from the sinogram. The catheter is then removed over the wire and replaced with a new one; the size of the catheter may be increased if the collection is particularly viscous (Fig. 5-7).
Ultimately, the catheter is removed if:
Results and complications
The success rate of PFD combined with antibiotics and nutritional support is about 90% for simple collections (cysts, unilocular abscesses). The cure rate drops to 70% for complex collections such as infected hematomas, multilocular abscesses, abscesses complicated by bowel fistula, pancreatic abscesses, and infected necrotic pancreatic collections.15,16 Drainage failures often are attributed to residual undrained collections, premature tube removal, or inadequate position (or number) of catheters. However, even when PFD is not completely curative, it often converts an emergent operation (with its attendant risks) to an elective procedure or obviates the need for a two-stage operation (e.g., diverting colostomy).
Stay updated, free articles. Join our Telegram channel

Full access? Get Clinical Tree


