and Bruno M. Humbel2
(1)
Max Planck Institute for Developmental Biology, Tübingen, Germany
(2)
Electron Microscopy Facility, Biophore, University of Lausanne, Lausanne, Switzerland
Abstract
In correlative microscopy, light microscopy provides the overview and orientation of the complex cells and tissue, while electron microscopy offers the detailed localization and correlation of subcellular structures. In this chapter we offer detailed high-quality electron microscopical preparation methods for optimum preservation of the cellular ultrastructure. From such preparations serial thin sections are collected and used for comparative histochemical, immunofluorescence, and immunogold staining.
In light microscopy histological stains identify the orientation of the sample and immunofluorescence labeling facilitates to find the region of interest, namely, the labeled cells expressing the macromolecule under investigation. Sections, labeled with immunogold are analyzed by electron microscopy in order to identify the label within the cellular architecture at high resolution.
Key words
ImmunolabelingImmunofluorescenceImmunogoldLight microscopyTransmission electron microscopyScanning electron microscopyResin embeddingMethacrylateEpoxyTokuyasu cryosectioningCorrelative microscopyArray tomography1 Introduction
Electron microscopy in combination with immunolabeling allows the localization of macromolecules at high resolution in the structural context of tissue and cells. The label can directly be bound to the antigen-containing structure. If one starts with a new antigen, this approach is definitely not the method one should use first. It can be tedious or even impossible to find the region of interest in the three-dimensional structure within the tissue by electron microscopy.
Light microscopy, on the other hand, offers the advantages of rapid screening a large area of a specimen, of determining the specificity of labeling, and of simultaneously detecting multiple antigens with ease. In bright field, phase or differential interference contrast light microscopy, the majority of cellular organelles cannot be directly identified due to the low-resolution power and to the discernment of the color reaction products of the label. In epifluorescence microscopy, the signal of the label is much higher because of the dark-field imaging mode. Unfortunately, there are no reference structures visible in epifluorescence microscopy, so the correlation between labeled antigen and a counterstain is indispensable [1]—e.g., DAPI to visualize the DNA or additional labeling for assumed compartments. Still, even using confocal microscopy, co-localization cannot be unequivocally proven due to the poor resolution along the z-axis. Furthermore, the point of focus of the different wavelengths, e.g., blue from DAPI and green from FITC, is not at the same z-height because of the different refraction indices.
Thus, ideally one should combine the advantages of both light and electron microscopic imaging using the identical specimen. The ultimate approach would be live-cell observation and selection of the region of interest in the light microscope and subsequent high-resolution imaging of the fluorescent signal of the identical region in frozen-hydrated sections in a cryoelectron microscope [2, 3].
With the development of a cryo-fluorescence microscope [4, 5], genetically labeled cells are imaged by fluorescence and its coordinates fed into a cryo-TEM for cryoelectron tomography [6]. In the meantime there is also an integrated light electron microscope (ILEM) that makes direct correlation in one instrument possible [7–10].
Cryo-applications are still restricted to relatively small objects and therefore more conventional approaches are needed for more routine applications. Electron microscopy preparation protocols have been designed that can preserve genetic labels, like GFP, YFP, RFP, and mCherry. The label distribution is imaged on a section by fluorescence microscopy and afterwards the ultrastructure of the same section can be correlated with the fluorescence image [11–16].
Another approach is the efficient conversion of a fluorescent signal in a living cell into an electron-dense signal for subsequent characterization on electron microscopic level [17–20]. One of the drawbacks of the photo-conversion method is the low contrast and the rather poor spatial resolution of deposited reaction pro-duct that may in addition obscure the structure of interest. Furthermore, although a region of interest is easy to find by light microscopy, the identical region is intricate to spot by electron microscopy. This problem is particularly troublesome if the signal is not both unequivocally identifiable and associated with a well-defined structure.
The preparation schemes of immunolabeling for light microscopy compromise the cellular ultrastructure, cause dislocation or even loss of components such as lipids and nonstructural proteins, and limit the admission of the detecting antibodies through steric hindrance [21–24]. For pre-embedding labeling, the samples have to be opened to provide access to the intracellular antigens either mechanically by freeze-thaw methods or chemically with solvents or detergents.
In the past four decades, we have learned a lot about preservation of the cellular architecture for high-resolution electron microscopy, which raises the possibility of applying this know-ledge to light microscopy. The aim of this report is to show the great potential of correlating light and electron microscopy data, which has developed from improved specimen preparation techniques in combination with post-embedding labeling for both immunofluorescence and immunogold (see Note 1).
The key observation in post-embedding labeling has been the fact that antibody binding is mainly restricted to the surface of a section of properly fixed material [25, 26]. Hence, there is no need to cut thick or semi-thin sections for on-section immunolabeling, as the signal would be similar to that of ultrathin sections (see Note 2). Particularly with resin-embedded material, the potential of ultrathin sectioning can be exploited to provide adjacent serial sections for light and electron microscopy [27–31]. The use of the identical specimen preparation via thin sections for both light and electron microscopy offers the possibility to examine the same sample at different orders of magnitude. Thus, identical sections of a specimen can be used to give an overview of labeling distribution in a total organ by fluorescence microscopy and to define precisely the fine details at the level of cellular compartments by electron microscopy. In principal, this approach is suited to Tokuyasu cryosections [32–37] and all methacrylate and epoxy resins, as long as antigenicity is retained.
The main advantages of Tokuyasu cryosections are twofold: the samples are not dehydrated by solvents—hence, the proteins remain in their natural aqueous environment until immunolabeling—and due to the open surface structure, more antigens are accessible than in resin sections (see Note 3). Moreover, the preparation procedure is fast and the results are obtainable within 1 day. The Tokuyasu cryosectioning technique can also be combined with cryofixation using high-pressure freezing [38–40]. Though the procedure is a bit more time consuming, its benefit is to better preserve membrane structures and, more importantly, to make difficult to fix biological samples like plants and insects accessible for the Tokuyasu technique [40]. With the current improvements of the technology and the instrumentations, Tokuyasu cryosections can as easily be cut as resin sections, e.g., sections parallel to the substrate [25, 41] or serial sections.
Embedding in resins such as cross-linked methacrylates (Lowicryl, London Resins, Unicryl) [42–46] or epoxies (Epon, Araldite, Spurr’s) [47–49] allow wet sectioning to produce large (millimeter sized) and ultrathin sections (>50 nm thickness) with excellent structural preservation. Furthermore, established histo-logical staining procedures, e.g., toluidine blue staining [50], can be applied and are advantageous to differentiate between the structures within the specimen. Last, but not least, large collections of resin-embedded specimens can easily be stored at room temperature, requiring only a small space. Somehow surprisingly, most epitopes keep the antigenicity, even after sectioning, for a very long time, in the range of years. Hence, libraries of samples can be established and serve as references for new mutants or constructs but also to be reinvestigated for new proteins and antibodies of interest. There are reports that antigen-retrieval protocols may increase label efficiency in “old” standard preparations [51–53].
Epoxy monomers cross-link with the cellular components during polymerization; hence, they form a copolymer of resin and molecules in the biological specimen [54]. Thus, biological material embedded in epoxy resins is easy to section. While this method provides excellent morphology, antigenicity is often affected. In contrast, methacrylates cures by a radical chain reaction, allowing only the monomers to polymerize [54, 55] so that the biological components are enmeshed in a network of resin polymers. Hence, the more open structure and its higher degree of hydrophilicity than Epon provides better labeling properties.
Resin embedding can be combined with a large variety of fixation and dehydration procedures. Fixation can be done chemically at ambient temperature or by cryofixation. Dehydration can be performed through a graded series of solvents at ambient temperature, by progressive lowering of temperature (PLT) [43] or by freeze-substitution [56].
The gold standard of preparation methods is cryofixation followed by freeze-substitution and resin embedding [56–59]. The cryofixation method of choice is high-pressure freezing [60–63]. To quote Dr. Martin Müller [64], “Even the best microscopes and the most sophisticated image analysis algorithms are unable to provide high density information from samples distorted during the sampling step (i.e., specimen preparation).” Therefore, improved specimen preparation using cryotechniques in combination with post-embedding labeling for both immunofluorescence and immunogold is a promising approach to bridge the gap between light and electron microscopy [28].
An intrinsic property of high-resolution objectives with high numerical apertures of light microscopes is the small depth of focus (see Note 4). This results in out-of-focus blurring of the image and loss of resolution in both bright field and phase contrast illumination settings as well as in fluorescence light microscopy. This is because biological objects, even cell monolayers, are much thicker. Therefore, only thin sections not thicker than the depth of focus of objectives with a high numerical aperture (0.5–1 μm) can exploit the much higher resolution. A further aspect is the z-resolution of a light microscope. With confocal, also 2-photon, microscopy at optimum conditions, the z-resolution is in the range of 400–500 nm. Even super-resolution microscopy has difficulties with the z-resolution. The maximum x, y-resolution of about 10 nm can only be achieved on ultrathin sections of 50–80 nm [65]. This observation strengthens our arguments to use ultrathin sections for fluorescence microscopy. For single images the z-resolution is not lower than the section thickness, e.g., array tomography, or even higher on resin sections where only a few nm are accessible for the antibodies. Also super-resolution microscopy cannot overcome the precision of the antibody detection of an antigen that is in the range of 5–30 nm as in electron microscopy.
Thus, for correlative microscopy, first, the region of interest is approached with the help of toluidine blue stained thin sections. Second, the signal is localized on ultrathin sections (50–100 nm) with fluorescence microscopy and then at high resolution with electron microscopy.
The widespread and successful application of confocal light microscopy has pushed tremendous development of a great variety of stable fluorochromes and detection systems, e.g., more precise optical filters (see Note 5). Due to the small size of the fluorochromes (a few hundred Daltons), they influence the binding properties of antibodies less than other marker systems [23]. Generally, if labeling with fluorescence markers fails, there will be no chance to detect the antigen with gold probes. Hermann et al. [66] have demonstrated the dramatic influence of even a very small gold particle (1 nm). They showed that Fab fragments directly coupled to ultrasmall gold particles detect only one copy of a homotrimer of proteins at distinct sites of the tail fibers of a T-even phage, whereas uncoupled Fab fragments detect two copies. Nevertheless, the smaller the size of the gold particle, the higher is the density of gold label [23, 26, 67]. This observation suggests that not all the primary antibodies are detected by the gold label. The larger the gold particle the stronger the electrical repulsion. Therefore a large number of primary antibodies can still be labeled with a smaller, uncharged detection system, i.e., fluorochrome markers after the gold labeling [31].
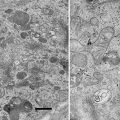
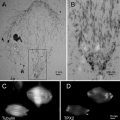
To permit optimum correlation of the results obtained by on-section labeling, the labeling conditions for immunofluorescence and immunogold have to be kept identical. The potency of this approach (Figs. 1, 2, 3, 4, and 5) has been demonstrated in a series of publications [28, 31, 68–74].
Based on this concept Micheva and Smith [75] developed the array tomography. They collect ribbons of serial sections on microscopy slides and perform immunolabeling of an antigen that is detected by a fluorescence marker. After imaging all sections in a fluorescence microscope, the antibodies can be removed and a second fluorescence labeling can be performed. This process can be repeated for several times resulting in an array of images of different antigens. Finally the ultrastructure is imaged in a scanning electron microscope using backscattered electrons. The result is a three-dimensional map of fluorescently labeled proteins that can be correlated to the cellular ultrastructure [53, 75–77].
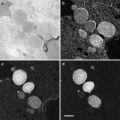
Due to the fact that after the detection with gold conjugates still a large number of primary antibodies are accessible for the smaller fluorochrome-labeled antibodies, double labeling could be done in an inverted sequence. Sections are mounted on indium tin oxide (ITO)-coated glass slides or coverslips [78]. The antigen is labeled with a primary antibody, then first detected with a gold detection system, followed by a fluorescence-tagged antibody directed against the same primary antibody. After imaging the label in a fluorescence microscope, the slides can directly be transferred to a SEM to image the gold label of the same sections (Figs. 6, 7, and 8).
Our goal is to use the labels at the level of resolution the physics of the instruments allow. With the fluorescence label the cell or organelle of interest is identified in the tissue. Then the tissue block is trimmed such that the area becomes accessible for sectioning [79–82]. On the section further proteins can be labeled with colloidal gold particles for electron microscopy to study the high-resolution distribution in the tissue and the cell of interest in particular.
2 Materials
1.
Poly-l-lysine stock solution. Prepare a stock solution of poly-l-lysine (Sigma, MW 70,000–150,000 Da) at 2 mg/ml (w/v) in bidistilled water, or order a 0.1 % stock solution (Sigma). Aliquots can be stored at −20 °C.
2.
Methacrylates. All work has to be carried out under a fume hood, use the appropriate gloves whenever handling meth-acrylates, because it can cause allergic reactions [83]. Oxygen is an inhibitor of the polymerization; therefore, avoid vigorous agitation of the methacrylates and use airtight tubes, e.g., 0.5 ml tubes (Sarstedt) for polymerization.
Preparation of Lowicryl stock solutions. Weigh substances under fume hood using screw-cap glass vials (e.g., Wheaton glassware for scintillation counting). Mix until initiator has dissolved completely and store at −20 °C. The mixture is stable at −20 °C for several months.
(a)
Lowicryl K4M: 3.0 g crosslinker A (Fluka or Polysciences); 19.0 g Monomer B; 110 mg initiator C: benzoin methyl ether (catalyst).
(b)
Lowicryl HM20: 3.3 g crosslinker D (Fluka or Polysciences); 18.7 g Monomer E; 110 mg initiator C: benzoin methyl ether (catalyst).
(c)
Lowicryl K11M: 1.1 g crosslinker H (Fluka or Polysciences); 20.9 g Monomer I 110 mg; initiator C: benzoin methyl ether (catalyst).
LR White and LR Gold are ready-to-use embedding media and can be purchased by any supplier for electron microscopy.
3.
Tokuyasu cryosections.
2.3 M sucrose in bidistilled water.
4 % uranyl acetate in bidistilled water.
2 % methylcellulose (25 cP, Sigma) in bidistilled water.
4.
Perfect loop (Electron Microscopy Sciences, Fort Washington, PA).
Slot grids L2x1, Synaptek (Electron Microscopy Sciences, Fort Washington, PA).
5.
Toluidine blue O solution. Dissolve 0.5 % toluidine blue O [C.I.52040] (Serva, Fluka, Sigma) in an aqueous solution of 1 % sodium tetraborate, pH 9.2 (Merck) (see Note 6), filter and store as aliquots, e.g., in microtubes. Centrifuge prior to use.
6.
Coverslips, 12 mm diameter, 0.17 mm thickness (Electron Microscopy Sciences, Fort Washington, PA).
Indium tin oxide (ITO)-coated glass slides (Optics Balzers, Liechtenstein).
7.
PAP-Pen (Electron Microscopy Sciences, Fort Washington, PA).
8.
Counterstains for nucleic acids.
DAPI: 4′,6-diamidine-2-phenylindole; for DNA staining.
Hoechst 33342 and Hoechst 33258: bisbenzimide, 2-(4-ethoxyphenyl)-5-(4-methyl-1-piperazinyl)-2,5-bi-1H-benzimidazole,trihydrochloride; for DNA staining.
Propidium iodide; for DNA and RNA staining.
9.
Mounting media for fluorescence microscopy.
Mowiol 4–88 from Hoechst [84] (Calbiochem).
Elvanol (DuPont).
Polyvinyl alcohol (PVA) (Sigma, MW 30,000–70,000 Da).
Commercially ready-to-use medium: Vectashield (Vector Laboratories, cat. #H-1000).
10.
11.
13.
Antibodies used in these experiments are:
Goat anti-mouse IgG-12 nm gold particles (Jackson 115-205-146).
Goat anti-rabbit IgG-6 nm gold particles (Jackson 111-195-144).
Protein A-15 nm gold particles.
Goat anti-rabbit IgG Alexa 448 (Molecular Probes A-11008).
Goat anti-mouse IgG Cy3 (Jackson 115-165-146).
Goat anti-rabbit IgG Cy3 (Jackson 111-165-003).
Mouse IgG2b anti-pan actin (Cedarlane CLT 9001).
Rabbit anti-β catenin P14L, MPI for Developmental Biology, Tübingen [72].
Rabbit anti-prolactin [74].
Rabbit anti-Trypanosoma VSG, Dr. George A.M. Cross, Rockefeller University, New York.
Mouse anti-α-tubulin IgG1 (Sigma T5168).
3 Methods
3.1 Fixation
3.1.1 Chemical Fixation at Ambient Temperature
The biological specimen is fixed as close to living conditions as possible by adjusting the pH, osmolarity, and temperature to those of the living conditions (see Note 8). To fix tissue of mammals, perfusion fixation is the first choice. For cells or small organisms growing in medium, the addition of an equal volume of double strength fixative is recommended.
For immunolabeling, aldehydes are used as fixative. The use of osmium tetroxide is strongly discouraged (see Note 9). The typical fixation protocols applied in light microscopy (such as cold acetone, or methanol, or aldehyde in combination with permeabilization with detergents) must be avoided. They have a deleterious effect on the cellular ultrastructure, and antigens can be relocated or even extracted [22, 24].
Our standard fixation protocol is 2–4 % formaldehyde or a mixture of 2–4 % formaldehyde with 0.02–0.2 % glutaraldehyde in HEPES or PIPES [for a comprehensive compilation see [91], pp 57–63] for 1–16 h. If necessary, aldehyde fixed samples may be stored in 1–4 % formaldehyde at 4 °C.
3.1.2 Cryofixation
Cryofixation or cryo-immobilization is a fast physical fixation procedure that arrests cellular processes within milliseconds, thereby avoiding the typical artifacts introduced by the relatively slow diffusion-dependent chemical fixation process (minutes) [64, 92–95].
Cryofixation can be achieved in many different ways: plunging [96, 97], jet freezing [98], metal mirror or slamming [99], spray freezing [100], or high-pressure freezing [60, 62, 101]. In cell biology, after a long time of stagnation, high-pressure freezing has become the method of choice, because much thicker samples can be processed. For a review of cryo-preparation techniques, refer to [101–105].
3.2 Sucrose-Infiltrated Cryosections According to Tokuyasu [32, 35, 67, 106–110]
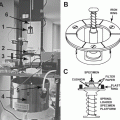
After chemical fixation single cells are embedded in gelatin, 10–20 % (w/v) in phosphate buffer or PBS. Sometimes it can be useful to also infiltrate tissue with gelatin to fill “empty” spaces like blood vessels with proteins. This way large differences in density are avoided and thus cutting properties are improved. In brain tissue, however, gelatin infiltration seems to seriously interfere with the ultrastructure (Dr. Céline Loussert, unpublished). The different effect of gelatin on the tissue may be explained by the fact that gelatin is a rather undefined product and some batches may for instance contain proteases. Then the gelatin or tissue blocks are cut into small cubes of about 1 mm3 or less. These cubes are infiltrated in 2.3 M sucrose in water for 4–20 h at 4 °C. When the blocks are floating or sinking to the bottom of the tube, they are well infiltrated. The blocks are mounted on the pins of the cryo-microtomes (Leica Ultracut or RMC PowerTome) and frozen in liquid nitrogen or in the cold cryo-chamber of the microtome.
3.3 Dehydration
3.3.1 Dehydration at Ambient Temperature
Dehydration at ambient temperature is traditionally done in a graded series of increasing ethanol concentrations [111]. Organic solvents dissolve and extract lipids as well as denature proteins in a polarity- and temperature-dependent manner. Therefore dehydration methods done at lower temperatures, i.e., progressive lowering of the temperature and freeze-substitution, are preferred.
3.3.2 Ethanol Dehydration by the Progressive Lowering of the Temperature (PLT) Method and Low-Temperature Embedding [43, 112]
Chemically fixed specimens are dehydrated and embedded into methacrylates according to the scheme given for Lowicryls.
Solvents/resins | Temperature °C | Time |
|---|---|---|
30 % ethanol | 0° | 30 min |
50 % ethanol | −20° | 60 min |
70 % ethanol | −20° | 60 min |
95 % ethanol | −35° | 60 min |
100 % ethanol | −35° | 60 min |
100 % ethanol | −35° | 60 min |
Ethanol/Lowicryl 1:1 | −35° | 60 min |
Ethanol/Lowicryl 1:2 | −35° | 60 min |
100 % Lowicryl | −35° | 60 min to overnight |
100 % Lowicryl | −35° | Approx. 6 h |
Embedding in Lowicryl and UV polymerization | −35° | 48 h |
Either of the Lowicryl mixtures K4M, K11M, or HM20 (also the other methacrylates, LR Gold and LR White) can be used for embedding. Note that the final temperature needs to be adapted to the physical and chemical properties of the resins used (seeSubheading 3.4.1 Methacrylates and also see Note 10).
Dehydration by Freeze-Substitution [56–59]
Cryofixed tissue and cells are dehydrated by freeze-substitution for subsequent embedding into resin. Thus, the superior morphological preservation of cryofixation can be combined with the advantages of resin sections, e.g., the ease to cut and the possibility for on-section immunolabeling.
During the freeze-substitution process, the biological samples are dehydrated by dissolving the ice and in addition they can be chemically fixed in immobilized state. Here, the negative effects of dehydration, such as loss of lipids and proteins [58, 113–115], are greatly reduced compared to dehydration at room temperature or by PLT.
The advantages of dehydration by freeze-substitution may also be exploited for chemically fixed specimens [72, 116, 117]. After chemical fixation, the specimens are cryo-protected and frozen. This approach is particularly suited for infectious material or specimens that cannot be cryofixed by high-pressure freezing, because they are too thick or samples have to be taken in the field.
The most frequently used solvents for freeze-substitution are acetone [54, 55], methanol [59, 118], or ethanol [72, 119]. They have to be liquid at −90 °C (i.e., below the recrystallization point of water in biological systems), and they have to dissolve the ice in due time, i.e., within hours or a few days [58, 59].
3.4 Resin Embedding
Some components of the resin formulations are hazardous, carcinogenic, allergenic, or toxic [83]. Please, follow the instructions of the manufacturer carefully. It is suggested to always work with appropriate gloves in a well-functioning fume hood.
3.4.1 Methacrylates
Acetone is a radical scavenger and should not be used for dehydration in combination with methacrylates. Ethanol is needed as an intermediate step before resin infiltration. Polymerization of methacrylates is inhibited by oxygen; therefore, the samples must be polymerized in tightly closed tubes or in an inert gas atmosphere (see Notes 10 and 12).
Lowicryls
The final temperature for infiltration and polymerization is dependent on the physical and chemical properties of the Lowicryls, K4M −35 °C, K11M −60 °C, HM20 −50 °C, and HM23 −80 °C [43, 112] (see manufacturer’s instructions).
1.
Transfer samples with a pipette into small (0.5 ml) test tubes and add fresh Lowicryl.
2.
Close the tubes airtight and polymerize for 24 h at −35 °C using a UV lamp (366 nm).
3.
The racks of tubes are placed in a stainless steel tray filled with ethanol. This ethanol bath acts as a heat sink.
4.
Cover the tubes with aluminum foil in order to obtain an indirect irradiation of the UV light to avoid irregular polymerization (see Note 13).
5.
After 24 h, remove the aluminum foil and continue UV polymerization for 24–48 h.
6.
For final polymerization, expose the tubes to sunlight (outdoors) or use a UV box under a fume hood at room temperature. Open the tubes to allow any remaining volatile Lowicryl components to escape so that the samples no longer smell like Lowicryl.
LR White and LR Gold
Dehydrated samples can be directly infiltrated with pure resin with 4–6 changes during a 3-h period at room temperature. We suggest first to infiltrate in a 1:1 mixture of LR White/ethanol and then to change with pure resin several times at room temperature (see Note 14).
LR White can be polymerized either by heating between 50 and 60 °C (see Note 15) or in the cold by exposing to UV light. For UV light polymerization (not below −15 °C), 0.5 % (w/v) benzoin methyl ether (initiator C of the Lowicryls) must be added.
LR Gold can be polymerized at −25 °C with UV light. The sectioning and labeling properties are very similar to those of the Lowicryls.
3.4.2 Epoxy Resins
Epoxy resins react covalently with the biological material, so antigens may get masked; therefore, epoxy resins are not the best-suited resins for immunolabeling. On the other hand, epoxy resins are far more stable and preserve the cellular ultrastructure better than the methacrylates. Practice shows that carbohydrates and other nonprotein components are less affected by epoxy resins and can easily be detected in epoxy sections, e.g., lectin labeling [122] (see Note 16).
3.5 Coating of Microscope Slides and Coverslips
3.5.1 Gelatin–Chrome Alum Coating of Microscope Slides for Toluidine Staining [123]
1.
Clean microscope slides and put them in a slide holder.
2.
Dip the loaded slide holder in gelatin solution containing: 5–10 g gelatin power, 0.25 g chromium potassium sulfate (Merck), 500 ml bidistilled water.
3.
Warm the gelatin solution up to 50 °C with continuous stirring for 8–10 min, then filtrate the solution.
4.
Let the slides dry and store in a dust-free box.
3.5.2 Coating of Coverslips or Slides to Mount Sections for Light Microscopy [124]
The preferred coatings for immunofluorescence microscopy are polylysine or Alcian Blue (see Note 17). We routinely use poly-l-lysine with a molecular weight between 70,000 and 150,000 Da.
1.
Clean round glass coverslips or microscopy slides with either ethanol, or 1 % hydrochloric acid in 70 % ethanol, or soap.
2.
Rinse with bidistilled water.
3.
Dry coverslips or slides separately on a filter paper in a large dish.
4.
Prepare a solution containing 0.2 mg/ml (w/v) poly-l-lysine in bidistilled water or use the commercially available 1 % stock solution. Place a 30–50 μl drop in the center of the coverslip or cover the microscope slide with the solution.
5.
Allow the coating to settle for at least 30 min in a moist chamber.
6.
Rinse briefly with bidistilled water and dry faceup on a filter paper for 1 h at 60 °C or overnight at ambient temperature.
7.
Coverslips can be coated in large batches and stored indefinitely in dust-free dishes at room temperature.
3.6 Transfer and Mounting
Resin sections are collected from the water trough of the knife either with a perfect loop or with an uncoated electron microscopy grid and transferred onto a dry polylysine-coated coverslip or microscopy slide (see Note 18). Residual water is drained with a filter paper along the outside of the loop or grid. To reduce wrinkling of the sections, they can be slowly air-dried in an oven at 60 °C without draining [125] or at room temperature. Tokuyasu cryosections are directly mounted on coverslips after picking up from the knife edge. Here, care has to be taken that they do not air-dry.
Related posts:
 Microwave-Assisted Processing and Embedding for Transmission Electron Microscopy
 Electron Microscopy of Microtubule Cytoskeleton Assembly In Vitro
 Biological Applications of Energy-Filtered TEM
 Freeze Fracture and Freeze Etching
 Elemental and Isotopic Imaging of Biological Samples Using NanoSIMS
Stay updated, free articles. Join our Telegram channel

Full access? Get Clinical Tree


