and Alexandre Webster2
(1)
Center for Electron Microscopy and Microanalysis (CEMMA), University of Souther California, Los Angeles, CA, USA
(2)
Division of Biology, California Institute of Technology, Pasadena, CA, USA
Abstract
Immunocytochemistry for electron microscopy provides important information on the location and relative abundance of proteins inside cells. Gaining access to this information without extracting or disrupting the location of target proteins requires specialized preparation methods. Sectioning frozen blocks of chemically fixed and cryoprotected biological material is one method for obtaining immunocytochemical data. Once the cells or tissues are cut, the cryosections are thawed, mounted onto coated grids, and labeled with specific antibodies and colloidal gold probes. They are then embedded in a thin film of plastic containing a contrasting agent. Subcellular morphology can then be correlated with specific affinity labeling by examination in the transmission electron microscope (TEM). The major advantage of using thawed cryosections for immunolabeling is that the sections remain fully hydrated through the immunolabeling steps, reducing the possibility of dehydration-induced antigen modification. Modern technical advancements both in preparation protocols and equipment design make cryosectioning a routine and rapid approach for immunocytochemistry that may provide increased sensitivity for some antibodies.
Key words
Transmission electron microscopyImmunocytochemistryCryosectioningChemical fixationAntibodiesImmunogold1 Introduction
1.1 History
Examination of biological material in the transmission electron microscope requires some form of sectioning to obtain access to intracellular morphology. Preparing sections thin enough to allow electrons to pass through have been the goal for biologists since they began using electron microscopes. Electron microscopists substituted acrylic [1, 2] and epoxy [3–5] resins for the paraffin-embedding media used by histologists to harden biological material and make it suitable for thin sectioning. For obtaining sections, metal knives were replaced with glass [6, 7] and diamond knives [8–10]; and glutaraldehyde [11] replaced formalin as the preferred chemical cross-linking agent. These developments were ideal for morphological examination of biological materials but were not so successful for immunocytochemical studies.
Parallel developments for sectioning frozen material [12–14] were pursued by few specialist laboratories [15–17], probably due to difficulties in retaining good ultrastructural detail despite using glycerol as a cryoprotectant [15]. Thin sectioning of frozen material became a viable option for less specialist laboratories when sucrose replaced glycerol as a cryoprotectant [18]. Sections were cut on a dry glass knife, retrieved on a drop of sucrose, and transferred to Formvar-coated specimen grids for immunolabeling, contrasting and drying, and examination. The fine structural preservation and the low contrast of the stained thin sections made it possible to visualize antibody locations within cells using ferritin as a visualization probe [19–22].
Thawed, thin cryosections of aldehyde-fixed biological material remain fully hydrated through the immunolabeling process, which may help explain improved labeling efficiency of antibodies [23]. However, full hydration without any embedding medium can have the disadvantage of leaving soluble antigens mobile within the section such that they are either removed or relocated [24, 25]. Drying in the presence of a support film is essential to preserve the thawed thin section from air-drying damage [26]. Thin, hydrated sections can be embedded in a range of materials to produce a film for protecting ultrastructure and producing different contrasting effects [27–31].
The hardness of fixed biological material frozen in sucrose cryoprotectant can be manipulated by changing the temperature of the specimen blocks. At warmer temperatures (e.g., −60 °C), the specimens are soft enough to enable thick sections to be produced. Cooling to lower temperatures hardens the specimen blocks and allows thin sections to be removed. This ability to manipulate specimen hardness and thus section thickness was recognized as a useful feature early on during technique development and made it possible for researchers to perform correlative light and electron microscopy (CLEM). The ability to examine thick sections from a specimen block by light microscopy and then obtain thin sections for electron microscopy has been exploited by many groups over the years [32–37].
The introduction of colloidal gold probes [38–40] made it possible to increase section contrast and also allowed for signal quantification [23, 25, 41–50]. The ability to prepare colloidal gold particles of different homogeneous particle sizes made multiple labeling experiments possible [39].
The fully hydrated sections that can be removed from frozen blocks are not embedded in anything other than an aqueous solution of sucrose, thus making it possible for researchers to experiment with different retrieval approaches. Initially, thawed, fixed cryosections were removed from a dry knife in a cryo-chamber using a drop of sucrose. It was discovered, however, that the surface tension of sucrose alone could damage the ultrastructure of the sections. Adding methyl cellulose to the sucrose drop resulted in improved structural preservation in the thin sections [51, 52]. Approaches for protecting thin cryosections from surface tension effects and air-drying during the section retrieval and immunolabeling steps have been explored in great detail elsewhere [53]. In other approaches, modified section retrieval has been used on unfixed, vitrified cryosections [54, 55]. The sections were collected on drops of sucrose and methyl cellulose containing a mixture of aldehydes to immediately fix the sections [56], and then immunolabeled. Developed from this approach was a method for cryosectioning that relied on cells being vitrified as a pellet using a high-pressure freezer, freeze substitution of the vitrified pellet in solvent, and then rehydrating the cells into PBS. The pellets were then cryoprotected in sucrose, frozen by immersion in liquid nitrogen, and cryosectioned while still frozen [57].
In conclusion, the ability to cryosection biological material, which has been chemically cross-linked in aldehydes and cryoprotected in sucrose, is an important and widely used method of obtaining thin sections for immunocytochemistry. The sections remain fully hydrated until they are ready to be imaged in the electron microscope, which may preserve antigenicity. The hydrated sections allow for different section retrieval methods to be applied to them and also make it possible to dry them using different approaches.
1.2 The Cryosectioning Method
The application of antibodies and other affinity markers to thin sections for high-resolution immunocytochemistry is an important tool of cell biologists. Cut surfaces offer increased accessibility to antigens on sections while still preserving subcellular morphology. In the transmission electron microscope, immunolocalized molecules can be accurately correlated to the large amount of visible subcellular components in the sections. If possible, the data obtained from immunocytochemical methods should be used for a quantitative analysis of the sample (see Note 1).
This chapter will describe the approach to cryosectioning that is often called the “Tokuyasu cryosectioning method” (see Notes 2 and 3). The method involves infiltrating chemically fixed specimens with a sucrose solution followed by freezing in liquid nitrogen and then sectioning on a dry knife while still frozen. The sections are removed from the knife surface, thawed, placed onto a coated specimen support grid, and immunolabeled at room temperature. The sections still on the specimen grid are dried in a plastic film and examined in the transmission electron microscope (see Table 1).
Table 1
Flow chart for cryosectioning and immunolabeling biological material
1. Chemical cross-linking (4 % formaldehyde and 0.1 % glutaraldehyde dissolved in 100 mM sodium phosphate buffer (pH 7.2)) |
2. Trim fixed tissues or scrape fixed cells. Centrifuge cells into a pellet |
3. Prepare small specimen blocks (e.g., 3 mm3) |
4. Soak in 2.3 M sucrose (15 min to 24 h) |
5. Place on specimen pins (see Fig. 1) |
6. Freeze in liquid nitrogen |
7. Place in cryo-chamber precooled to –80 °C |
8. Trim the front and sides of the block with a trim tool (see Fig. 2) |
9. Cool the cryo-chamber to –120 °C and replace trim tool with a knife |
10. Set the ultramicrotome to cut 70-nm-thick sections and section |
11. Retrieve sections from the dry knife surface with a wire loop filled with a 1:1 mixture of 2 % methyl cellulose and 2.3 M sucrose (see Fig. 4) |
12. Transfer the sections to specimen grids at room temperature (see Fig. 5) |
13. Float the grids section-side down on a drop of PBS containing 0.12 % glycine (5 min) |
14. Transfer the grids to drops of PBS containing 10 % fetal calf serum (10 min) |
15. Float grids individually on 5-μL drops of diluted antibody (20 min) |
16. Float grids on 500-μL drops of PBS (5 drops, 2 min each) |
17. Float the grids individually on 5-μL drops of diluted colloidal gold probe (20 min) |
18. Wash the grids by floating on drops of PBS (5 drops, 2 min each) |
19. Float the grids on 4 drops of water, 1 min each |
20. Transfer each grid to drops of methyl cellulose containing uranyl acetate (9 parts 2 % methyl cellulose plus 1 part 3 % uranyl acetate), on ice for 10 min |
21. Lift off each grid in a wire loop and remove excess liquid |
22. Leave to dry, remove the grid, and examine in the TEM |
The use of thin cryosections for immunolabeling offers two advantages over resin-embedded material: (A) cryosections can be rapidly prepared, and (B) cryosections remain fully hydrated during the immunolabeling process (see Notes 4 and 5).
As with resin sections, cryosections from cryoprotected, frozen specimens can be used for light microscopy observations and electron microscopy. Sequential sections can be immunolabeled and used in correlative microscopy studies [36] or as a substitute for confocal microscopy [58, 59] (see Note 6).
This chapter aims to describe a basic cryosectioning method in a way that will allow readers to produce, label, and contrast cryosections without assistance. However, the most successful way to learn how to cryosection is either to visit a laboratory where cryosectioning is routinely used or to join a hands-on cryosectioning practical course. Previous versions of this chapter have been extensively tested on such courses and shown to serve as a useful guide to beginners wanting to master this specialized specimen preparation method. Once the basic technique has been mastered, more advanced information on the Tokuyasu cryosectioning method can be obtained elsewhere [53, 60].
2 Materials
2.1 Transmission Electron Microscopy
2.
Fine forceps with good quality tips (e.g., Dumont Biologie #5 or #7).
3.
Grid boxes or grid mats for storing immunolabeled grids with dried cryosections.
2.2 Specimen Grids for Cryosections
1.
EM specimen grids (Hexagonal 100 mesh grids).
2.
Precleaned 25 × 75-mm microslides from VWR Scientific Inc. (Media, PA).
3.
Thin film casting device.
4.
2 % and 4 % solutions of Formvar in chloroform.
5.
200-ml glass conical flask.
6.
2 % aqueous acetic acid.
7.
100 % acetone.
8.
Ross lens tissue.
9.
White 1‶ × 2.5″ self-adhesive address labels.
10.
Vacuum evaporator.
2.3 Specimen Preparation
1.
A solution of 4 % formaldehyde and 0.1 % glutaraldehyde dissolved in 100 mM sodium phosphate buffer (pH 7.2).
2.
2.3 M sucrose in PBS.
3.
Stereo microscope with overhead light source.
4.
Scalpel blades with handles.
5.
Thin razor blades.
6.
Metal mounting pins and forceps for holding the pins.
7.
Liquid nitrogen thermos flasks with wide neck.
8.
Liquid nitrogen storage tank (for specimen storage).
2.4 Cryosectioning
1.
Cryo-ultramicrotome (an ultramicrotome equipped with cryosectioning attachment).
2.
Diamond knife for cryosectioning.
3.
Diamond cryo-trim tool.
4.
Antistatic device for ultramicrotome.
5.
Liquid nitrogen.
6.
2.3 M sucrose in PBS.
8.
Eyelash probes mounted on wooden sticks.
2.5 Immunolabeling
1.
PBS.
2.
Fetal calf serum (FCS, 10 % in PBS).
3.
Primary antibodies with known antigen specificity.
4.
Colloidal gold probes. Protein A-gold is the recommended probe, but secondary antibodies coupled to colloidal gold can also be used.
5.
Unconjugated secondary antibodies.
6.
1 % glutaraldehyde in PBS.
7.
0.12 % glycine in PBS.
8.
Parafilm® (Parafilm).
2.6 Contrasting and Drying Labeled Sections
1.
Large wire loops for drying the sections. These loops can also be used for transferring specimen grids from drop to drop during the washing steps of the immunolabeling protocol.
2.
Hardened filter paper (e.g., Whatman, type 5).
3.
Ice in a bucket and a flat support for placing on ice (e.g., metal sheet or inverted plastic dish).
4.
3–5 % aqueous uranyl acetate.
6.
Parafilm.
3 Methods
3.1 Formvar Coating of Specimen Grids
Plastic support films on specimen grids are essential for supporting the fragile thawed cryosections during subsequent handling and imaging. The ideal films should be thin, strong, and clean and should remain attached to the specimen grid at all times. There are many methods described in textbooks for preparing coated grids. Here is our contribution for making coated grids.
1.
Clean 100 mesh hexagonal specimen grids (see Note 11) by placing them in a 200-ml glass flask, rinsing with 2 % aqueous acetic acid, multiple washes with distilled water, and finally with three changes of dry acetone. Pour off the excess acetone and dry the grids by placing the flask on a warm plate. Clean, dry grids will fall easily from the flask when it is inverted.
2.
Remove a glass slide from its box (precleaned 25 × 75-mm microslides selected, VWR Scientific) and immerse it in dry ethanol. Immediately remove the slide and dry it with Ross lens tissue.
3.
Dip the dry slide into a solution of Formvar dissolved in chloroform (2 % w/v), and withdraw it carefully. Slower withdrawal will increase the thickness of the Formvar film on the glass surface.
4.
Let the slide dry by propping it vertically in a clean environment. The slide usually dries in 1–2 min.
5.
Fill a deep dish with distilled water and stand it below a diffuse light source so that the light reflects off the water surface. Dirt and other particles should be easily observed if present on the water surface.
6.
Clean the water surface by passing a page of Ross lens tissue over the surface.
7.
Use a razor blade or scalpel blade to score around the edge of the slide. Score around all four sides to define the limits of the film to be dislodged from the slide.
8.
Hold the Formvar-coated glass slide at a 45° angle at the edge of the glass dish and touch the bottom of the slide to the water surface. Slowly and carefully slide the glass slide into the water while maintaining a 45° angle. The Formvar film should start to detach from the glass surface and float onto the water surface.
9.
Remove the glass slide from the water when the Formvar film has completely detached from the glass surface. Examine the floating film for dirt particles and imperfections. Interference colors, a result of the reflected light, should be present on the film and should be silver. Yellow, purple, red, or green interference colors indicate a thicker film. A thinner film will have a gray color (see Notes 12 and 13).
10.
Place cleaned specimen grids (from step 1) onto the floating film using clean, sharp fine forceps. Place grids so that the shiny surface of the grid is facing up and the dull side is on the film.
11.
Dry the glass slide used for casting the film and stick a 1 in. by 2.5-in. white address label on its surface.
12.
Hold the glass slide vertically over one edge of the floating film and push it into the water so that the film floating on the water surface sticks to the address label on the glass slide. Forcing the film into the water will cause it to adhere to the address label, thus trapping the grids between the Formvar film and the label.
13.
Once the glass slide has been totally immersed, remove it from the water, making sure the grids remain attached, and leave it to dry.
14.
Coat the grids with carbon using a vacuum evaporator.
3.2 Chemical Fixation of Sample
If we are to study the location of molecules within cells, then some form of immobilization must take place before sectioning and immunolabeling occurs. For example, molecules that are not immobilized may be displaced from their normal location, resulting in either a false localization or a negative result such as when molecules are washed away.
The easiest immobilization method is by chemical fixation using aldehydes to cross-link cellular components. In addition to immobilizing antigens in place, fixatives also help to preserve specimen morphology (see Notes 14–20).
For immunocytochemistry, tissues or cells can be fixed by immersion in a buffered solution of aldehyde using the same methods that are used for epoxy resin embedding. The specimen should be small for rapid penetration of aldehyde, and care should be taken not to damage the sample by over-manipulation (i.e., squeezing, pulling, and cutting). Large organs are best fixed by perfusing with warm fixative (see Note 21).
3.2.1 Fixing Tissues
The main problem when fixing tissues is the slow rate of diffusion of the chemical fixative through the specimen. When possible, it is best that perfusion methods are performed. This may vary from whole body perfusion, where the fixative is pumped through the vascular system of deeply sedated animals, to perfusion of isolated organs.
When perfusion-fixation is not possible, then small tissue pieces should be carefully excised and immersed in fixative as soon as possible. Cutting the tissue into small pieces while in fixative will assist with penetration of fixative.
The buffers used with fixatives will affect the morphology of biological material and although the exact role of pH in fixation is not known, it is known that a buffer must have a large buffering capacity in order to counter rapid drops in pH during fixation (see Note 22).
Dissection and Handling of Perfusion-Fixed Tissues
1.
Carefully dissect out the tissue under study once the perfusion has been completed and transfer it whole into fresh fixative (see Note 23). Leave for 1 h. Any pulling or squeezing at this stage may adversely affect the subcellular morphology of the tissue. Do not mince the tissue as is sometimes recommended in other textbooks. Damage caused by the cutting may result in poor morphology in the cryosections.
2.
Transfer the tissue to a 100 mM phosphate buffer and slice into 1–2-mm-thick slabs using two sharp, clean razor blades. Use one blade to immobilize the tissue by applying slight pressure and gently cut into the sample with a second blade. It is important to avoid any squeezing or pulling. This may damage or alter subcellular morphology.
3.
Use similar cutting techniques with two blades to slice the slabs into rods and then to cut the rods into small cubes approx. 1–3 mm3.
3.2.2 Fixing Cells
1.
Add double-strength buffered fixative (e.g., 8 % formaldehyde/0.2 % glutaraldehyde in 100 mM phosphate buffer or 8 % phosphate-buffered formaldehyde) to the cell culture (1:1 ratio). For best results, fixation should occur at the normal growing temperature. Cooling cells down before fixation should be avoided as this may alter morphology (e.g., depolymerize microtubules). Cell suspensions can be fixed in suspension and immediately pelleted by gentle centrifugation. If possible do not centrifuge cells prior to fixation. The presence of extracellular proteins (e.g., fetal calf serum) does not normally affect intracellular labeling so washing cells before fixation is not essential.
2.
For cells grown on culture dishes or in flasks, fix by the addition of double-strength fixative to the culture medium. Carefully scrape the cells off the substrate using a soft wooden stick or piece of Teflon that has been beveled on the edge to form a blade (see Notes 24 and 25). Scraping should be performed in the presence of a small amount of protein. For cells in culture, this may be serum from the culture medium. If the cells have been washed to remove serum, then the cells should be treated with PBS-glycine and then scraped at ambient temperature in the presence of PBS containing 2 % gelatin.
3.
Centrifuge the scraped cells into a pellet. Centrifugation is performed in the same medium the cells were scraped in (i.e., containing proteins). The protein will prevent cells from sticking to the sides of plastic tubes during centrifugation.
If the pellet is loose or is falling apart, it will be necessary to embed in gelatin or agarose.
(a)
Remove the fixative supernatant from the cell pellet.
(b)
Resuspend the pellet in a small volume of 12 % gelatin dissolved in water. While the gelatin is still warm, repellet the cells. If the gelatin sets before the cells have pelleted, warm the tube until the gelatin becomes liquid again and recentrifuge. Alternatively, cells can be embedded in 2 % low-melting-point agarose. Warm agarose solution is cooled to 40 °C, and the cells resuspended in it. The cells are pelleted down in the warm agarose. If the agarose sets, then the agarose has to be melted again at 60 °C, which may not be good for cellular morphology or antigenicity.
(c)
Cool the pellet in ice for 30 min or until the support medium has solidified.
Cut off the tip of the Eppendorf tube and remove the embedded pellet.
Slice the embedded pellet into slabs, cutting away gel that does not contain the specimen (see Note 32).
Slice the slabs into rods and then into small blocks using the same method of cutting for the tissue samples.
3.3 Cryoprotection and Freezing
1.
2.
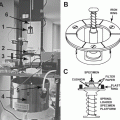
Transfer each infiltrated specimen block onto a clean specimen stub (see Fig. 1), remove excess sucrose with a damp filter paper, and immerse the specimen stub and specimen in liquid nitrogen until freezing is complete (see Note 35).

Fig. 1
After the specimen (cell pellet or tissue block) has been fixed, trimmed, and infiltrated in 2.3 M sucrose, it is placed onto a clean specimen pin (supplied with the cryo-ultramicrotome). Hold the pin in a stand or in locking forceps at room temperature. Pick up the specimen from the sucrose without crushing it, remove excess sucrose, and place the specimen onto the top surface of the pin. There should be a small amount of sucrose around the base of the specimen (arrow) to stick the block in place. The sucrose solution should not cover the top of the specimen. Pick up the pin with warm forceps and transfer it to liquid nitrogen. Do not pick up the pin with forceps previously cooled in liquid nitrogen. The frozen specimen can be quickly transferred to a precooled cryo-chamber on an ultramicrotome for trimming and sectioning
3.4 Specimen Transfer to Precooled Cryo-chamber
1.
Precool the cryo-chamber of the ultramicrotome to −80 °C. Temperatures will depend on the ultramicrotome being used. Usually a setting of −80 °C will result in a soft specimen block that thick sections (500 nm) can be removed from without damaging the block.
2.
Insert the diamond cryo-trim tool and allow the chamber to reach equilibration temperature. Any tools inserted into the cryo-chamber, and especially those that are used to manipulate the specimen, must be precooled in liquid nitrogen.
3.
Rapidly transfer the specimen, on the specimen stub, from the liquid nitrogen using precooled forceps and quickly place it into the precooled cryo-chamber.
4.
Place the specimen stub into the specimen holder and lock it in place using minimal force.
3.5 Trimming the Block
1.
Turn on the antistatic line to full power.
2.
Carefully advance the front of the trim tool to the surface of the block until it is just touching the front of the block. First-time users may benefit from a few lessons from more experienced ultramicrotome operators at this step (see Note 36).
3.
Set the ultramicrotome to cut sections of 500 nm (0.5 μm) and leave the machine to section at the maximum speed setting.
4.
Once a substantial portion of the block (revealing an area of between 1 and 3 mm2) has been smoothed away, stop sectioning. This process is called “facing-off” the block.
5.
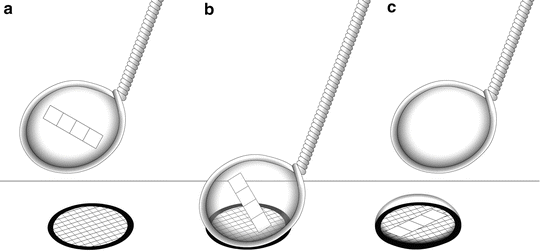
Use the edge of the trim tool to shape the front of the block into a “mesa” protruding approx. 1 mm from the block surface, approx. 1 mm wide and 2 mm long. Cut each side of the block to make each smooth and slightly depressed (see Fig. 2). The trimming process can be performed either with a diamond trim tool (shown in Fig. 2) or with glass knives. Due to the cost of diamond knives, we recommend that beginners practice the trimming and sectioning process with glass knives.

Fig. 2
Set the cryo-chamber at −80 °C and the antistatic line set at 100 % power. (a) Trim the front of the block until the block face is smooth and shiny. (b) Retract the trim tool, move the trim tool to the right, advance it to the block, and trim the right side of the block until the edge is smooth. (c) Retract the trim tool, move it to the left, and advance to trim the left side of the block. (d) Rotate the block 90° clockwise and trim the left side of the block. (e) Move the trim tool to the right and trim the right side of the block. The last two cuts will form the bottom (D) and top (E) of the specimen block. (F) Rotate the block 90° counterclockwise to return it to its original position, replace the trim tool with a precooled knife, and move the specimen to the knife for sectioning
6.
Semi-thin sections can be obtained when the cryo-chamber is still set at –80 °C by sectioning at thicknesses of between 200 and 500 nm. When mounted on glass coverslips, these sections can be used for orientation (see Fig. 3) or for testing antibody dilutions.
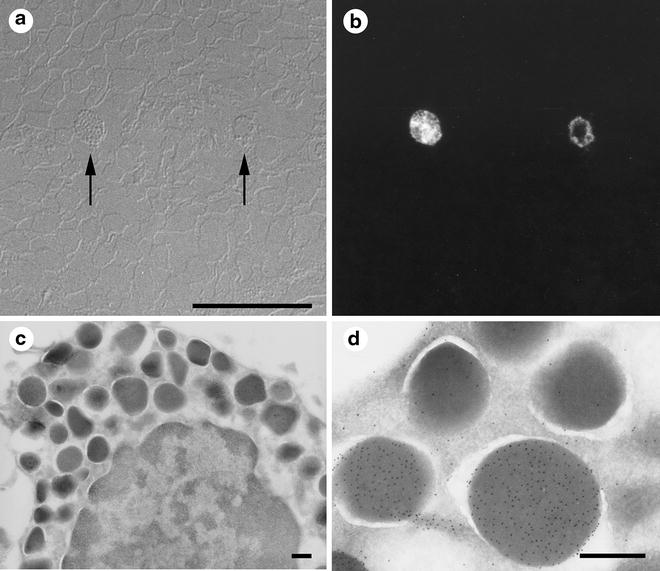
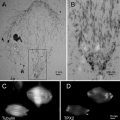
Fig. 3
Cryosections from the same specimen block can be used for light and electron microscopy (one example of correlative light and electron microscopy or CLEM). Small pieces of bovine nasal mucosa were immersed in 4 % buffered formaldehyde, left overnight, cryoprotected in 2.3 M sucrose, frozen, and sectioned. The first sections removed from the specimen block were 300 nm thick and were cut at −80 °C. The sections were placed on glass coverslips and immunolabeled with primary antibody (rabbit anti-aprotinin) and then with fluorescent secondary antibody (goat anti-rabbit TRITC). The sections were examined by light microscopy, first using Nomarski DIC optics (a) and then with indirect epifluorescent illumination (b). Only two cells in the section were labeled with the antibody (arrows). The specimen block was trimmed so that it contained only the region with the aprotinin-positive cells and then thin-sectioned for electron microscopy. From their morphology, the positive cells were identified as mast cells (c). Granules in the mast cell labeled with the anti-aprotinin antibodies (d). Not all granules labeled with the antibodies (d), a result that was not apparent from light microscopic observation. Scale bars = 0.5 μm
3.6 Sectioning
1.
Mount the diamond knife in its holder, place in the cryo-chamber, and leave to cool down.
2.
Cool the cryo-chamber to –120 °C and leave to equilibrate.
3.
Carefully move the trimmed block to the knife edge and set the cutting window so that the section stroke starts just above the knife and ends just below the knife (see Note 37).
4.
Set the antistatic line to 50 % power or less. Variations in the antistatic line power will affect the sectioning properties of a diamond knife (see Note 38).
6.
Use the rough advance to move the knife close to the block. The orientation of the knife and the block can be evaluated and, if needed, aligned to bring the knife parallel to the block.
7.
Continue moving the knife to the block using the fine advance control until the two are almost touching. When advancing the knife, move the specimen up and down past the knife edge. This will ensure that the part of the block closest to the knife will be seen. The knife can then be appropriately aligned.
8.
When it seems as if the knife and the block are almost touching, continue to advance the knife to the specimen using the extra-fine feed. This will allow the knife to be advanced in small steps of known distance. We use 0.5-μm steps for the final adjustments.
9.
When the knife and specimen block are almost touching (indicated by the presence of small amounts of debris from the specimen block on the knife after the specimen has passed over the knife edge), switch over to automatic sectioning and wait for sections appear on the knife.
10.
Set the cutting speed between 0.6 mm/s and 2 mm/s. The slow cutting speed may be combined with a fast return cycle in order to reduce the possibility of thermal changes within the specimen.
11.
If sections fail to appear, first check to make sure the knife and the specimen block are aligned and almost touching. If sections appear but the sectioning is irregular (e.g., it is cutting thin and then thick sections), check the machine for loose knife or specimen block (see Note 40).
3.7 Manipulating the Sections
1.
Turn off antistatic line.
2.
Pull sections from the knife edge with an eyelash probe and arrange them in groups on the knife surface (see Note 41).
3.8 Section Retrieval
1.
2.
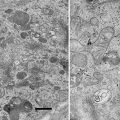
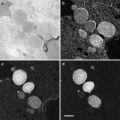
Transfer the loop to the cryo-chamber and, looking through the binoculars, direct the drop so that it is just above a group of sections. Move the drop to the sections and pick them up onto the drop (see Fig. 4).
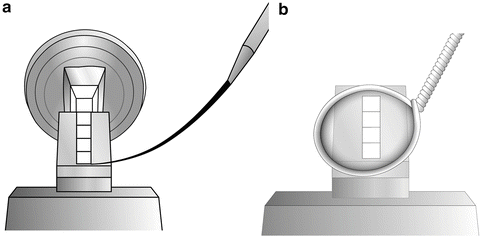
Fig. 4
(a) The cryo-chamber is cooled and stabilized at −120 °C, the section thickness on the ultramicrotome control is set to 70 nm, and the antistatic line is turned to 50 % power. The cutting window is set and the knife is carefully advanced to the trimmed block. The ultramicrotome is left to section automatically with the cutting speed set at 0.8 mm/s. As sections start to appear on the knife surface, they can be manipulated using a probe, which can be made from a human eyelash attached to a wooden or plastic stick. Hairs from Dalmatian dogs have also been used for manipulating sections [69, 70]. (b) When a ribbon of sections appears on the knife surface, turn off the automatic cutting and the antistatic line, and bring a wire loop filled with 1 part methyl cellulose:1 part 2.3 M sucrose to the sections. Pick up the sections and remove the loop from the cryo-chamber
3.
Remove the loop from the cryo-chamber, thaw, and place the drop section-side down onto a Formvar-/carbon-coated specimen grid. The drop can be left to dry on the grid until it is ready for labeling (see Fig. 5).
 Microwave-Assisted Processing and Embedding for Transmission Electron Microscopy
 Electron Microscopy of Microtubule Cytoskeleton Assembly In Vitro
 Biological Applications of Energy-Filtered TEM
 Freeze Fracture and Freeze Etching
 Elemental and Isotopic Imaging of Biological Samples Using NanoSIMS
 X-Ray Microanalysis in the Scanning Electron Microscope


Related posts:
Microwave-Assisted Processing and Embedding for Transmission Electron Microscopy
Electron Microscopy of Microtubule Cytoskeleton Assembly In Vitro
Biological Applications of Energy-Filtered TEM
Freeze Fracture and Freeze Etching
Elemental and Isotopic Imaging of Biological Samples Using NanoSIMS
Stay updated, free articles. Join our Telegram channel
Full access? Get Clinical Tree
