Fine Needle Aspiration Cytology
The fine needle aspiration cytology (FNAC) of tumors was first described in 1931 by the German pathologist Ernst Mannheim. He was the first to use small-gauge needles (1 mm in diameter) in the diagnosis of 43 patients with tumors of the breast and abdomen.1 Lopes-Cardozo in the Netherlands and Söderström, Eneroth, Franzen, and Zjicek in Sweden published the first comprehensive case series in the 1950s and 1970s. It was not until ultrasound guidance became available for fine needle aspirations (US-FNA) that the barriers in traditional pathology were broken down, and the technique became widely practiced during the 1980s (for the history of FNAC, see reference 2 and review articles3,4). New impulses resulted from the introduction of endoscopic ultrasound-guided FNA (EUS-FNA) in 1982 and of endobronchial ultrasound-guided transbronchial needle aspiration (EBUS-TBNA) in 2004.5,6
Ideally, it is best to have one operator determine the need for the service, collect the specimens, and perform the cytologic evaluation (clinical cytology). At a few German centers the specimens are analyzed by the clinician who collects them, while in the United States, United Kingdom, Sweden, and Italy, specimen collection at some centers is performed by an interventional cytopathologist—but these are the exceptions. Most ultrasound diagnosticians work with a cytopathologist partner in their own facility or, increasingly, work contractually with an outside laboratory to which cytology samples are submitted for evaluation. In this setting, good communication and standardization are key factors in determining the quality of the cytologic diagnosis.
In this chapter, then, the collection, preparation, and processing of the cellular material obtained by US-FNA, EUS-FNA, and EBUS-TBNA will be described from the viewpoint of the ultrasound diagnostician and clinical cytologist. Rapid on-site evaluation (ROSE), common artifacts, sources of error, and limitations will also be explored.
6.1 Specimen Collection
6.1.1 Ultrasound-Guided Biopsy
The technique of ultrasound-guided biopsy is fully described in numerous monographs2,7–10 and in video tutorials on the website of the Papanicolaou Society of Cytopathology (http://www.papsociety.org/fna.html). The technique of EUS-guided biopsy was recently described in detail.11 Biopsy needles are used in sizes ranging from 27 to 22 gauge. Their length and design depend on the depth of the lesion and the specific sampling procedure (US-FNA, EUS-FNA, EBUS-TBNA).
6.1.2 Needle Movement and Aspiration
In the sampling of solid target lesions, the needle is introduced into the mass and moved quickly in and out in multiple, short excursions (“needling”) to minimize the sampling error (http://www.papsociety.org/Needle%20Movement/index.html). In fine needle aspirations of the thyroid gland and lymph nodes and in EUS-guided fine needle aspirations, it has been shown that aspiration with suction and needling without suction (capillary method) are equally effective for sampling cellular material.7,12–14 If aspiration yields a bloody aspirate, further sampling should be performed without suction. The aspiration of a solid lesion is concluded and the needle removed from the lesion as soon as cellular material or blood is seen in the transparent needle hub. Suction should be released before the needle is withdrawn from the lesion. Cystic lesions should be completely aspirated whenever possible.
6.2 Specimen Preparation
6.2.1 Fluid Aspirates
Mucinous or viscous aspirates can be smeared onto a slide using conventional technique. Hypocellular fluids collected from effusions or cystic lesions, on the other hand, are centrifuged to concentrate the cellular material. If swift transport and rapid processing in the cytopathology laboratory are ensured, fluid aspirates can be submitted directly. Otherwise the fluids should be stored in tightly sealed containers with a fixative solution (e.g., maximum of 50% alcohol in a 1:1 ratio, no formalin!) for submission according to the requirements of the cytology laboratory. With very bloody fluids, addition of 3.8% sodium citrate (2 mL per 20 mL aspirate) or heparin (e.g., 5000 IU standard heparin) is recommended to prevent clotting.
6.2.2 Centrifuging Effusions
Large volumes of aspirated effusion fluid are centrifuged using a clinical centrifuge at 2500 rpm for approximately 10 minutes. The supernatant liquid is carefully suctioned off, and smears are prepared from the upper layer of sediment. Bloody sediments require preliminary density gradient centrifugation. Clots or fibrin particles are fixed in formalin and embedded in paraffin for standard histologic processing. The question whether the examination of larger effusion volumes (>50 mL) increases the diagnostic yield and sensitivity of effusion cytology has been investigated in one retrospective and two prospective studies, but the results were inconclusive.15–17
Cytocentrifugation (Cytospin)
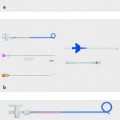
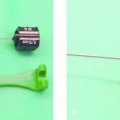
Small amounts of fluid aspirate (e.g., from a cystic lesion) can be spun directly onto a special slide with a Cytospin centrifuge (▶ Fig. 6.1). The chamber of the cytocentrifuge can accommodate samples of 250 to 300 μL. The deposition area on the slide is rimmed by a filter card that absorbs residual fluid during centrifugation (750 rpm for 2 minutes). Higher spinning speeds should be avoided as they would cause mechanical destruction of the deposited cells. The resulting thin-layer preparations can be air-dried or wet-fixed, and various stains can be applied.
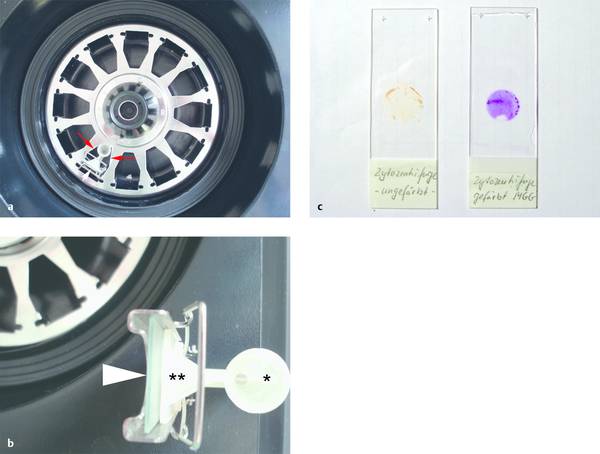
Fig. 6.1
a Overhead view of a cytocentrifuge with cytology funnel and sample chamber (red arrows) and a glass slide (white arrow).
b Close-up view of the cytology funnel (✫), sample chamber (✫✫) and glass slide (arrowhead), held in place with a metal clip.
c Cytospin slide with central deposition area. Left: unstained. Right: May–Grünwald–Giemsa (MGG)-stained.
Source: Images a and b reproduced with kind permission of B. Lucke, Wriezen, Germany. Image c with kind permission of B. Fiedler, Berlin, Germany
6.2.3 Aspirates from Solid Lesions
Material aspirated from solid lesions can be processed in various ways for cytologic evaluation. In many cases it is expedient to run multiple sample preparation techniques in parallel fashion. The selection of techniques will depend on the experience of the cytopathologist and clinician, the distance between the site of specimen collection and the cytopathology laboratory, the capabilities for on-site evaluation, the type of material, and the presumptive clinical diagnosis. Thus, the cytopathology partner should be consulted in selecting the technique. Several preparation options are available for materials aspirated from solid lesions2,8,9:
Conventional smears (air-dried or wet-fixed)
Liquid-based thin-layer techniques (e.g., thin preparations)
Cell block
Additionally, residual aspirate can be flushed out with physiologic saline solution and submitted for cytomorphologic evaluation following micropore filtration or cytocentrifugation.
Conventional Smears
Optimum smear preparation is essential for an accurate cytomorphologic evaluation. The goal is to produce uniform, artifact-free, thin-layer smears while avoiding the loss of material. Coherent cell clusters should be preserved whenever possible so that their specific aggregation patterns can be assessed during cytologic evaluation. The quality of a smear depends both on the smearing technique and on the nature and consistency of the sample. Admixture of blood or fluid is a very common source of artifacts. Various smear techniques have been described in the literature.9,18 An instructional video on the website of the Papanicolaou Society of Cytopathology (http://www.papsociety.org/Basic%20Smearing%20Technique/index.html) demonstrates the optimum smearing technique and common errors.
Expelling the Material onto the Slide
To deposit the material sampled by FNA onto a slide, the needle tip is touched to an area of the slide near the frosted end while being held at an angle of approximately 45°, and a small amount of the harvested material is expelled onto the slide either with a stylet or by slowly depressing the plunger of an air-filled syringe (2–10 mL) (▶ Fig. 6.2a) (http://www.papsociety.org/Expulsion%20Onto%20Slide/index.html). The smaller the amount of material, the easier it is to prepare a thin smear. If there appears to be too much material on one slide for a thin-layer smear, the material can easily be divided by loosely applying a second slide to the original slide (http://www.papsociety.org/Dividing%20Material/index.html). The material should never be ejected onto the slide from a distance, as this may scatter tiny droplets over the slide that would dry before a smear can be prepared.
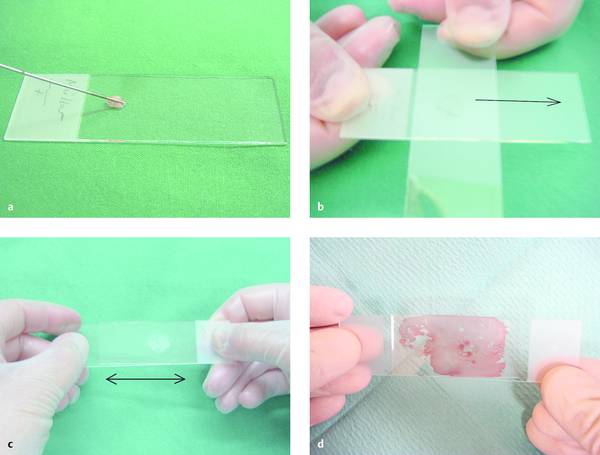
Fig. 6.2 Smearing technique.
a The needle, held at an angle, is touched to the glass slide near the frosted end, and a small amount of material is expelled onto the slide.
b, c The material is spread into a thin smear with a second slide, which is placed either across the bottom slide (b) or parallel to it (c) and slid along the bottom slide with light pressure.
d Another technique is to divide the material between two slides that are placed lightly together and then lifted apart without sliding.
Figures a, b, c from Beyer T. Tips and tricks for fine-needle puncture. In: Dietrich CF, ed. Endoscopic Ultrasound. An Introductory Manual and Atlas. Stuttgart, New York: Thieme; 2011:168–175.
Residual material is initially left in the needle, where it is protected from drying. Once a smear has been completed, additional material may be expelled from the needle onto a second slide. With some practice in smearing, material can be deposited on up to three slides in one run and then smeared in rapid succession. Material trapped in the needle hub can be deposited onto the slide using the “flip technique,” i.e., fixing the needle barrel with two fingers and flicking the hub onto the slide repeatedly to eject the residual material (http://www.papsociety.org/Flip%20Technique/index.html).
Smearing Technique
The frosted end of the slide is held between the thumb and index finger of the left hand. The right hand then places the transparent side of a second, clean slide against the bottom slide containing the sample, positioning the top slide either across or parallel to the bottom slide. The top slide is initially tilted at an angle of 30° to 45° angle but is then rotated downward until it is parallel to the bottom slide. Gentle pressure is applied, depending on the consistency of the material, and the surface tension of the droplet should be sufficient to spread the material into a circular film between the slides. If the specimen is thin and uniform, it is unnecessary to smear the material any further. Both slides are lifted apart and fixed (“pull-apart” method, ▶ Fig. 6.2d).
If a thin, uniform specimen is not obtained, the top slide is slid along the bottom slide under light pressure, moving away from the frosted edge and keeping both slides parallel throughout the smearing process (▶ Fig. 6.2b, c). The top slide is removed, leaving a thin, oval-shaped smear on the bottom slide (▶ Fig. 6.3). Mostly isolated cells are found at the periphery of the smear, while cell clusters are found at the center. Some material is incidentally spread onto the top slide, but that smear is generally of poor quality.
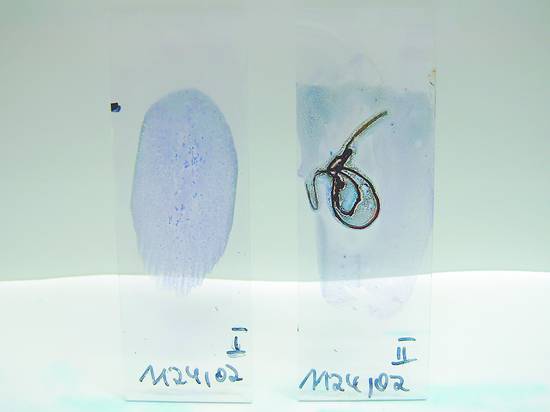
Fig. 6.3 May–Grünwald–Giemsa (MGG) stained smears: overhead view of two slides. Left: high-quality stain. Right: severe crush and air-drying artifacts.
(Beyer T. Tips and tricks for fine-needle puncture. In: Dietrich CF, ed. Endoscopic Ultrasound. An Introductory Manual and Atlas. Stuttgart, New York: Thieme; 2011:168–175.)
If the harvested solid material is mixed with a significant amount of fluid, artifacts due to cellular swelling may occur. Before smearing, then, the slide can be tilted sideways, causing the fluid to collect along the bottom edge; then another slide can be used to scrape off some of the solid material, which is then smeared onto another slide. Another technique is to blot admixtures of body fluids and fresh blood from the edge of the tilted slide with filter paper or a gauze pad before the diagnostic material is smeared. If tiny tissue particles remain on the smear, they can be picked up with a needle and placed in fixative for paraffin block preparation (http://www.papsociety.org/Problem%20Material%201/index.html).
Caution
Aspirate should always be spread gently into a thin, uniform smear. This should be done swiftly to prevent air-drying of the specimen before smearing (smear: “less is more”). Tissue particles or clots should not be crushed or discarded, but placed in fixative for later histologic examination (cell block). (With tissue particles: “more is better.”)
Possible Errors
Various technical errors may occur during the preparation of smears and may sometimes cause significant artifacts. In unfavorable cases this may prevent a correct diagnosis despite the collection of an adequate specimen.
The most common errors are as follows.
Depositing too much material onto the slide (thick-layer artifacts, ▶ Fig. 6.3 and ▶ Fig. 6.4a, b)
Leaving too much fluid on the slide (swelling artifacts)
Smearing blood along with the diagnostic material (blood artifacts, ▶ Fig. 6.4c)
Spraying the material onto the slide from a distance (air-drying artifacts)
Working too slowly (air-drying artifacts)
Applying too much pressure while smearing the material (crush artifacts)
Failure to keep both slides parallel to each other throughout smearing (scratch artifacts)
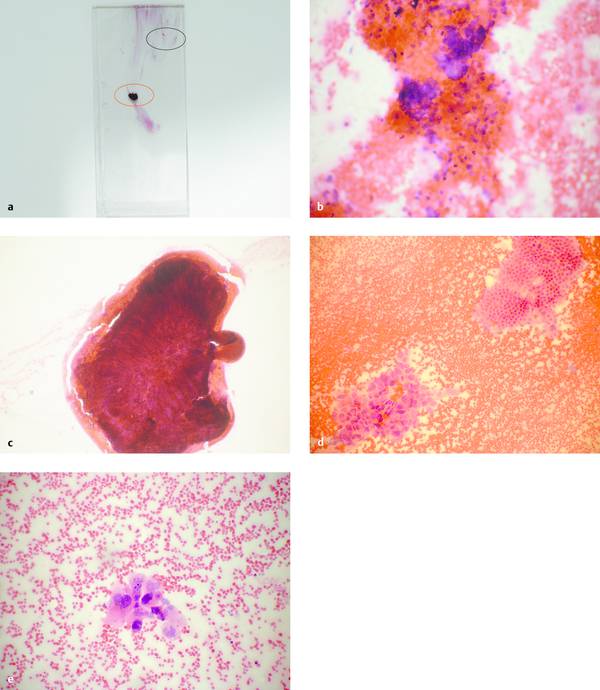
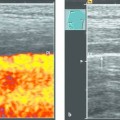
Fig. 6.4 Technical errors in the preparation of smears.
a Poor-quality smear (H&E stain) from a pancreatic mass displays numerous artifacts.
b Relatively thick portion of the smear with poorly preserved cells, dominant erythrocytes (area outlined in black in a, ×100).
c Small, partially dried clot with no visible cells (area outlined in red in a, ×200).
d Relatively thin portion of the smear (area outlined in green in a,×200): dominant erythrocytes with normal glandular epithelium at upper right and tumor cells at lower left, consistent with adenocarcinoma.
e Detail from that portion of the smear shown in d (×400). Cytologic diagnosis: poorly differentiated adenocarcinoma.
Source: All pictures courtesy of B. Fiedler, Berlin, Germany.
Labeling
Materials from different sites must be carefully separated from each other and clearly labeled. The frosted end of the slide should be labeled either before or immediately after specimen collection. Generally a pencil should be used, because labeling done with other markers (e.g., fiber-tip pens, ballpoint pens) will be effaced by fixative and staining solutions.
Cytocentrifugation (Cytospin)
When conventional smears have been prepared, residual material still trapped in the needle after it has been grossly emptied with a stylet and/or air-filled syringe can be rinsed into a transport container with approximately 1 mL of physiologic saline solution, Hank’s balanced saline solution, or dilute Bouin fixative and then processed further by cytocentrifugation in the cytopathology laboratory.2,8,9,19 If an expert in smearing technique is not available, the entire aspirated sample can simply be placed in transport solution and cytocentrifuged in the cytopathology laboratory.20
Thin-Layer Preparations
Liquid-based thin-layer preparations are an alternative or adjunct to conventional smears, and partially automated systems (e.g., PapSpin [Thermo Scientific]; ThinPrep and SurePath [Becton Dickinson]) can be used to produce them. The material obtained by aspiration, or residual material that was not used for conventional smears, is placed in a specific transport and fixation medium (e.g., CytoLyt solution [Cytyc Corporation]). After ultracentrifugation, the cellular material is transferred to a glass slide as a monolayer preparation in an automated process.2,8,19 The main advantage of these methods is that they do not depend on the smearing technique of the clinical examiner. Other advantages are the removal of red cells, mucus, and protein precipitates, the concentration of diagnostically relevant material, an improved ability to evaluate individual cells, and an enhanced ability to perform ancillary tests (e.g., immunocytochemistry, molecular biology). As a result, screening and interpretation by the cytopathologist are faster and easier. Disadvantages of thin-layer techniques are the somewhat lower cellularity of the smears, the loss of diagnostically relevant extracellular background (e.g., mucin, necrosis), destruction of the architectural integrity of small cell clusters, and the significantly higher costs (▶ Table 6.1).21
| Criterion | Air drying | Wet fixation | Thin-layer preparation |
| Immediate staining and on-site cytology | +++ | + | − |
| Dependence on smearing technique | +++ | ++ | − |
| Time loss | − | + | + |
| Cytochemistry, immunocytochemistry | ++ | + | ++ |
| Romanowsky staining (e.g., MGG) | +++ | + | − |
| Papanicolaou staining | ++ | +++ | +++ |
| Artifacts | Enlarged cells and nuclei, increased pleomorphism, chromatin condensation | Shrinkage and rounding of cells | Optimum cell preservation, but significant changes in cellular architecture |
| Extracellular background | Distinct background with prominent extracellular substances | Faint | Clear background, almost complete disappearance of extracellular substances (mucin) |
| Cytoplasmic details | Well defined, good color gradation with MGG; keratinization visible | Poorly defined; transparent cytoplasm; keratinization visible | Preserved |
| Nuclear details and chromatin quality | Limited; good color gradation with MGG | Crisp visualization | Crisp nuclear details, prominent nucleoli |
| Stromal elements | Clearly defined | Poorly defined | Poorly defined |
| Partially necrotic tissue | Obscured cellular details | Good visualization of intact single cells | Good visualization of intact single cells |
| Source: Compiled from sources cited in the text. | |||
Cell Blocks
Material for cell block preparations is obtained from aspirated fluids (cystic contents, ascites, pleural effusion) or needle rinse, which is centrifuged to yield a sediment that is placed in fixative solution (e.g., 50–96% alcohol, 10% formalin, or CytoRich Red preservative [Thermo Scientific]). Material from the fixation and transport media used to make thin-layer preparations can also be processed as cell blocks. Multiple centrifugations may be needed to obtain a consistent sediment, or pellet, that can be paraffin-embedded in a biopsy cassette. Various techniques for the aggregation of individual cells, such as artificial clot formation induced by adding plasma and/or thrombin, are used in preparing cell blocks.2,8,9,19 Fibrin and blood clots forming in fine needle aspirate can be placed in formalin and embedded in paraffin to produce “natural” cell blocks. There is no definition that uniquely distinguishes “natural” cell blocks from histologic preparations of small tissue cores like those obtained with 22-gauge needles.
Numerous paraffin sections can be produced from one aspiration sample and stored almost indefinitely for possible later tests. Essentially all histochemical and immunohistochemical techniques can be performed on cell blocks, just as on histologic preparations. This is particularly important in the evaluation of solid neoplasms, as in the differential diagnosis of malignant lymphadenopathy or of hepatic and pulmonary metastases from several possible primary tumors. For these reasons, cell blocks are prepared routinely as an adjunct to conventional smears at many institutions.2,8,9,11,22
6.3 Fixation and Staining
6.3.1 Basic Principles
Fixation is a crucial step for later cytologic assessment as it stabilizes the cellular architecture and produces permanent adhesion of the cells to the microscope slide. The dehydration and/or denaturing of structural and functional proteins terminates the autolysis that begins immediately after the specimen is collected.
A smear may be wet-fixed or air-dried. The selection of a particular fixation method determines the subsequent staining methods that can be used. The desired staining method in turn depends on the preference and experience of the cytopathology laboratory. May–Grünwald–Giemsa (MGG) is the standard stain used for air-dried smears, while Papanicolaou or hematoxylin and eosin (H&E) stain is preferred for wet-fixed smears. The advantages and disadvantages of the various fixation and staining methods are listed in ▶ Table 6.1.2,8,9,19–21,23 Typical staining patterns are illustrated in ▶ Fig. 6.5 and ▶ Fig. 6.6.
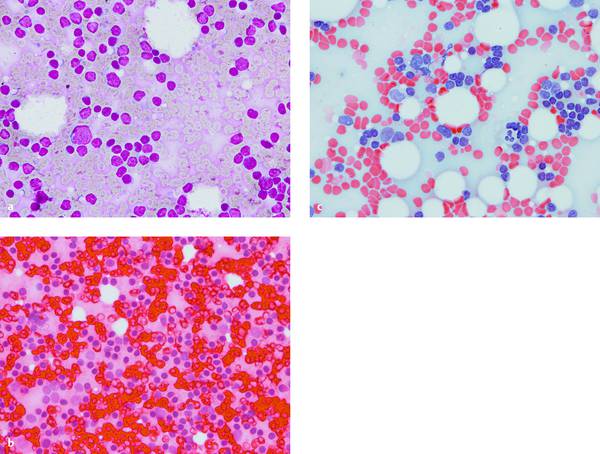
Fig. 6.5 Percutaneous FNA of a small inguinal lymph node in a woman with squamous cell carcinoma of the anal canal. Cytopathologic diagnosis: “benign” (only lymphocytes and macrophages, no tumor cells). The cells in the thin-layer smears at ×400 magnification are somewhat larger with MGG and H&E stain than with Papanicolaou. The nuclei and cytoplasm stain differently. The red-cell background is most troublesome with H&E stain.
a MGG stain.
b H&E stain.
c Papanicolaou stain.
With kind permission of S. Wagner, Königs Wusterhausen, Germany.

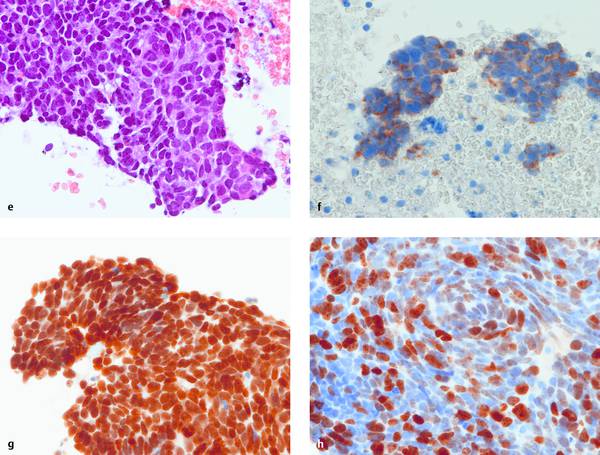
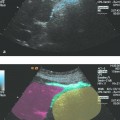
Fig. 6.6 Transesophageal EUS-FNA of an enlarged and morphologically abnormal infracarinal lymph node associated with an unknown primary tumor. Cytopathologic diagnosis: malignant small-cell neoplasm. Five different fixation and staining methods are shown (a–e). The diagnosis is evident in all five, but the different preparation methods cause marked differences with respect to apparent cell size (larger with air drying [a–c] than with wet fixation [d]), cytoplasmic and nuclear staining (metachronous with MGG [a] and H&E [b, e]), nuclear details and chromatin structure (better with Papanicolaou stain), and the architecture of the cell cluster (best in the cell block [e]). The marked differences are apparent even to a noncytologist. Immunocytochemistry on the cell blocks (f–h) reveals a lymph node metastasis from small cell lung cancer with high proliferative activity (all plates are ×400).
a MGG, air-dried.
b H&E, air-dried.
c Papanicolaou, air-dried.
d Papanicolaou, wet-fixed.
With kind permission of S. Wagner, Königs Wusterhausen, Germany.
continued.
e H&E, “natural” cell block after formalin fixation.
f Positive cytoplasmic staining for AE1/AE3 = epithelial origin.
g TTF-1 positive = pulmonary origin. (LCA negative = excludes lymphatic origin; CK34β12 negative = differentiates from basaloid squamous cell carcinoma; LCA and CK34β12 not shown.)
h Ki-67 positive in approximately 70% of tumor cells = large proportion of mitotically active cells.
With kind permission of S. Wagner, Königs Wusterhausen, Germany.
6.3.2 Air Drying and Romanowsky Stains
The smears should be thin enough to appear visually dry within approximately 5 minutes. Smears should never be placed in closed transport containers before the drying process is complete. Drying artifacts such as indistinct cell borders, enlarged nuclei, and altered chromatin structure may lead to false-negative as well as false-positive diagnoses. Air-dried smears can be evaluated without delay by drying the smear with a small hand-held fan. This shortens the drying time by approximately two-thirds compared with ordinary air drying and does not degrade the quality of the smear.24
Air-dried smears are preferably stained with various Romanowsky stains (Diff-Quick [LT-SYS Diagnostika LABOR+TECHNIK], Hemacolor [Merck Millipore], May–Grünwald, Giemsa, May–Grünwald–Giemsa = Pappenheim; ▶ Fig. 6.3, ▶ Fig. 6.5a, ▶ Fig. 6.6a). Romanowsky stains contain methylene blue and eosin, which stain nuclear structures and cytoplasm differently depending on the pH (metachromasia). These stains are very good for (immuno)cytochemical testing because the slight protein denaturing gives excellent preservation of enzymes and antigen structures for immunocytochemistry. Papanicolaou (▶ Fig. 6.6c) and H&E stains (▶ Fig. 6.4, ▶ Fig. 6.5b, ▶ Fig. 6.6e) can also give excellent results on air-dried smears.25–27
While traditional MGG staining takes approximately 4 minutes, the commercial Diff-Quick and Hemacolor stains take less than 1 minute.
The MGG staining of air-dried smears, a method adopted from hematologic cytology, is preferred by most clinical cytologists, especially since it permits rapid on-site evaluation (ROSE) of specimens within about 2 minutes when fan drying and rapid staining are used. Air-dried smears have a virtually unlimited shelf life.
Note
Air-dried smears are compatible with nearly all staining methods as well as cytochemical and immunocytologic techniques.
6.3.3 Wet Fixation and Papanicolaou Staining
Wet fixation is advantageous because it can be done quickly and gives excellent preservation of cellular and nuclear morphology. Shrinkage artifacts aside, it provides pathologists less experienced in cytology with more familiar images that resemble histologic sections (▶ Fig. 6.5c, ▶ Fig. 6.6d). Immunocytochemistry is somewhat limited because wet fixation denatures structural proteins in the cell membrane, with the result that certain epitopes are no longer accessible to the monoclonal antibodies that are used. Cytoplasmic details are lost (▶ Table 6.1).
Wet fixations are prepared either by immersing the smear in special solutions (immersion fixation: absolute alcohol, mixed solutions of alcohol and ether or acetone, formalin, methanol, isopropanol) or by using a spray fixative (Cyto-Fix [BD Bio Sciences], CytoRAL [RAL Diagnostics], Merckofix [Merck Millipore]). Besides alcohol or acetone and occasionally isopropanol, most spray fixatives contain polyethylene glycol, which acts as a sealant. This protective film is removed from the slide before staining in the cytopathology laboratory by immersing it in 96% alcohol. Wet fixation must be done immediately (<5 seconds) after the sample has been smeared on the slide. This is necessary to prevent air-drying artifacts that could seriously compromise morphologic evaluation. The thinner a smear is and the less moisture it contains, the more rapidly it must be fixed.2,9,19,21,23 If some drying has already occurred, the specimen can be wet-fixed after rehydrating it in physiologic saline solution (30 seconds) without loss of quality.25
Spray-fixed preparations are ready for submission in approximately 10 to 20 minutes. Immersion-fixed preparations should be submitted in screw-capped plastic containers filled with fixative solution whenever possible.
Wet fixation is most commonly used for cytology samples that will be submitted to an outside laboratory. Papanicolaou stain is generally used on wet-fixed preparations. A compelling feature of Papanicolaou-stained smears is the excellent depiction of nuclear chromatin structure. Cellular evaluation in thin smears is less compromised by extracellular mucin, mucus, or blood. Disadvantages of wet fixation are its relatively high time and labor costs and the photosensitivity of the preparations (▶ Table 6.1).2
Related posts:

Stay updated, free articles. Join our Telegram channel

Full access? Get Clinical Tree


