1 General
How to Use This Book
This book is a self-study guide, designed to enable you to begin scanning a live subject right away, without any prior theoretical knowledge of ultrasonography. Different readers will have different degrees of experience with ultrasound. Therefore the book is structured so that you can access the material at your own level of knowledge and experience. Because the book is practice-oriented, less emphasis is placed on physical and technical details, which are basically limited to the following three questions:
LEARNING GOALS
 Who do you examine first when learning ultrasound?
 How do you adjust the ultrasound machine?
 What can you do with the transducer?
After addressing these questions, we will cover the practical aspects of performing an upper abdominal ultrasound examination according to a standardized routine. The protocol for examining the major abdominal organs — the liver, gallbladder, pancreas, kidneys, spleen, vena cava, and aorta — proceeds from the simple to the more complex:
K E Y P O I N T S
Locate and survey the organ.
Define the details of the organ.
Define its relations to neighboring structures.
First, you locate the organ of interest and demonstrate it in its entirety. Second, you define the organ details. Third, you evaluate the relations of the organ to surrounding structures.
In theory, then, there are two basic strategies for scanning the upper abdomen:
 Organ-oriented: an organ or structure is identified, scrutinized, and evaluated in relation to surrounding structures.
 Level-oriented: the abdominal organs are examined as a whole, proceeding in steps. First, all of the abdominal organs are successively located and surveyed. Next the organ details are defined, and finally the interrelationships of all the organs are evaluated.
In practice, you will generally apply a combination of both strategies. But in all cases you will learn to follow a structured, step-by-step protocol that is the essence of systematic upper abdominal ultrasound.
Smaller organs and structures of the upper abdomen will be covered in a less formalized way: the stomach, duodenum, porta hepatis, and adrenal glands.
Examination Technique and Equipment
Who do you examine first when learning to scan?
You should select a young, slender, fasting subject and examine him or her in the morning if at all possible. If you meet these criteria yourself, you should know that self-examination can be mastered with very little practice. You just have to reorient your thinking compared with examining another person, and this can be done relatively quickly.
How do you adjust the ultrasound machine?
The ultrasound system consists of the ultrasound machine itself, the transducer (probe), and the monitor (screen). Each of these elements affects the quality of the examination.
Ultrasound machine
As a beginner, you should not try to learn all the fine points of “knobology” right away. You should, however, be familiar with all of the functions shown in Fig. 1.1.
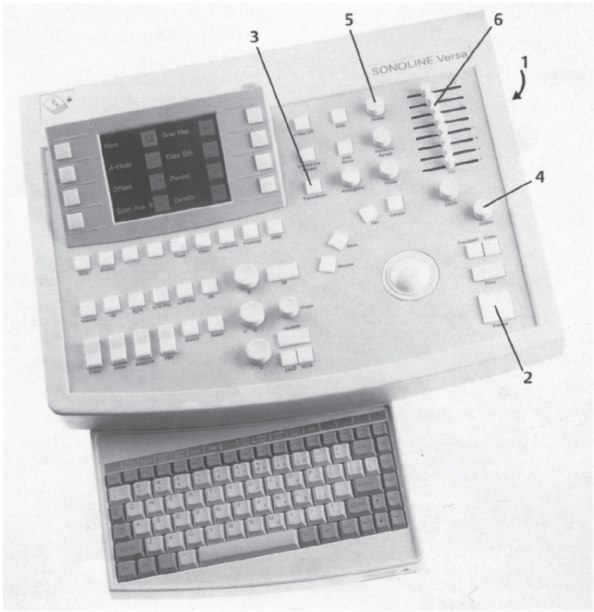
Fig. 1.1 Control panel of an ultrasound machine.
1 On/off switch
2 Freeze button
3 Transducer selector switch
4 Penetration depth
5 Power output
6 Time-gain compensation (TGC)
On switch. Turns the machine on and off.
Freeze button. If the machine was used earlier, the previous operator may have activated the freeze button, locking out all the function switches. In this case you must turn off the freeze switch before using the machine.
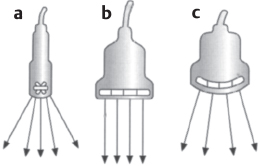
Transducer selector switch. More than one transducer may be available for use. You can choose the desired transducer with a selector switch. To begin with, select the 3.5 MHz curved array. Further details on this type of transducer are given below.
Penetration depth. You turn a knob to set the penetration depth of the ultrasound scan. This has the effect of widening or narrowing the image field. Start with the control set to 12 cm. Most of the images in this book were obtained at this setting.
T I P
Set the power output to an intermediate setting, and move all the TGC slide switches to the center. Adjust the overall gain to obtain good mid-field brightness. Now adjust the slide switches to produce uniform brightness in the near and far fields. When this is done correctly, the slide switches will usually form an approximate diagonal line.
Power output, overall gain, and time-gain compensation. Recall for a moment the way that diagnostic ultrasound works. Ultrasound waves are transmitted, partially reflected by tissues, and received. The intensity of both the transmitted waves and the received signals can and should be adjusted and optimized. The power transmitted by the system, called the power output, affects the brightness of the image. A low power output produces a dark image, while a high power output yields a bright image. The overall gain also affects image brightness. A dark image at a low power setting can be brightened by increasing the gain, and a bright image can be darkened by lowering the gain. Both functions should be carefully balanced to obtain a quality image. A good general rule is to set the power output to the lowest possible level. On the other hand, setting the gain too high to compensate for a low power setting will produce a “noisy” image. Through practice, you will learn how to achieve a proper balance.
Every ultrasound machine has two gain controls. The overall gain control is used to amplify the received echoes over the entire depth of the image field. The time-gain compensation (TGC) amplifies echoes according to their depth to achieve uniform image brightness.
