Reading X-rays, or radiographs, is a critical skill for medical professionals, including radiologists, physicians, and medical students. While it may seem daunting at first, understanding the fundamentals of radiograph interpretation can make the process more approachable. This article, inspired by the principles outlined in X-Ray Film Reading Made Easy by William F. Hook, MD, provides a clear, academic guide to simplify X-ray reading for beginners. We’ll cover essential techniques, systematic approaches, and resources to enhance your skills. Additionally, we’ll introduce tools like the Clinical Tree app to keep you updated with the latest advancements in diagnostic imaging.
Understanding the Basics of X-Ray Interpretation
Radiographs are images produced by passing X-ray beams through the body, revealing four primary densities types: gas (black), fat (dark gray), water (light gray), and mineral (white). Recognizing these densities is the foundation of X-ray interpretation. For example:
- Gas appears black due to minimal beam attenuation, as seen in air-filled lungs or intestines.
- Fat is slightly lighter than gas, often visible in areas like the hip joint capsule.
- Water density includes muscles and organs, comprising most of the body’s volume.
- Mineral density, such as bones or metal objects, appears white.
By familiarizing yourself with these densities, you can begin to identify normal and abnormal patterns on radiographs, as outlined by Dr. Hook. For instance, in an abdominal X-ray, gas in the colon, fat in the hip joint, and water density in muscles are key landmarks.
A Systematic Approach to Reading X-Rays
A systematic checklist is crucial for consistent and accurate X-ray interpretation. Dr. Hook emphasizes the importance of a structured approach, particularly for beginners. Below are tailored systems for key anatomical regions:
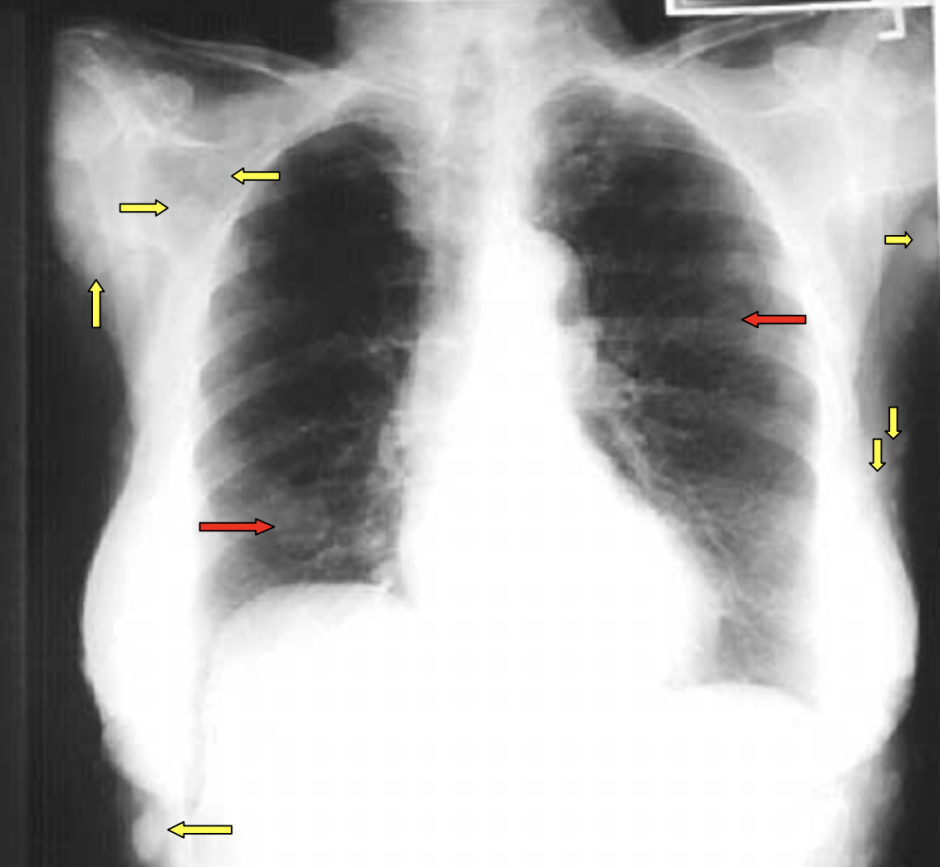
1. Chest Radiographs
- Checklist: Evaluate the lungs, heart, mediastinum, diaphragm, bony thorax, film corners, and labels.
- Key Patterns:
- Interstitial infiltrates: Recognized by fuzzy bronchovascular markings and air bronchograms, often due to inflammatory cells invading lung interstices.
- Alveolar filling infiltrates: Appear as whiteout areas in alveolar spaces, indicating conditions like pneumonia.
- Tips: Always check for silhouetting, where water-density structures (e.g., heart and lung infiltrates) lose their borders when touching, aiding in identifying abnormalities like pneumonia.
2. Spine Radiographs
- Checklist: Assess vertebral body heights, bone density, facets, neuroforamina, alignments, and soft tissues.
- Key Findings:
- Look for spondylosis (degenerative changes) versus spondylolysis (pars interarticularis defects).
- In trauma, evaluate cervical spine alignment, particularly the C1-C2 region, using views like the odontoid view to detect fractures (e.g., Jefferson fracture).
- Tips: Use Swischuk’s line to differentiate pseudosubluxation from true fractures in pediatric cervical spines.
3. Pelvis and Hips
- Checklist: Examine pelvic shape, bone density, sacroiliac (SI) and hip joints, ovals (e.g., obturator foramen, Shenton’s line), and symphysis pubis/sacrum/coccyx.
- Key Findings:
- Abnormal pelvic shape may indicate conditions like achondroplasia or Paget’s disease.
- Increased femoral head density suggests avascular necrosis, detectable early via MRI.
- Tips: Trace pelvic ovals with your finger to spot subtle cortical breaks in trauma cases.
4. Elbow and Wrist
- Checklist for Elbow: Check fat pads, radial head, growth centers, and humerus/ulna.
- Checklist for Wrist: Evaluate soft tissues, arcs, carpal bone mnemonic, styloid processes, and cortices.
- Key Findings:
- Displaced fat pads in the elbow indicate joint effusion, often due to intra-articular hemorrhage.
- Scaphoid-lunate dissociation (Terry Thomas sign) is a subtle wrist injury detectable by widened spaces.
- Tips: Use the mnemonic “Never Lower Tillie’s Panties, Grandma Might Come Home” to systematically review carpal bones.
5. Ankle and Foot
- Checklist: Assess soft tissues, ankle mortise width, base of the fifth metatarsal, and cortices.
- Key Findings:
- A positive teardrop sign (displaced fat pad) indicates ankle effusion.
- Fifth metatarsal fractures are common and typically transverse, unlike the parallel apophysis.
- Tips: Use a bright light to evaluate soft tissues for subtle swelling or hemorrhage.
Practical Tips for Accurate X-Ray Reading
To enhance your X-ray interpretation skills, follow these practical tips from Dr. Hook’s guide:
- Eliminate Distractions: Turn off extraneous lights to focus on the radiograph.
- Use Magnification: Employ a magnifying glass for small parts like hands, feet, or carpal bones.
- Hot Light for Overexposed Films: Overexposed films retain information recoverable with a hot light or lighter copies.
- Compare Old and New Studies: Always review prior radiographs to detect changes and confirm patient identity (e.g., using clavicle “fingerprints” in chest X-rays).
- Provide Clinical History: History forms the third side of the diagnostic triangle (objective findings, differential diagnosis, history), aiding accurate interpretation.
Common Pitfalls and How to Avoid Them
Beginners often face challenges in X-ray interpretation. Here are common pitfalls and solutions:
- Misinterpreting Normal Variants: Growth centers or sesamoids (e.g., os trigonum in the ankle) may mimic fractures. Refer to texts like Atlas of Normal Roentgen Variants by Theo E. Keats to distinguish variants.
- Missing Subtle Findings: Use a systematic checklist to avoid overlooking abnormalities, such as scaphoid fractures or lunate dislocations.
- Ignoring Soft Tissues: Soft tissue abnormalities (e.g., retropharyngeal masses or displaced fat pads) are critical clues. Always evaluate soft tissues first in trauma cases.
Enhancing Your Skills with Modern Resources
To stay updated with the latest advancements in diagnostic imaging, leverage digital tools and references:
- Clinical Tree App: Download the Clinical Tree app to access cutting-edge journals and books on diagnostic imaging. This app provides real-time updates on radiology techniques, case studies, and research, ensuring you stay ahead in your practice.
- Reference Texts:
- Reeder and Felson’s Gamuts in Radiology: Essential for differential diagnoses.
- Atlas of Normal Roentgen Variants That May Simulate Disease: Helps distinguish normal variants from pathology.
- Online Resources: Websites like the University of Hawaii’s pediatric radiology page (www2.hawaii.edu/medicine/pediatrics) offer valuable case studies.
Why Systematic X-Ray Reading Matters
A systematic approach to X-ray interpretation reduces errors and builds confidence. By mastering the basics—densities, checklists, and practical tips—you can accurately identify normal and abnormal findings. This skill is particularly vital in settings where immediate radiological consultation is unavailable, such as rural hospitals or busy emergency departments.
For medical professionals in the USA, Australia, and India, where demand for efficient diagnostic skills is high, adopting a structured method ensures quality patient care. As Dr. Hook notes, technology like teleradiology and Picture Archiving and Communication Systems (PACS) is transforming radiology, but a strong foundation in film reading remains essential.
Take Your Radiology Skills to the Next Level
Reading X-rays doesn’t have to be intimidating. By understanding radiographic densities, using systematic checklists, and avoiding common pitfalls, you can simplify the process and improve diagnostic accuracy. To stay at the forefront of radiology, download the Clinical Tree app for access to the latest journals, books, and research on diagnostic imaging. Whether you’re a medical student, nurse practitioner, or physician, continuous learning is key to mastering X-ray interpretation.
Start applying these techniques today, and share your experiences or questions in the comments below. Let’s make X-ray reading easier together!
Related posts:
Stay updated, free articles. Join our Telegram channel

Full access? Get Clinical Tree


