Key Points
- •
Ultrasound increases the success rate of lumbar puncture by improving landmark identification of the lumbar spine’s midline and interspaces.
- •
Identification of spinal landmarks with ultrasound relies on visualization of bony processes in both longitudinal and transverse planes.
- •
The greatest improvement in success rate of lumbar puncture with ultrasound guidance has been shown in morbidly obese patients and those without palpable landmarks.
Background
Ultrasound was first described as a tool to identify lumbar spine anatomy in 1971. With its increasing availability, point-of-care ultrasound has evolved to become an essential bedside tool for identifying spinal landmarks before performing lumbar puncture, especially in obese patients. Ultrasound guidance for lumbar puncture is most beneficial in patients who have had multiple failed attempts and those with abnormal spinal anatomy, such as scoliosis.
A recent meta-analysis showed that use of ultrasound to identify a needle insertion site before performing lumbar puncture or epidural catheterization reduced the number of attempts, needle redirections, procedural failures, and traumatic taps. Studies have shown that images can be acquired quickly by nonradiologists after brief training, and high-quality images can usually be obtained in under a minute. Lumbar puncture spine mapping has generally shown greatest benefit in obese patients in whom palpation of landmarks is often difficult. Training requirements to obtain consistently high-quality images in one study included review of ultrasound anatomy images and 10 practice scans.
Spinal ultrasound has been used to measure the distance between the skin and ligamentum flavum in patients with body mass index (BMI) <25 versus morbidly obese patients with BMI >30, with an average difference of 2 cm of depth (4.4 cm vs. 6.4 cm). Depth of the ligamentum flavum can be accurately measured with ultrasound and is best performed using a longitudinal paramedian view. Because the ligamentum flavum is adjacent to the dura mater, this measurement can guide selection of the most appropriate length spinal needle and determine the maximum insertion depth before which cerebrospinal fluid should be obtained.
Lumbar puncture using real-time ultrasound guidance has been described using a paramedian approach. Although small studies describing real-time ultrasound guidance appear promising, lumbar spine mapping to mark a needle insertion site is currently the most common technique and is the focus of this chapter.
Anatomy
The spine consists of 24 vertebral bodies (7 cervical, 12 thoracic, and 5 lumbar), intervertebral cartilaginous discs, sacrum, and coccyx. The five lumbar vertebrae are relatively larger than those of the cervical or thoracic spine ( Figure 35.1 ). Each vertebra has a vertebral body, the weight-bearing and largest part, connected to pedicles, laminae, and transverse and spinous processes ( Figure 35.2 ). The spinous processes extend posteriorly and are the most superficial component of vertebrae that are palpable in the midline. Connecting the transverse processes to the spinous process are the superior and inferior articular processes, or facet joints, and laminae. The spinous processes are connected at the tips by the supraspinous ligament and at the shafts by the interspinous ligament. Ligamentum flavum lines the vertebral foramina connecting the laminae. The posterior longitudinal ligament runs along the posterior aspect of the vertebral bodies ( Figure 35.3 ).


In adults, the spinal cord terminates at L1, and therefore lumbar puncture can be safely performed below L2. The level of the posterior superior iliac crests is approximately L4. In general, the L3–4 interspace is preferred. Careful review of the lumbar spine anatomy reveals that the L3–4 interspace tends to be wider and have less soft tissue overlying the spinous processes compared to the L4–5 interspace ( Figure 35.4 ).

After the spinal needle passes through the skin and subcutaneous tissue, it encounters resistance from the dense supraspinous and interspinous ligaments, and firm pressure is required to traverse these ligaments. The first “pop” or release of resistance is felt as the needle passes through the ligamentum flavum and enters the epidural space. The second “pop” is felt a few millimeters deeper as the needle punctures the dura mater and enters the subarachnoid space where cerebrospinal fluid is obtained.
Technique
Patient Position
Lumbar puncture can be performed with patients in an upright or lateral decubitus position. In an upright-seated position, the patient leans forward with arms folded on a table and feet supported with a chair or stool. In a lateral decubitus position, the patient lies on his left or right side with the knees flexed to the chest. Lumbar puncture success rates tend to be lower in a lateral decubitus position than in the upright position because the vertebral column bows or twists on the soft bed surface and interspaces between spinous processes open less in a lateral decubitus position. However, in a hospital setting, some patients may have physical limitations or debility that prevents them from sitting in an upright position for the duration of the procedure. In these patients, a lateral decubitus position should be chosen.
If the patient is in a lateral decubitus position, it is important to square the shoulders and hips perpendicular to the bed surface to ensure that they are vertical. If the hips and shoulders are not perfectly vertical in a lateral decubitus position, the spine will be twisted in one direction and mostly likely result in failed attempts. A lateral decubitus position allows measurement of the opening pressure using manometry because the patient’s head is at the same level as the needle entry site in the lumbar spine. Manometry is not performed when the patient is in an upright position.
Ultrasound Exam
For patients with average or low BMI, a high frequency, linear array transducer is preferred because it provides the highest resolution of superficial bony structures. For obese patients with high BMI, a low frequency, curvilinear transducer is preferred because it provides deeper penetration to visualize the spinal structures.
In patients with palpable landmarks, the level of the lumbar spine is identified by first palpating the posterior superior iliac crests and drawing an imaginary line between them. The L4 spinous process is at this level. One interspace above or below the level of the iliac crest is ideal for lumbar puncture because the spinal needle enters in the L3–4 or L4–5 spinous interspace.
Identification of the Lumbar Spine
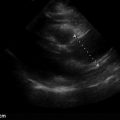
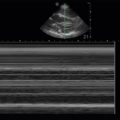
In morbidly obese patients or those with no palpable bone landmarks, identification of all five lumbar spinous processes can be easily achieved. Starting in a transverse plane, place the transducer over the sacrum just above the intergluteal cleft. The transducer orientation marker should be pointed to the operator’s left. The sacrum can be recognized by its distinctly hyperechoic, fused bones that have a rough appearance superficially. Slide the transducer superiorly until the first lumbar spinous process (L5) is seen. The L5 spinous process is usually relatively deep in soft tissue, even in thin patients ( Figure 35.4 ). Continue sliding the transducer superiorly marking the L4, L3, L2, and L1 lumbar spinous processes ( ![]() ). Marking the midline and interspinous spaces is described below.
). Marking the midline and interspinous spaces is described below.
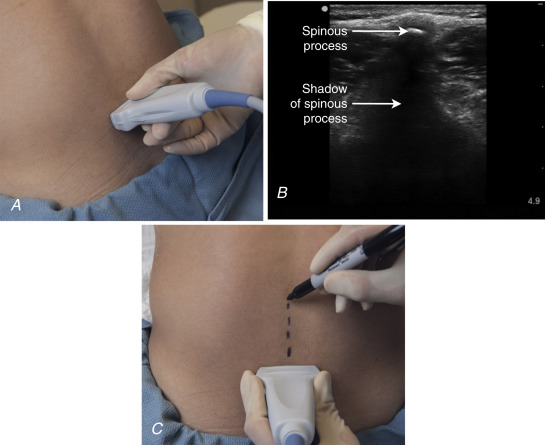
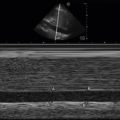
Transverse View: Midline Identification
The transducer is oriented in a transverse plane to the spine ( Figure 35.5 A ). In this view, a spinous process appears as a small, bright white, pointed bone most superficially near the top of the screen. Shadowing is seen deep to the bone vertically extending from the bony spinous process to the bottom of the screen ( Figure 35.5 B). The spinous process appears much thinner in a transverse view compared to a longitudinal view. Several centimeters deep and lateral to the superficial midline spinous processes the transverse processes can be seen as two horizontal white lines and can confirm identification of the midline ( Figure 35.6 ). Center the transducer exactly on the spinal midline and make a mark perpendicular to the transducer along the spinous processes ( Figure 35.5 C). The midline should be marked at two to three levels.