CHAPTER 6 MRI of the Abdomen and Pelvis
MRI of the abdomen and pelvis—considerations
Scan Considerations
Refer to all vendor-specific safety parameters.
Ensure that the patient empties their bladder before scanning.
Patients should have an IV placed in the antecubital fossa prior to positioning when contrast is indicated. A 20-gauge angiocath is preferred. A power injector should be used for all abdominal MRI and MRA imaging for most effective contrast enhancement. For abdominal MRI and MRA, an injection rate of 1.5-2.0 cc/sec is suggested.
There are several types of contrasts used for imaging the abdomen and pelvis. Gadolinium-based contrast agent (GCBA) dosing is based on the patient’s weight, and the manufactures dosing guidelines should be followed. The weight-based approach of 0.1 mmol/kg (0.2 mL/kg) followed by 20-30 mL of saline is recommended for extracellular contrast.
All contrast imaging should have pre contrast sequences prior to injection. Precontrast scans are multi-purpose.
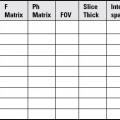
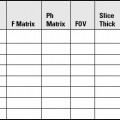
• They allow for assessment of adequate anatomical coverage.
• They permit image review for asset artifacts in the FOV.
It is important to document the patient’s contrast dose, flow rate and contrast agent used during the procedure, for the radiologist who will be interpreting the MR scan.
Secretin is a medication that enhances visualization of the pancreatic duct. A slow IV injection of 1 U/kg of secretin is given and a MRCP is performed immediately after the injection and several times post injection through the pancreatic duct until it is properly visualized.
Because of respiratory motion, breath-hold sequences are essential in abdominal MRI and MRA imaging. A respiratory bellows should be placed on the patient prior to positioning the patient in the coil. The respiratory bellows is used to monitor the patient’s breathing pattern as well as to monitor their ability to follow breath-hold direction. Before positioning the patient on the table make sure you explain the importance of holding their breath. Breath hold sequences can be acquired either on inspiration or expiration but must be consistent.
Dielectric artifacts impact MRI studies by causing an increase in inhomogeneity. Dielectric effects are caused by local eddy currents due to the increased conductivity of body tissue. This effect is particularly prominent in 3T body imaging. There is shading, or a drop off of signal in the area being imaged. This effect is exaggerated when the patient has ascites. The dielectric effect in muscle is worse than that of fatty tissue. This inhomogeneity artifact can limit the scans diagnostic capabilities. Most vendors provide a dielectric pad, which should be placed on the patient’s abdomen or pelvis before positioning the coil. Although the pad does not eliminate shading, it can effectively compensate for it. At 3T when the artifact limits the scan quality, the patient should be scanned on a 1.5T system.
Coils
A multi channel vendor specific array coil should be used for abdominal and pelvic imaging when available. A multi-channel cardiac coil can also be used particularly for the MRA of the renal arteries, MRCP, prostate and uterus. Configuration of the coils is dependent on the area of the abdomen and pelvis being scanned.
Pulse Sequences
Breath-hold T1 SPGR and T2 SSFSE can be acquired in 20 seconds or less.
Breath-hold T1 SPGR exhibits T1 contrast and best identifies anatomical structures. Dual SPGR In phase (2.2 TE) and Out of phase (4.4 TE) can help identify pancreatic and adrenal pathology. Fat saturation can be helpful in this pulse sequence to decrease bright fat signal seen on T1 imaging.
Breath-hold T2 SSFSE or FSE sequences best visualizes T2 contrast of the liver, pancreas, bile ducts, and kidneys. These sequences best delineate pathology of the structures. Fat saturation is used to further demonstrate pathology when fat is present.
FIESTA (Fast Imaging Employing Steady State Acquisition) is a sequence that identifies bright fluid and vessels in the abdomen without contrast. It is a non–breath-hold sequence, which can be acquired in the axial and coronal plane in approximately one minute each. It is an effective localizer for a MRCP and phase-contrast imaging of the portal vein, as well as defining the vascular structures of the abdomen and pelvis.
The MRCP uses a T2 FRFSE and SSFSE (high TR and TE) with fat saturation, to examine the biliary system in patients with possible biliary obstruction, stones. A 2D or 3D volume is acquired at the level of the common bile duct and head of the pancreas. This produces an image with heavily suppressed background and bright fluid.
3D LAVA is a high-resolution, dynamic, multi-phase T1 SPGR image with saturated fat. This contrast-enhanced sequence can identify the arterial, venous, and equilibrium phases of the liver and abdominal structures, as well as blood vessels. A dynamic LAVA precontrast scan is initially preformed and used as the MASK for increased contrast enhancement.
DWI imaging is performed on the liver with b-values of 50, 250, and 500 and higher. It is used for increased visualization and detection of the number of lesions present as well as to help to characterize the type of lesions present.
Gradient echo, susceptibility-weighted imaging sequences, is especially useful to demonstrate iron deposition in the liver (hemochromatosis).
Options
In parallel imaging (GE Asset), a reduced dataset in the phase encoding direction(s) of k-space is acquired to shorten the acquisition time by combining the signal of several coil arrays. A low-resolution, fully Fourier-encoded reference image (GE asset calibration scan) is required for sensitivity assessment. Asset is important in abdominal MRI and MRA because breath-hold imaging is necessary. Asset imaging cuts the scan time in half but needs a calibration scan to do so. Prescribe a calibration scan for each coil selected. Prescribe the asset scan superiorly and inferiorly at least four centimeters above and below the area of interest, to help avoid asset directional artifacts. A breath-hold calibration scan should be acquired in a single breath-hold acquisition.
All multi-channel coils produce excessive signal adjacent to the coil. This can be compensated for by using vendor-specific options, i.e., GE uses SCIC or PURE, to provide uniform signal intensity. When PURE is used a calibration scan is necessary.
Flouro trigger is an option that is used with dynamic imaging to follow the contrast as it enters the abdominal aorta. Contrast is injected with a power injector and the contrast is followed from the heart to the pulmonary arteries, to the aorta. When the contrast is detected entering the superior abdominal aorta, the post-contrast phase begins. Three post-contrast phases are acquired, each in a single breath hold of about 20 seconds. The precontrast scan is used as a MASK for the subsequent dynamic contrast scans.
Saturation bands can be used on all pulse sequences. A Superior (S) and Inferior (I) saturation (Sat) bands can be used to help compensate for vascular pulsation and Anterior (A) saturation (Sat) can help to compensate for abdominal wall motion.
Fat saturation (FS) options and terminology are vendor specific. For GE systems use “fat classic” for fat saturation with enhanced anatomical detail. SPECIAL is a fat suppression technique used with 3D LAVA.
Flow compensation (FC) or gradient nulling should be used with T2 imaging to help compensate for vascular motion.
Scan Considerations for the Pelvis
When scanning the female pelvis, the anatomy of concern is the uterus, ovaries, and related structures. T2 images are performed in sagittal, and long and short axes of the uterus. Short axis is the coronal plane and the long axis is the axial plane of the uterus.
When scanning the male pelvis, the anatomy of concern is the prostate, seminal vesicles, neural bundles, and related structures. The prostate is often imaged with an endorectal coil, in conjunction with the torso or cardiac coil. The endorectal coil is placed in the patient’s rectum and 50-70 cc of air is injected into the coil to keep it securely in place. For the male pelvis, T2 imaging in all three planes is performed. T1 gradient echo imaging should be performed to identify residual blood, particularly after a prostate biopsy.
Scan Considerations for a Runoff of the Abdomen and Lower Extremities
MRAs or runoffs can be performed with 0.2–0.3 mmol/kg (0.4-0.6 mL/kg) of contrast agents that are FDA approved for multiple dosing (see contrast section). An injection rate of 1.5-2 cc/sec is suggested.
For TRICKS, an injection rate of 1.5 cc/sec is suggested. For a TRICKS sequence, a temporal resolution of approximately 7-10 sec should be used for claudication. Reduce temporal resolution to 3-6 seconds when ulceration of the lower limb is present to avoid venous contamination of surrounding tissue.
When scanning a runoff, a multi-station MRA of the abdomen, pelvis, and lower extremity, there are several coil considerations.
On a 1.5T scanner, a PV (peripheral vascular) coil can be used to scan the patient’s vessels in their entirety, from top to bottom. When a PV coil is not available, the CTL coil can also be used at 1.5T or 3T.
A TRICKS (Time Resolved Imaging Contrast Kinetics) scan of the lower station, from the knees down is initially performed (first injection) and then a multi-station runoff, abdomen-pelvis, thighs, and lower leg (second injection), which follows the contrast from top to bottom.
When a CTL spine coil is used, the patient’s lower legs should be positioned at the top station. The patient is positioned on the coil supine, feet first, and a TRICKS scan of the lower legs is performed. An additional 2-station runoff is acquired using the mid and lower portions of the coil. The patient’s position on the coil must be considered and adjusted for proper coverage.
Place a sponge between the patient’s legs and secure with sheets.
A noncontrast scan should always be performed at all stations to use as a MASK for increased tissue suppression and contrast enhancement.
It is recommended when scanning a runoff that thigh compression is used to decrease venous contamination. The use of thigh cuffs with long extension tubing, which can be inflated before the mask acquisition, will help to delay venous contamination (see Figures 4-87 through 4-89).
MRI of the abdomen—kidneys
Acquire three-plane pilot of the abdomen and pelvis per site specifications.
COIL: Multi-channel or 12-channel torso array or multi-channel cardiac coil
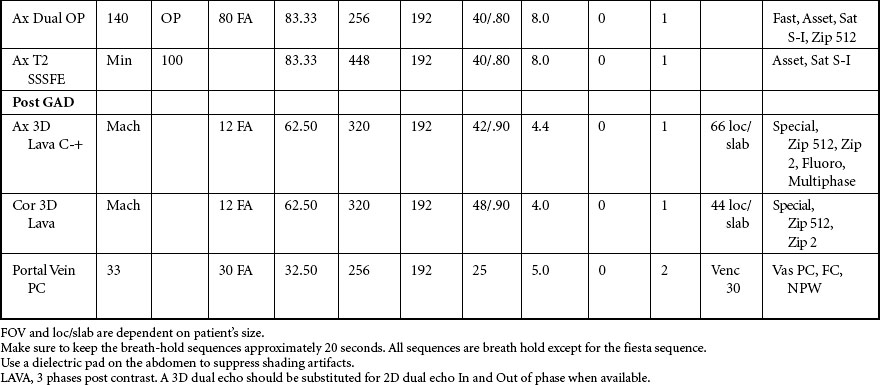
SPECIAL CONSIDERATIONS: Position respiratory bellows on the patient before starting the scan at the level of the diaphragm. Position a diaelectric pad on the abdomen to help suppress shading artifacts.
POSITION: Supine, feet first, with coil covering diaphragm to iliac crest
Place patient’s arms over the head or elevated on cushions away from the body.
LANDMARK: Midline, 4 inches above the iliac crest.
IMMOBILIZATION: Place a cushion under the patient’s knees.
Prevent the body from touching the sides of the magnet by using sponges or sheets.
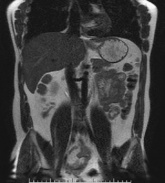
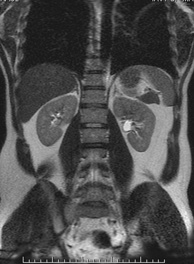
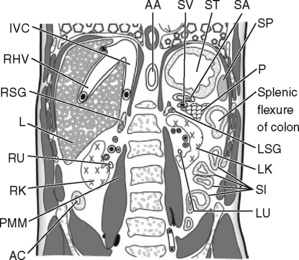
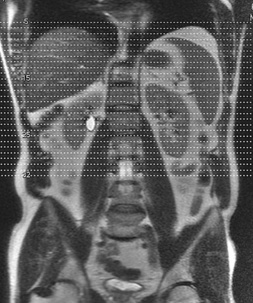
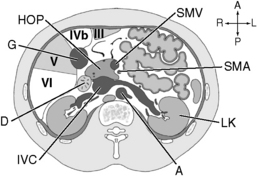
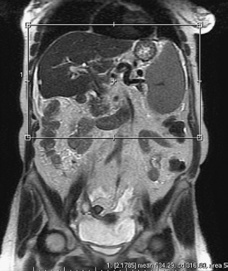
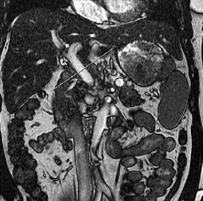
Acquisition of Coronal Images of the Abdomen
Practice breath-holds with the patient before starting the examination to ensure the patient’s ability to hold their breath for an adequate time to ensure that all images are acquired at the same level of inspiration or expiration.
AA, abdominal aorta; AC, ascending colon; IVC, inferior vena cava; L, liver; LK, left kidney; LSG, left suprarenal gland; LU, left ureter; P, pancreas; PMM, psoas major muscle; RHV, right hepatic vein; RK, right kidney; RSG, right suprarenal gland; RU, right ureter; SA, splenic artery; SI, small intestine; SP, spleen; ST, stomach; SV, splenic vein.
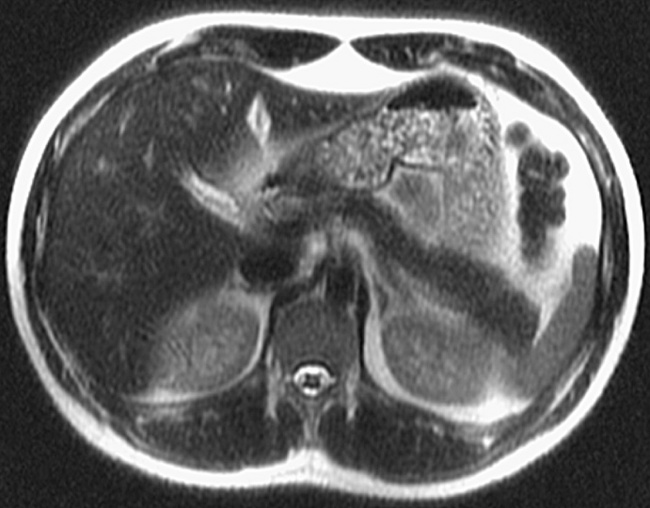
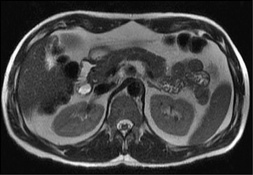
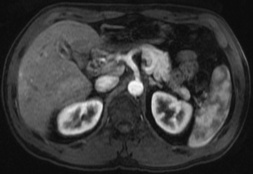
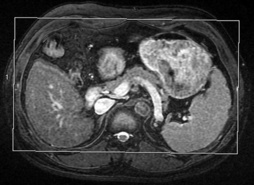
Acquisition of Axial Images of the Abdomen
SLICE ACQUISITION: Superior to inferior
SLICE ALIGNMENT: Straight; no angulation of slices is necessary.
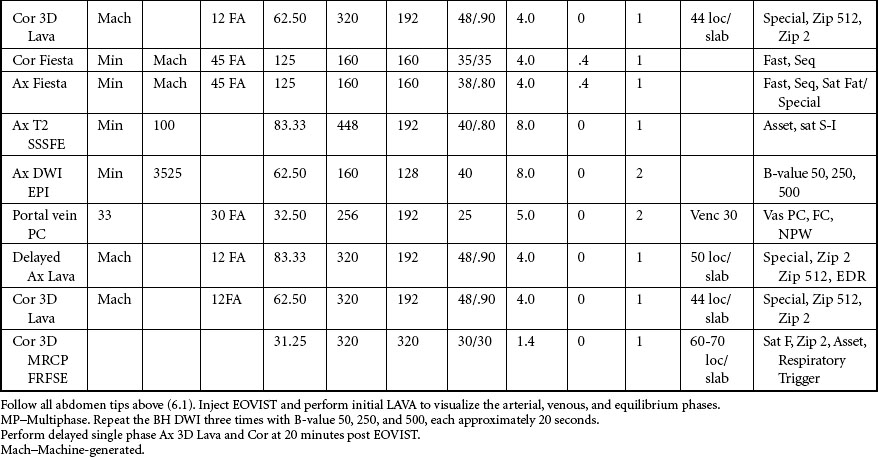
Acquisition of the Axial 3-D LAVA Images of the Abdomen
SLICE ACQUISITION: Superior to inferior
SLICE ALIGNMENT: Straight; no angulation of slices is necessary.
ANATOMIC COVERAGE: From diaphragm to the lower poles of the kidneys
Acquisition of the Coronal 3-D Delayed Enhanced Images of the Abdomen and Pelvis
SLICE ACQUISITION: Anterior to posterior
SLICE ALIGNMENT: Straight; no angulation of slices is necessary.
ANATOMIC COVERAGE: From anterior liver through the posterior kidneys
AC, ascending colon; DC, descending colon; I, ileum; IMV, inferior mesenteric vein; IVC, inferior vena cava; L, liver; LHV, left hepatic vein; LMPV, left main portal vein; MHV, middle hepatic vein; PV, portal vein; R, rectum; RHV, right hepatic vein; RMPV, right main portal vein; SMV, superior mesenteric vein; SP, spleen; SV, splenic vein.
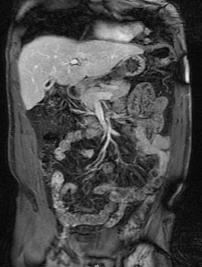
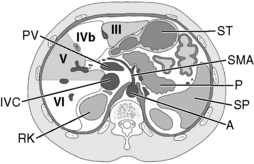
MRI of the abdomen—portal vein
Follow the scan protocol for abdomen and kidneys, adding a sequence for the portal vein.
Acquisition of the Portal Vein
SLICE ACQUISITION: Single slice angled through the portal vein
SLICE ALIGNMENT: Perpendicular to portal vein
ANATOMIC COVERAGE: Single slice through the portal vein; cross section portal vein and surrounding tissue.
A, appendix; AC, ascending colon; C, cecum; DC, descending colon; HPV, hepatic portal vein; I, ileum; IMV, inferior mesenteric vein; P, pancreas; R, rectum; SMV, superior mesenteric vein; SP, spleen; SV, splenic vein; TC, transverse colon.

Stay updated, free articles. Join our Telegram channel

Full access? Get Clinical Tree

