Musculoskeletal Interventions
Percutaneous interventions on musculoskeletal structures have become well established in both rheumatology and orthopedic surgery and have gained an important role in the diagnosis and treatment of inflammatory and degenerative diseases of the musculoskeletal system. Percutaneous procedures on joints, intra-articular cysts, ganglia, tendon sheaths, and bursae are performed routinely in everyday practice.
Even today, a large percentage of percutaneous procedures are still performed “blind,” i.e., the operator is guided by visual and palpable anatomical landmarks in locating the desired route for needle insertion. Several studies have documented the relatively poor precision of “blind” procedures, however. Eustace,1 for example, found that only 37% of needles had been placed accurately for glenohumeral joint injections. Jones,2 in a review of 108 joint injections, confirmed correct intra-articular needle placement in just 56 cases (52%), with only a 10% rate of correct needle placements in the subgroup of glenohumeral injections.
Practice
In the light of these findings, “blind” procedures should be limited strictly to joints that are easily accessible and show significant swelling (e.g., a large joint effusion or subdeltoid bursitis).
As the ultrasound imaging of joints has become more widely practiced in rheumatology and orthopedics, ultrasound has emerged as the imaging modality of choice for guiding percutaneous procedures on joints and soft tissues.3–7 Ultrasound guidance can significantly increase the success rates of both diagnostic and therapeutic interventions.1 Even the smallest intra-articular effusion (<1 mL) can be selectively aspirated with high precision.
Moreover, ultrasound-guided joint injections and aspirations can be performed considerably faster than CT- or fluoroscopy-assisted interventions8 and can be done without radiation exposure to patients or staff.
Two principal techniques are employed in ultrasound-guided musculoskeletal interventions. In one technique the most favorable puncture site is identified sonographically and is marked on the skin with a waterproof marking pen. The needle is then introduced at that site in a separate step. But we prefer the technique described below, in which the needle is introduced under sonographic vision. We believe that this technique is particularly accurate and effective for puncturing small joints and aspirating small fluid volumes.
28.1 Indications and Contraindications
28.1.1 Indications
The indications for ultrasound-guided interventional procedures are basically the same as for all percutaneous procedures on joints and soft tissues.
The general indications are:
Decompression of joints (reduction of capsular tension) by the aspiration of intra-articular effusions
Analysis of aspirated material (crystal arthropathies, bacterial effusion, etc.; inflammatory versus noninflammatory effusion)
Drug injections (e.g., for local anti-inflammatory treatment of arthritis or activated osteoarthritis, chemical synoviorthesis, etc.)
Special indications are:
Previous “dry tap” of an ultrasound-detected effusion, with need to retrieve a diagnostic sample
Needle insertions close to vulnerable anatomical structures (nerves, vessels, etc.), as in the treatment of digital flexor tendon synovitis
28.1.2 Contraindications
Contraindications to therapeutic joint injections are:Systemic infections
Skin damage or disease at the injection site
Tumors about the puncture site
Fresh fractures near the puncture site
Suspected bacterial infection of the affected joint
Prior unsuccessful therapeutic injections in the same region within the previous 6 weeks
Lack of informed consent
The following are considered relative contraindications to diagnostic arthrocentesis: Coagulation disorders or anticoagulant therapy (Quick value <30%, PTT >50 seconds)
Note that strong suspicion of septic arthritis does not contraindicate diagnostic arthrocentesis because of the importance of establishing a diagnosis.
28.2 Materials and Equipment
The selection of materials depends partly on the size of the joint and its specific anatomical characteristics (▶ Table 28.1). A small joint such as the MCP (metacarpophalangeal) joint will require a shorter and thinner-gauge needle than a large joint such as the knee. Another consideration is the clinical question, which determines the scope of the proposed procedure: will the joint be injected, aspirated, or both? In our experience, an effusion that is echogenic at ultrasound has a high cellularity, indicating the need to use a larger-caliber needle.
| Joint region | Manufacturera | Size | Color code | Comment |
| Small joints (e.g., fingers, toes) | Braun | 26G × 1 (0.45 × 25 mm) | Brown | |
| Medium-sized joints (e.g., wrist, elbow) | Braun | 22G × 1¼ (0.7 × 30 mm) | Black | |
| Large joints (e.g., knee) | Braun | 20G × 1½ (0.9 × 40 mm) | Yellow | |
| Hip | Braun | 20G × 2¾ (0.9 × 70 mm) | Yellow | First measure the necessary insertion depth! |
| 21G × 4¾ (0.8 × 120 mm) | Green | First measure the necessary insertion depth! | ||
| Sacroiliac joint | Braun | 20G × 2¾ (0.9 × 70 mm) | Yellow | First measure the necessary insertion depth! |
| 21G × 4¾ (0.8 × 120 mm) | Green | First measure the necessary insertion depth! | ||
| aRepresents products habitually used in our department. | ||||
No special puncture sets are available for joint interventions. We use ordinary disposable syringes and injection needles (Luer system) that are appropriate for the specific joint region and requirements in ▶ Table 28.1.
For the transducers, we use a probe cover set that includes sterile coupling gel. The size of the cover should fit the length of the linear probe (▶ Table 28.2).
| Probe size | Manufacturer | Product IDa | Size | Comment |
| Linear up to 5 cm | Microtek Medical | Ultracover PC1297 | 8 × 61 cm | |
| Linear up to 7 cm | Microtek Medical | Ultracover PC1298 | 10 × 61 cm | |
| Curved array | Microtek Medical | Ultracover PC1291 | 13 × 61 cm | Hip joint |
| aRepresents products habitually used in our department. | ||||
28.3 Procedure
28.3.1 Preparations
Patient position depends on the joint that will be injected or aspirated. Patients are positioned supine for procedures on lower-limb joints and are generally placed in a sitting position for procedures on upper-limb joints (except in patients with circulatory problems, for example). Correct initial positioning of the joint is essential and will help to accomplish the procedure with better speed and accuracy.
Transducer selection depends on joint size. We use a linear probe with a high-frequency bandwidth for small joints (e.g., 8–18 MHz) and a linear probe with a 5- to 10-MHz bandwidth for large and medium-sized joints. In very rare cases we may use a curved array on a hip with a thick soft-tissue envelope, as it will give a larger field of view with better penetration depth due to the low center frequency (3.5 MHz).
The procedure room requires regular cleaning and disinfection of objects and surfaces close to the patient, and additional disinfection is needed after exposure to material contaminated with infectious organisms. The number of staff members in the treatment room during the procedure should be limited to essential personnel. The clothing worn by the physician and assistants should not pose an infection risk, so we don protective clothing that is worn only in the procedure rooms (long-sleeved gown). The hands are cleaned with a hygienic handwash or handrub, and sterile gloves are worn. Conversation should be avoided if possible during the procedure itself, and a mask should always be worn during joint interventions that require a change of syringes.9
The injection site and its surroundings should be widely exposed to prevent contamination by clothing items and draped with a sterile towel. They should be antiseptically prepared after any necessary initial cleaning. Any hair that is in the way should be removed with scissors rather than with a razor (which may cause skin injury that promotes infection). The injection site should be generously prepared with antiseptic spray or wipes, thoroughly wetting the skin and leaving the solution in place for at least 1 minute (or perhaps longer; note the manufacturer’s recommended contact time).
Sterile, disposable syringes and needles should be used. All sterile-packaged items should be kept sealed until just before the procedure, then opened and laid out ready for use, preferably on a side table covered with a sterile drape (▶ Fig. 28.1). Necessary pharmacologic agents are drawn into the syringes using rigorous sterile technique (the needle used to draw the agent should not be used for the injection!).
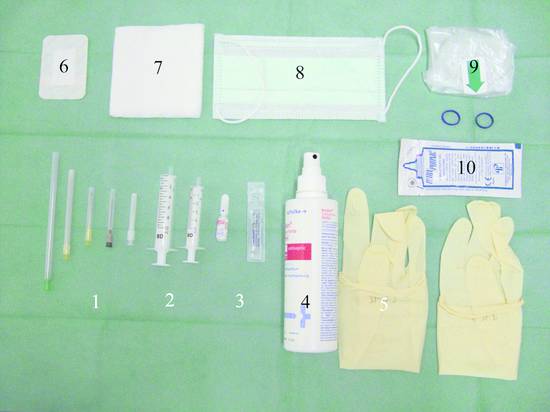
Fig. 28.1 Materials and supplies for ultrasound-guided joint injections and aspirations. 1: Injection needles (size depends on the joint and indication; small joints require smaller-gauge needles than large joints, and viscous aspirate requires larger needles). 2: Disposable syringes (for aspiration or injection). 3: Injectable agent (e.g., triamcinolone or 0.5% lidocaine); an extra needle is required for drawing the agent into the syringe. 4: Antiseptic spray (for skin preparation and acoustic coupling of the ultrasound probe). 5: Sterile gloves. 6: Adhesive dressing to cover the puncture site after the intervention. 7: Sterile pads. 8: mask. 9: Sterile probe cover. 10: Sterile ultrasound gel.
Finally a sterile probe cover is placed over the transducer. Some coupling gel is placed into the cover before it is applied.
The needle for an intra-articular injection is not introduced through a stab incision.
Caution
If a cold spray is used for cryoanesthesia of the skin, it should never come in contact with the transducer as it could seriously damage the delicate instrument. Consequently, we do not recommend local cryoanesthesia and do not consider it to be necessary.
28.3.2 Overview of Technique
Once an ultrasound-guided musculoskeletal intervention has become routine, it can be practiced by one operator holding both the needle and the ultrasound probe.
When relevant anatomical structures have been identified in two planes, the needle is always directed parallel to the long axis of the probe (▶ Fig. 28.2). This technique can display the needle over a long distance (utilizing the full length of the probe) and allows for accurate tracking of the needle tip.
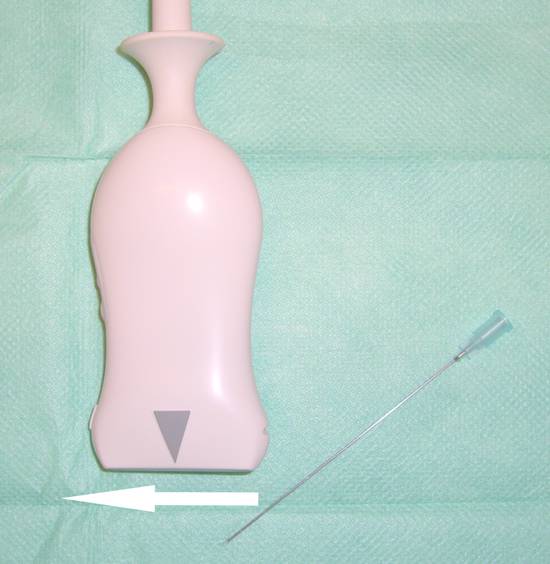
Fig. 28.2 The needle is introduced parallel to the long axis of the ultrasound probe. This provides a long-axis view of the needle shaft (full probe width can be utilized), and the advancing needle tip can be closely monitored. The short-axis technique (probe perpendicular to the needle axis) provides a much more limited view.
28.3.3 Details of Technique
One operator maintains sonographic guidance while simultaneously performing the intervention itself: the probe is held in one hand (“guide hand”) and the needle in the other (“working hand”).
Related posts:
 Informed Consent
 Percutaneous Sclerotherapy of Cysts
 Contraindications, Complications, and Complication Management
 Fine Needle Aspiration Biopsy and Core Needle Biopsy
 Indications for Diagnostic Interventions in the Abdomen and Thorax (Liver, Pancreas, Spleen, Kidneys, Lung, Other Sites)
 Thoracic Interventions
Stay updated, free articles. Join our Telegram channel

Full access? Get Clinical Tree


