Figure 6.1
Shoulder patient position: Have the patient in a seated position with arm bent at 90°, place the transducer with the transducer indicator laterally

Figure 6.2
Achilles tendon patient position: If possible, having the patient in the prone position allows for easy visualization of the Achilles tendon

Figure 6.3
Quadriceps tendon patient position: Have the patient lay supine or seated with their knee flexed to 90°. Place the transducer proximal to the knee over the quadriceps tendon attachment site to the patella

Figure 6.4
Patella tendon position: With the patient’s leg hanging over the side, the bed flexed at 90°, place the transducer over the patella tendon attachment site inferior to the patella

Figure 6.5
Water bath example: To facilitate visualization of small parts, you can have the patient place the affected area in a container of water, and hover the probe over the area of interest

Figure 6.6
Knee joint patient position: To view the knee joint, a lateral or medial approach is preferred. For patient comfort, a towel roll can be placed beneath the knee

Figure 6.7
Median nerve patient position: With the arm extended and in supination, place the transducer over the forearm to locate the median nerve, and then slide the transducer down the arm to the wrist while following the median nerve
Shoulder Joint
- (a)
Standard Exam Views
Begin by placing the transducer posteriorly on the proximal humerus in a transverse plane and trace it proximally to find the glenohumeral joint.
If the patient can range the joint, obtain a video clip of internal and external rotation:
Video shoulder internal external rotation
- (b)
Ultrasound Anatomy
The bony cortex of humeral head and glenoid fossa will appear hyperechoic with posterior acoustic shadowing:
Figure 6.8—Normal shoulder on ultrasound
Video 6.1—Shoulder joint
Normally, the humerus will be 0.5–1.0 cm posterior to the glenoid [2]:
Compare to contralateral side as needed.
Infraspinatus muscle can be seen as a hypoechoic band superior to the joint [1] attaching to the greater tuberosity of the humerus.
- (c)
Shoulder Pathology
Shoulder dislocation:
Studies have shown ultrasound to be 100% sensitive in detecting shoulder dislocations and nearly 100% sensitive with detecting complete reduction [3].
With anterior shoulder dislocations, which are most common, the humeral head will be anterior and inferior to the glenoid:
From a posterior approach as described above, the humeral head will be seen as a deeper structure on the ultrasound image.
Figure 6.9—Anterior shoulder dislocation.
Video 6.2—Anterior shoulder dislocation.
In a posterior shoulder dislocation, which is much less common and typically only occurs due to seizures or electrocutions, the humeral head will be posterior and inferior to the glenoid and appear more superficial on the ultrasound image.
A hypoechoic area may also be seen which is indicative of a joint effusion:
Figure 6.10—Shoulder effusion

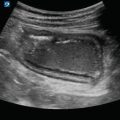
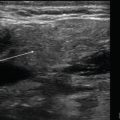
Figure 6.8
Normal shoulder on ultrasound: In the normal shoulder, you can see the humeral head (A) sitting in the glenoid joint fossa (curved line) created by the scapula (B)

Figure 6.9
Anterior shoulder dislocation: With an anterior dislocation, the humeral head (A) will be displaced anteriorly away from the scapula (B)

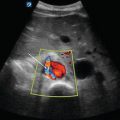
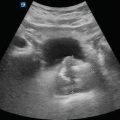
Figure 6.10
Shoulder effusion: A shoulder effusion can be visualized as a hypoechoic area between the humeral head and scapula. Heterogeneous material may sometimes be visualized if blood has started to clot
Tendons
- (a)
Standard Exam Views
Tendons should be imaged in both transverse or cross-sectional and longitudinal planes.
Be sure to scan through the entire length of the tendon to confirm the tendon is intact without tears or rupture.
Obtain similar views of contralateral tendon for comparison as needed.
- (b)
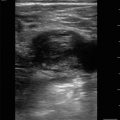
Ultrasound Anatomy
In a longitudinal plane, visualize the dense hyperechoic organized parallel fibers [1]. Occasionally a surrounding sheath may also be seen:
Figure 6.11—Tendon in long axis
Video 6.3—Tendon in long axis
It is important to distinguish muscles from tendons.
Grossly, the location of the transducer can help with this.
On ultrasound, muscles appear as hypoechoic tissue separated by fine hyperechoic fibrillary septa with a striated appearance.
Figure 6.12—Muscle.
In a transverse plane, tendons will appear as a circular or oval collection of hyperechoic, punctate structures:
Figure 6.13—Tendon in short axis
Video 6.4—Tendon in short axis
Tendons elicit a phenomenon called anisotropy which can distinguish a tendon from nerves:
Anisotropy means that the echogenicity of tendons will change based on the angle of the transducer:
- (c)
Get Clinical Tree app for offline access
Tendon Pathology
Tendon rupture:
Disruption of tendon fibers can be partial or complete.Related posts:

Stay updated, free articles. Join our Telegram channel

Full access? Get Clinical Tree