and Sacha De Carlo3, 4
(1)
Institute of Zoology, University of Mainz, Mainz, Germany
(2)
Institute of Cell and Molecular Biosciences, Newcastle University, Newcastle-upon-Tyne, UK
(3)
Netherlands Center for Electron Nanoscopy (NeCEN), FEI Company Europe, Leiden, The Netherlands
(4)
FEI, Eindhoven, The Netherlands
Abstract
Negative staining is widely applicable to isolated viruses, protein molecules, macromolecular assemblies and fibrils, subcellular membrane fractions, liposomes and artificial membranes, synthetic DNA arrays, and also to polymer solutions and a variety of nanotechnology samples. Techniques are provided for the preparation of the necessary support films (continuous carbon and holey/perforated carbon). The range of suitable negative stains is presented, with some emphasis on the benefit of using ammonium molybdate and of negative stain–trehalose combinations. Protocols are provided for the single droplet negative staining technique (on continuous and holey carbon support films), the floating and carbon sandwich techniques in addition to the negative staining-carbon film (NS-CF) technique for randomly dispersed fragile molecules, 2D crystallization of proteins and for cleavage of cells and organelles. Immuno-negative staining and negative staining of affinity labeled complexes (e.g., biotin–streptavidin) are presented in some detail. The formation of immune complexes in solution for droplet negative staining is given, as is the use of carbon–plastic support films as an adsorption surface on which to perform immunolabeling or affinity experiments, prior to negative staining. Dynamic biological systems can be investigated by negative staining, where the time period is in excess of a few minutes, but there are possibilities to greatly reduce the time by rapid stabilization of molecular systems with uranyl acetate or tannic acid. The more recently developed cryo-negative staining procedures are also included: first, the high concentration ammonium molybdate procedure on holey carbon films and second, the carbon sandwich procedure using uranyl formate. Several electron micrographs showing examples of applications of negative staining techniques are included and the chapter is thoroughly referenced.
Key words
Negative stainingCryo-negative stainingCarbon support filmHoley carbon support filmImmuno-labelingAffinity-labelingThe single droplet techniqueFloating techniqueNegative staining-carbon film (NS-CF) techniqueDynamic negative stainingUranyl acetateUranyl formateAmmonium molybdateTrehalosePolyethylene glycol (PEG)Single particle analysis2D crystal3D reconstructionThe authors dedicate this chapter to the late Robert (Bob) W. Horne (21st January, 1923–13th November, 2010).
1 Introduction
The basic negative staining technique has stood the test of time, since its introduction as a laboratory procedure in 1959 by Brenner and Horne [1], as recently fully acknowledged by Harris and Munn [2] following the death of Robert (Bob) W. Horne in November, 2010. With variations the technique continues to be applied widely to thinly spread biological samples, ranging from viruses to single macromolecules and macromolecular assemblies, subcellular membrane fractions, lipid suspensions, toxin–lipid/membrane interactions, etc. The progression of fibrillogenesis of the range of amyloid-forming peptides and proteins, and collagen can readily be monitored by negative staining. Negative staining can also be applied to cells, and subcellular fractions where the material is sufficiently thin, permeablized or physically lysed, in particular to reveal cytoskeletal structures, then accessible for immunolabeling. The technique readily extends into nanotechnology, nanobiotechnology and polymer science for the assessment of particle size and structure [3]. In diagnostic virology negative staining made a significant early contribution which continues to this day, albeit to a lesser extent, alongside the more recently introduced molecular and immunological assays, see Mast and Demeestere [4]. For rapid assessment of biological extracts and purified proteins, often produced by bacterial expression, negative staining can provide useful information in a matter of minutes. This relates primarily to an immediate indication of sample purity, in addition to the dissociation and aggregation state of the aqueous sample. For those wishing to take sample material forward for higher resolution cryo-electron microscopy, either in the unstained vitrified state or as cryo-negatively stained specimens, conventional negative staining can provide valuable time-saving information, as indeed it can alongside 2D or 3D crystallization studies. Despite the limited resolution achievable from air-dried negatively stained samples (generally in the order of 2 nm), several groups continue to use this approach for producing low resolution 3D image reconstructions by single-particle analysis, in some cases with docking of higher resolution structures from NMR and X-ray crystallography [5–8]. Cryo-negative staining [9] can achieve a considerably superior resolution, in the order of 1 nm. The overall topic has been reviewed recently in depth by de Carlo and Harris [10].
It is of some technical interest to consider briefly the derivation of and modifications to the carbon support film procedures for negative staining that have occurred over the years, and how these impact upon present-day procedures. Pre-formed carbon supports, carbon–plastic support films, or holey carbon films across grids have found extensive usage for the thin spreading, adsorption and negative staining of biological samples, from droplets on Parafilm or from a microspray/nebulizer with the sample and negative stain pre-mixed. The versatile droplet technique, which the authors favor, was initially introduced in 1965 by Ennio-Lucio Benedetti during his studies on liver cell membranes (see Subheading 3.1.1). However, an alternative approach was introduced in 1968 by the late Robin Valentine and colleagues [11], in that the carbon film can be released from mica, floating directly onto the surface of a solution of the biological sample in a small petri dish, microwell or as a droplet on Parafilm, with subsequent sample adsorption onto the carbon film. This can then be transferred to grids, washed and negatively stained as required. Furthermore, this procedure can be readily extended to produce specimens between a carbon-sandwich on grids. A variant introduced by Horne and Pasquali-Ronchetti [12], termed the negative staining-carbon film (NS-CF) procedure, changed the order of carbon deposition, in that this was performed directly onto sample already spread in the presence of ammonium molybdate and air-dried on a mica surface, followed by release of the carbon film + adsorbed sample onto the surface of a second negative stain solution. A distinct advantage of this procedure has been for the production of 2D arrays and 2D crystals (even 3D microcrystals), when the drying of virus and protein samples onto the mica is performed in the presence of ammonium molybdate + polyethylene glycol (PEG). Removal of glycerol from samples in vacuo can also be performed using this technique and it can be extended as a “wet-cleavage” procedure for cellular samples that have been bound to Alcian blue-treated mica [13]. Extension of negative staining to holey carbon support films, where the biological material is freely suspended across holes, supported only by the surrounding negative stain and protective carbohydrate, provides conditions where the material is not adsorbed to carbon and thereby avoids possible adsorption-induced structural distortion and flattening. Essentially the same comment applies to the use of holey carbon support films for cryo-negative staining. Here, inclusion of PEG in the ammonium molybdate cryo-negative staining procedure also promotes the formation of 2D arrays prior to vitrification, indicating that fluid–air interface forces are involved in both techniques.
An important aspect of negative staining on carbon support films that need to be expanded upon, within the context of recent and older studies, is the possible benefits to be gained from adsorbing and negative staining samples on a single layer of carbon versus a carbon sandwich with the sample and stain layer trapped between the two layers. Negative staining of biological samples on a single layer of carbon has always shown regions of varying stain depth, essentially from almost unstained regions to regions with an excessive stain depth. The thinner partial-depth regions of stain may only generate images from the lower part of the structures under investigation, and excessive stain depth will mask structural detail. To create a more even full-depth spreading of stain, inclusion of the disaccharide trehalose was introduced [14], and the problem is almost completely overcome by spreading and negative staining samples initially as a thin aqueous film in the presence of trehalose across the holes of holey carbon support films, followed by air drying (see Subheading 3.1.2). This latter approach is essentially equivalent to the procedure for preparing unstained or negatively stained frozen-hydrated/vitreous specimens, in that the mixture of negative stain and trehalose is a dried yet thin vitreous stain–sugar layer across the holes.
The creation of a double carbon layer with sample and stain trapped between was encountered and utilized many years ago, but at that time was generally thought to be unsatisfactory due to the likelihood of significant sample flattening/distortion. However, for rigid or glutaraldehyde-stabilized samples this approach has come into more recent use, both for air-dried negative staining and cryo-negative staining (see Subheading 3.1.4). The benefit here is that for single particle reconstructions, there is even coverage with stain all around the entrapped specimen particles. Thus, both approaches (i.e., single and double-layer carbon supports) are currently in use for negative staining studies of biological structures; each can claim to have some benefits and disadvantages. It is fairly clear that every laboratory performing negative staining will use slightly different in-house protocols; all will have been standardized locally, thereby generating reproducible data.
The currently used cryo-negative staining methodology developed from a productive collaboration between one of us (JRH) and the Lausanne-based cryo-electron microscopists Marc Adrian and Jacques Dubochet (see Adrian et al. [9]), in an attempt to produce superior sample preservation and image resolution, compared to the conventional negative staining technique with air-dried specimens. This topic was reviewed briefly by Harris and Adrian [15], and Harris et al. [16], and more recently by de Carlo and Harris [10]. From a methodological point of view, this sample preparation technique is very similar to the thin film vitrification technique for unstained specimens [17], with the exception that there is an additional step, a short time of contact between the biological sample and the negative stain prior to plunge-freezing (see Subheading 3.1.8). As a result, the biological sample is entrapped in a thin vitrified high concentration ammonium molybdate solution, essentially at a saturation concentration (~0.8 M). However, if this cryo-methodology is analogous to the initial rapid plunge vitrification procedure [17], the results obtained with this cryo-negative staining technique are completely different, in our opinion exceptional and strongly supported by recent applications [18–20].
Recent developments/variants of the negative staining technique are few, although Zhang and colleagues have made a significant contribution to the understanding of lipoprotein structure, using an optimized negative staining protocol [21], extending from the approach presented by Ohi et al. [22]. An ambitious attempt to standardize and improve negative staining for TEM and STEM has recently been introduced by Kemmerling et al. [23], using robotic automated equipment with microfluidic-dialysis to desalt and mix the biological samples with negative stain. It is unlikely that this equipment and the detailed sequence that it provides, will immediately be widely available, but it provides strong evidence that further technical improvement is possible.
An alternative carbon sandwich cryo-negative staining method, using uranyl formate and glycerol, was developed by Stark and colleagues [24], as presented fully by Sanders and Golas [25]. A significant difference here is that the specimen, negatively stained with a low concentration of stain, is briefly air-dried before freezing in liquid nitrogen for cryo-negative staining EM study. Thus, this modified cryo-negative staining technique is not directly equivalent to the Adrian holey carbon technique [9], which has a closer parallel to the conventional vitrification procedure for unstained specimens.
Although some of the negative staining techniques included here have been presented by one of us (JRH) in a Royal Microscopical Handbook [26] and in the two earlier editions of this book (1999 and 2007), in this third edition some effort has been made to update these approaches and present the techniques in a new light. Nevertheless, all the techniques as previously and currently documented remain usable and reproducible. In addition, in Subheading 4 several new examples of EM data from the negative staining techniques will be presented here, but the examples used in the previous editions remain valid.
2 Materials
2.1 Equipment Required
1.
The principal large item of equipment that is needed in order to prepare support films for negatively stained EM specimens is a vacuum coating apparatus (e.g., the Edwards model Auto 306, the Bal-Tec model BAE 080T, the Emitech model K405X, or Agar TEM Turbo Carbon Coater), together with facility to perform glow-discharge treatment. This latter may be an attachment within the vacuum coating apparatus or a separate item of equipment. Carbon coating, to produce thin continuous carbon, carbon–plastic, or perforated (holey) carbon support films (see Subheading 2.2 and also ref. 26), can be performed using carbon rods, carbon fiber, or a carbon electron beam source, as described by the equipment manufacturer concerned. A carbon thickness monitor can be useful, but is not essential. Brief (30–60 s) glow discharge treatment of the surface of support films is particularly useful to combat the inherent hydrophobicity of the carbon surface, which interferes with the even spreading and adsorption of biological materials and the smooth spreading of a thin film of aqueous negative stain over and around the biological particles (i.e., satisfactory embedment in a high contrast medium) prior to air drying. The use of prolonged UV irradiation has also been shown to render the surface of carbon support films hydrophilic.
2.
For cryo-negative staining a plunge-freezing apparatus and associated consumables (e.g., liquid nitrogen, ethane gas) will be required. Some time will need to be devoted in order to master the use of this equipment and the cryo-transfer of frozen specimens to a TEM [26].
3.
Numerous smaller items of equipment are needed (see Fig. 1), such as Parafilm, fine curved forceps (with rubber or plastic sliding closing ring, or use reverse-action forceps), fine straight forceps, a range of lab. pipettes (e.g., 5, 10, 20, up to 1,000 μL), plastic tips, scissors, metal needle/ finely pointed probe, mica strips, filter paper wedges (e.g., cut from Whatman No. 1), petri dishes with filter paper insert, 300 or 400 mesh electron microscope (EM) specimen grids (usually copper, but nickel or gold for immunonegative staining), grid storage boxes, a microcentrifuge, tubes and tube racks, etc. Last and importantly, small Kleenex or other absorbant tissues need to be available to rigorously wipe the tips of the forceps and needles, immediately after use, to avoid sample cross-contamination.
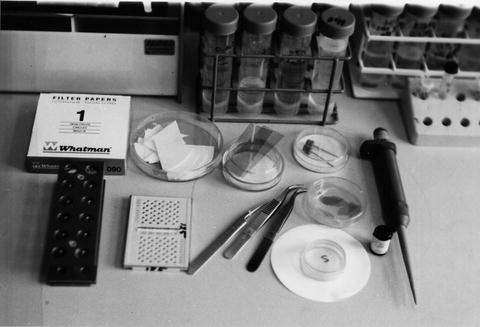

Fig. 1
An example of some of the small equipment and consumables needed for the routine production of negatively stained specimens
2.2 Support Films
From the early days of TEM progress has depended upon the preparation of satisfactory support films for a range of different material science and biological samples, documented thoroughly even in the 1961 edition of Kay’s Techniques for Electron Microscopy. Although carbon support films can be readily purchased as consumables from the various EM supplies companies, it is still usual for individuals to prepare their own for immediate use. Some time needs to be devoted to the perfection of these additional techniques, to make available a ready supply of the necessary continuous or holey carbon support films for conventional negative staining or for the preparation of thin frozen-hydrated/vitrified cryo-negatively stained specimens.
Thin carbon support films can routinely be prepared by in vacuo carbon deposition onto the clean surface of freshly cleaved mica, with subsequent floatation of the carbon layer onto a distilled water surface followed by lowering onto a batch of EM grids (300 or 400 mesh) positioned beneath, i.e., in a Buchner funnel or glass trough with controlled outflow of the water [26]. The thickness of the carbon can be assessed by a crystal thickness monitor during continuous carbon evaporation, but this is not essential. With a little experience, repeated short periods of evaporation from pointed carbon rods readily enable the desired thickness (e.g., ~10 nm) to be achieved, based upon the faint gray color of a piece of white paper placed alongside the mica.
Carbon–plastic (e.g., collodion, Formvar, Butvar, and Pioloform) support films can be produced by first making a thin plastic film on the surface of a clean glass microscope slide, from a chloroform solution (0.1–0.5 % w/v). This plastic film is then released from the glass slide following scoring of the edges with a metal blade, with floatation onto a distilled water surface. An array of EM grids can then be positioned individually on the floating plastic sheet, or the plastic sheet can be lowered onto an array of pre-positioned EM grids at the bottom of the funnel or trough, when the water level is reduced. After drying, the batch of grids can be carbon-coated in vacuo.
The presence of a thin plastic layer provides an increase in strength to the carbon support, which is desirable for the extended sequence of steps required for immunolabeling (see Subheading 3.1.6), but the extra film thickness does inevitably slightly reduce image detail and the maximal level of resolution. However, if desired, for both continuous carbon–plastic and holey/perforated carbon–plastic films, the plastic can be dissolved by washing grids singly by dipping on edge into an appropriate solvent such as chloroform or amyl acetate and touching to a filter paper wedge before use.
Most would agree that the production of holey/perforated carbon–plastic or carbon support films (also termed micro-grids) still remains something of a difficult art. Some therefore resort to the purchase of commercially prepared holey carbon films, or Quantifoil® and C-flat™ films with regularly sized and spaced holes, produced by semi-conductor lithographic techniques. The simplest procedure is to initially perforate a drying film of plastic on the surface of a precooled (4 °C) clean glass microscope slide by heavily breathing onto the surface. The small water droplets in the breath perforate the plastic film during evaporation of the chloroform.
Alternatively, a more reproducible way of producing perforated plastic films is to use a glycerol–water (0.5 % v/v each) emulsion in chloroform containing 0.1 % or 0.2 % w/v Formvar. With vigorous shaking an emulsion of small droplets is readily produced. On dipping a clean glass microscope slide vertically rapidly in and out of the emulsion, allowing it to drain-off and dry, the thin plastic film so produced will be found to contain an array of small holes, of varying size. A phase contrast light microscope can be used to quality control the production of holes in the drying plastic film. After wiping the glass edges and the edge of the film on the surface of the slide (i.e., ~2 mm) with a paper tissue, the perforated plastic film can then released from the slide by floating the film onto a water surface and lowered onto a batch of EM grids previously placed beneath, as described above. After drying, the grids should be carbon-coated, with in vacuo deposition of an additional layer of gold or gold/palladium, if desired. The inclusion of the metal layer enables the quality of holey carbon grids to be more easily assessed by bright-field or phase-contrast light microscopy, but its prime advantage is for rapid TEM focussing at higher magnifications and the fact that the presence of a metal layer improves the spreading properties of the surface, so no glow discharge treatment is necessary before use. Attempts have been made by some researchers to standardize this procedure [27], but most do tend to include their own individual variations [26].
2.3 Reagents and Solutions
1.
Buffer: 20 mM Tris–HCl at pH 7.0 or 8.0 is most useful for diluting biological sample solutions. 5 mM Tris–HCl can be used as an on-grid washing solution.
2.
Glutaraldehyde: make a 1 % working solution in distilled water from the 25 % w/v stock solution. Add an aliquot directly to biological sample, usually to the concentration range 0.05–0.1 %.
3.
Trehalose: make a 10 % w/v stock solution in distilled water. Add an aliquot to negative stain solution, to give 1.0 or 0.1 %, as desired.
4.
Polyethylene glycol (PEG), Mr 1,000: make a 10 % w/v stock solution. Adjust to desired pH with a 0.01 N NaOH. Add an aliquot to negative stain and protein solution, as required.
5.
Uranyl acetate/formate: use as 1 or 2 % w/v aqueous solution, without pH adjustment.
6.
Ammonium molybdate, Na/K-phosphotungstate and -silicotungstate: use as 1 or 2 % (w/v) aqueous solution, or as 5 % (w/v) solution when 0.1 or 1 % trehalose present. Adjust pH as desired with 1.0 N Na/KOH, usually to pH 7.0.
7.
Methylamine tungstate: use as 1 or 2 % w/v solution, with pH adjustment as desired.
8.
Sodium/methylamine vanadate: use as a 2 % w/v pH 7.0 solution. Useful for low contrast negative staining.
9.
Preimmune rabbit serum: dilute to 0.1 % v/v with PBS.
10.
BSA: make up 0.1 % w/v solution in PBS.
11.
Rabbit anti-mouse IgG/Fab′: dilute with PBS, as required.
12.
Protein A—5/10 nm gold conjugate: dilute with PBS.
13.
Streptavidin—5/10 nm gold conjugate: dilute with PBS. Possible stability problem.
14.
Ammonium acetate: use as 0.155 M solution.
15.
Glycerol: add as a protectant to protein/viral solutions at 50 % v/v. Add to 0.155 M ammonium acetate solution at 30 % v/v.
16.
Alcian blue: use as 0.01 % w/v aqueous solution.
2.3.1 Some Further Comments on the Use of Reagents and Solutions
Although prefixation/chemical cross-linking is not generally required for the negative staining of biological particulates, if it emerges that a sample is exceptionally unstable in the available negative stains, prior fixation with a low concentration of buffered glutaraldehyde (e.g., 0.05 or 0.1 % v/v) may be included. This can be performed in solution or by direct on-grid droplet treatment of material already adsorbed to a carbon support film. It must, however, be borne in mind that the chemical attachment of glutaraldehyde to the available basic amino acid side groups, producing intra-protein cross-linkage and stabilization, may at the same time produce structural alterations at the higher levels of resolution. Also, in solution, care must be taken to avoid protein–protein cross-linkage/aggregation induced by glutaraldehyde. A combined glycerol gradient purification and glutaraldehyde fixation procedure was introduced by Stark and colleagues [28, 29] prior to specimen preparation for unstable molecular complexes, but in practice glutaraldehyde can be added immediately following any purification procedure [30].
The more commonly used negative staining salts are listed in Table 1 (for a more detailed listing, including some of the less commonly used negative stains, see ref. 26). These negative stains are generally used as 2 % w/v aqueous solutions, but there is always the possibility of increasing the concentration to provide greater electron density for small proteins or reducing the concentration for excessively thick biological samples that retain a greater volume of surrounding fluid. If the stain concentration is too low, on air drying the thin layer of fluid that surrounds a biological particle may not leave a sufficiently thick layer of amorphous salt to completely embed and support the particle, thereby resulting in partial-depth staining and undesirable sample flattening. The adjustment of negative stain pH, to a value close to that of the sample buffer is standard. This is not usually possible for the uranyl negative stains, which precipitate at pH values above ca pH 5.5. It should also be borne in mind that the presence of even traces of phosphate buffer is incompatible with the use of uranyl negative stains.
Table 1
Negative stain solutions
Commonly use negative stain solutions |
These stains are generally prepared as 1 or 2 % w/v aqueous solutionsa,b, but for negative staining across holes and for cryo-negative staining a higher concentration is usually required (see protocols). All stain solutions except the uranyl stains can be neutralized |
Uranyl acetate |
Uranyl formate |
Sodium/potassium phosphotungstate |
Sodium/potassium silicotungstate |
Ammonium molybdate |
Methylamine tungstate |
Methylamine vanadate (Nanovan) |
Negative stain-carbohydrate combinations |
All of the above negative stains can also be prepared as 2–6 % w/v aqueous solutions containing 0.1–1 % w/v carbohydrate (e.g., glucose or trehalose)c |
Negative stain-PEG combinations |
The inclusion of 0.1–0.5 % w/v polyethylene glycol (PEG) Mr 1,000 in 2 % w/v ammonium molybdate creates a solution that potentiates 2D virus and protein crystal formationd |
Addition of a protective carbohydrate such as trehalose (e.g., 0.1–1.0 % w/v) to the negative stain solution has the advantage of creating a thicker supportive layer of dried stain, whilst at the same time helping to actually preserve the biological sample during air drying. Trehalose has uniquely beneficial properties in this respect. This is because of the retention of sample structure within a vitreous carbohydrate-negative stain-layer. Trehalose is thought to replace or protect protein-bound water and has been shown to have widespread value as a protectant in bioscience. Inclusion of a higher concentration of negative stain (e.g., 5 or 6 % w/v) is then usually required to create an optimal electron density [14, 31]. Specimen-bound water, with or without the presence of a carbohydrate, will be greatly reduced once a specimen is inserted into the high vacuum of the TEM unless direct cooling in liquid nitrogen is performed first and followed by cryo-transfer to the electron microscope (with the specimen then maintained and studied at low temperature). As specimen lability within the electron beam is initially related to the presence of vitreous water, the early and continued success of conventional negative staining would appear to be due to the rapid in vacuo removal of almost all loosely bound water from the biological material and amorphous stain, prior to electron irradiation. With the current increasingly widespread availability of TEM low dose systems, image recording from frozen-hydrated negatively stained specimens (produced following air drying or by rapid plunge freezing), can be successfully pursued, thereby creating the possibility of improved image resolution because of sample hydration maintained at low temperature. Although negative staining and cryo-electron microscopy do now appear to have some significant overlap [10, 26, 27], it is likely that the two separate technical approaches will often be maintained for the foreseeable future. Indeed, for high resolution low temperature negative stain studies the phrase high contrast embedding media has been introduced to avoid the negative connotations and undesirable limitations of conventional room temperature air-dry negative staining on continuous support films, that can at least in part be overcome when holey carbon support films are used (see Subheading 3.1.2).
A significant technical parallel exists regarding the use of PEG and ammonium molybdate to create 2D viral and protein crystals via the negative staining-carbon film (NS-CF) technique, during negative staining across holes and during the cryo-negative staining procedure (prior to freezing). In all three instances, it is thought that the 2D crystals form at the fluid–air interface, promoted by these reagents and surface tension forces [32, 33].
2.4 Sample Material
For conventional on-grid negative staining it is desirable to have purified sample material in the form of a free suspension (i.e., without any large aggregates) in water or an aqueous buffer solution, at a concentration of ca 0.1–1.0 mg protein/ml. For negative staining on holey carbon support films [27, 34] and for the negative staining-carbon film technique [32, 35] (when used to produce 2D crystals) the optimal concentration will need to be, in the order of 0.5–2.0 mg/ml protein. For lipid suspensions, lipoproteins, nucleic acids, nucleoproteins and viral particles, these concentration figures provide only a general guide; the main aim in all cases is to avoid overloading the specimen with sample material since particle superimposition will always obliterate structural detail. The presence of a high concentration of sucrose, urea or other solute in the sample suspension will introduce some problem for negative staining, so these reagents must be removed. This can be done by prior dialysis or gel filtration using a dilute buffer solution, or by carbon adsorption and on-grid washing with distilled water or a dilute buffer solution, immediately before negative staining.
3 Methods
Protocols will be presented below for negative staining using the single droplet procedure, applied to samples adsorbed to a continuous carbon film or spread across the small holes of a holey/perforated carbon film [27]. The floating and carbon-sandwich methods will also be given, but the spray-droplet method will not be included, primarily due to present-day safety considerations. Although all the different approaches can generate satisfactory negatively stained specimens for TEM study, is the considered opinion of the author, that the use of holey carbon films with ammonium molybdate–trehalose as the negative stain, although technically slightly more difficult, is preferable for detailed molecular negative stain studies. For routine studies negative staining with uranyl acetate on continuous carbon support films is usually satisfactory.
The negative staining-carbon film (NS-CF) techniques, for 2D crystallization or proteins and viruses [26, 35], for randomly dispersed molecules and cleavage of cells and organelles [10] will be given. In addition, application of the droplet negative staining procedure for the production of antibody- or affinity-labeled specimens will also be given, together with comments on the possibilities for dynamic negative staining experiments (where the time-period is generally in the range of a few minutes to hours, rather than milliseconds or seconds). Finally, two procedures for the preparation of cryo-negatively stained specimens with be presented [9, 24].
Despite the procedural listings given below the user should, having gained some limited experience, be prepared to freely introduce small technical variations to suit any local requirements determined by the biological sample, the equipment available, and the aims of any individual study. Thus, an overall scientific/technical awareness that improvements at the specimen grid level can continually be sought and included is highly desirable.
3.1 The Single Droplet Negative Staining Technique
This general and versatile procedure [26] is applicable to biological samples adsorbed to continuous carbon films and freely spread across the holes of holey carbon films. With slight modification, it is applicable to immuno-negative staining and dynamic negative staining experiments (see below, Subheadings 3.1.6 and 3.1.7).
3.1.1 Conventional Negative Staining on Continuous Carbon Films [26, 36]
1.
Cut off a piece of Parafilm from a roll (length depending upon the number of samples and grids to be prepared), so that individual samples can be spaced by approx. 1.5 cm, as shown in Fig. 2.
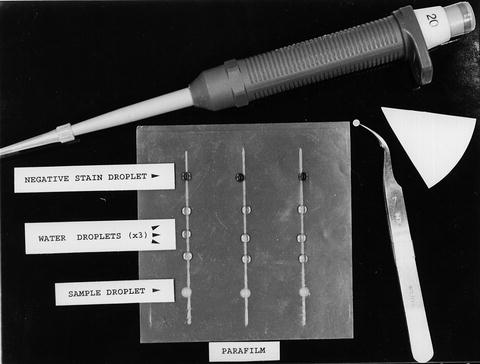

Fig. 2
A representative example of the layout of material for the single droplet negative staining procedure. The number of water-wash droplets is variable, depending upon the buffer and salt concentration in the sample
2.
Place the Parafilm, paraffin-wax-down, onto a clean bench surface and before removing the paper overlay produce a number of parallel lines by scoring with a blunt object across the paper. Then remove the paper overlay, leaving the Parafilm loosely attached to the bench surface.
3.
Place 20 μL droplets of sample suspension, distilled water (or dilute e.g., 5 mM buffer solution), and negative stain solution onto the Parafilm, as in Fig. 2. The number of water droplets can vary, depending upon the concentration of reagent to be removed from the sample, with the proviso that each successive wash may introduce additional breakage of the fragile carbon support film. (In general, it is best not to attempt to prepare more than 6–8 specimen grids as a single batch, unless this is absolutely necessary).
4.
Take in a pair of curved forceps an individual specimen grid coated with a thin continuous carbon support film. (Brief glow discharge treatment should be applied in advance to increase hydrophilicity of the carbon surface and thereby improve the sample and stain spreading). Touch the carbon surface to the sample droplet. After a period of a time, ranging from 5 to 60 s (see Note 1), remove almost all the fluid by touching the edge of the grid carefully to a filter paper wedge.
5.
Before the sample has time to dry, wash the adsorbed sample with one or more droplets of distilled water, and each time carefully drain away the excess water from the grid, as in step 4.
6.
Touch the grid surface to the droplet of negative stain and likewise remove excess fluid. Then allow the thin film of sample + negative stain to air-dry, before positioning the grid in a suitable container (petri dish or commercially available grid storage box; see Note 2).
7.
After drying at room temperature, grids are immediately ready for TEM study, under either conventional electron dose conditions at ambient temperature or under low electron dose conditions at either ambient temperature or after specimen cooling in the TEM (e.g., to approx. −180 °C; see Note 3).
3.1.2 Negative Staining on Holey Carbon Support Films
This variant of the droplet negative staining technique is particularly useful for detailed studies on samples that have already been assessed by conventional negative staining on continuous carbon support films and justify more detailed investigation under conditions where carbon adsorption and specimen flattening are avoided. The protocol given in Subheading 3.1.1 should be followed, with incorporation of the following variations, as described by Harris and Scheffler [27]:
1.
For holey carbon films, glow discharge is not usually necessary when a thin microcrystalline layer of gold or palladium metal has also been deposited.
2.
It is necessary to use one of the negative stain-carbohydrate combinations (e.g., 5 % w/v ammonium molybdate or sodium phosphotungstate + 0.1 % w/v trehalose; see Note 4) since an unsupported air dried film of sample and stain alone breaks very readily. This situation is considerably improved by the presence of carbohydrate, but concentrations in excess of 1.0 % w/v trehalose lead to rapid damage in the electron beam unless low electron dose conditions are employed.
3.


For specimens prepared across holey carbon films, sample concentrations of 1.0–2.0 mg/ml protein are generally desirable, as a greater quantity of free material is lost from the holes during the washing and staining steps. Biological material is, however, often retained at the fluid–air interface at the side of the grid opposite to where the filter paper is touched, due to surface tension forces.
Stay updated, free articles. Join our Telegram channel

Full access? Get Clinical Tree


